10 Must-Have Super Bowl Foods Everyone Loves
As the Super Bowl approaches, I can't help but get excited about the delicious spread that will grace my table! Whether you're hosting a party or bringing a dish to share, I've compiled a list of ten must-have foods that everyone will rave about. From savory pizza pockets to healthy quinoa bowls, these recipes not…
As the Super Bowl approaches, I can't help but get excited about the delicious spread that will grace my table! Whether you're hosting a party or bringing a dish to share, I've compiled a list of ten must-have foods that everyone will rave about. From savory pizza pockets to healthy quinoa bowls, these recipes not only satisfy cravings but also cater to a variety of dietary preferences. Get ready to impress your friends and family with flavorful dishes that are easy to prepare and sure to be a hit. Let's dive into the ultimate game-day feast that will elevate your Super Bowl experience!
1. The Ultimate Homemade Pizza Pockets (Easy Super Bowl Food!)
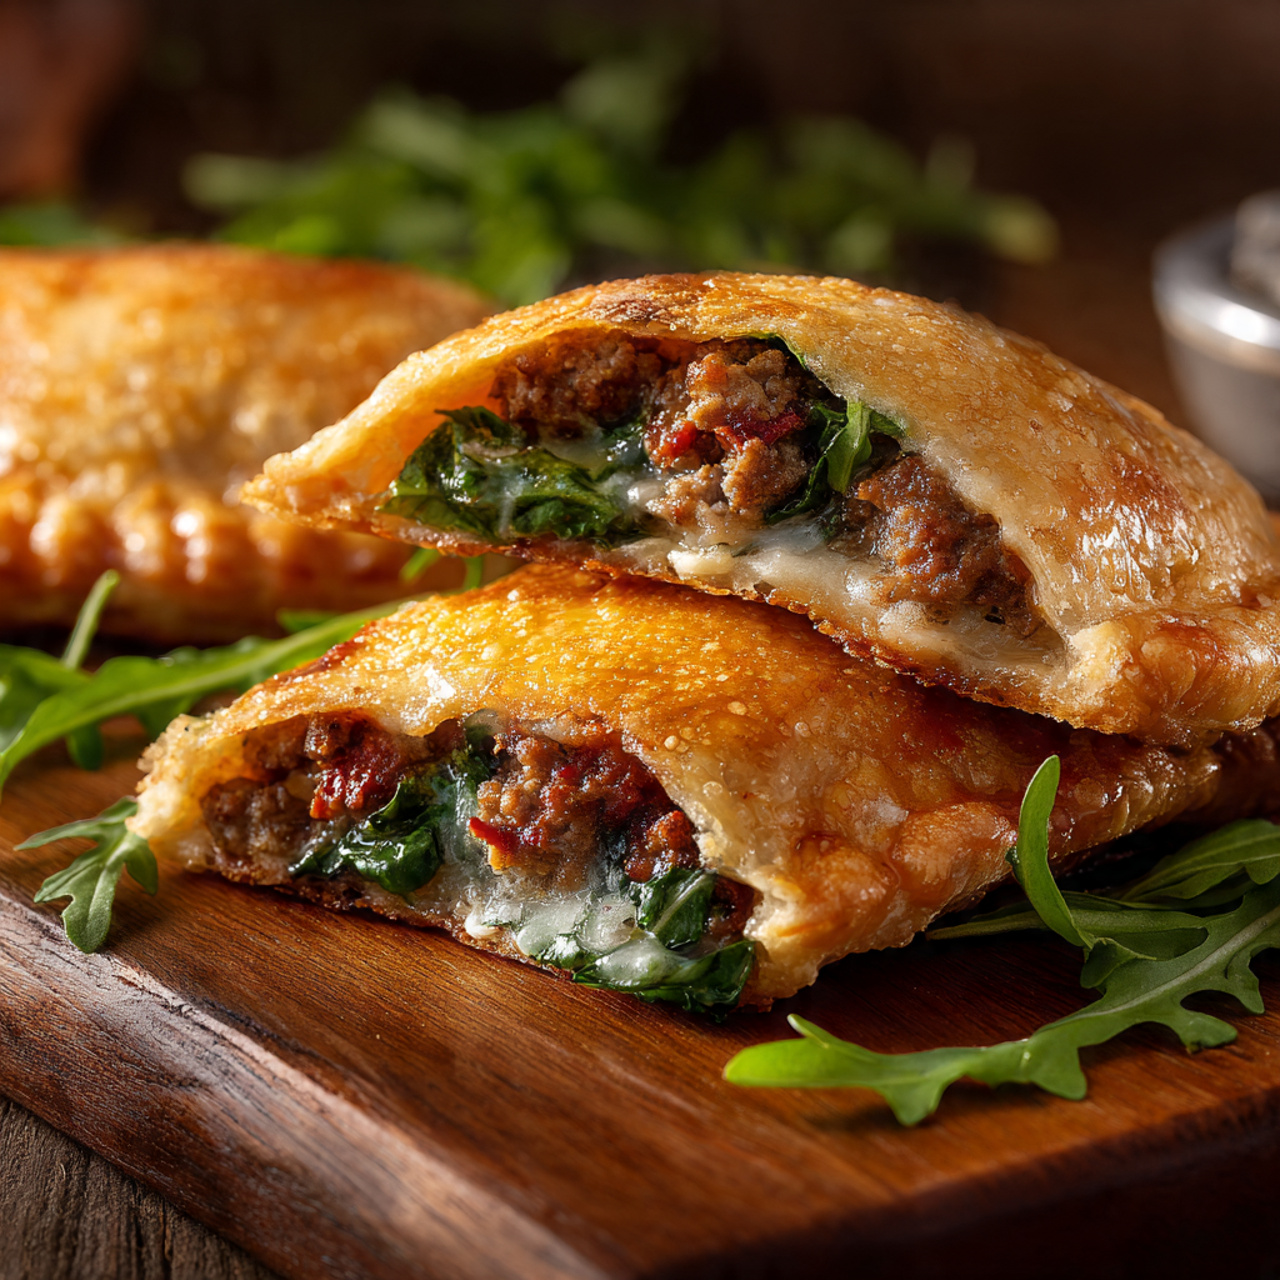
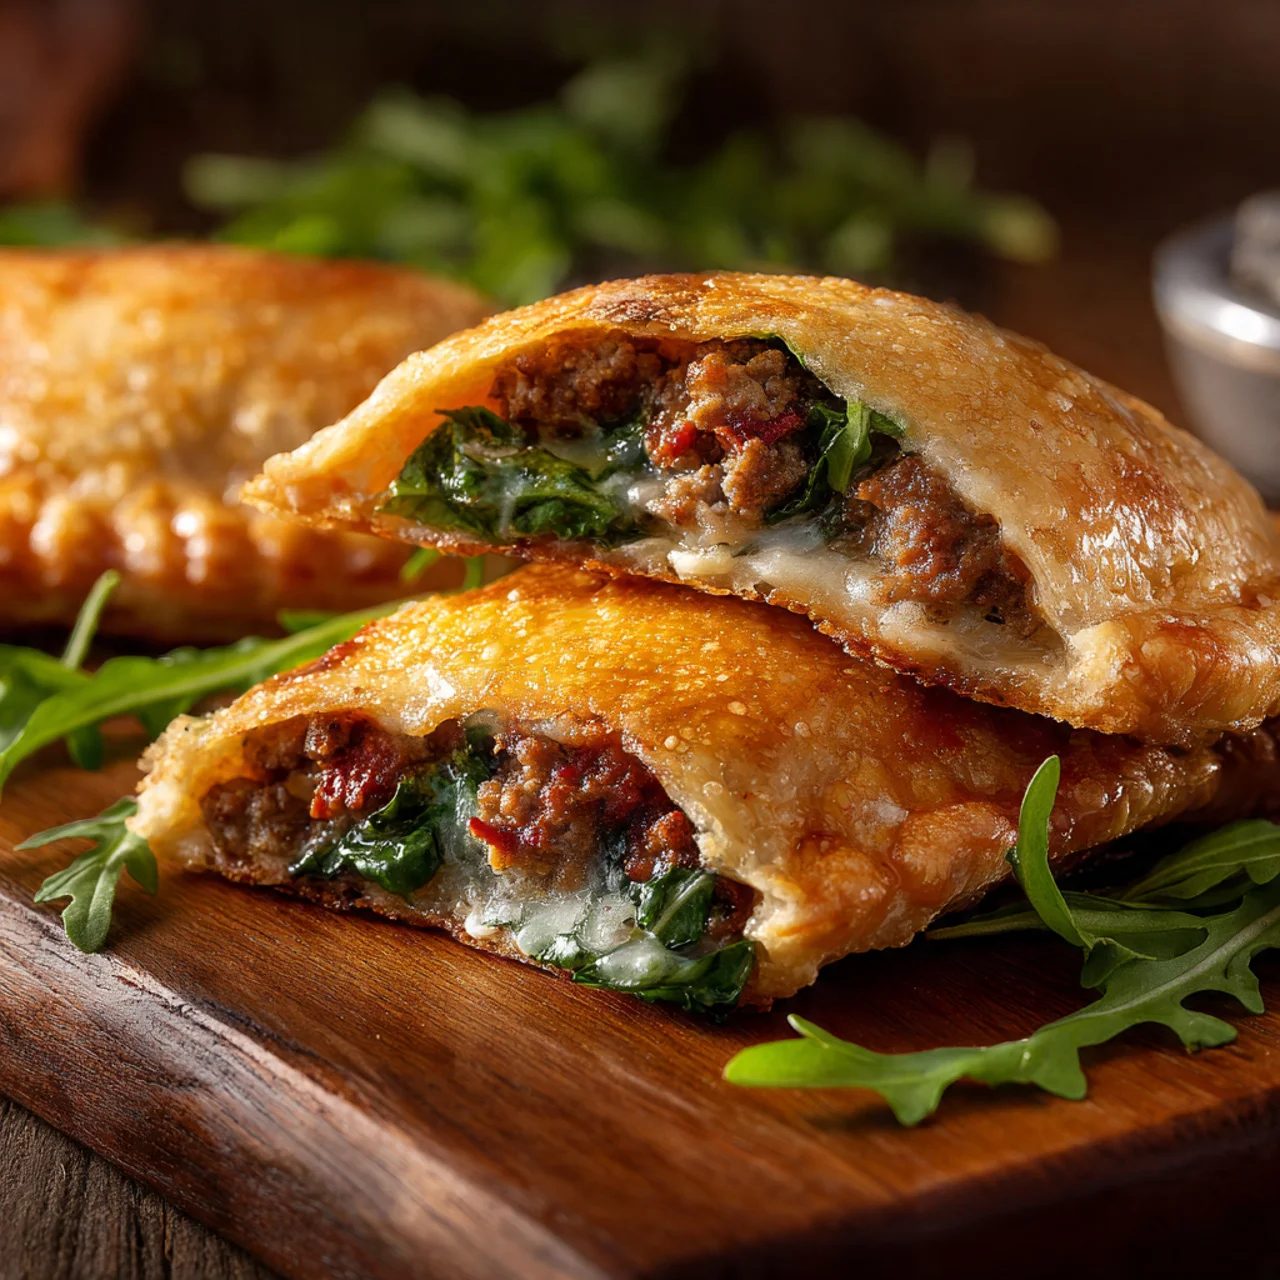
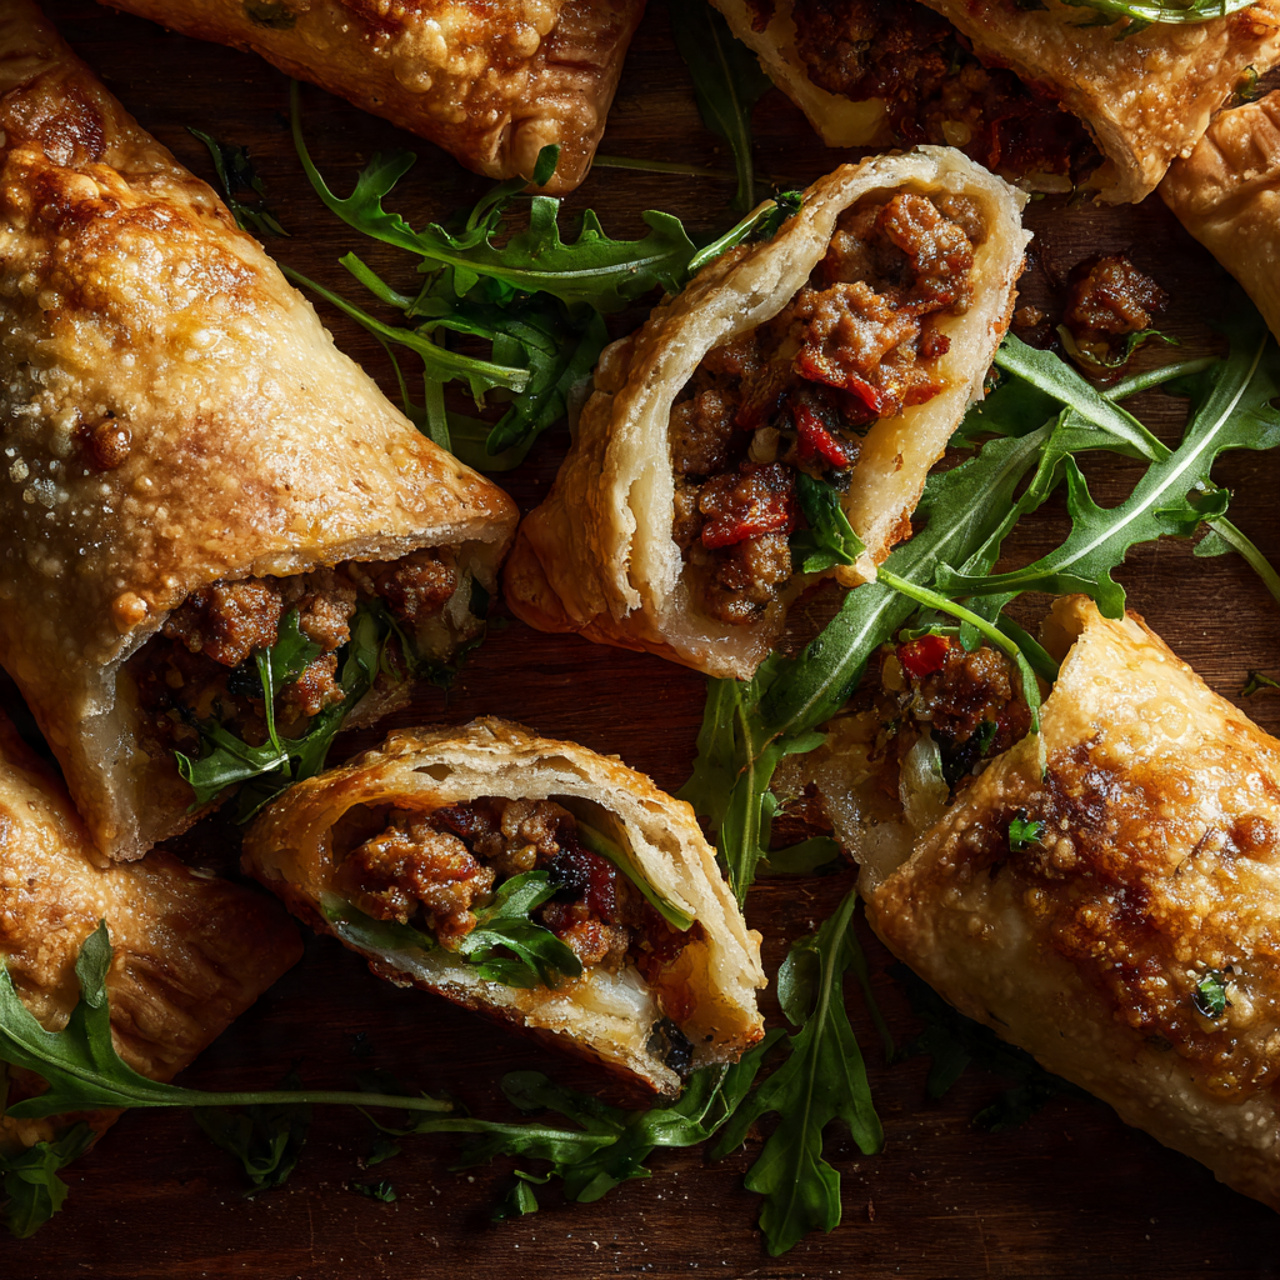
Imagine the perfect game day snack: a golden-brown, handheld pocket of dough, crisp on the outside, soft and chewy inside, and bursting with a savory filling of Italian sausage, creamy cheese, and peppery arugula. Now, imagine dipping that perfect pocket into a bowl of warm marinara sauce. That, my friends, is the comforting, crowd-pleasing magic of these Homemade Pizza Pockets. This is, without a doubt, the ultimate comfort food upgrade for your Super Bowl spread.
I promise you, there is no greater feeling than pulling a tray of these gorgeous, golden, crimped pockets from the oven. The filling is a creamy, savory dream, a perfect combination of seasoned sausage, tangy cream cheese, nutty Parmesan, and a surprising bite from fresh arugula. They are a true taste of pizzeria perfection, made right in your own kitchen.
Get ready to create the undisputed champion of your snack table, a recipe so delicious and satisfying, it will be the first thing to disappear before kickoff.

Why These Pizza Pockets are a Game Day Must-Have
You are going to be completely obsessed with how easy and delicious these pizza pockets are. They are a guaranteed touchdown. Here’s why:
- A Genius Shortcut for Easy Assembly: Using store-bought pizza crust is the secret to a perfect, chewy, golden pocket every time, saving you the hassle of making dough from scratch.
- Incredibly Flavorful and Savory Filling: The creamy, cheesy filling of Italian turkey sausage, arugula, and Parmesan is a sophisticated and absolutely delicious upgrade from a simple pepperoni pizza.
- The Perfect Handheld Game Day Food: No plates or forks required! These are the ultimate easy-to-eat, no-mess snack, perfect for a party atmosphere.
Recipe Snapshot
| Prep Time | 15 minutes |
| Cook Time | 20 minutes |
| Total Time | 35 minutes |
| Servings | 4-6 servings (16 pockets) |
| Calories | 280 kcal per 2 pockets (estimated) |
| Course | Appetizer, Snack, Main Course |
| Cuisine | Italian-American |
| Difficulty/Method | Easy / Baking |
Your Shopping List for These Winning Pockets
This crowd-pleasing recipe comes together with a handful of flavorful, easy-to-find ingredients.

→ For the Pizza Pockets
- 1 tablespoon olive oil → For browning the sausage.
- 8 ounces Italian turkey sausage → A leaner, flavorful alternative to pork sausage.
- 1 cup tightly-packed arugula → Adds a fresh, peppery bite that cuts through the richness.
Let’s Get Cooking! Your Step-by-Step Guide
Ready to create the best handheld snack of the season? Let’s get to it!
Part 1: The Creamy Sausage Filling
- Cook the Sausage: Heat the olive oil in a medium, heavy skillet over medium-high heat. Add the turkey sausage and use a spoon to break it up. Cook until it’s crumbled and golden brown, about 5 minutes.
- Wilt the Arugula: Add the packed arugula to the skillet with the cooked sausage. Cook, stirring, just until it has wilted. Turn off the heat and let the mixture cool for about 10 minutes.
- Combine the Filling: To the cooled sausage mixture in the skillet, add the room temperature cream cheese, ⅓ cup of Parmesan, salt, and pepper. Stir until everything is well combined into a creamy, savory filling.
Part 2: Assemble the Pockets
- Preheat and Prep: Preheat your oven to 400°F (200°C). On a lightly floured surface, unroll the pizza dough and roll it out into a large, thin 20×12-inch rectangle.
- Cut the Dough: Use a knife or a pizza cutter to cut the rectangle in half lengthwise. Then, cut each long half into 8 equal, smaller rectangles. You will have 16 total pieces.
- Fill and Seal: Spoon a portion of the filling onto one half of each small rectangle. In a small bowl, beat the egg to create an egg wash. Using a pastry brush, brush the edges of the rectangle with the egg wash. Fold the empty half of the dough over the filling.
- Crimp and Finish: Use the tines of a fork to press down and crimp the edges, sealing the pocket completely. Place the finished pockets on a baking sheet lined with parchment paper. Brush the tops of each pizza pocket with the remaining egg wash and sprinkle with the final ¼ cup of Parmesan cheese.
Part 3: Bake and Serve
- Bake to Golden Perfection: Bake for 15 to 17 minutes, until the pizza pockets are puffed, golden brown, and crisp.
- Warm the Sauce: While the pockets bake, gently warm your marinara sauce in a small saucepan over low heat.
- Serve Hot!: Serve the hot, fresh pizza pockets immediately with the warm marinara sauce on the side for dipping.
Homemade Pizza Pockets with Sausage and Arugula
Ingredients
Equipment
Method
-
Heat olive oil in a skillet over medium-high heat. Add the sausage and cook until crumbled and golden, about 5 minutes. Add the arugula and cook until wilted. Let cool for 10 minutes.
-
Stir the room temperature cream cheese, 1/3 cup Parmesan, salt, and pepper into the cooled sausage mixture.
-
Preheat the oven to 400°F. Roll out the pizza dough on a lightly floured surface to a 20×12-inch rectangle. Cut into 16 smaller rectangles.
-
Spoon filling onto one side of each rectangle. Brush the edges with beaten egg. Fold the dough over the filling and use a fork to crimp and seal the edges.
-
Place the pockets onto a parchment-lined baking sheet. Brush the tops with egg wash and sprinkle with the remaining 1/4 cup Parmesan.
-
Bake until golden, about 15 to 17 minutes.
-
Meanwhile, gently warm the marinara sauce. Serve the hot pizza pockets with the marinara sauce for dipping.
Notes
Seal Well: The egg wash and the fork crimp are both important for creating a strong seal to keep the filling inside.
Make Ahead: You can assemble the unbaked pockets and store them on a baking sheet, covered, in the refrigerator for up to 24 hours. Brush with egg wash and bake just before serving.
WiseRecipes’ Top Tips for Perfect Pizza Pockets
These simple secrets will ensure your homemade pockets are a huge success.
- Room Temperature Cream Cheese is Key. For a truly creamy, well-combined filling that’s easy to stir, your cream cheese must be fully softened.
- Don’t Overfill the Pockets. It’s tempting to pack them full, but overfilling will cause them to burst open in the oven. A generous spoonful is all you need.
- The Egg Wash is a Double-Agent. The egg wash does two crucial jobs here. First, it acts as the “glue” to seal the edges of the dough together. Second, it gives the tops that beautiful, shiny, deep golden-brown finish. Don’t skip it!
- Crimp with a Fork. Pressing the edges with a fork not only looks classic and beautiful, but it also creates a super-secure seal to keep all that delicious filling from leaking out during baking.
- Make Them Ahead! You can fully assemble the unbaked pizza pockets, arrange them on the baking sheet, cover them tightly, and refrigerate for up to 24 hours. When you’re ready, just brush with the egg wash, sprinkle with cheese, and bake as directed (you may need to add a minute or two to the baking time).
Keep Them Fresh! Storing & Reheating Leftovers
These are fantastic for making ahead for a quick lunch or snack.
- Refrigerator: Store any cooled leftovers in an airtight container in the refrigerator for up to 3 days.
FAQs: Your Pizza Pocket Questions, Answered!
Can I use a different kind of sausage?
Absolutely! Regular Italian pork sausage, spicy chorizo, or even a plant-based sausage crumble would all be fantastic in this recipe. Just be sure to cook it through and drain any excess fat before mixing the filling.
Can I make these with a different filling?
Yes, this is a very versatile recipe! You could make a classic pepperoni and mozzarella version, a vegetarian one with sautéed mushrooms and peppers, or even a “four cheese” version. The possibilities are endless!
I don’t have pizza dough. What’s a good substitute?
Canned crescent roll dough or even sheets of puff pastry would work as a great substitute in a pinch! Just be aware that the texture will be different (flakier and more buttery) and the baking time may need to be adjusted according to the package directions.
Can I freeze these?
Yes, they freeze beautifully! You can freeze them either baked or unbaked. For unbaked, assemble them completely (without the final egg wash) and freeze them flat on a baking sheet until solid. Then transfer to a freezer bag. You can bake them from frozen, adding about 10-15 minutes to the baking time. For baked, let them cool completely, then freeze and reheat in the oven.
Final Thoughts: Your New Game Day Tradition
There is nothing that says “game day” quite like a hot, cheesy, handheld snack. These Homemade Pizza Pockets are the ultimate comfort food, elevated with a delicious, creamy filling and a perfect golden crust. They are guaranteed to be the first thing to disappear from your Super Bowl snack table. I hope they become a new and much-requested favorite for all your gatherings. Enjoy the game!
2. The Ultimate Green Beans in a Blanket (Vegetarian Super Bowl Food!)
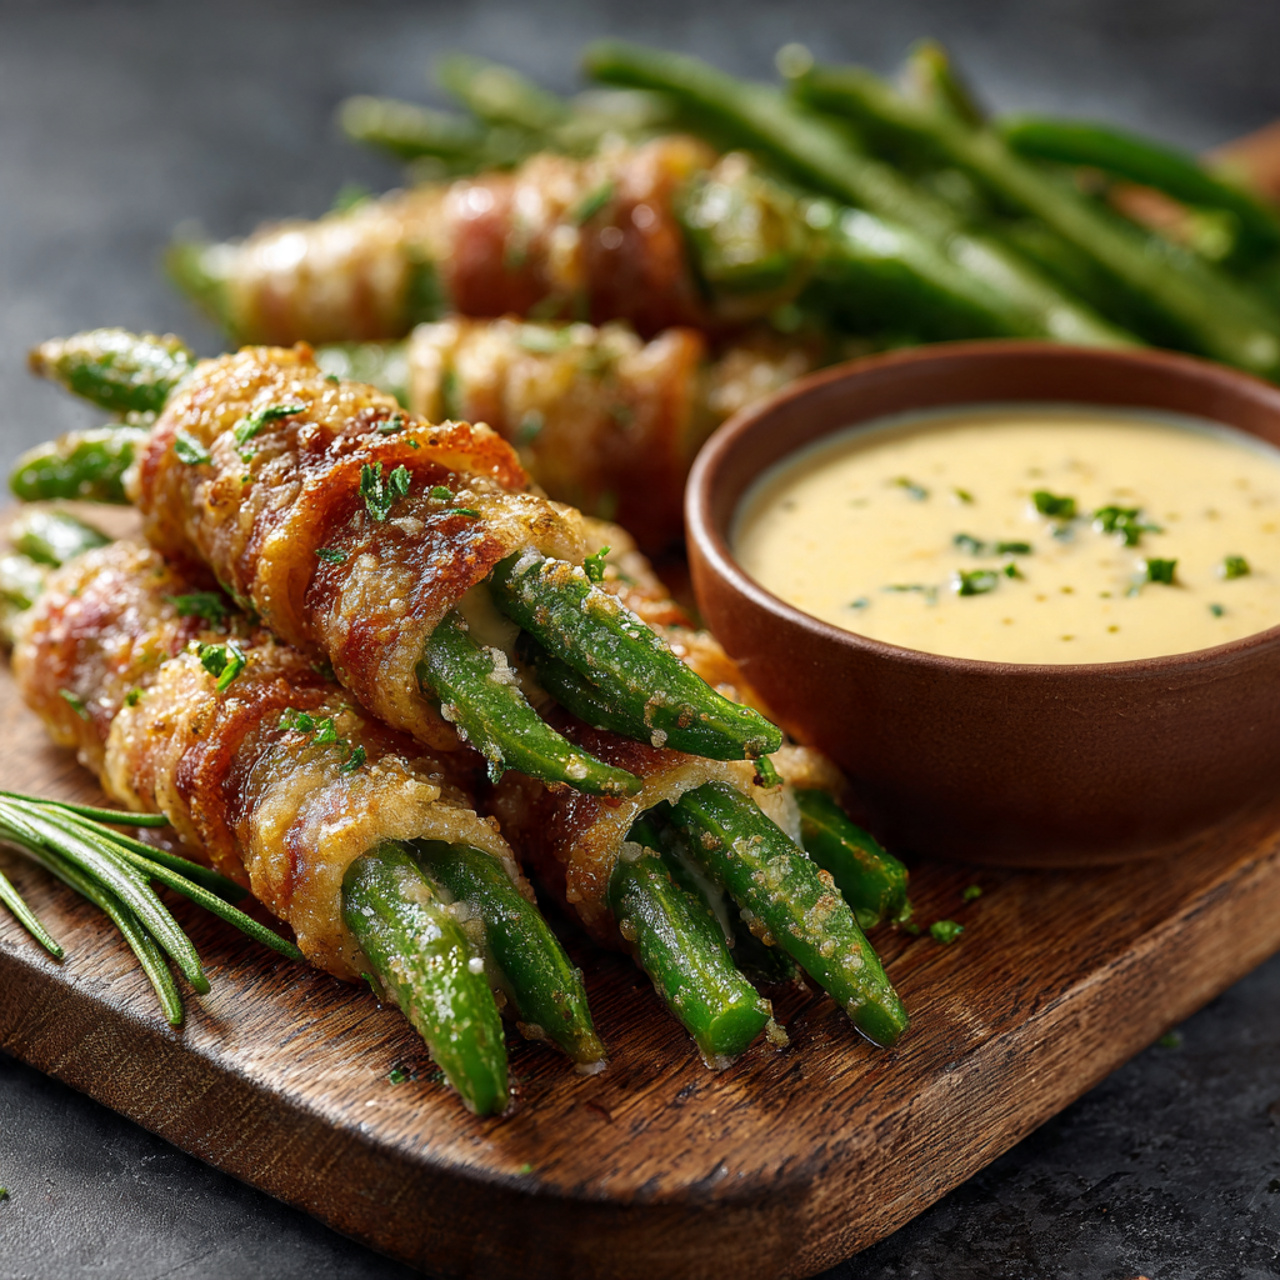
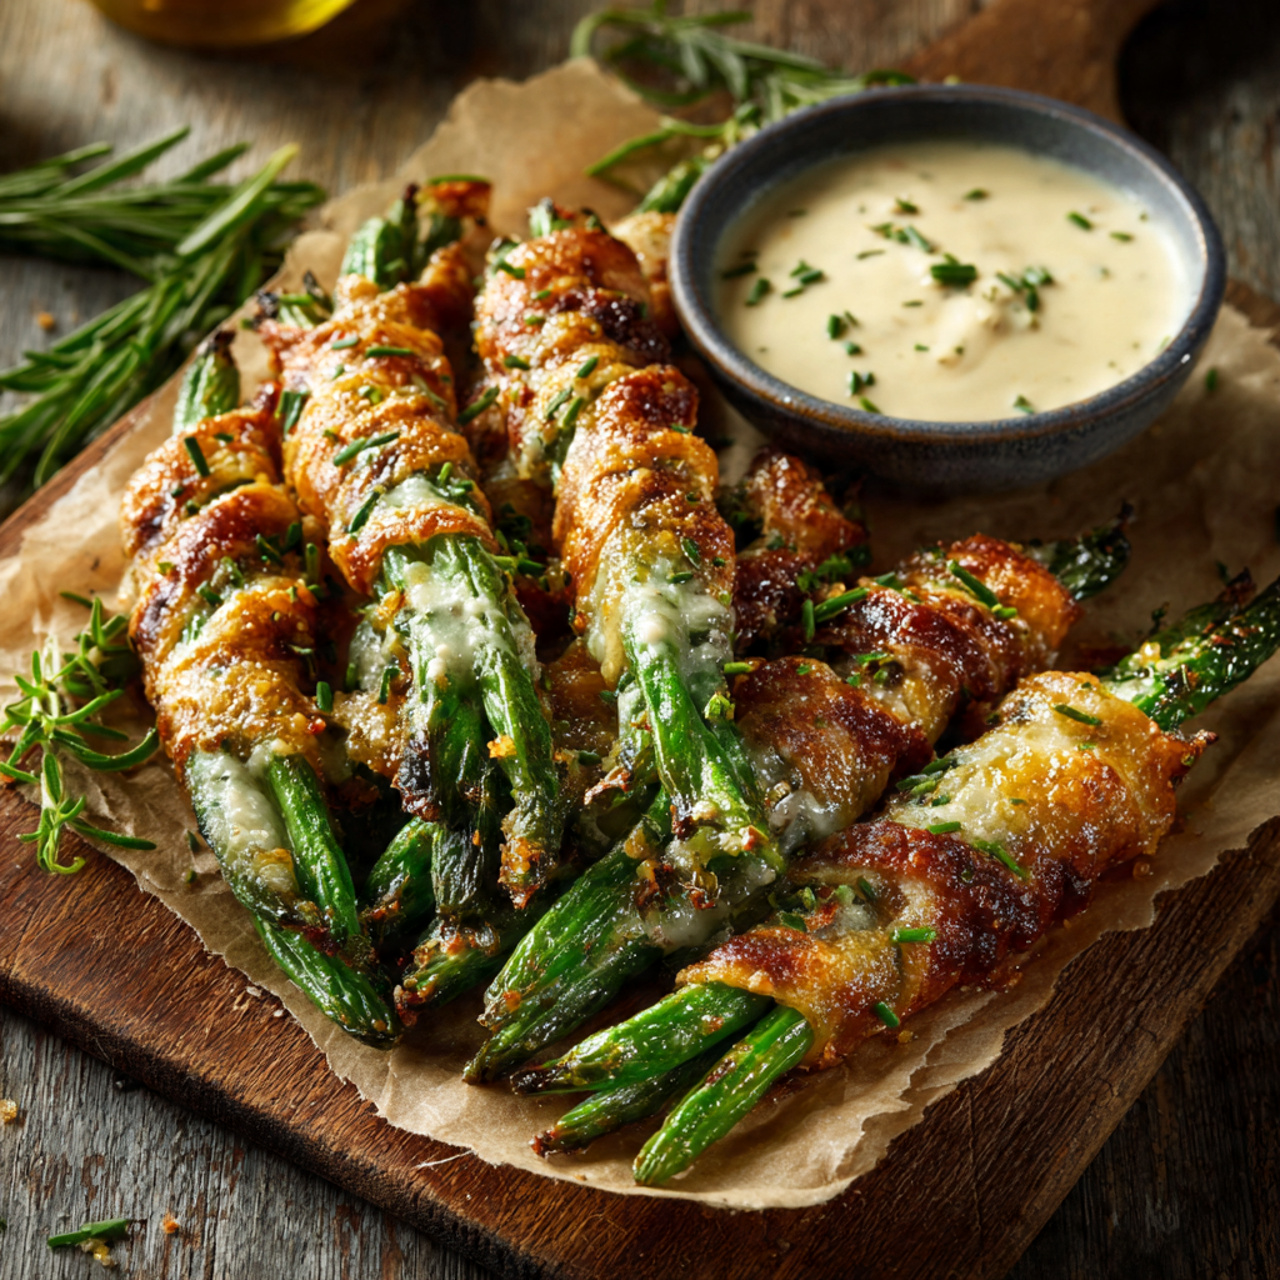
Imagine the ultimate game day snack: the beloved, nostalgic “pigs in a blanket,” but reimagined into a sophisticated, healthier, and completely vegetarian show-stopper. Picture tender-crisp green beans and creamy dill Havarti cheese, all wrapped up in a flaky, homemade whole-wheat pastry and baked to golden-brown perfection. That, my friends, is the creative, ridiculously delicious magic of these Green Beans in a Blanket. This is, without a doubt, the most unique and crowd-pleasing appetizer you will bring to your Super Bowl party.
I promise you, there is no greater satisfaction than dipping one of these warm, flaky bundles into the tangy, creamy mustard sauce. The snap of the green bean, the gooey melted dill Havarti, the nutty whole-wheat pastry, and the pop of caraway seeds create a flavor and texture combination that is simply out of this world. They are a true game-changer.
Get ready to create the talk of the party, a brilliant and delicious twist on a classic that will have both vegetarians and meat-lovers fighting for the last one.

Why These Green Beans in a Blanket are a Total Touchdown
You are going to be completely amazed by how delicious this unique vegetarian appetizer is. It’s a true game day champion. Here’s why:
- A Creative and Delicious Vegetarian Option: Finally, a “pig in a blanket” for everyone! It’s a thoughtful and incredibly tasty option that goes way beyond a standard veggie platter.
- Incredibly Flavorful and Sophisticated: The combination of crisp green beans, creamy dill Havarti cheese, and nutty caraway seeds is a grown-up flavor profile that feels truly special.
- Homemade Flaky Whole-Wheat Pastry: The from-scratch pastry is surprisingly easy to make and provides a wholesome, nutty flavor and a wonderful flaky texture that you can’t get from a can.
Recipe Snapshot
| Prep Time | 35 minutes (active) |
| Cook Time | 18 minutes |
| Total Time | 55 minutes |
| Servings | 8-10 servings |
| Calories | 215 kcal per serving (estimated) |
| Course | Appetizer, Snack |
| Cuisine | American |
| Difficulty/Method | Easy / Baking |
Your Shopping List for This Game-Changing Snack
This impressive appetizer comes together with a wonderful mix of fresh produce and pantry staples.

→ For the Green Beans in a Blanket
- ¾ pound green beans → Trimmed and halved crosswise. Look for fresh, crisp beans!
- 2 cups whole-wheat pastry flour → The secret to a tender, flaky, and wholesome pastry.
- 1 tsp baking powder & ½ tsp baking soda → For the perfect puff and lift.
- 4 tablespoons (½ stick) cold unsalted butter → Cut into small cubes. It must be cold!
→ For the Creamy Mustard Sauce
- 2 tablespoons country Dijon mustard → The grainy texture is wonderful here.
- 1 tablespoon sour cream → For a cool, creamy tang.
Let’s Get Rolling! Your Step-by-Step Guide
Ready to create the most unique appetizer on the Super Bowl spread? Let’s do this!
Part 1: The Flaky Whole-Wheat Dough
- Prep the Green Beans: Place the halved green beans in a large microwave-safe bowl with a splash of water. Cover and microwave for about 5 minutes, until they are bright green and crisp-tender. Drain them and let them cool.
- Make the Dough: In a medium bowl, whisk together the whole-wheat pastry flour, baking powder, baking soda, and 1 tsp salt. Add the cubes of cold butter. Use your fingertips to quickly work the butter into the flour until the mixture resembles coarse crumbs with some pea-sized pieces of butter remaining.
- Bring It Together: Make a well in the center of the flour mixture and pour in the milk. Use a fork to stir everything together until a shaggy dough forms. Gently knead it just a couple of times on a well-floured surface until it comes together.
Part 2: Assemble the Bundles
- Preheat and Prep: Preheat your oven to 375°F (190°C). Line two large baking sheets with parchment paper.
- Roll and Cut: On your floured surface, roll the dough out into a large rectangle, a little thinner than 1/8 inch. Use a knife or pizza cutter to cut the dough into as many 1.5-by-3-inch rectangles as you can.
- Fill and Roll: On each rectangle, lay about 4 green bean halves crosswise so their tips poke out the sides. Top the beans with about 1 teaspoon of the shredded dill Havarti. Roll the rectangle up snugly, making sure the ends of the dough overlap. Place it seam-side down on the prepared baking sheet.
- Finish and Bake: Repeat with all the rectangles. Brush the tops of each bundle with the beaten egg and sprinkle with caraway seeds. Bake for 15 to 18 minutes, until puffed and a deep golden brown.
Part 3: The Dipping Sauce
- Mix the Sauce: While the bundles are baking, simply stir together the country Dijon mustard and the sour cream in a small bowl until smooth.
- Serve Hot!: Let the Green Beans in a Blanket cool for a few minutes on the baking sheets, then serve them warm with the creamy mustard sauce on the side for dipping.
Green Beans in a Blanket with Creamy Mustard Dip
Ingredients
Equipment
Method
-
Preheat the oven to 375°F and line 2 baking sheets with parchment paper. Microwave the green beans with a splash of water for 5 minutes until crisp-tender. Drain and toss with olive oil and salt.
-
In a medium bowl, whisk together the flour, baking powder, baking soda, and 1 tsp salt. Work in the cold butter with your fingers until it resembles coarse crumbs. Stir in the milk to form a shaggy dough.
-
On a floured surface, knead the dough a few times and roll it out to a little thinner than 1/8 inch. Cut it into 1 1/2-by-3-inch rectangles.
-
On each rectangle, lay 4 green bean halves and top with about 1 teaspoon of the Havarti cheese. Roll the rectangle up and place it seam-side down on the prepared baking sheets.
-
Brush each bundle with beaten egg and sprinkle with caraway seeds.
-
Bake until golden brown, 15 to 18 minutes.
-
Meanwhile, stir together the mustard and sour cream in a small bowl for the dipping sauce. Serve the warm bundles with the sauce on the side.
Notes
Make Ahead: You can assemble the unbaked bundles and store them, covered, on the baking sheet in the refrigerator for up to one day before baking.
Shortcut: For a faster version, you can use store-bought puff pastry or crescent roll dough instead of making the pastry from scratch.
WiseRecipes’ Top Tips for Perfect “Blankets”
These simple secrets will ensure your vegetarian bites are flaky and delicious.
- Cold Butter is CRUCIAL. For a flaky pastry, your butter must be cold, straight from the fridge. The little pea-sized pieces of butter will melt in the oven, creating steam pockets that result in a light, flaky texture.
- Don’t Overwork the Dough. Mix and knead the dough only until it just comes together. Overworking it will develop the gluten too much and can make your pastry tough instead of tender.
- Microwave the Beans for Speed. The microwave is a brilliant shortcut for getting the green beans perfectly crisp-tender before they go into the pastry. It’s much faster than boiling.
- Don’t Skip the Egg Wash. Brushing the tops with a beaten egg is what gives these little bundles their beautiful, shiny, deep golden-brown finish. It makes them look truly professional.
- Seal the Seam. When you place the rolled-up bundles on the baking sheet, make sure they are seam-side down. This helps prevent them from unrolling during baking.
Keep Them Fresh! Storing & Reheating
These are definitely at their absolute best when served fresh and warm from the oven.
- Storage: If you have leftovers, they can be stored in an airtight container in the refrigerator for up to 3 days. The pastry will soften upon storage.
FAQs: Your Green Bean Blanket Questions, Answered!
Can I use a different kind of cheese?
Yes! While the dill Havarti is fantastic, this would also be delicious with a sharp cheddar, a smoky Gruyère, or even a spicy pepper jack cheese for a little kick.
Can I make these ahead of time?
You can! You can fully assemble the unbaked bundles, place them on the baking sheet, cover them tightly, and refrigerate for up to 24 hours. When you’re ready, just brush with the egg wash, sprinkle with seeds, and bake as directed (you may need to add a minute or two to the baking time).
I don’t have whole-wheat pastry flour. What can I use?
Whole-wheat pastry flour is great because it has the wholesome flavor of whole wheat but the tenderness of a lower-protein flour. In a pinch, you can substitute with regular all-purpose flour. The pastry will just have a slightly less nutty flavor.
Can I use store-bought dough?
Yes, for a super-fast shortcut, you could use store-bought puff pastry or even crescent roll dough. Just cut the dough into rectangles and proceed with the filling and rolling steps. The baking time and temperature will need to be adjusted according to the package directions for the dough you use.
Final Thoughts: Your Surprise Game Day Star
There is nothing more fun than introducing your friends and family to a new and exciting snack that they instantly fall in love with. These Green Beans in a Blanket are a true original—a sophisticated, delicious, and satisfying appetizer that proves vegetarian game day food can be the most exciting thing on the table. I hope they become a new favorite for your Super Bowl celebrations. Enjoy the game!
3. The Ultimate Hot Artichoke-Spinach Dip (Healthy Super Bowl Food!)
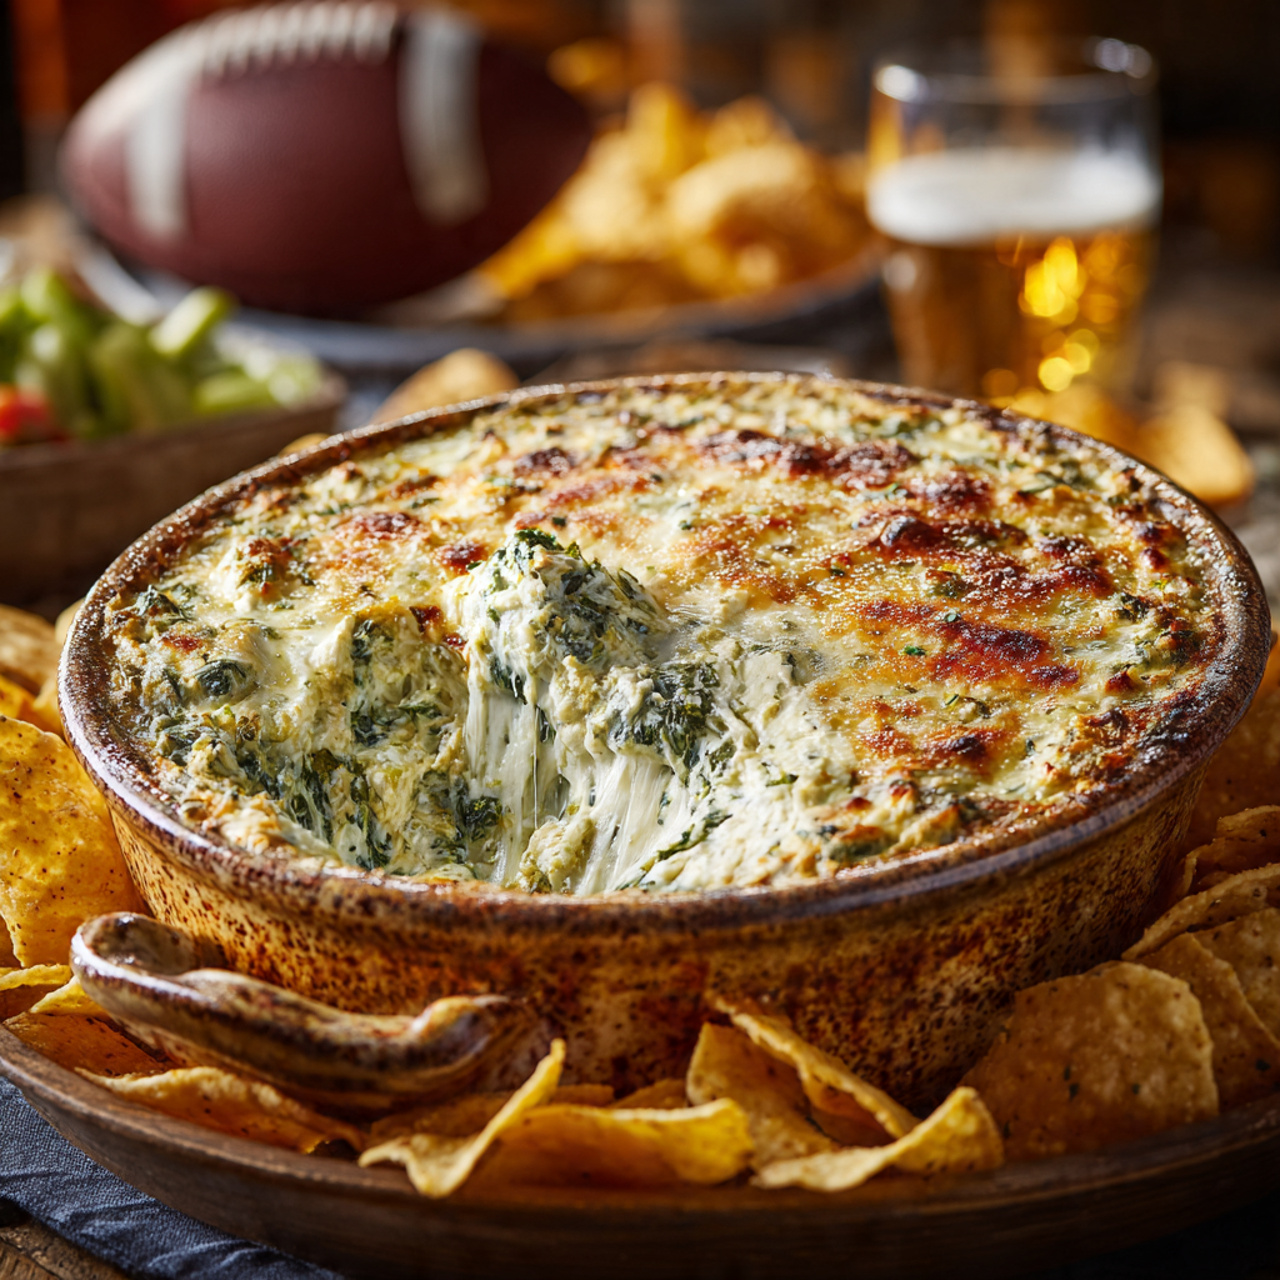
Imagine a bubbling, golden-brown, absolutely irresistible dip, fresh from the oven, loaded with tender artichoke hearts, vibrant spinach, and three kinds of cheese, all in a ridiculously creamy, savory base. Now, imagine that this ultimate crowd-pleaser is a healthier, lightened-up version that tastes even better than the original. That, my friends, is the game-winning magic of this Hot Artichoke-Spinach Dip. This is, without a doubt, the appetizer that will completely disappear from your Super Bowl spread.
I promise you, no one will ever guess this dip is lightened-up. It is unbelievably rich, cheesy, and packed with flavor from fresh basil, garlic, and a hint of cayenne. Served hot and bubbly with a mountain of crispy chips for dipping, it is the absolute pinnacle of game day comfort food.
Get ready to create the undisputed champion of your snack table, a healthier, more delicious take on a classic that will have everyone begging for the recipe.

Why This Is the Winning Artichoke Dip Recipe
You are going to be completely amazed by how rich and creamy this healthier dip is. It’s a true game day miracle. Here’s why:
- A Genius Healthy Hack: This recipe uses a purée of cannellini beans and Neufchâtel cheese instead of a heavy, mayo-based sauce, making it incredibly creamy and protein-packed without the excess fat.
- Unbelievably Rich and Cheesy: Loaded with artichokes, spinach, fresh basil, Parmesan, and mozzarella, this dip is absolutely packed with all the savory, cheesy flavor you crave.
Recipe Snapshot
| Prep Time | 20 minutes |
| Cook Time | 25 minutes |
| Total Time | 45 minutes |
| Servings | 12 servings |
| Calories | 110 kcal per serving (estimated) |
| Course | Appetizer, Snack |
| Cuisine | American |
| Difficulty/Method | Easy / Baking |
Your Shopping List for the Winning Dip
This vibrant and flavorful dip comes together with a handful of fresh and pantry-staple ingredients.

→ For the Hot Artichoke-Spinach Dip
- 1 (10-ounce) bag baby spinach → The leafy green heart of our dip.
- 1 cup packed fresh basil → A secret ingredient that adds a bright, fresh, peppery flavor.
- ¾ cup canned cannellini beans → Rinsed and drained. This is the key to our creamy, healthy base!
Let’s Get Dipping! Your Step-by-Step Guide
Ready to make the best Artichoke-Spinach Dip of your life? Let’s break it down.
Part 1: Prepare the Greens and the Creamy Base
- Preheat and Prep: Preheat your oven to 450°F (230°C). Mist a deep 1-quart casserole dish with nonstick cooking spray.
- Blanch the Greens: Bring a pot of salted water to a boil and prepare a separate large bowl of ice water. Add the spinach and basil to the boiling water and cook for just 30 seconds, until they are bright green and wilted. Immediately use a slotted spoon to transfer them to the ice water bath to stop the cooking.
- Squeeze it Dry!: Drain the cooled greens and then squeeze them with your hands to remove as much water as physically possible. This is a crucial step! Roughly chop the squeezed greens.
- Make the Base: In a food processor, combine the rinsed cannellini beans, Neufchâtel cream cheese, smashed garlic, and chicken broth. Purée until the mixture is completely smooth, scraping down the sides of the bowl as needed.
Part 2: Mix, Bake, and Serve
- Combine the Dip: Transfer the creamy bean purée to a medium bowl. Fold in the chopped spinach and basil, the chopped artichoke hearts, the Parmesan cheese, and ½ cup of the mozzarella.
- Season to Perfection: Stir in the cayenne pepper, Worcestershire sauce, ½ teaspoon of salt, and a few grinds of black pepper.
- Bake Until Bubbly: Spread the dip mixture evenly into your prepared casserole dish. Top with the remaining ¼ cup of mozzarella cheese. Bake for 20 to 25 minutes, until the dip is hot and the cheese on top is golden brown and bubbling.
- Serve Hot!: Let the dip rest for a few minutes (it will be incredibly hot!). Serve warm with your favorite baked chips for dipping.

Healthier Hot Artichoke-Spinach Dip with White Beans
Ingredients
Equipment
Method
-
Preheat the oven to 450°F. Bring a pot of salted water to a boil. Stir in the spinach and basil and cook until bright green, about 30 seconds. Plunge into an ice water bath, then drain and squeeze very dry. Roughly chop.
-
In a food processor, purée the cannellini beans, cream cheese, garlic, and chicken broth until completely smooth.
-
Transfer the purée to a medium bowl. Fold in the chopped spinach and basil, chopped artichokes, parmesan, and 1/2 cup of the mozzarella.
-
Stir in the cayenne, Worcestershire sauce, 1/2 teaspoon salt, and black pepper to taste.
-
Mist a 1-quart casserole dish with cooking spray. Spread the dip mixture into the dish and top with the remaining 1/4 cup mozzarella.
-
Bake until golden and bubbly, 20 to 25 minutes. Serve warm with baked chips.
Notes
Make Ahead: This dip can be fully assembled in the casserole dish (before baking) up to a day in advance. Cover and refrigerate, then bake as directed, adding 5-10 minutes to the time.
Vegetarian Option: To make this vegetarian, substitute the chicken broth with vegetable broth and use a vegan Worcestershire sauce.
WiseRecipes’ Top Tips for the Best Dip Ever
These simple secrets will ensure your Artichoke-Spinach Dip is a total touchdown.
- SQUEEZE. THAT. SPINACH. I cannot overstate the importance of this step. After blanching and draining the spinach and basil, you must squeeze out every last drop of water. Excess water is the number one enemy of a thick, creamy dip.
- And Squeeze the Artichokes, Too! Canned artichoke hearts are packed in liquid. After draining them, place them in a clean kitchen towel or a few layers of paper towels and squeeze them firmly to remove as much moisture as possible before chopping.
- Don’t Skip the Fresh Basil. While spinach and artichoke are the stars, the fresh basil is the secret weapon in this recipe. It adds a bright, peppery, almost pesto-like note that elevates the dip from good to absolutely incredible.
- The Bean Purée is Genius. Trust the process! The cannellini bean and cream cheese base creates a luxuriously smooth, creamy texture that mimics a much fattier dip, all while adding protein and fiber.
- Make It Ahead for Easy Hosting. This is the perfect make-ahead party dip. You can fully assemble it in the casserole dish, cover it, and refrigerate for up to a day. When you’re ready, just pop it into the preheated oven (you may need to add 5-10 minutes to the baking time).
Keep It Fresh! Storing & Reheating Leftovers
Leftover dip (if you have any!) is a true treat.
- Refrigerator: Once cooled, store any leftover dip in an airtight container in the refrigerator for up to 4 days.
- Reheating: The best way to reheat is in the oven or a toaster oven. Place the dip in an oven-safe dish and bake at 350°F for about 10-15 minutes, until warmed through and bubbly. You can also microwave individual portions, stirring halfway through.
FAQs: Your Dip Questions, Answered!
Can I use frozen spinach instead of fresh?
Yes, you can. You’ll need one 10-ounce package of frozen chopped spinach. Thaw it completely and then squeeze, squeeze, squeeze out all the excess water before adding it to the dip. You can skip the blanching step if you use frozen.
Can I make this vegetarian?
Easily! Simply substitute the chicken broth with vegetable broth, and make sure the Worcestershire sauce you use is a vegetarian/vegan version (as traditional Worcestershire contains anchovies).
Can I use regular cream cheese instead of Neufchâtel?
Of course. Regular full-fat cream cheese will work perfectly; the final dip will just be slightly richer. Neufchâtel is simply a way to lighten it up a bit without sacrificing texture.
Can I serve this dip cold?
While this recipe is designed to be served hot and bubbly, the chilled dip is also quite delicious! It will be much firmer, like a cheese spread. It’s great on crackers or as a spread for sandwiches and wraps.
Final Thoughts: The Undisputed Dip Champion
There is nothing that brings a party together quite like a truly great, hot, cheesy dip. This Hot Artichoke-Spinach Dip is everything you want in a game day snack—it’s comforting, wildly flavorful, and perfect for sharing. The fact that it’s a healthier version is just our little secret. I hope it becomes the star of your Super Bowl celebration. Happy Dipping!
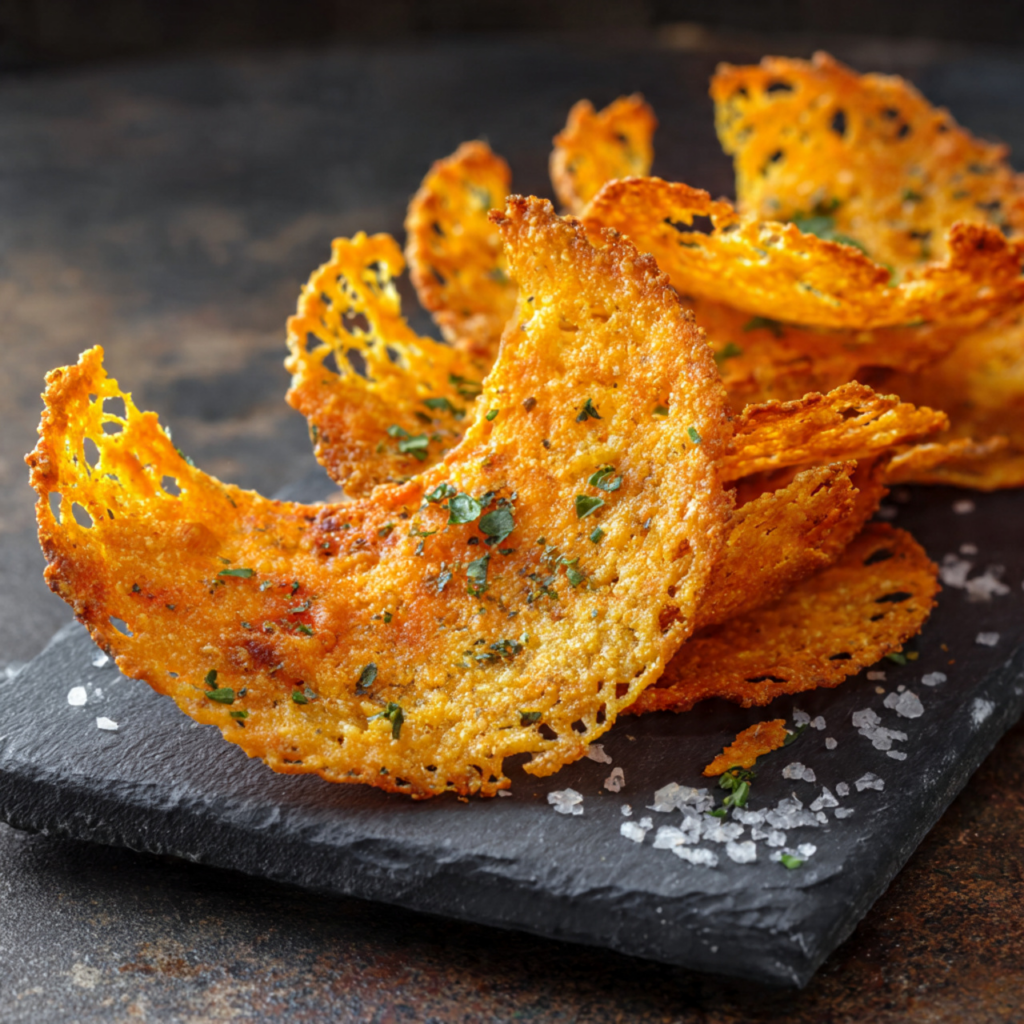
4. The Ultimate Keto Cheddar Taco Crisps (Easy Super Bowl Food!)
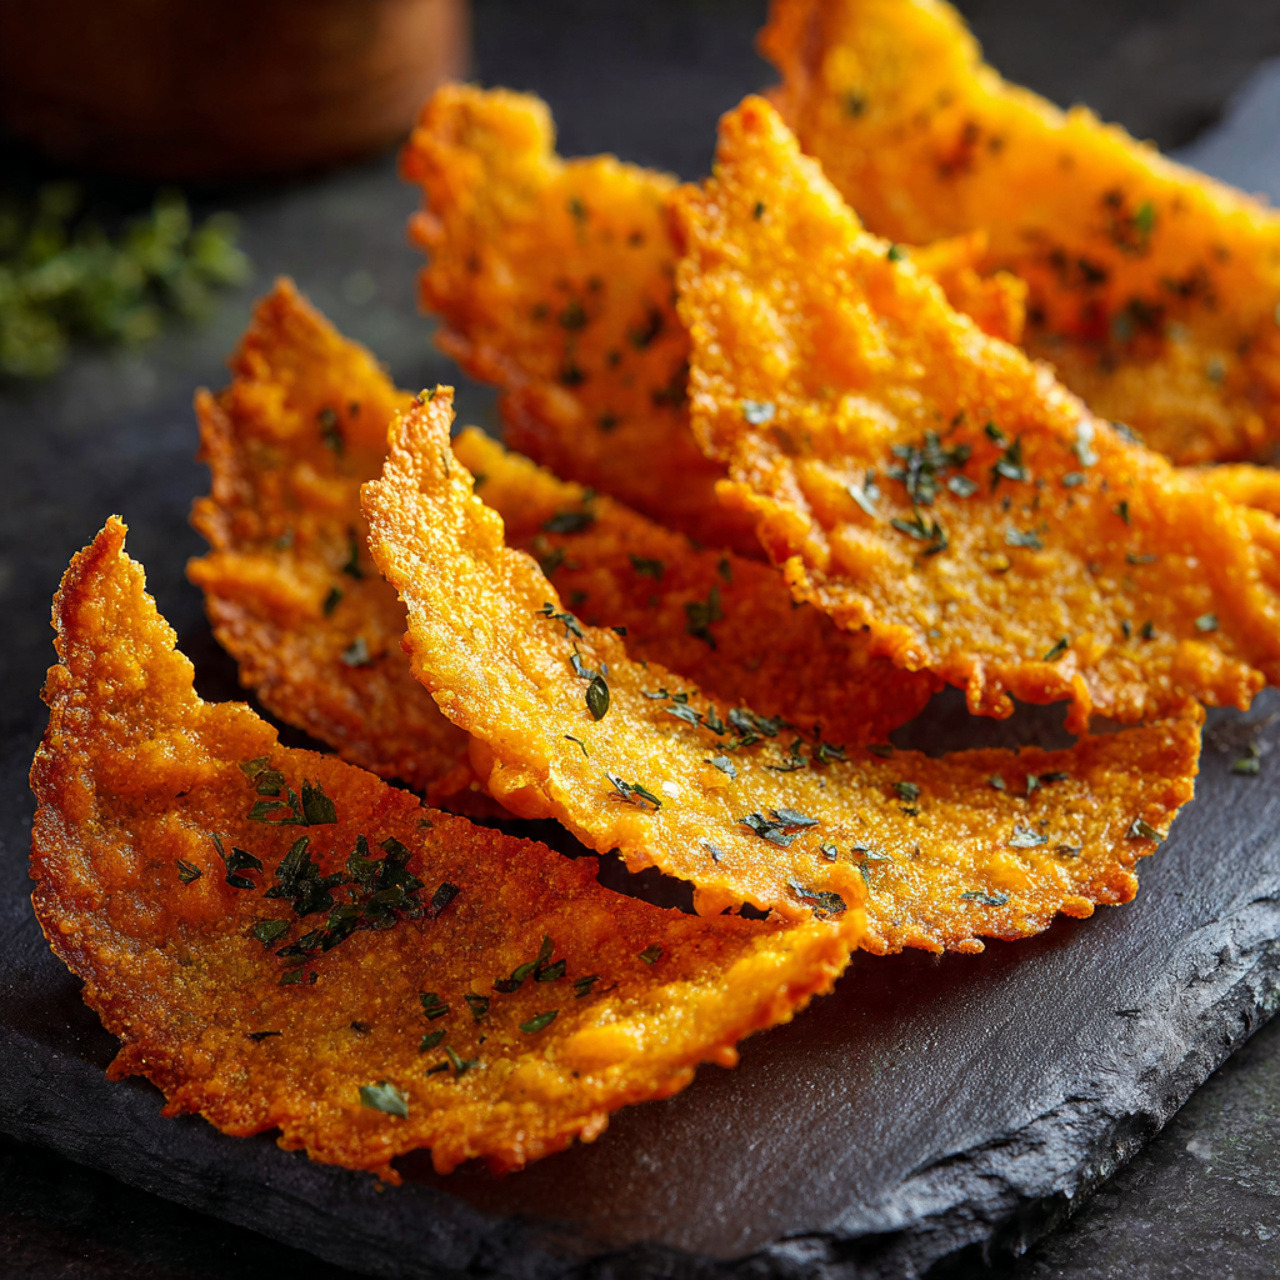
Imagine a shatteringly crisp, perfectly crunchy chip, loaded with the zesty flavor of taco seasoning and savory, sharp cheddar cheese, that you can enjoy completely guilt-free on game day. That, my friends, is the low-carb, high-flavor magic of these Keto Cheddar Taco Crisps. This is, without a doubt, the easiest and most addictive keto-friendly snack you will ever make for your Super Bowl party.
I promise you, there is no greater feeling than pulling these lacy, golden crisps from the oven. The aroma is incredible, and the flavor is pure, concentrated cheesy goodness. Whether you shape them into little taco shells for dipping or leave them flat for crunching, they are a true game day miracle that everyone, keto or not, will go crazy for.
Get ready to create the MVP of your snack table, a 5-ingredient recipe that proves you don’t need carbs to win the Super Bowl spread.

Why These Keto Crisps Will Be Your New Obsession
You are going to be completely blown away by how much flavor you can get from such a simple recipe. This is a must-have for any low-carb snacker. Here’s why:
- Perfectly Keto-Friendly: With virtually zero carbs, these are the ultimate guilt-free snack to satisfy your chip cravings while staying perfectly on your keto plan.
- Ready in 15 Minutes!: This is the definition of a quick and easy snack. From mixing to baking, you can have a batch of these crispy delights ready in no time flat.
- Only 5 Simple Ingredients: All you need are two types of cheese and three common spices to create this incredibly flavorful and crunchy treat.
Recipe Snapshot
| Prep Time | 10 minutes |
| Cook Time | 5 minutes |
| Total Time | 15 minutes |
| Servings | 5-6 servings (2 crisps per person) |
| Calories | 165 kcal per serving (estimated) |
| Course | Appetizer, Snack |
| Cuisine | American, Tex-Mex |
| Difficulty/Method | Easy / Baking |
Your 5-Ingredient Shopping List
This incredibly simple recipe comes together with just a few pantry staples.
→ For the Keto Taco Crisps
- ¾ cup finely shredded full-fat sharp Cheddar → The star of the show! Use a sharp variety for the boldest cheese flavor.
- ¼ cup shredded Parmesan → Adds a salty, nutty depth and helps the crisps get extra crunchy.
- ¼ teaspoon chili powder → For that classic, warm taco flavor.
- ¼ teaspoon ground cumin → Adds a smoky, earthy note.
- Large pinch of cayenne pepper → For a little kick of heat! Adjust to your preference.
Let’s Get Baking! Your Step-by-Step Guide
Ready for the easiest, cheesiest snack of your life? Let’s do this!
Part 1: The Spiced Cheese Mixture
- Preheat and Prep: Preheat your oven to 400°F (200°C). Line a large baking sheet with a silicone baking mat. This is essential!
- Combine Ingredients: In a small bowl, toss together the shredded Cheddar, shredded Parmesan, chili powder, ground cumin, and cayenne pepper until the spices are evenly distributed throughout the cheese.
Part 2: Bake, Shape, and Cool
- Portion and Bake: Spoon heaping tablespoonfuls of the cheese mixture onto the prepared baking sheet, leaving about 1 inch of space between each pile. Gently spread out each pile and lightly pat it down. Bake until the cheese is melted, bubbly, and golden brown around the edges, about 5 minutes. Watch them closely!
- Shape the Crisps (Optional): Let the crisps cool on the baking sheet for just a few seconds until they are firm enough to lift with a spatula but still pliable. Carefully lift each crisp and drape it over a rolling pin or the side of a bowl to cool completely into a taco-shell shape. (Alternatively, just let them cool flat on the baking sheet.)
- Cool and Serve: Once they are completely cool, they will be shatteringly crisp and ready to enjoy!
Keto Cheddar Taco Crisps
Ingredients
Equipment
Method
-
Preheat the oven to 400°F. Line a baking sheet with a silicone baking mat.
-
In a small bowl, toss together the Cheddar, Parmesan, chili powder, cumin, and cayenne until well combined.
-
Spoon heaping tablespoonfuls of the cheese mixture about 1 inch apart on the prepared baking sheet. Gently spread out each pile.
-
Bake until the cheese is golden brown and bubbly, about 5 minutes. Watch them closely as they can burn quickly.
-
Let the crisps cool for a few seconds on the baking sheet until they are just firm enough to lift but still pliable. Use a metal spatula to lift and drape them over a rolling pin to cool completely into a curved shape.
Notes
Shred Your Own Cheese: For the best melting and crisping, shred cheese from a block. Pre-shredded cheese contains starches that can affect the texture.
Storage: Store cooled crisps in an airtight container at room temperature for up to 2 days for the best crispiness.
Nutrition Information: The provided nutrition information is an estimate and can vary based on the specific ingredients used.
WiseRecipes’ Top Tips for Perfect Cheese Crisps
These simple secrets will guarantee your keto crisps are flawless every time.
- A Silicone Mat is Non-Negotiable. I cannot stress this enough. Parchment paper can become saturated with the grease from the cheese and stick. A silicone baking mat (like a Silpat) is the only foolproof way to ensure your delicate, lacy crisps release perfectly without breaking.
- Shred Your Own Cheese! Pre-shredded, bagged cheese is coated in starches like cellulose to prevent clumping. This powder will prevent your cheese from melting as smoothly and can result in a less delicate, less crispy texture. Always shred from a block for best results.
- Watch Them Like a Hawk. These crisps go from perfectly golden to burnt in a matter of seconds. Stay by your oven and pull them out as soon as the edges are a nice, deep golden brown.
- The Shaping Window is Short. If you’re shaping them over a rolling pin, you have to work quickly. They need to cool for about 30 seconds to be stable enough to lift, but if they cool for too long, they will become brittle and crack when you try to bend them.
- Give Them Space. The cheese will spread as it melts, so be sure to leave enough space between your piles on the baking sheet to prevent them from melting into one giant cheese crisp (although that doesn’t sound too bad, either!).
Keep Them Fresh! Storing Your Crisps
These are best enjoyed fresh for maximum crispiness, but they do store well.
- Storage: Once completely cooled, store the crisps in an airtight container at room temperature. They will stay crispy for up to 2 days, though they may lose a little of their initial snap over time. Do not refrigerate, as the moisture will make them soft.
FAQs: Your Keto Crisp Questions, Answered!
Can I make these in an air fryer?
Yes, you can! Place a small piece of parchment paper in your air fryer basket, spoon a few piles of the cheese mixture on top (don’t overcrowd!), and air fry at 375°F (190°C) for 3-5 minutes, until golden and bubbly. You’ll need to work in small batches.
Can I use different kinds of cheese?
Absolutely! This is a great recipe to experiment with. A mix of cheddar and Monterey Jack would be great, or try adding some smoked Gouda for a different flavor. Just make sure you’re using hard, shreddable cheeses.
What should I serve these with?
They are fantastic on their own, but they are born for dipping! Serve them with a side of guacamole, salsa, or sour cream. They also make an amazing crunchy topping for a bowl of keto chili or a taco salad.
Why did my crisps turn out chewy instead of crispy?
This usually means they weren’t baked for quite long enough. They need to get to that fully golden brown, bubbly stage for all the moisture to cook out, which is what makes them crisp up as they cool. Pop them back in the oven for another minute or two!
Final Thoughts: Your New Favorite Keto Snack
There is nothing more satisfying than discovering a snack that is both incredibly delicious and perfectly fits your healthy lifestyle. These Keto Cheddar Taco Crisps are a true game-changer—a simple, quick, and wildly flavorful way to conquer your crunchy cravings. They are guaranteed to be the MVP of your Super Bowl snack table. Happy Snacking!
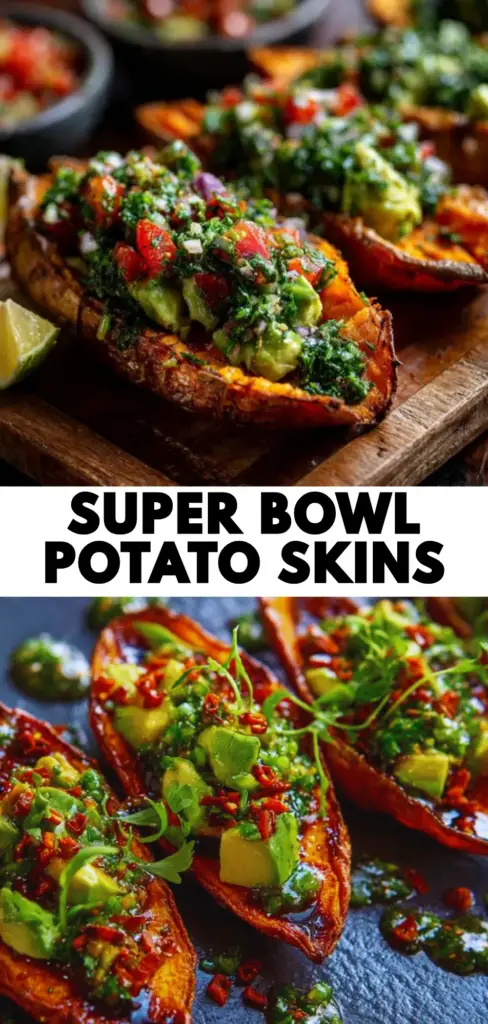
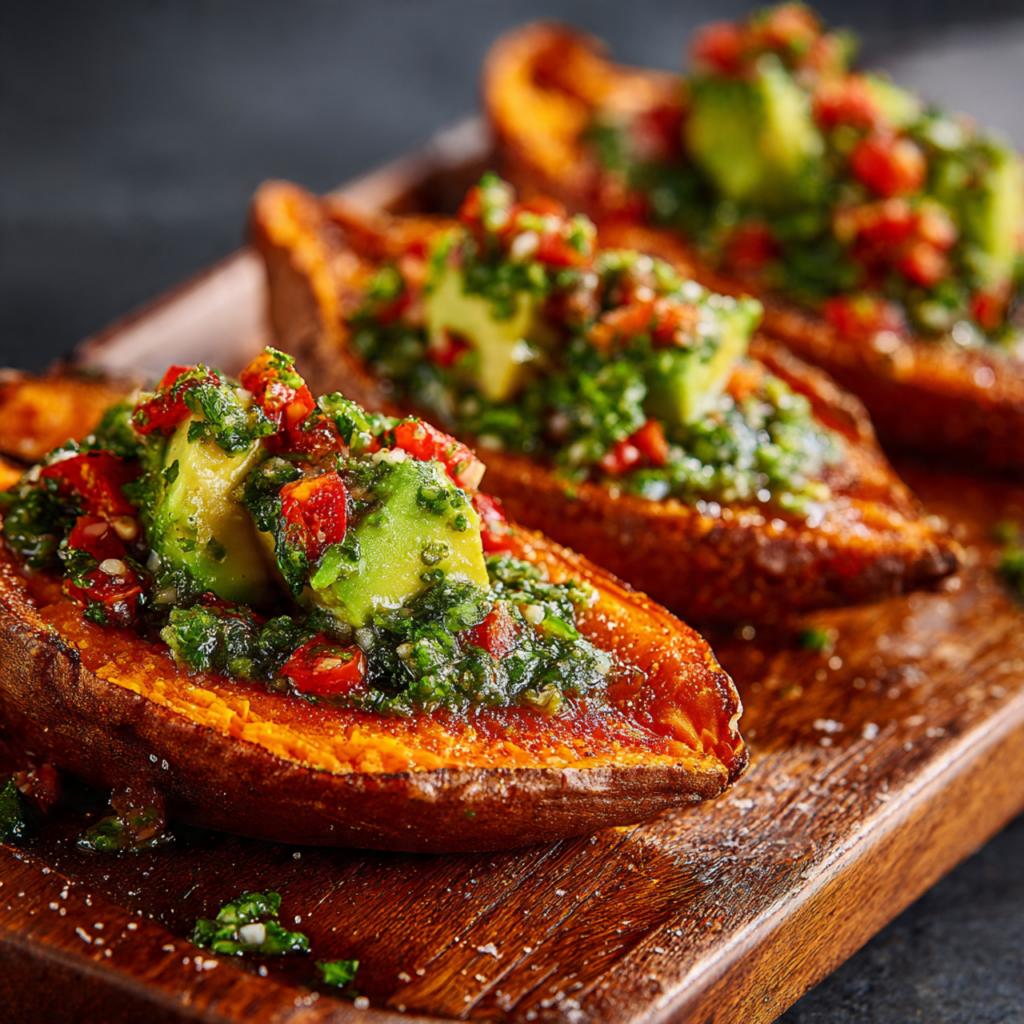
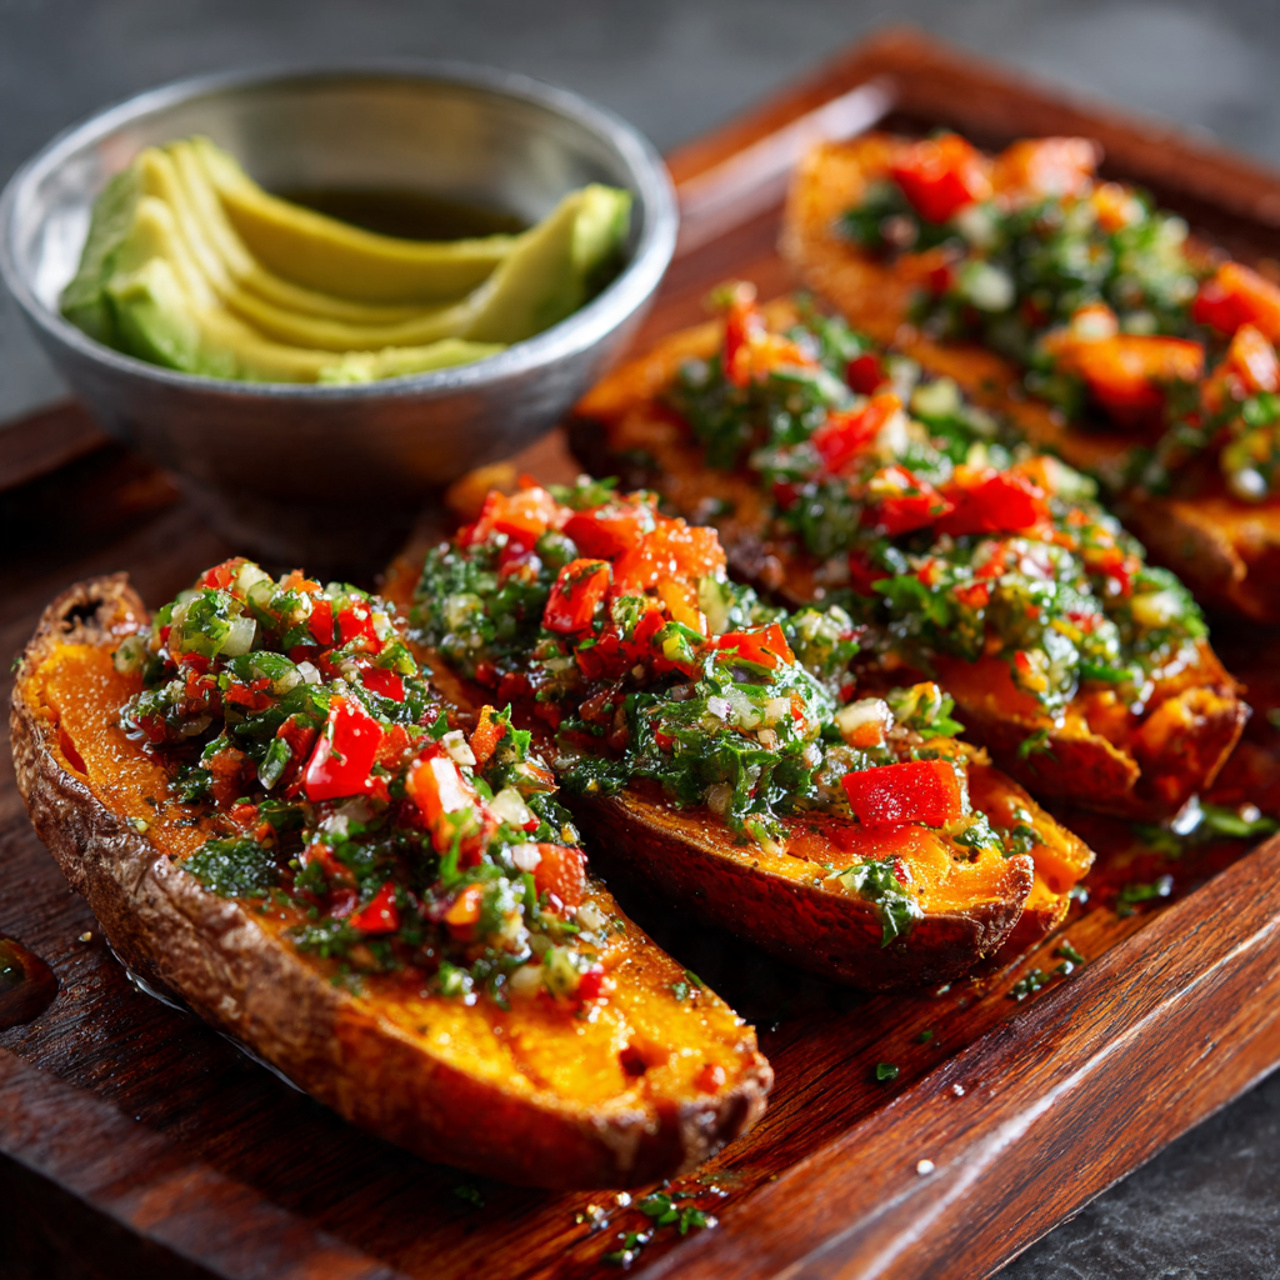
5. The Ultimate Sweet Potato Skins (Healthy Super Bowl Food!)

Imagine the ultimate game day snack: a perfectly crisp, salty potato skin, loaded with gooey melted cheese and delicious toppings. Now, imagine a healthier, more flavorful twist on that classic, using nutritious sweet potatoes as the base, topped with zesty salsa Verde, creamy avocado, and a final, surprising crunch. That, my friends, is the vibrant, ridiculously delicious magic of these Sweet Potato Skins. This is, without a doubt, the appetizer that will win your Super Bowl party.
I promise you, there is no greater game day triumph than pulling a tray of these colorful, crispy skins from the oven. The natural sweetness of the potato is the perfect canvas for the savory melted cheese, the tangy kick of salsa verde, the creamy avocado, and the genius crunch of the crushed black bean chips. It’s a true explosion of flavor and texture in every single bite.
Get ready to create the star of your Super Bowl spread, a healthier, more delicious take on a classic appetizer that will have everyone cheering.
Why These Sweet Potato Skins are a Game Day Champion
You are going to be completely amazed by how much flavor is packed into these healthy little bites. This recipe is a true winner. Here’s why:
- A Healthy, Flavorful Twist on a Classic: Using nutrient-rich sweet potatoes instead of regular potatoes adds a wonderful sweetness and a boost of vitamins.
- Incredible Sweet and Spicy Flavor Combo: The natural sweetness of the potato paired with the tangy, spicy salsa verde is an absolutely perfect and addictive flavor combination.
- Crispy Skins, Guaranteed: Our two-step baking process—first baking the skins on their own—ensures they get perfectly crisp and sturdy, ready for all those delicious toppings.
Recipe Snapshot
| Prep Time | 30 minutes (active) |
| Cook Time | 1 hour 30 minutes |
| Total Time | 3 hours (includes cooling) |
| Servings | 8 servings (3 pieces per person) |
| Calories | 225 kcal per serving (estimated) |
| Course | Appetizer, Snack |
| Cuisine | American, Tex-Mex |
| Difficulty/Method | Easy / Baking |
Your Shopping List for This Winning Appetizer
This vibrant and flavorful snack comes together with a handful of fresh, simple ingredients.
→ For the Sweet Potato Skins
- 6 medium sweet potatoes → About 2 ½ pounds total. Look for ones that are relatively uniform in size and shape.
- 3 tablespoons extra-virgin olive oil → Divided, for crisping the skins and adding a final drizzle.
- 1 cup shredded part-skim mozzarella → For that perfect, gooey, cheesy melt.
- 2 tablespoons grated Parmesan → Adds a salty, nutty flavor to the cheese topping.
- 2 scallions → Thinly sliced, for a mild, fresh oniony bite.
- ½ cup salsa verde → The zesty, tangy, and slightly spicy green salsa is the key to this recipe!
- ½ avocado → Pitted and cut into small pieces for a creamy finish.
- 1 cup black bean chips → Crushed, for a final, genius crunch and savory flavor.
Let’s Get Cooking! Your Step-by-Step Guide
Ready to make the best appetizer of the season? Let’s break it down.
Part 1: The Initial Potato Bake
- First Bake: Preheat your oven to 350°F (175°C). Place the whole sweet potatoes on a rimmed baking sheet and bake until they are completely fork-tender, about 40 to 50 minutes.
- Cool and Scoop: Let the potatoes cool completely. Once they’re cool enough to handle, slice each one in half lengthwise. Use a spoon to carefully scoop out most of the flesh, leaving about a ¼-inch border of potato attached to the skin. (Save that delicious scooped-out flesh for another use!)
Part 2: Crisping the Skins
- Second Bake: Increase the oven temperature to 400°F (200°C). Place a wire rack on a rimmed baking sheet. Arrange the hollowed-out potato skins skin-side up on the rack.
- Brush and Crisp: Brush the skins with 2 tablespoons of the olive oil. Bake until the skins are slightly browned and feel crisp to the touch, about 20 to 30 minutes. Let them cool completely.
- Cut into Pieces: Once cooled, cut each of the 12 halves in half crosswise to create 24 bite-sized pieces.
Part 3: The Final Bake and Topping
- Top and Melt: Arrange the crispy potato skin pieces skin-side down on the wire rack. Sprinkle each piece with a mix of the mozzarella, Parmesan, and sliced scallions.
- Final Melt: Bake for 8 to 10 minutes, or until the mozzarella is completely melted, gooey, and bubbly.
- Garnish and Serve: Remove the potato skins from the oven. Drizzle them with the remaining 1 tablespoon of olive oil. Top each one with a small spoonful of salsa verde, a few pieces of fresh avocado, and a final sprinkle of the crushed black bean chips. Serve immediately!
Crispy Sweet Potato Skins with Salsa Verde and Avocado
Ingredients
Equipment
Method
-
Preheat oven to 350°F. Place sweet potatoes on a baking sheet and bake until fork-tender, 40 to 50 minutes. Let cool completely.
-
Split each cooled potato in half lengthwise. Scoop out most of the flesh, leaving a 1/4-inch border.
-
Preheat oven to 400°F. Place a wire rack on a baking sheet. Arrange potato skins skin-side up on the rack and brush with 2 tablespoons of oil. Bake until skins are slightly browned and crisp, 20 to 30 minutes. Let cool completely.
-
Cut each cooled half crosswise to create 24 smaller pieces. Arrange them skin-side down on the rack.
-
Sprinkle each piece with mozzarella, Parmesan, and scallions. Bake until the mozzarella is melted and bubbly, 8 to 10 minutes.
-
Remove from the oven. Drizzle with the remaining tablespoon of oil. Top each skin with some salsa verde, avocado, and a sprinkle of crushed chips. Serve immediately.
Notes
Crispy Skin Secret: The second bake on a wire rack is essential for getting the skins perfectly crisp and sturdy. Don’t skip this step!
Leftover Potato Flesh: Save the scooped-out sweet potato flesh! It’s delicious mashed with butter and salt, or added to a quesadilla.
WiseRecipes’ Top Tips for the Crispiest Skins
These simple secrets are the key to achieving that perfect, crispy, restaurant-quality result.
- The Double Bake is a MUST. Do not skip the second bake where you crisp up the skins on their own! This is the essential step that dries out the skins and makes them sturdy and perfectly crispy, preventing a soggy final product.
- Bake on a Wire Rack. Placing the skins on a wire rack allows the hot air to circulate all around them, which is crucial for getting them evenly browned and crisped on all sides.
- Don’t Scoop Too Much! Be sure to leave a ¼-inch border of sweet potato flesh attached to the skin. This provides structure and a nice, soft interior to contrast with the crispy skin.
- Make Them Ahead! This is the ultimate game day prep hack. You can do the entire first bake (cooking the potatoes, scooping, and crisping the skins) a day in advance. Let them cool, store them in the fridge, and then just do the final topping and melting right before the party starts.
- Add Toppings Just Before Serving. For the best texture, the final toppings—salsa verde, avocado, and crushed chips—should be added right after the skins come out of the oven. This keeps the salsa fresh, the avocado green, and the chips crunchy!
Keep Them Fresh! Storing & Reheating
These are definitely at their best when served hot and fresh from the oven.
- Storage: If you do have leftovers, they can be stored in an airtight container in the refrigerator for up to 2 days. The chips will likely soften, but they will still be tasty.
- Reheating: The best way to reheat and re-crisp the skins is in an air fryer or a conventional oven. Place them on a baking sheet and heat at 375°F for about 5-8 minutes, until warmed through and crispy again.
FAQs: Your Sweet Potato Skin Questions, Answered!
Can I use regular potatoes instead of sweet potatoes?
Absolutely! This recipe and technique will work perfectly with classic russet potatoes for a more traditional potato skin experience. Just adjust the initial baking time as needed for the russets to become fork-tender.
Can I make these in an air fryer?
Yes, an air fryer is fantastic for making these! For the second “crisping” step, you can air fry the oiled skins at 400°F for about 10-15 minutes, until crisp. For the final melt, air fry the topped skins at 375°F for 3-5 minutes, until the cheese is bubbly.
What can I do with the scooped-out sweet potato flesh?
Don’t throw it away! The recipe has a great suggestion: mash it up and add it to a cheese quesadilla, or mix it with regular mashed potatoes for a beautiful marbled effect and extra flavor. You can also just reheat it with a little butter and salt for a simple, delicious side dish.
What are some other fun topping ideas?
Get creative! These would be delicious with a dollop of sour cream or Greek yogurt, some crumbled bacon or chorizo, or a sprinkle of fresh cilantro. A drizzle of your favorite hot sauce would also be a great addition.
Final Thoughts: Your New Game Day MVP
There is nothing better than a crowd-pleasing appetizer that is both incredibly delicious and secretly on the healthier side. These Sweet Potato Skins are the perfect balance of indulgent and wholesome, packed with flavor, and guaranteed to be a huge hit at your Super Bowl party. They are a true taste of victory. Happy Snacking and enjoy the game!
6. The Ultimate Super Bowl Bread Bowl Dip (Football-Shaped!)

Imagine the ultimate game day centerpiece: a warm, golden-brown, freshly baked bread bowl, shaped like a giant football, and filled to the brim with a ridiculously cheesy, creamy, and bubbly kale and artichoke dip. That, my friends, is the show-stopping, crowd-pleasing magic of this Super Bread Bowl Dip. This is, without a doubt, the most impressive and delicious appetizer you will ever bring to a football party.
I promise you, there is no greater feeling than placing this magnificent creation on your snack table. The bread is soft and warm, the dip is a perfect harmony of creamy, cheesy goodness with tender kale and artichoke hearts, and the presentation is an absolute touchdown. It’s a complete, interactive appetizer that has the dip and the dippers all in one.
Get ready to create the most talked-about, photographed, and devoured dish at your next game day gathering.

Why This Football Bread Bowl is a Guaranteed Touchdown!
You are going to be so incredibly proud of this amazing and delicious creation. It’s a true party MVP. Here’s why you have to make it:
- The Ultimate Game Day Show-Stopper: The football shape is an absolute show-stopper, making this the perfect, must-have centerpiece for any Super Bowl party or tailgate.
- Incredibly Cheesy and Delicious Dip: The dip is a rich and flavorful blend of three cheeses—cream cheese, cheddar, and Parmesan—with tender kale and artichokes. It’s unbelievably good.
- Surprisingly Easy to Make: Don’t be intimidated by the shape! Using refrigerated French bread dough makes creating the football bowl incredibly simple and foolproof.
- Dip and Dippers All in One: Not only is the bowl itself edible and delicious for tearing and dipping, but it’s also perfect served with extra pita chips or veggies.
- Perfect for a Crowd: This is a substantial, hearty dip that is designed to be shared and enjoyed by a crowd of hungry fans.
Recipe Snapshot
| Prep Time | 10 minutes |
| Cook Time | 45 minutes |
| Total Time | 55 minutes |
| Servings | 10 servings |
| Calories | 492 kcal per serving |
| Course | Appetizer, Snack |
| Cuisine | American |
| Difficulty/Method | Easy / Baking |
Your Shopping List for the Big Game
This recipe uses a smart shortcut and a fantastic mix of cheeses and veggies. Here’s what you’ll need:
→ For the Football Bread Bowl
- 3 (11-oz.) tubes refrigerated French bread dough → The secret to our easy and impressive edible bowl.
- 1 large egg → Mixed with a tablespoon of water for the perfect golden-brown egg wash.
→ For the Cheesy Kale Artichoke Dip
- 1 bunch Tuscan kale → About 6 cups, with the tough ribs and stems removed.
- 1 (15-oz.) can artichoke hearts → Drained and chopped.
- 1 (8-oz.) block cream cheese → Softened to room temperature for a smooth, creamy base.
- 1 ½ cups shredded white cheddar → For a sharp, cheesy flavor.
- ½ cup finely grated Parmesan → For a salty, nutty bite.
- ½ cup ricotta → Adds a wonderful, light creaminess to the dip.
- 2 cloves garlic → Finely chopped.
- Kosher salt & Freshly ground black pepper → To taste.
- Pita chips → For extra dipping!
Let’s Make a Super Bowl! Your Step-by-Step Guide
Ready to create the ultimate party appetizer? This is a fun and rewarding process!
Part 1: Shape and Bake the Football Bread Bowl
- Prep the Oven and Dough: Preheat your oven to 350°F. On a large baking sheet, unroll and spread out one tube of the bread dough to form a flattened oval base.
- Form the Football: Using your hands, roll the remaining two tubes of dough into long, 15-inch logs. Place these logs on top of the flattened dough base, shaping them to form the raised “walls” of a football. Pinch the ends together and secure them with toothpicks.
- Create the Laces: Trim the excess flat dough from around the outside of your football shape. Use these scraps to form the decorative laces for the football. Arrange the laces next to the bread bowl on the baking sheet for now—we’ll add them later.
- Bake the Bowl: Brush the entire surface of the dough (both the bowl and the loose laces) with the egg wash. Bake until the bread is a light golden brown, about 20 minutes.

Part 2: Mix the Dip and Final Bake
- Prep the Kale: While the bread bakes, blanch the kale. Drop the chopped kale leaves into a large pot of boiling salted water for just 1 minute until they turn bright green. Immediately drain and pat them very dry with paper towels.
- Mix the Dip: In a large bowl, combine the blanched kale, chopped artichokes, softened cream cheese, shredded cheddar, Parmesan, ricotta, and chopped garlic. Season generously with salt and pepper and mix until well combined.
- Fill and Decorate: Carefully transfer the cheesy dip mixture into your partially baked bread bowl. Arrange the pre-baked dough laces on top of the dip to look like the laces of a football.
- Final Bake: Return the filled bread bowl to the oven and bake for another 15 to 20 minutes. The dip is ready when it’s hot, golden brown on top, and bubbly around the edges. Serve hot with pita chips for dipping!

Super Bowl Football Bread Bowl Dip
Ingredients
Equipment
Method
-
Preheat oven to 350°. On a baking sheet, flatten 1 tube of dough. Roll remaining 2 tubes into 15″-long logs.
-
Form logs into a football shape on top of the flattened dough to create walls, securing ends with toothpicks. Trim the outside dough and use scraps to form laces. Brush all dough with egg wash.
-
Bake the empty bread bowl and laces until lightly golden, about 20 minutes.
-
Meanwhile, blanch kale in boiling salted water for 1 minute. Drain and pat very dry.
-
In a large bowl, combine the dried kale, artichokes, cream cheese, cheddar, Parmesan, ricotta, and garlic. Season with salt and pepper.
-
Transfer the dip to the par-baked bread bowl. Arrange the baked dough laces on top of the dip.
-
Bake until the dip is golden and bubbly, 15 to 20 minutes more. Serve hot with chips.
Notes
Par-Bake the Bowl: Baking the bread bowl before adding the filling is a key step to ensure the bread is cooked through and doesn’t get soggy.
Make-Ahead: You can prepare the dip mixture up to 2 days in advance. On game day, just shape and bake the bread bowl, fill, and do the final bake.
WiseRecipes’ Top Tips for a Touchdown Dip
These simple secrets will help you achieve flawless, delicious results every time.
- Use Refrigerated Dough for Ease. This is the ultimate shortcut and it works perfectly. Don’t stress about making bread from scratch; the refrigerated dough logs are easy to shape and bake up beautifully.
- Dry Your Kale Thoroughly! After blanching the kale, it’s crucial to pat it as dry as possible with paper towels or even give it a spin in a salad spinner. Removing excess water prevents your final dip from being watery.
- Soften Your Cream Cheese. For a perfectly smooth, creamy dip without any lumps, make sure your cream cheese is fully softened to room temperature before you start mixing.
- Par-Bake the Bread Bowl. The initial 20-minute bake for the empty bread bowl is a crucial step. It ensures the bread is sturdy and cooked through before you add the wet dip filling, preventing a soggy bottom.
- Don’t Forget the Egg Wash. Brushing the dough with an egg wash before baking is what gives the football bread bowl that beautiful, shiny, deep golden-brown finish.
Keep It Fresh! Storing and Reheating
This is one spectacular dish that is definitely at its best when served fresh from the oven.
- Make-Ahead Prep: You can save a lot of time on game day! Prepare the entire dip mixture up to 2 days in advance and store it in an airtight container in the fridge. On party day, all you need to do is shape and par-bake the bread bowl, fill it, and do the final bake.
- Storing Leftovers: If you have leftovers, you can store the dip and any remaining bread in separate airtight containers in the refrigerator for up to 3 days. The bread bowl itself will get soft from the dip as it sits.
- Reheating: Gently reheat the leftover dip in the microwave or in a small saucepan over low heat until warm.
FAQs: Your Bread Bowl Dip Questions, Answered!
Can I use spinach instead of kale?
Yes, absolutely! A classic spinach and artichoke dip would be fantastic here. Use a 10-ounce package of frozen spinach, thawed and squeezed very, very dry, as a substitute for the fresh kale.
Can I use a different kind of bread dough?
You can! Refrigerated pizza dough would also work well for shaping the bowl. The texture will just be a bit chewier, more like a pizza crust, which is also delicious!
What other cheeses would work well in the dip?
This dip is very forgiving. You could swap the white cheddar for a sharp yellow cheddar, Gruyère, or Monterey Jack. You could also substitute the ricotta with a little sour cream for a tangier flavor.
Can I make this in a regular bowl instead of a football?
Of course! If you’re short on time, you can bake the dip in a standard 1.5-quart ovenproof dish at 350°F for 20-25 minutes until bubbly and serve it with chips, crackers, or slices of toasted baguette.
Final Thoughts: Your Game Day Centerpiece
There is such a wonderful sense of fun and occasion that comes from creating a themed dish that is as delicious as it is creative. This Football Bread Bowl Dip is the ultimate game day appetizer, a guaranteed crowd-pleaser that will disappear before halftime. I hope it brings a lot of cheers and happy fans to your party. Enjoy!
7. High-Protein Cheeseburger Bowls Recipe – Low-Carb Meal Prep with Ground Beef & Burger Sauce
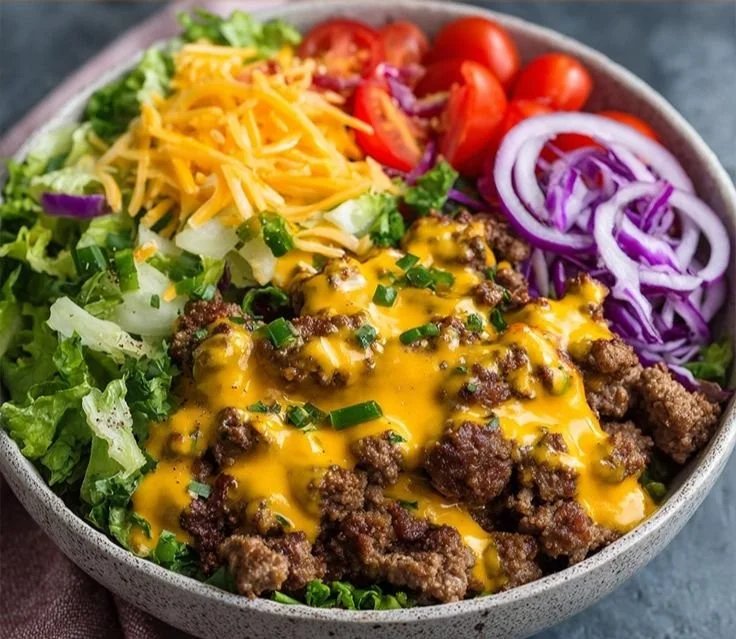
There’s something incredibly satisfying about a meal that not only tantalizes your taste buds but also aligns perfectly with your healthy eating goals. Introducing my High-Protein Cheeseburger Bowls—where juicy, seasoned ground beef meets fresh, crisp veggies, and rich flavors come together in a glorious dance of deliciousness. This dish delights your senses while keeping your carb count in check, making it the ideal weeknight dinner or meal prep option to kick your health journey into high gear!
This Dish is a Must-Try
Why should you roll up your sleeves and whip up these amazing cheeseburger bowls this week? Let me share a few reasons:
- Super Satisfying: Packed with protein from the ground beef and eggs, every bite keeps you feeling full and satisfied. It’s the kind of meal that keeps those hunger pangs at bay.
- Endless Customization: Whether you’re in the mood for additional toppings or different bases, these bowls can be tailored to your preferences. Swap out ingredients or throw in some of your favorites!
- Meal Prep Magic: The bowls are perfect for prepping ahead of time. You can easily portion them out for the week and have a nutritious lunch or dinner ready to go!
- Flavor Explosion: Savory flavors abound, thanks to the burger sauce made from Greek yogurt, mustard, and ketchup. This unique twist packs a punch that makes every bite feel like a treat.
- Low-Carb Friendly: With plenty of fiber-rich veggies and a focus on protein, this recipe is a perfect go-to for low-carb lifestyles without skimping on taste.
Now that we’ve established why these cheeseburger bowls are incredible, let’s dive into the ingredients.
Gathering Your Ingredients
Before we begin cooking, let’s gather everything you’ll need to make these High-Protein Cheeseburger Bowls shine in your kitchen:
- 1 lb lean ground beef or turkey (90% lean): The star of the dish, delivering a hearty protein punch.
- Salt, pepper, garlic powder, onion powder: Basic seasonings bring out the meaty flavors and enhance every component of the meal.
- 4 cups chopped lettuce: Alternatively, you can use 2 cups of cooked quinoa, brown rice, or cauliflower rice for that carb base. The crunchy lettuce adds freshness.
- 1 cup cherry tomatoes, halved: These sweet bursts of flavor add color and freshness, balancing the richness of the beef.
- ½ cup sliced dill pickles: Bright and tangy, these pickles add that classic burger taste!
- ½ red onion, thinly sliced: A touch of sharpness that elevates the entire bowl.
- 1 cup shredded cheddar or American cheese: Melty and comforting, providing that cheeseburger experience.
- 1 avocado, sliced: Creamy and packed with healthy fats, it rounds out the dish beautifully.
- 4 strips cooked bacon: Optional but highly recommended! The crunch and smokiness add an irresistible twist.
- Jalapeño slices: For a spicy kick—just a little heat to the mix if you’re feeling adventurous.
- 4 fried eggs: These are the crowning jewel, bringing richness to the bowl.
- ½ cup low-fat Greek yogurt: The base for your sauce—rich in protein and a creamy alternative to mayonnaise.
- 1 tbsp mustard & 1 tbsp ketchup: For that classic burger flavor, bringing both tang and sweetness.
- ½ tsp garlic powder & ½ tsp paprika: For extra depth and warmth.
- Salt and pepper to taste: Always essential for seasoning!
With all these lovely ingredients gathered, let’s get cooking!
Crafting Your Perfect Cheeseburger Bowls
Putting together these delightful bowls is as simple as pie! Here’s the step-by-step breakdown to help you create a masterpiece:
- Cook the meat: In a skillet over medium heat, crumble the ground beef or turkey. Season with salt, pepper, garlic powder, and onion powder as it cooks. Stir regularly until the meat is browned and cooked through (about 8–10 minutes). Once done, drain any excess fat to keep things light.
- Prepare the base: While the meat is cooking, you can chop the lettuce or, if you prefer, cook your grains or cauliflower rice based on your choice of base.
- Prep your toppings: Slice the cherry tomatoes, pickles, red onion, and any optional add-ons like jalapeños or bacon.
- Make the sauce: In a mixing bowl, whisk together the Greek yogurt, mustard, ketchup, garlic powder, paprika, salt, and pepper until smooth. This sauce is where the magic happens!
- Assemble the bowls: Start layering! Place your base in the bottom, followed by the cooked meat, toppings, and a generous handful of cheese. Drizzle the sauce over the top to tie everything together.
- Optional finish: For the pièce de résistance, top each bowl with a fried egg, crispy bacon, or slices of creamy avocado. These additions are optional, but they add flair and extra goodness!
Pro Tips for Perfection
As your friendly kitchen companion, here are some expert tips to elevate your cheeseburger bowls:
- Choose Quality Meat: Opt for lean ground beef or turkey to keep your bowls light. If you prefer beef, grass-fed or organic is usually tastier.
- Customize your sauce: Feel free to balance out the flavor with smoked paprika or hot sauce for an extra kick. You can also add a splash of pickle juice to your sauce for an even bigger flavor boost!
- Egg Cooking Options: If frying eggs isn’t your thing, try poaching or scrambling them. Each method brings its own charm to the bowl.
- Store Ingredients Separately: If you’re prepping for the week, keep your components separate until you’re ready to eat. This ensures everything stays fresh and crisp!
- Seasonation is Key: Always taste as you go! Adjust spices and seasoning until your palate dances with joy—everyone’s taste buds are different!
Ways to Change It Up
Though the original recipe is nothing short of fantastic, there’s always room for creativity in the kitchen! Here are some ways to make your High-Protein Cheeseburger Bowls your own:
- Swap the Protein: Instead of ground beef, use shredded chicken or turkey. Vegetarian lovers can even use black beans or lentils for a plant-based protein punch.
- Base Alternatives: Try zucchini noodles for a refreshing twist or even sweet potatoes for a hint of sweetness in your bowls!
- Create a Southwest Version: Use black beans, corn, avocado, and a lime-cilantro dressing for a zesty spin.
- Experiment with Cheese: Blend in some pepper jack or feta cheese for a different flavor profile that complements your toppings.
- International Flare: Think about adding herbs and spices to focus on a different cuisine. Try Italian seasoning with sundried tomatoes or taco seasoning for a Tex-Mex flavor.
Bringing It to the Table
When serving your High-Protein Cheeseburger Bowls, presentation is key! Arrange the colorful vegetables in a swirling fashion, and don’t shy away from draping that vinaigrette sauce generously over everything. This beautiful arrangement not only tempts the appetite but makes every bite a feast for the eyes!
Pair these bowls with a light and tangy side salad or juicy slices of grilled veggies for a delightful dinner experience. The freshness of the salad will complement the rich flavors of the bowls, creating a harmonious meal that hits all the right notes.
Saving for Later
If any deliciousness remains after your meal, here’s how to keep everything fresh and tasty for future lunches or dinners:
- Refrigerate Properly: Seal the bowls in airtight containers and store in the refrigerator for up to four days.
- Freeze for Longevity: If you want to extend their life, meat and toppings can be frozen in a separate container for up to three months. Just remember to cool them completely before freezing.
- Reheat Wisely: When you’re ready to enjoy your bowls again, gently reheat your meat and toppings in the microwave, or for better texture, on the stovetop until heated through. Fresh toppings should always be added after reheating!
Your Questions Answered
As always, I’m here to help! Here’s a few commonly asked questions about these cheeseburger bowls:
-
Can I make this recipe ahead of time?
Absolutely! These cheeseburger bowls are great for meal prep, and you can prepare all components and store them separately in the fridge for quick assembly during the week. -
Is this recipe kid-friendly?
Definitely! Kids love burgers, and these bowls present an exciting way to get them involved in meal prep. They can customize their own bowl with their favorite toppings! -
Can I make it vegetarian?
Sure! Substitute the meat with a plant-based protein like lentils or black beans. Plus, add more colorful veggies for a veggie-packed bowl! -
What’s the best way to serve leftovers?
Leftovers taste amazing! Warm everything gently to retain the texture, and toss in a few fresh toppings for that just-made feel.
I hope you’re excited to make these High-Protein Cheeseburger Bowls! They’re nourishing, customizable, and full of flavor—what more could you want? Give this recipe a try, and I promise you’ll be making it again and again, finding new favorite variations along the way. Happy cooking!
High-Protein Cheeseburger Bowls
Ingredients
Method
-
In a skillet over medium heat, crumble the ground beef or turkey. Season with salt, pepper, garlic powder, and onion powder as it cooks.
-
Stir regularly until the meat is browned and cooked through (about 8–10 minutes). Drain any excess fat.
-
While the meat is cooking, chop the lettuce or cook your chosen grains according to package instructions.
-
Slice the cherry tomatoes, pickles, red onion, and optional ingredients like jalapeños or bacon.
-
In a mixing bowl, whisk together the Greek yogurt, mustard, ketchup, garlic powder, paprika, salt, and pepper until smooth.
-
Layer your base at the bottom of the bowl, followed by the cooked meat, toppings, and a generous handful of cheese.
-
Drizzle the sauce over the top to tie everything together.
-
Top each bowl with a fried egg, crispy bacon, or avocado slices as desired.
Notes
8. Spicy Ground Beef Stir-Fry Bowl with Garlic Veggies & Steamy Rice
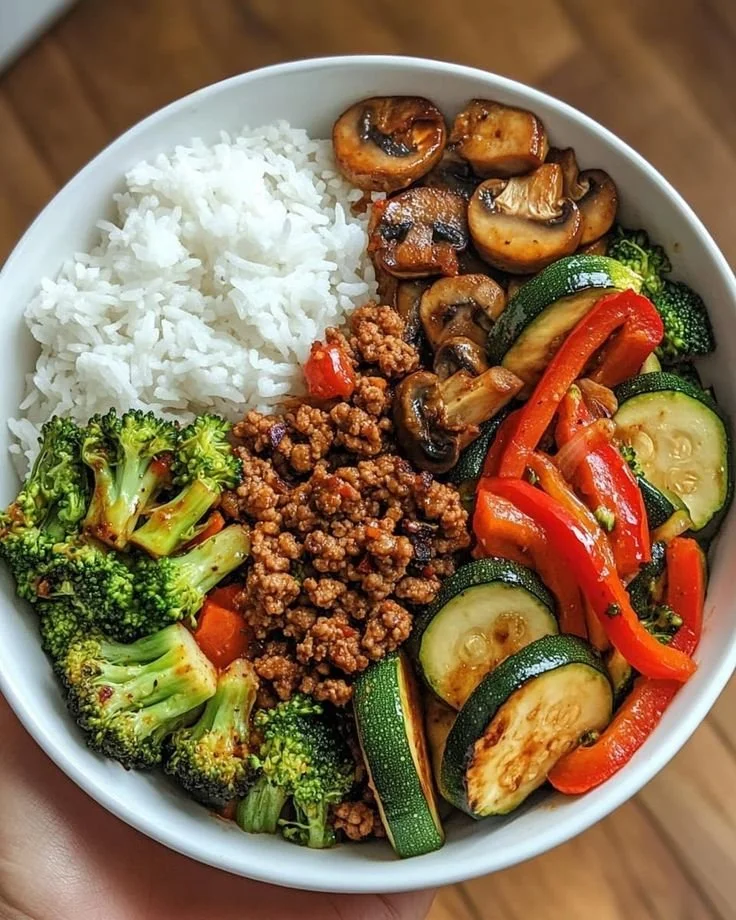
It’s one of those busy weeknights where dinner needs to be delicious, satisfying, and on the table in a flash. Enter my Spicy Ground Beef Stir-Fry Bowl with Garlic Veggies & Steamy Rice! This dish is a culinary hug in a bowl, bursting with vibrant colors and a medley of flavors that will dance on your palate. The moment you mix the tender, savory beef with an array of crunchy vegetables and fluffy rice, you’ll feel the love that went into making this quick and wholesome meal!
Why This Dish is a Must-Try
- Flavor Explosion: Each bite boasts a tantalizing blend of spicy, savory, and slightly sweet notes. The addition of chili flakes brings an inviting heat that complements the juicy ground beef beautifully.
- Quick and Easy: In just about 30 minutes, you can whip up this mouthwatering meal. It’s perfect for those evenings when you need to put something together quickly yet enjoy a homemade dish.
- Nutritious Goodness: Packed with colorful veggies like broccoli and bell peppers, this stir-fry isn’t just a treat for your taste buds; it’s also a delight for your body, keeping you energized and satisfied.
- Versatile and Customizable: Whether opting for chicken, tofu, or a variety of different vegetables, you have complete control over the components, making it a dish you can make your own every time.
- Comfort Food Vibes: There’s something undeniably comforting about a stir-fry bowl, especially when served piping hot over a bed of rice. It’s the kind of meal that invites you to settle in and savor every bite.
Gathering Your Essentials
Before diving into this culinary adventure, let’s gather our ingredients. Each component plays a vital role in the symphony of flavors we’re about to create.
- ½ pound ground beef: This will provide the hearty base of our stir-fry, ensuring each bite is packed with protein and flavor.
- 2 cloves garlic, minced: Fresh garlic is the aromatic superstar that will infuse our dish with warmth and richness.
- 2 tablespoons soy sauce: A must-have for that umami depth, giving the beef a savory glaze.
- ½ teaspoon chili flakes: For that perfect kick! Adjust to your preferred spice level.
- 1 teaspoon sesame oil: Adds a nutty undertone and a hint of sophistication to our stir-fry.
- 1 teaspoon brown sugar: Just a touch to balance the flavors and enhance the richness of the beef and sauce.
- 1 cup broccoli florets: These add vibrant green color and a satisfying crunch.
- ½ red bell pepper, sliced into strips: Sweet and juicy, the bell pepper pairs perfectly with the spiciness.
- ½ zucchini, sliced: A delightful addition that brings a lovely texture to the dish.
- ½ cup mushrooms, sliced: Earthy and full of umami, mushrooms elevate the overall flavor.
- 1 tablespoon olive oil: Used for sautéing the veggies, lending a beautiful sheen and flavor.
- 1 cup steamed white rice: The comforting base for our stir-fry, creating a perfect canvas for the delicious toppings.
Crafting Your Perfect Bowl
Let’s get to the fun part—bringing this dish to life! Here’s how to make your Spicy Ground Beef Stir-Fry Bowl with Garlic Veggies & Steamy Rice step by step.
-
Prepare your veggies: Start by washing and chopping all of your vegetables. Mince the garlic and measure out the sauces and seasonings so everything is ready when you begin cooking.
-
Cook the beef: In a skillet over medium-high heat, add the sesame oil and minced garlic. Cook for about 30 seconds until it’s beautifully fragrant—trust me, this will make your kitchen smell amazing! Add the ground beef to the skillet and sauté until it’s nicely browned, breaking it into small pieces as it cooks.
-
Add flavor: Stir in the soy sauce, chili flakes, and brown sugar. Allow the mixture to simmer for about 3-4 minutes until it thickens slightly. Once done, remove it from the heat.
-
Sauté the veggies: In a separate pan, heat the olive oil over medium heat and sauté the minced garlic for about 30 seconds until fragrant. Then, toss in the sliced mushrooms and cook for around 2 minutes until they begin to soften.
-
Get your crunch: Add in the broccoli, zucchini, and red bell pepper to the pan, and stir-fry everything together for about 4-5 minutes until the vegetables are tender-crisp. Drizzle in a bit more soy sauce for an extra kick, and give everything a good toss.
-
Serve it up: Take your steaming white rice and spoon it into bowls. Carefully arrange the beef and sautéed veggies over the grains, either side by side or piled on top. Don’t forget to spoon any extra sauce over the top for that added burst of flavor!
Tips for a Flawless Finish
- Prep is key: Take a few minutes to chop and measure everything before starting. It keeps the cooking process seamless and enjoyable!
- Use high heat: Don’t shy away from cooking on medium-high heat. It helps achieve that signature stir-fry texture—tender yet crisp!
- Choosing your beef: If you prefer a leaner option, ground turkey or chicken will work beautifully in this recipe. Just be mindful of adjusting cooking times as needed.
- Don’t overcrowd the pans: When sautéing vegetables, if your pan looks cramped, work in batches. Proper spacing allows for even cooking and that delightful browning.
- Taste as you go: Adjust the seasoning to your liking! If you adore more heat, sprinkle in extra chili flakes or a dash of hot sauce right before serving.
Let Your Creativity Shine
Feeling inspired? There are so many ways to give your Spicy Ground Beef Stir-Fry Bowl a unique flair! Here are a few variations to consider:
- Switch up the protein: Swap the ground beef for ground turkey, chicken, or even a plant-based protein like tempeh for a vegetarian option.
- Experiment with veggies: Toss in snap peas, carrots, or green onions. Seasonal veggies can add delightful freshness and color.
- Add a sauce twist: Instead of soy sauce, try hoisin or teriyaki sauce for a sweeter alternative, or experiment with a spicy Szechuan sauce if you love heat!
- Make it a grain bowl: Use brown rice, quinoa, or cauliflower rice instead of white rice for a different texture—and a boost in nutrients.
- Top it off: Garnish your bowl with sesame seeds or chopped cilantro for an extra pop of flavor and color.
How to Serve and Enjoy
When it comes to serving this beautiful dish, think colorful and inviting! Take a deep serving bowl and spoon in the fluffy white rice—its cloud-like softness complements the dish beautifully. Then, build your masterpiece by layering the aromatic beef and glistening veggies right on top. Drizzling that savory sauce over the arrangement creates a lavish finish you can’t resist.
You can take it a step further by pairing your stir-fry bowl with a simple side salad or some crispy spring rolls for an extra crunch. For those hot days, consider serving it with refreshing iced tea or sparkling water to cleanse your palate between bites. Each dish can turn this simple meal into a bustling feast fit for friends and family.
Keeping It Fresh for Later
After enjoying this flavorful dish, you might wonder how to store your leftovers. Here’s everything you need to know to keep your Spicy Ground Beef Stir-Fry Bowl fresh!
- Refrigeration: Allow the dish to cool completely before transferring it to an airtight container. It can be stored in the fridge for up to 3-4 days.
- Freezing: If you’d like to keep it longer, you can freeze it in a freezer-safe container for up to 2-3 months. Just make sure to separate the rice from the beef and veggies; this way, everything stays fresh when you reheat.
- Reheating methods: When you’re ready to enjoy your leftovers, reheat in the microwave or on the stovetop. If using the microwave, add a splash of water to keep the rice from drying out. Stir-fry bowls are best enjoyed hot!
Your Questions Answered
-
Can I use frozen vegetables? Absolutely! Frozen veggies can be a great time-saver. Just toss them in directly, adding a couple of extra minutes to your cooking time.
-
Is this dish gluten-free? If you use gluten-free soy sauce or tamari, this stir-fry can easily fit into a gluten-free diet!
-
Can I make this vegan? Definitely! Substitute the ground beef with plant-based alternatives, such as lentils or a meatless burger crumbled up.
-
How spicy is this dish? The level of heat really depends on your personal taste and how many chili flakes you decide to incorporate. Start with a little and add more as you go!
For those busy family nights or laid-back weekends, the Spicy Ground Beef Stir-Fry Bowl with Garlic Veggies & Steamy Rice fills your kitchen with mouthwatering aromas and your hearts with warmth. It’s a simple yet delightful dish that’s both satisfying and vibrant—inviting you to gather around the table and share stories over the hearty flavors. So why not give it a try? Your taste buds will thank you!
Spicy Ground Beef Stir-Fry Bowl
Ingredients
Method
-
Wash and chop all vegetables. Mince the garlic and measure out sauces and seasonings.
-
In a skillet over medium-high heat, add sesame oil and minced garlic. Cook for about 30 seconds.
-
Add ground beef, sautéing until browned and breaking into small pieces.
-
Stir in soy sauce, chili flakes, and brown sugar. Simmer for about 3-4 minutes until thickened.
-
Remove from heat.
-
In a separate pan, heat olive oil over medium heat. Sauté garlic for 30 seconds.
-
Add sliced mushrooms and cook for around 2 minutes until softened.
-
Add broccoli, zucchini, and red bell pepper. Stir-fry for 4-5 minutes until tender-crisp.
-
Spoon the steamed rice into bowls. Arrange beef and sautéed veggies on top.
-
Drizzle with any extra sauce and enjoy!
Notes
9. Honey Mustard Chicken Quinoa Bowl
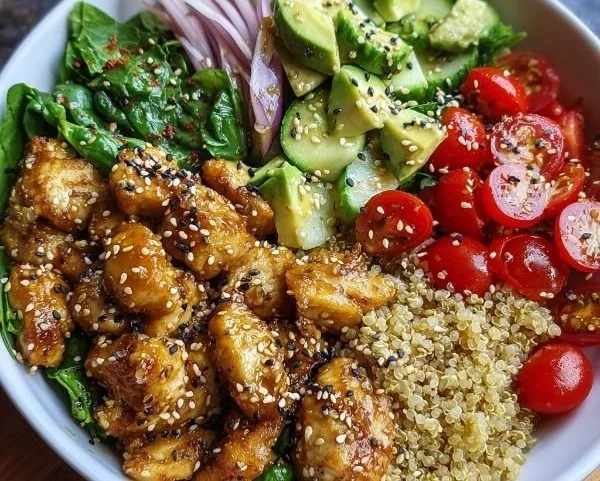
There’s something irresistible about a dish that can wrap you in comfort while bustling with vibrant flavors and wholesome goodness. The Honey Mustard Chicken Quinoa Bowl does just that! Picture tender, golden-brown chicken coated in a sticky, sweet, and tangy honey mustard sauce, resting atop a fluffy bed of quinoa paired with crisp veggies. It’s a nourishing meal that is not only satisfying but also bursting with a symphony of flavors, perfect for a quick weeknight dinner or a cozy weekend lunch.
Why Honey Mustard Chicken Quinoa Bowl Will Brighten Your Day
-
Nutritionally Packed: Quinoa is a superfood, rich in protein and fiber, and provides a great base for a well-rounded meal. Combined with veggies and lean chicken, this bowl is a powerhouse of nutrition.
-
Flavor Harmony: The delightful combination of honey and Dijon mustard creates a deliciously sticky sauce that brings everything together. It’s a sweet, tangy embrace for the chicken that you just can’t resist!
-
Quick and Easy: This recipe is a breeze to whip up in about 30 minutes, making it ideal for those busy evenings when you want something delicious without a long prep time.
-
Versatile Ingredients: Feel free to customize! You can swap out vegetables or modify the protein to suit your cravings or dietary needs.
-
Meal Prep Friend: The bowl holds up beautifully for meal prep, ensuring you have tasty lunches or quick dinners ready to go throughout the week. Just make sure to keep the dressing separate until you’re ready to dig in!
Your Shopping List
Let’s gather the wonderful ingredients that give life to this dish. Each component plays a crucial role in making the Honey Mustard Chicken Quinoa Bowl both delicious and nutritious.
- 1 cup quinoa: A fantastic source of protein and fiber, quinoa serves as the hearty base of this dish.
- 2 cups water: This will cook the quinoa to fluffy perfection.
- 2 tablespoons olive oil: For sautéing the chicken, adding healthy fats, and flavor.
- Salt and pepper: Simple yet essential for enhancing all the flavors.
- 1 lb boneless, skinless chicken breasts, cut into bite-sized pieces: Lean protein that absorbs the sauce beautifully.
- 1/4 cup honey: The star ingredient that adds sweetness and a sticky texture.
- 1/4 cup Dijon mustard: Offers that delicious tang that contrasts nicely with the honey.
- 1 tablespoon apple cider vinegar: A touch of acidity brightens the overall flavor profile.
- 1 tablespoon soy sauce: Enhances umami notes and contributes to a well-rounded taste.
- 1 teaspoon garlic powder: Adds an aromatic depth that complements all the other ingredients.
- 1 cup baby spinach: A handful of greens for freshness and a nutritional boost.
- 1/2 cup cherry tomatoes, halved: Sweet bursts of flavor and color.
- 1/2 cup cucumber, diced: Adds a refreshing crunch.
- 1/4 cup red onion, thinly sliced: A bit of tang and sweetness, balancing the dish.
- 1 avocado, sliced: Creamy goodness that ties everything together.
- 1 tablespoon sesame seeds (optional): For a sprinkle of texture and a nutty finish.
Crafting Your Perfect Honey Mustard Chicken Quinoa Bowl
Ready to get cooking? Follow these simple steps to create a bowl that will leave you feeling nourished and satisfied:
- Rinse the quinoa under cold water. This helps remove the natural coating that can make it taste bitter.
- In a medium saucepan, combine the quinoa and 2 cups of water. Bring to a boil, then reduce the heat to low. Cover and simmer for 15 minutes, or until the quinoa is fluffy and all the water is absorbed. Fluff with a fork and season with salt and pepper to taste.
- While the quinoa is cooking, heat one tablespoon of olive oil in a large skillet over medium-high heat. Add the chicken pieces, season with salt and pepper, and cook until the chicken is browned and cooked through (about 6-8 minutes). Remove from the skillet and set aside.
- In the same skillet, add the honey, Dijon mustard, apple cider vinegar, soy sauce, and garlic powder. Stir to combine, letting it simmer for 2-3 minutes until the sauce thickens slightly.
- Return the cooked chicken to the skillet and toss to coat it evenly with the honey mustard sauce. Cook for another 2 minutes to heat through.
- In a large bowl, combine the cooked quinoa, baby spinach, cherry tomatoes, cucumber, and red onion. Drizzle with the remaining tablespoon of olive oil, and season with salt and pepper. Toss gently to mix.
- Divide the quinoa salad into bowls. Top with the honey mustard chicken, sliced avocado, and sprinkle with sesame seeds if you’re feeling fancy.
Helpful Hints for Your Cooking Journey
-
Quinoa Tip: For extra flavor, try cooking the quinoa in vegetable broth instead of water. It adds a rich depth to the dish.
-
Chicken Cooking: Ensure your chicken is cut into even pieces to guarantee consistent cooking. Nobody wants a dry chicken piece!
-
Sauce Adjustment: Don’t be afraid to tweak the honey or mustard levels to match your taste preferences. If you love a spicier kick, add some crushed red pepper flakes.
-
Freshness Check: Always taste as you go! Adjust seasonings along the way to find your perfect balance.
Mix It Up: Creative Variations for Your Bowl
Feeling adventurous? Here are some fun twists to make this Honey Mustard Chicken Quinoa Bowl your own:
-
Add Extra Veggies: Toss in roasted bell peppers, zucchini, or even some snap peas for a delightful crunch and color.
-
Grain Swap: Swap quinoa for brown rice, farro, or even cauliflower rice for a lower-carb alternative.
-
Protein Changes: Try substituting the chicken with grilled shrimp, tofu, or chickpeas for a vegetarian option.
-
Fruit Fusion: For a pop of sweetness, add diced apples or dried cranberries to the quinoa salad.
-
Herb Enhancements: Sprinkle fresh herbs like cilantro or parsley over the bowl for a vibrant freshness.
Bringing It to the Table
Presentation makes all the difference! Serve your Honey Mustard Chicken Quinoa Bowl in deep bowls to showcase the rich colors and textures. The glistening honey mustard chicken perfectly contrasts with the vibrant greens and the creamy avocado. If you want to elevate it even further, layer everything artfully—start with the quinoa as your base, then create a colorful arrangement with the chicken, veggies, and last but not least, your avocado slices. And don’t forget that optional sprinkle of sesame seeds for a nutty finish.
How to Keep Your Bowl Fresh
If you happen to have leftovers (which in my opinion, is a wonderful bonus), here’s how to keep your Honey Mustard Chicken Quinoa Bowl fresh:
-
Refrigeration: Store your bowl in an airtight container in the fridge. It should stay good for about 3-4 days. Just keep the dressing separate if you can.
-
Freezing: While quinoa and chicken freeze relatively well, the fresh veggies like spinach and avocado won’t hold up. I recommend freezing just the chicken and quinoa mixture. Layer it in a freezer-safe container and let it thaw in the fridge before reheating.
-
Reheating Tips: Gently reheat in the microwave, or toss it in a skillet over medium heat with a splash of water to steam it back to life.
Your Questions Answered
-
Can I make this dish ahead of time? Absolutely! It’s perfect for meal prep. Just layer everything in containers and refrigerate until you’re ready to enjoy.
-
Is it gluten-free? Yes, this dish is naturally gluten-free as long as you use gluten-free soy sauce or tamari.
-
What can I do with leftover honey mustard sauce? Great question! Use it as a dressing for salads, a marinade for other proteins, or even a dip for veggie sticks!
-
Can I use a different cooking method for chicken? Of course! You could grill or bake the chicken instead of sautéing for a healthier option.
There you have it—a flavorful, wholesome dish that’s as versatile as it is delightful! I can’t wait for you to try this Honey Mustard Chicken Quinoa Bowl; it’s the perfect balance of nutrition and indulgence. Whether you’re cooking for yourself or a group, I assure you it will leave everyone smiling and satisfied. Happy cooking!
Honey Mustard Chicken Quinoa Bowl
Ingredients
Method
-
Rinse the quinoa under cold water to remove bitterness.
-
In a medium saucepan, combine the quinoa and 2 cups of water. Bring to a boil, then reduce heat to low. Cover and simmer for 15 minutes until quinoa is fluffy and all water is absorbed.
-
Fluff quinoa with a fork and season with salt and pepper to taste.
-
While the quinoa is cooking, heat 1 tablespoon of olive oil in a large skillet over medium-high heat.
-
Add the chicken pieces, season with salt and pepper, and cook until browned and cooked through, about 6-8 minutes. Remove from skillet and set aside.
-
In the same skillet, add honey, Dijon mustard, apple cider vinegar, soy sauce, and garlic powder. Stir to combine and let simmer for 2-3 minutes until sauce thickens slightly.
-
Return the cooked chicken to the skillet and toss to coat evenly with the honey mustard sauce. Cook for another 2 minutes to heat through.
-
In a large bowl, combine the cooked quinoa, baby spinach, cherry tomatoes, cucumber, and red onion. Drizzle with remaining tablespoon of olive oil, and season with salt and pepper. Toss gently to mix.
-
Divide the quinoa salad into bowls. Top with the honey mustard chicken, sliced avocado, and sprinkle with sesame seeds if desired.
Notes
10. Blueberry Quinoa Breakfast Bowl
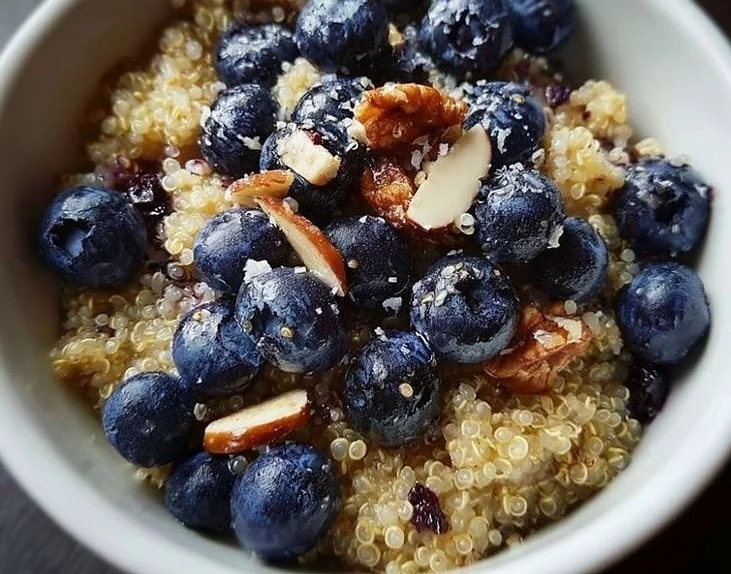
I can’t tell you how much joy a warm, nutritious breakfast filled with vibrant colors can bring to your morning routine! The Blueberry Quinoa Breakfast Bowl is one of those delightful dishes that not only tickles your taste buds but also nourishes your body. Picture this: fluffy quinoa mingling with sweet, plump blueberries and the creamy goodness of almond milk, all topped with a sprinkle of crunchy nuts. Trust me, this isn’t just a meal; it’s a morning embrace that will keep you energized throughout the day!
Why Blueberry Quinoa Breakfast Bowl is a Must-Try
Let me share a few reasons why this breakfast bowl deserves a cozy corner in your recipe collection:
- Nutritional Powerhouse: Packed with high-quality protein, fiber, and antioxidants, this bowl sets a solid foundation for your day and supports your health goals.
- Versatility at its Best: Whether you’re vegan, gluten-free, or just looking to eat a bit healthier, this recipe fits like a glove into all kinds of dietary preferences.
- Breeze to Make: You don’t need to be a culinary whiz to pull this off. It takes just a few minutes, making it ideal for busy mornings when you still want something wholesome.
- Flavor Explosion: The combination of nutty quinoa, sweet blueberries, and a hint of cinnamon creates a symphony of flavors that dances on your palate.
- Perfect for Meal Prep: It keeps well in the fridge, meaning you can whip up a batch and enjoy it throughout the week.
The Ingredient Essentials
Gathering your ingredients is half the fun, and trust me, this recipe is wonderfully simple. Here’s everything you’ll need:
- 1 cup cooked quinoa: This tiny grain is a superstar! It’s full of protein and gives your breakfast a satisfying texture.
- 1 cup fresh blueberries: These beauties aren’t just pretty; they’re bursting with antioxidants and natural sweetness that brighten up your bowl.
- 1 banana, sliced: The creamy banana adds a lovely sweetness and a touch of natural richness, complementing the blueberries perfectly.
- 1/2 cup almond milk (or milk of choice): Almond milk keeps it light and adds a subtle nuttiness. Feel free to use any milk you love!
- 1 tablespoon honey or maple syrup (optional): While the fruits provide natural sweetness, this drizzle takes it up a notch if you prefer a sweeter bowl.
- 1 tablespoon chia seeds: These little gems bring in some healthy fats and fiber, giving a satisfying crunch to your bowl.
- 1/4 teaspoon cinnamon: Just a sprinkle adds warmth and a comforting aroma that wraps around this dish like a hug.
- Nuts or seeds for topping (optional): If you’re in the mood for a bit of crunch, go ahead and throw in your favorite nuts or seeds.
Let’s Create a Breakfast Winner
Now, let’s get down to business! This breakfast bowl comes together effortlessly. Just follow these steps, and before you know it, you’ll have a lovely meal ready to go:
- In a bowl, combine the cooked quinoa, almond milk, honey or maple syrup, chia seeds, and cinnamon. Stir well to mix.
- Top the quinoa mixture with fresh blueberries and sliced banana.
- If desired, add nuts or seeds for extra crunch.
- Serve immediately and enjoy a nutritious breakfast!
Tips to Make It Just Right
Here are my go-to tips to ensure your Blueberry Quinoa Breakfast Bowl turns out perfectly every single time:
- Meal Prep Magic: Cook a large batch of quinoa ahead of time! This step not only saves you time during busy mornings but also makes it easy to whip up a fresh breakfast on the fly.
- Customize Your Sweetness: Start with less honey or maple syrup and adjust according to your personal taste. Each fruit’s sweetness can vary, so find your perfect balance.
- Freshness Matters: Use the freshest blueberries you can find for that juicy burst of flavor. Frozen ones work in a pinch but don’t quite capture the same delightful pop.
- Chill Your Bowl: For a refreshing twist on hot days, chill your bowl in the fridge for a bit before serving. It adds a cool contrast that’s wonderfully refreshing!
- Texture Play: Don’t be shy about experimenting with toppings! Different nuts or seeds, even a sprinkle of coconut or dark chocolate shavings, can elevate your breakfast experience.
Spin It Your Way
The Blueberry Quinoa Breakfast Bowl is such a versatile canvas for your culinary creativity. Feel free to jazz it up with these variations:
- Add Yogurt: Swirl in a dollop of Greek yogurt for a creamier texture and a protein boost.
- Flavor It Up: Experiment with almond extract or vanilla extract for a flavored twist that complements the fruit beautifully.
- Fruit Mix-Up: Swap the blueberries for other berries like strawberries or raspberries, or try peaches or mango for a taste of summer.
- Nut Butters Galore: Drizzle a spoonful of almond or peanut butter on top for added richness and flavor complexity.
- Seasonal Spice: Feel free to swap out the cinnamon for nutmeg or a pumpkin spice mix during the fall for a seasonal flair.
Serving Ideas That Shine
When it comes to serving your Blueberry Quinoa Breakfast Bowl, presentation can make all the difference! Here are some delightful ideas:
- Layer It Up: Create beautiful layers in a clear glass bowl to show off the vibrant colors of the quinoa and fruits.
- Garnish Smartly: A sprinkle of extra chia seeds or a few whole blueberries on top can elevate the look. It’s all in the details!
- Plate It with Care: Use a wide, shallow bowl for a more rustic presentation, and don’t forget a beautiful spoon to scoop that goodness!
- Part of a Breakfast Spread: Serve your bowl alongside fresh pastries, scrambled eggs, or a selection of fruits for a lovely brunch gathering with friends or family.
Keeping It Fresh and Flavorful
Let’s be honest; sometimes, life happens, and you might have some leftovers. Here’s how to keep your breakfast masterpiece fresh:
- Refrigerate Smart: Store any leftovers in an airtight container in the fridge. It can last for up to three days. Just give it a good stir before enjoying again!
- Freezing Stash: If you’ve made a batch and want to save some for later, you can freeze the mixture (without the fruit toppings) for up to a month. Thaw overnight in the fridge before serving.
- Reheat with Care: When you’re ready to eat, gently reheat in the microwave for 30 seconds to a minute, adding a splash of almond milk to restore creaminess.
Your Questions Answered
Here are some common questions I get about this delicious breakfast bowl:
- Can I use other grains? Absolutely! Feel free to substitute quinoa with other whole grains like farro, millet, or even oats depending on your preference.
- What can I do if I don’t have chia seeds? You can omit them or use flax seeds as a substitute. They work similarly in terms of texture.
- Is this dish suitable for meal prepping? Yes! It’s perfect for meal prep—a batch can be prepared on the weekend and enjoyed throughout the week!
- How can I make it more fulfilling? Adding protein like Greek yogurt or nuts will give it that extra heartiness to keep you full longer.
Every mouthful of the Blueberry Quinoa Breakfast Bowl is a harmony of vibrant flavors and cozy textures that truly sets the tone for a delightful day ahead. I wholeheartedly encourage you to gather your ingredients and try it for yourself! It’s a nourishing hug in a bowl, perfect for any morning. Let your creativity flow, and enjoy every spoonful!
Blueberry Quinoa Breakfast Bowl
Ingredients
Method
-
In a bowl, combine the cooked quinoa, almond milk, honey or maple syrup, chia seeds, and cinnamon. Stir well to mix.
-
Top the quinoa mixture with fresh blueberries and sliced banana.
-
If desired, add nuts or seeds for extra crunch.
-
Serve immediately and enjoy a nutritious breakfast!