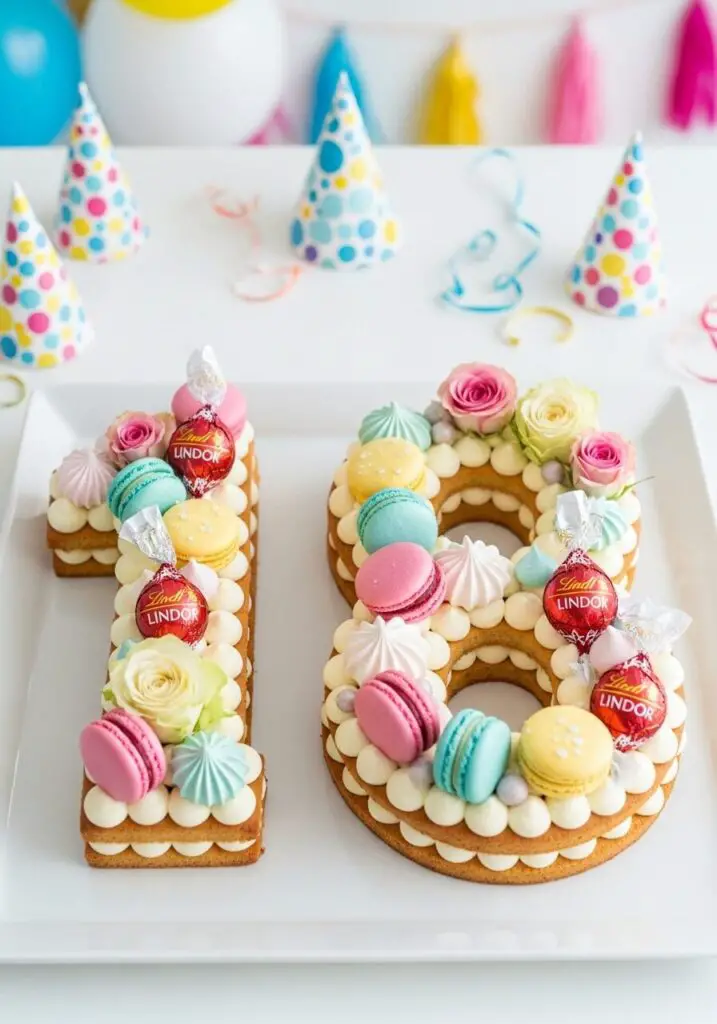
The Ultimate 18th Birthday Cake (Stunning Number Cake Recipe!)
Imagine the look on their face when you bring out this breathtaking, edible masterpiece to celebrate their big 1-8. This isn’t just any cake; it’s a spectacular, personalized number cake, crafted from a classic, tender Victoria sponge, layered with sweet jam and creamy buttercream, and adorned with a dreamy pastel wonderland of macarons, sparkly meringues,…
Imagine the look on their face when you bring out this breathtaking, edible masterpiece to celebrate their big 1-8. This isn’t just any cake; it’s a spectacular, personalized number cake, crafted from a classic, tender Victoria sponge, layered with sweet jam and creamy buttercream, and adorned with a dreamy pastel wonderland of macarons, sparkly meringues, and fresh roses. It is, simply put, a celebration in cake form.
I’ve always believed a milestone birthday deserves a truly show-stopping cake, but let’s be honest—the idea of creating something so intricate can be seriously intimidating! This recipe is my secret to achieving that “wow” factor without the professional-baker stress. It’s less about complicated techniques and more about the joyful, creative process of assembly and decoration. It’s an act of love, and it’s so much fun to make.
I promise you, this guide breaks down the process into simple, manageable steps. The Victoria sponge is wonderfully forgiving, and the buttercream is a simple classic. The real magic happens when you get to play artist, arranging the beautiful pastel decorations to create a personalized work of art.
Get ready to create a heartfelt, breathtaking birthday cake that will be the centerpiece of the celebration and a memory they’ll cherish for years to come.
Why This Is the Perfect Milestone Birthday Cake!
You are going to be so incredibly proud of this cake when you’re finished. It’s a true labor of love with a spectacular result. Here’s why it’s so special:
- A Personalized Show-Stopper: A number cake is such a fun and personal way to celebrate a milestone birthday. It’s a guaranteed centerpiece that will have every camera in the room pointed at it.
- Classic, Crowd-Pleasing Flavors: You simply can’t go wrong with a perfectly moist Victoria sponge, tangy strawberry jam, and sweet vanilla buttercream. It’s a combination everyone adores.
- A Fun and Creative Project: This is your chance to be an artist! Arranging the beautiful pastel macarons, meringues, and roses is the most joyful part of the process.
- Feeds a Whole Party: This is a large, generous cake designed to serve a crowd, making it perfect for a big 18th birthday bash.
- Surprisingly Achievable: While it looks incredibly impressive, the recipe uses a straightforward, reliable sponge and simple decorating techniques that any determined home baker can master.
Recipe Snapshot
| Prep Time | 3 hours (includes mixing, baking in batches, and cooling) |
| Cook Time | 1 hour |
| Total Time | 4 hours |
| Servings | 30 servings |
| Calories | 562 kcal per serving |
| Course | Dessert |
| Cuisine | British / American |
| Difficulty/Method | Advanced / Baking |
Your Royal Shopping List for the Celebration
This show-stopper is made up of a few key components. Planning your shopping will make the process a breeze!
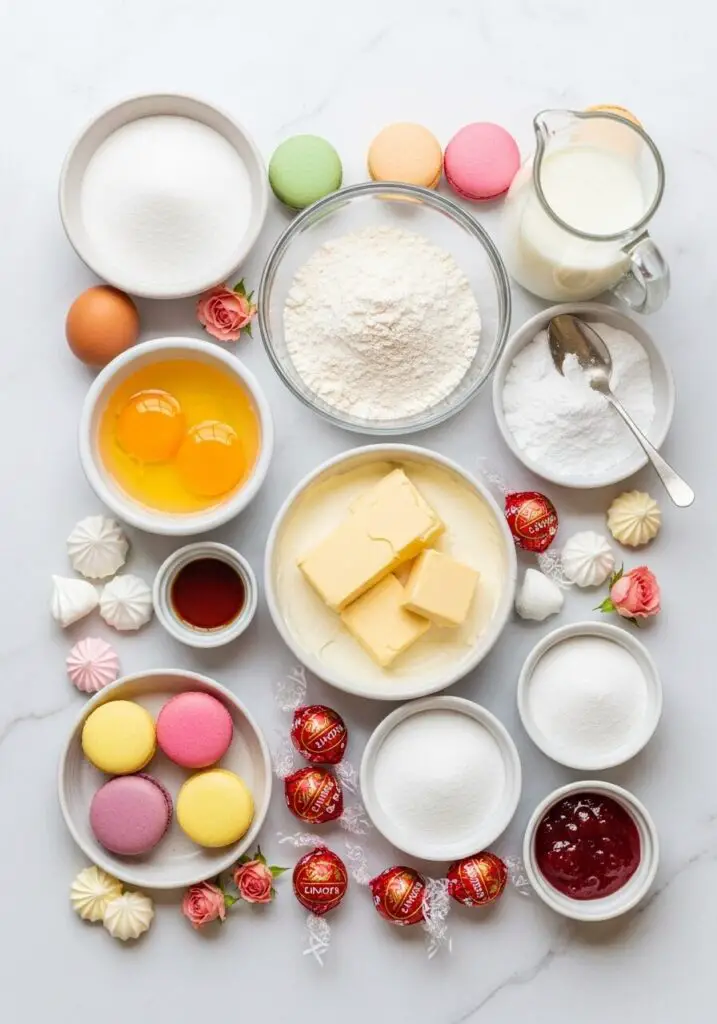
→ For the Classic Victoria Sponge (Makes 4 Number Cakes)
- 800g caster sugar → Caster sugar is superfine and dissolves beautifully, but granulated works too.
- 800g butter, softened → Make sure it’s properly softened to room temperature!
- 8 medium eggs, beaten → At room temperature, of course!
- 800g self-raising flour → The classic choice for a light and tender Victoria sponge.
- 4 teaspoon baking powder → For that extra lift.
- 8 tablespoon whole milk → For a moist, tender crumb.
→ For the Buttercream & Filling
- 400g butter, softened → The base of our simple, delicious buttercream.
- 560g icing sugar → Also known as confectioners’ or powdered sugar.
- 4 drops vanilla extract → For that classic flavor.
- 1 jar strawberry jam → Use a good quality one you love the taste of!
→ For the Pastel Palace Decorations
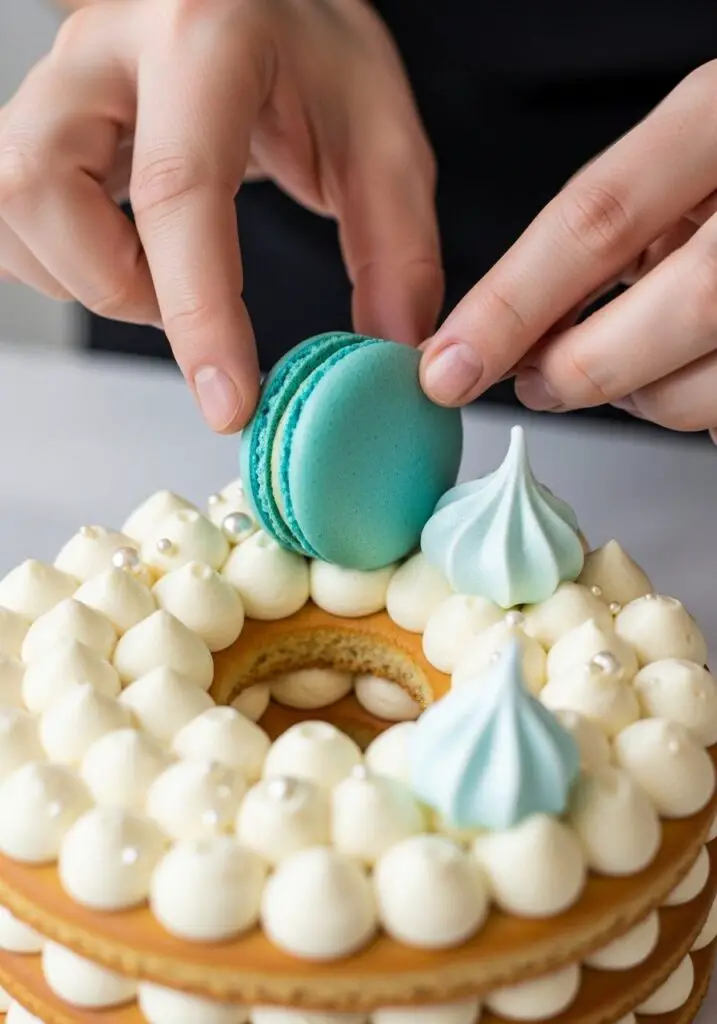
- Macarons: In 3-4 different pastel colors (like pink, blue, lavender, and yellow).
- Meringue Kisses: Homemade or store-bought, painted with edible glitter or luster dust.
- Chocolates: Lindt Strawberry & Cream Lindor truffles are a perfect pink and white addition.
- Fresh Roses: A few small, beautiful spray roses in a coordinating pastel color (make sure they are food-safe/non-toxic).
Let’s Bake! Crafting Your Milestone Masterpiece
Ready for a fun and rewarding baking project? We’ll tackle this in simple stages: the cakes, the buttercream, and the grand assembly!
Part 1: The Victoria Sponge Foundation
- Prep Your Oven and Molds: First, preheat your oven to 190°C (170°C fan). Lightly spray your two number-shaped silicone molds with vegetable oil and place them on a sturdy baking tray.
- Make the First Batch of Batter: We’re making the batter in two batches for the best results. In a large bowl with an electric mixer, beat 400g of the softened butter and 400g of the caster sugar until it’s very pale, light, and fluffy. Beat in 4 of the eggs and 4 tablespoons of the milk.
- Fold in the Flour: Sift 400g of the self-raising flour and 2 teaspoons of the baking powder into the bowl. Use a large metal spoon or spatula to gently fold the flour in until it’s just combined. Be careful not to overmix!
- Bake the First Two Cakes: Divide this first batch of batter evenly between your two number molds. Bake for about 30 minutes, or until a skewer inserted into the center comes out clean. Let them cool completely on a wire rack before attempting to turn them out of the molds.
- Repeat!: Once your first two cakes are cooled and removed, repeat the entire process with the remaining ingredients to make your second set of number cakes. You will have four cakes in total. Once all cakes are completely cool, use a long serrated knife to carefully level the tops.
Part 2: The Simple Buttercream & Grand Assembly
- Make the Buttercream: In a large bowl, beat the softened butter until it’s very creamy. Gradually add the icing sugar a few tablespoons at a time, mixing on low speed until it’s incorporated. Add the vanilla extract, then beat on high speed until the buttercream is light and fluffy.
- Build Your Base: Place your first set of number cakes (one number ‘1’ and one number ‘8’) onto your serving board. Spread a generous layer of strawberry jam over the top of each.
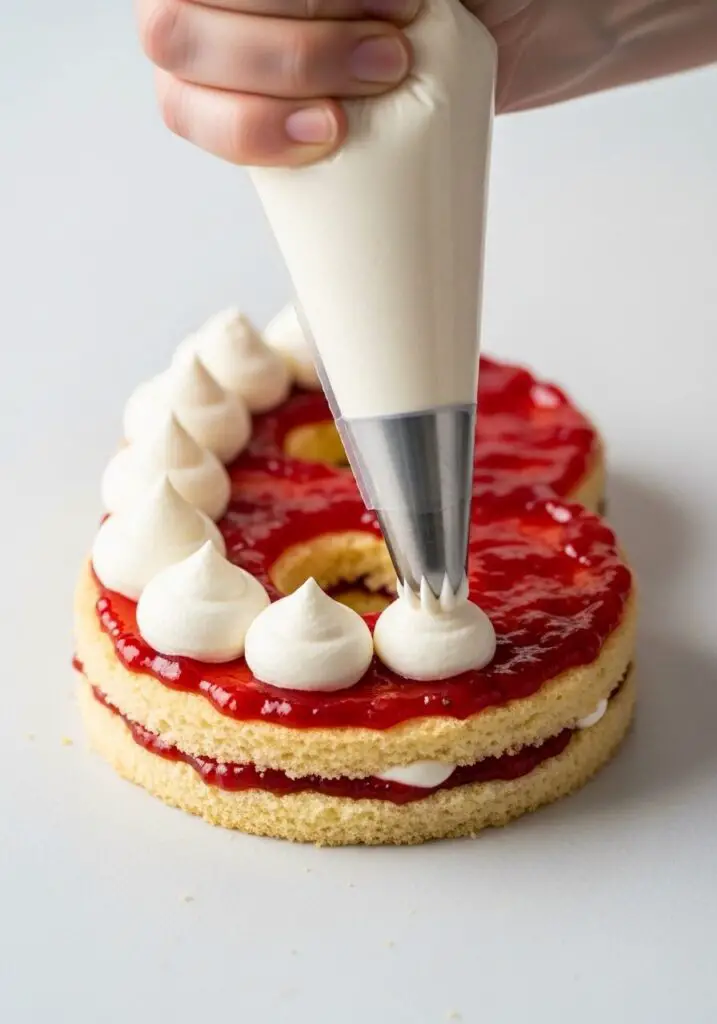
- Pipe the First Layer: Fill a piping bag fitted with a large round nozzle with your buttercream. Pipe large, neat, uniform dots (or kisses) of buttercream all over the jam layer.
- Add the Top Layer: Carefully place the remaining two number cakes on top of the buttercream dots, sandwiching the filling.
- Decorate the Top: Now, pipe the same large, beautiful buttercream dots all over the top surface of the cakes.
- The Royal Decorations: This is the best part! Artfully arrange your pastel macarons, sparkly meringues, Lindt chocolates, and fresh roses among the buttercream dots. Stand back and admire your breathtaking creation!
WiseRecipes’ Top Tips for a Show-Stopping Number Cake
A big project like this is made easy with a few key secrets. These are my must-knows for success!
- Don’t Overmix the Batter! The golden rule of a tender sponge cake is to fold the flour in gently and stop mixing the moment it’s combined. This keeps the cake light and airy.
- Cool the Cakes Completely. I cannot stress this enough. The cakes must be 100% cool before you even think about handling them or frosting them. A warm cake is a fragile cake, and it will melt your beautiful buttercream.
- Make the Batter in Two Batches. It might seem like extra work, but making the batter twice is the secret to a perfect rise for all four cakes. If you make one giant batch, the leavening agents in the second half will start to lose their power while the first half is baking.
- Use a Piping Bag for a Professional Look. Taking the time to pipe the buttercream on in neat, uniform dots is what gives this cake its elegant, professional finish. It’s much cleaner and prettier than just spreading it on.
- Plan Your Decorations. Before you start placing your expensive macarons and flowers, have a rough idea of where you want them to go. This helps create a balanced and beautiful final design.
Keep It Fresh! Storing Your Masterpiece
This cake is a perfect make-ahead project, which is a lifesaver for party planning!
- Make-Ahead Plan: You can bake the cake layers up to two days in advance. Once they are completely cool, wrap them tightly in plastic wrap and store them at room temperature (or in the freezer for up to a month). The buttercream can also be made a day ahead and stored in an airtight container in the fridge (just let it come to room temperature and re-whip it before using).
- Assembly: I recommend decorating the cake on the day of the party for the freshest look, especially when using fresh flowers.
- Refrigerator: Once assembled, especially with fresh flowers, the cake should be stored in the refrigerator. It will keep beautifully for up to 3 days. For the best flavor and texture, take it out of the fridge 1-2 hours before serving.
FAQs: Your 18th Birthday Cake Questions, Answered!
Do I absolutely need number-shaped cake pans?
They certainly make it easier! However, if you don’t have them, you can bake the cake batter in large sheet pans and then use a printed, cardboard cutout of the numbers as a template to carefully cut the shapes out with a sharp knife.
My buttercream is too stiff/runny! What do I do?
This is a common and easy fix! If your buttercream is too stiff to pipe easily, beat in a tiny splash of milk (a teaspoon at a time) until it reaches the perfect consistency. If it’s too soft or runny, it usually just needs more powdered sugar. Add a few tablespoons at a time, beating well, until it thickens up.
How do I make the meringues sparkly?
This is a fun and easy trick! You can buy edible luster dust or pearl dust from a craft or baking supply store. Once your meringues are baked and cooled, simply use a small, clean (food-only!) paintbrush to gently brush the dust over their surface for a beautiful, shimmery effect.
Are fresh roses safe to put on a cake?
This is a great question! It’s important to use roses that are “food-safe,” meaning they haven’t been treated with pesticides. You can often find these at specialty baking stores, online, or by asking your local florist for unsprayed blooms. I also recommend wrapping the very bottom of the stems in a tiny bit of plastic wrap before inserting them into the cake.
My Final Thoughts: A Milestone Made of Cake
This 18th Birthday Number Cake is so much more than a dessert; it’s a beautiful, edible monument to a huge milestone in life. It’s a project filled with love, creativity, and the joy of celebration. I hope you have the most wonderful time creating this unforgettable centerpiece for a very special day!