5-Ingredient Crusty Panini Bread
How I Stumbled Into This One I have a confession: I used to think making good bread at home required an hour of kneading, a mysterious starter and a very patient personality. That changed the day I tried something that felt impossibly simple and ended up singing in my kitchen. I first tinkered with this…
How I Stumbled Into This One
I have a confession: I used to think making good bread at home required an hour of kneading, a mysterious starter and a very patient personality. That changed the day I tried something that felt impossibly simple and ended up singing in my kitchen. I first tinkered with this idea after following a helpful post, but I made it my own over a few weekends. The result is what I call 5-Ingredient Crusty Panini Bread, and once you smell that caramelized crust and warm, olive-scented crumb, you’ll forgive me for raving.
The Ingredient Lineup (Yes, it’s just six)
I always smile when someone asks what’s in it, because the list is so short and unapologetically basic: 4 Cups All-Purpose Flour, 2 Tsp Instant Yeast, ½ Tsp Sugar, 1 Tsp Salt, 2 Cups Warm Water, 1 Tbsp Olive Oil. Those six things make a loaf that is crisp on the outside, tender inside, and perfectly suited for panini presses, sandwiches or just tearing apart with your hands. You don’t need any specialty flours or fancy equipment, which is why I reach for this on weeknights and lazy Saturdays alike. If you want a little inspiration for other crusty loaves, I sometimes compare techniques with a classic crusty loaf to vary my approach.
Making the Dough and the Little Tricks I Swear By
I start in a large bowl; it’s less intimidating than a mixer and the dough gets a lovely texture. In a large bowl, combine all-purpose flour, instant yeast, salt, and sugar. Stir to combine. Then I pour in the warm water and add the olive oil. Pour in warm water and olive oil. Mix until no dry flour remains; the dough will be sticky. The first time I mixed it, I thought it was too wet, but that sticky feel is exactly right.
Here’s a trick I learned: wet your hands before you touch this dough so it doesn’t cling to every finger. Wet your hands and fold the dough over itself in the bowl eight times to develop its structure. It feels almost like a gentle workout, folding and tucking, and you can hear the slight slap as gluten begins to organize. Cover the bowl with plastic wrap and let rise in a warm place for about an hour until doubled in size. The kitchen will start to smell faintly yeasty and sweet—one of my favorite home smells.
Once it’s puffed, I turn the dough out onto a floured surface and divide into six pieces. Turn the dough out onto a floured surface and divide into six pieces. I don’t be too precious about shaping; just gentle rounds are fine. Place the pieces on a floured, parchment-lined baking sheet. If you want super-even browning, leave a little room between them so air circulates.
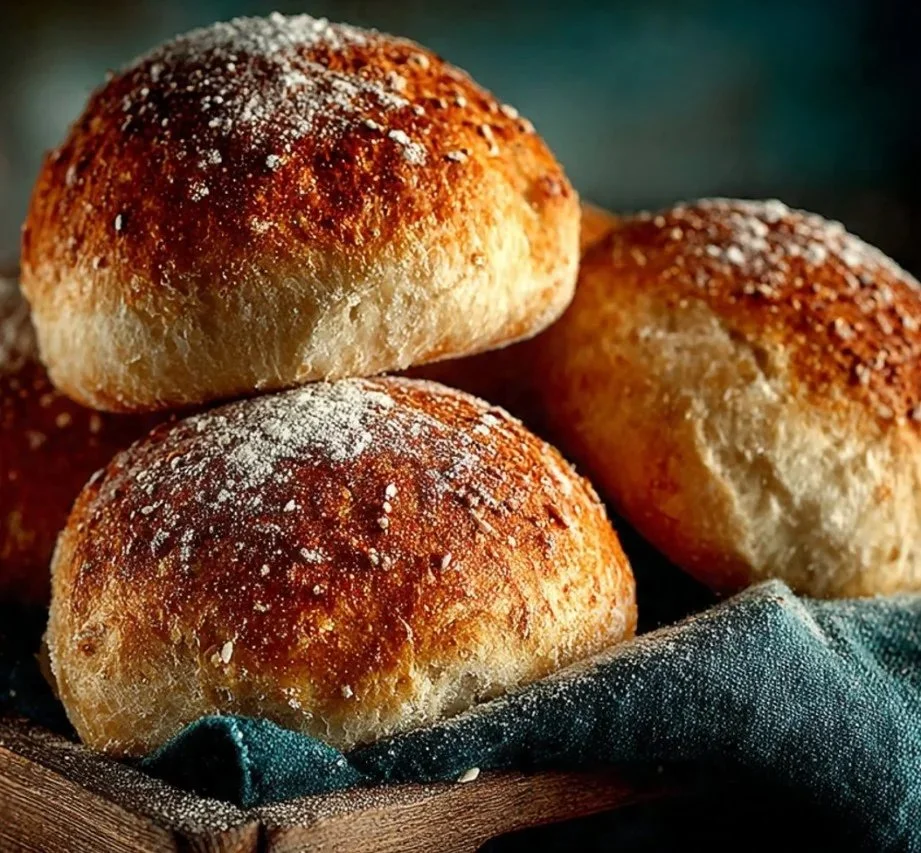
Preheat the oven to 440°F and slide the sheet in. Preheat oven to 440°F and bake for 30 minutes until golden brown. The bake is where magic happens—steam trapped inside expands, the crust forms a dark, caramelized pattern and the aroma takes over. I tap the bottom to listen for a hollow sound to know they’re done, but following the time and watching for a deep golden color works too. Allow to cool completely before serving. That patience is hard, especially when the house smells like this, but cooling helps the crumb set; rush it and you’ll get gummy centers.
Getting the Texture Just Right and Other Notes
You’ll know it’s done right when the crust has a satisfying crackle and the interior is open but not holey like ciabatta. I like my panini bread with a slightly chewy crumb that soaks up sauces but doesn’t collapse under a press. A few small things that changed the results for me: use warm water, not hot, to avoid killing the yeast; fold eight times exactly, or close to it, because the number gives a consistent structure; and give it a full hour to double—shortchanging rise time is the common culprit for dense loaves.
A couple more small tips: if your kitchen is cold, set the bowl near a warm oven or pour a cup of hot water in another bowl and set the dough bowl on top to create a cozy little incubator. If you want a shinier crust, brush with a tiny bit of extra olive oil before baking. And if you love scented loaves, fold in a teaspoon of dried herbs or minced garlic right after the first fold.
What I Serve It With, Variations, and How I Keep Leftovers Tasting Good
This bread is my go-to for panini—slices press beautifully and toast into crunchy, chewy perfection. I’ll fill them with melted provolone, roasted vegetables and a smear of pesto, or keep things simple with prosciutto and fig jam. It also makes addictive little sandwiches for picnics because it stays sturdy and doesn’t get soggy quickly. If you’re curious about more roll ideas, I often borrow finishing touches from recipes like crusty French bread rolls that show how shaping tweaks texture.
For variations, try swapping half the flour for whole wheat for a nuttier flavor, fold in a handful of grated parmesan for savory notes, or sprinkle sesame seeds on top before baking for extra crunch. If you want garlic-herb panini bread, press minced garlic and rosemary lightly into the tops before they go into the oven.
Leftovers keep surprisingly well. I usually store cooled loaves in a paper bag at room temperature for a day or two to maintain the crust’s character; for longer storage I slice and freeze them in a zip bag and toast slices straight from the freezer. Reheating briefly in a hot pan or oven brings the crust back to life better than a microwave ever will.
When things don’t go as planned, like if the dough refuses to rise, it’s almost always the yeast or the water temperature. Fresh yeast and water that’s around warm-to-the-touch (not scalding) fix most problems. If the crust browns too fast, tent with foil for the last 10–15 minutes.
Conclusion
If you want another take on this style, Panini Bread, The Clever Meal offers a similar no-knead approach with useful comparisons, and for a slightly different regional spin try No Knead Italian Panini Bread Recipe – Mangia Bedda which has nice notes on shaping and flavor variations. Give it a try on a drizzly afternoon, and don’t be surprised if this becomes the bread you reach for every week—simple ingredients, a little patience, and a whole lot of comforting flavor.
5-Ingredient Crusty Panini Bread
Ingredients
Method
- In a large bowl, combine all-purpose flour, instant yeast, salt, and sugar. Stir to combine.
- Pour in the warm water and add the olive oil. Mix until no dry flour remains; the dough will be sticky.
- Wet your hands before handling the dough to prevent sticking. Fold the dough over itself in the bowl eight times.
- Cover the bowl with plastic wrap and let rise in a warm place for about an hour or until doubled in size.
- Turn the dough out onto a floured surface and divide it into six pieces.
- Gently shape each piece into a round and place on a floured, parchment-lined baking sheet.
- Preheat the oven to 440°F (220°C). Bake the bread for 30 minutes or until golden brown.
- Allow the bread to cool completely before serving.