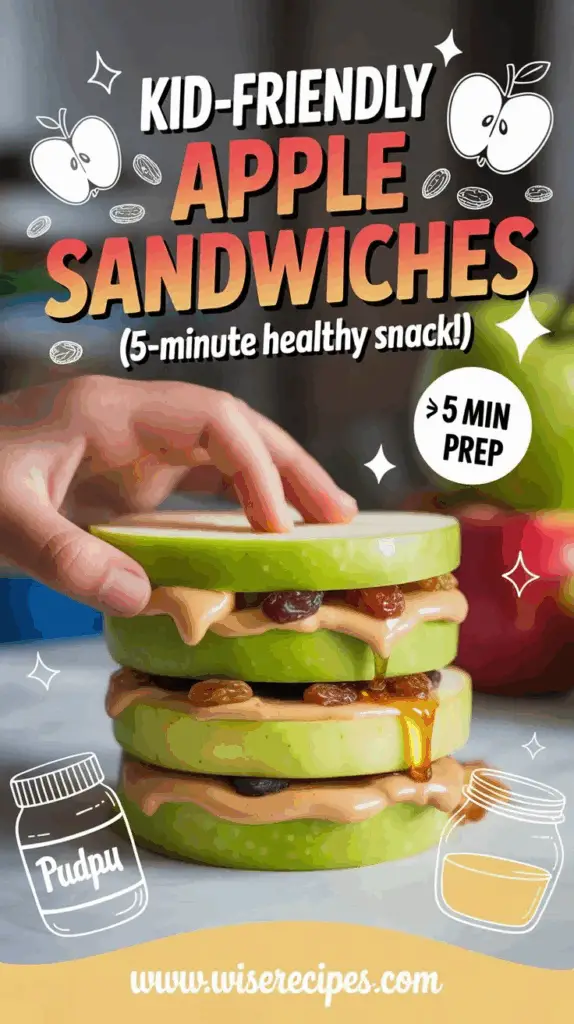
The Ultimate 5-Minute Apple Sandwiches (A Kid-Friendly Favorite!)
Imagine a snack that’s healthy, incredibly fun, ready in five minutes, and something your kids will actually ask for. That, my friends, is the simple, brilliant magic of these Kid-Friendly Apple Sandwiches. Crispy, sweet apple slices take the place of bread, sandwiching a creamy, protein-packed filling that’s both delicious and nourishing. This is, without a…
Imagine a snack that’s healthy, incredibly fun, ready in five minutes, and something your kids will actually ask for. That, my friends, is the simple, brilliant magic of these Kid-Friendly Apple Sandwiches. Crispy, sweet apple slices take the place of bread, sandwiching a creamy, protein-packed filling that’s both delicious and nourishing. This is, without a doubt, the easiest and most-loved snack in my recipe box.
I promise you, there is no greater parenting win than seeing your little ones happily crunching away on a snack made of pure, wholesome ingredients. The combination of crisp apple, creamy peanut butter, a sweet drizzle of honey, and chewy raisins is a classic for a reason. It’s the perfect balance of textures and flavors in a playful, easy-to-eat format.
Get ready to discover your new go-to healthy snack, a no-cook, low-calorie treat that will make you a hero in your own kitchen.
Why These Apple Sandwiches are a Total Lifesaver!
You are going to be obsessed with how quickly you can put together such a fun and healthy snack. It’s a guaranteed winner. Here’s why you’ll love it:
- A True 5-Minute Wonder: This is the ultimate fast snack. From slicing the apple to serving, it takes just five minutes, with zero cooking required.
- Healthy, Wholesome, and Simple: Made with whole fruit, protein-rich peanut butter, and natural sweeteners, this is a snack you can feel great about serving.
- Incredibly Fun for Kids: The “sandwich” format is a novelty that kids adore. They love helping to spread the filling and sprinkle the toppings!
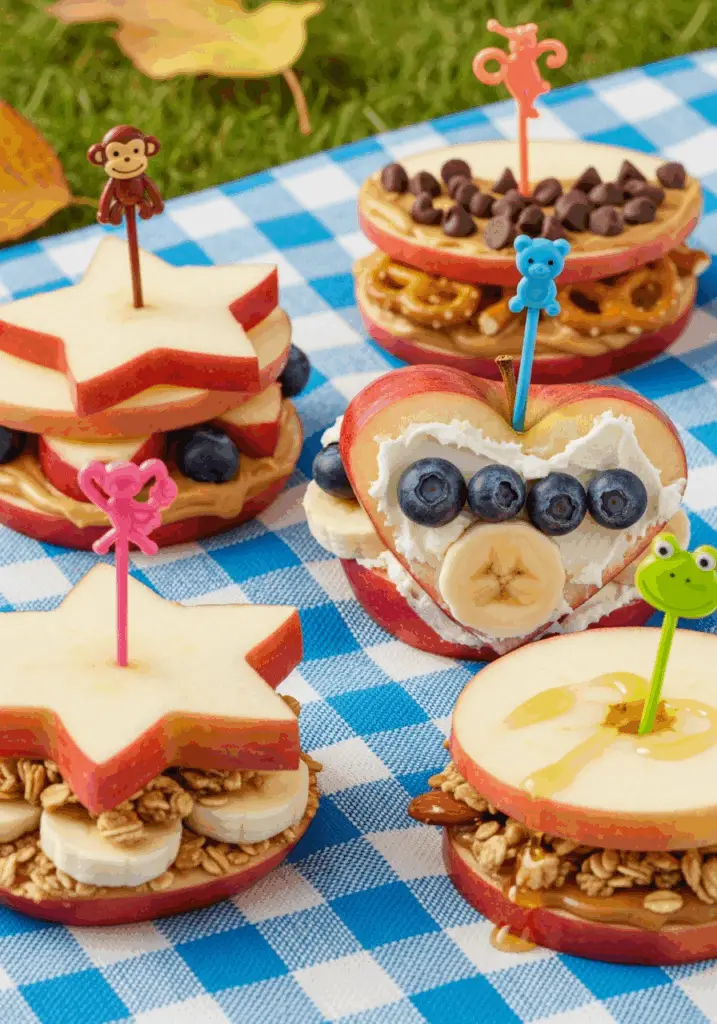
- Endlessly Customizable: This recipe is a fantastic starting point. You can swap the peanut butter and raisins for dozens of other fun and delicious fillings.
- Perfect for Lunchboxes: With a simple trick to prevent browning, these make a fantastic and healthy addition to any school lunchbox.
Recipe Snapshot
| Prep Time | 5 minutes |
| Cook Time | 0 minutes |
| Total Time | 5 minutes |
| Servings | 1 serving (3 sandwiches) |
| Calories | 288 kcal per serving |
| Course | Snack, Dessert, Breakfast |
| Cuisine | American |
| Difficulty/Method | Easy / No-Cook |
Your Shopping List for This Fun Snack
You only need four simple ingredients to create this delicious and healthy treat. Here’s what you’ll need:
→ For the Apple Sandwiches
- 1 apple → A large, crisp, and sweet apple is best. Honeycrisp, Gala, Fuji, or Pink Lady are all fantastic choices.
- 1 tablespoon natural peanut butter → A creamy, natural peanut butter is easiest to spread.
- ½ teaspoon honey → For a touch of extra sweetness. Maple syrup also works well.
- 2 tablespoons raisins → For a chewy, sweet surprise inside.
Let’s Make Sandwiches! Your Step-by-Step Guide
Ready for the fastest, funnest snack ever? This comes together in just a couple of simple steps!
Part 1: Prep the Apple “Bread”
- Core and Slice: First, core the apple. Using an apple corer is the easiest way to get a perfect hollow center. Then, lay the cored apple on its side on a cutting board and slice it into even, ¼-inch thick disks. You should get about 6 disks from one apple.
Part 2: Assemble Your Sandwiches
- Spread the Filling: On three of the apple disks, spread the peanut butter and then drizzle with honey.
- Add Toppings and Assemble: Sprinkle the raisins over the peanut butter. Place another apple disk on top of each one to create a “sandwich.”
- Serve and Enjoy: That’s it! Serve immediately and enjoy the crunchy, creamy, chewy goodness.
Kid-Friendly Apple Sandwiches
Ingredients
Equipment
Method
- Spread peanut butter and honey onto one apple disk.
- Sprinkle with raisins.
- Top with another apple disk to create a sandwich.
- Repeat with the rest of the apple until you have used all of the disks.
Notes
WiseRecipes’ Top Tips for Perfect Apple Sandwiches
These simple secrets will help you make the best apple sandwiches every single time.
- An Apple Corer is Your Best Friend. For those perfect, uniform apple “buns,” an apple corer is a game-changing tool. It makes the process quick, easy, and creates a neat-looking final product.
- Prevent Browning with a Lemon Squeeze. If you’re not serving them immediately or are packing them for lunch, you’ll want to prevent the apple slices from browning. Simply toss the fresh-cut slices in a bowl with a little bit of lemon juice.
- Choose a Crisp Apple. The “bread” of our sandwich needs to be sturdy! Use a firm, crisp apple variety that won’t get mushy. Stay away from softer apples like Red Delicious.
- Get the Kids Involved. This is the ultimate recipe for little kitchen helpers. Let them do the spreading and sprinkling. They are always more likely to eat a healthy snack that they had a hand in making.
- Warm the Peanut Butter if it’s Stiff. If you’re using a thick natural peanut butter from the fridge, it can be hard to spread without breaking the apple slice. Just microwave a small amount for 10-15 seconds to soften it up perfectly.
Keep It Fresh! Storing Your Apple Sandwiches
These snacks are definitely at their best when made fresh. Here’s what you need to know:
- Serving: For the ultimate crisp and fresh experience, assemble and serve these immediately.
- Make-Ahead for Lunchboxes: You can absolutely make these ahead for school lunches! Just be sure to treat the apple slices with a bit of lemon juice to prevent browning. Assemble the sandwiches and wrap them tightly in plastic wrap to keep them fresh until lunchtime.
FAQs: Your Apple Sandwich Questions, Answered!
How do I make these school-friendly or nut-free?
It’s an easy swap! To make them nut-free, simply substitute the peanut butter with sunflower seed butter (sunbutter), a soy-based butter, or even cream cheese. They will be just as delicious and safe for nut-free environments.
What are some other fun filling ideas?
The possibilities are endless! Try cream cheese with a sprinkle of cinnamon, a chocolate-hazelnut spread with mini chocolate chips, Greek yogurt with granola, or even a savory version with hummus and shredded carrots. Have fun and experiment!
My kids don’t like raisins. What else can I use?
Swap the raisins for mini chocolate chips, shredded coconut, granola, chopped dates, or other dried fruits like cranberries or blueberries. Sprinkles are also a fun (though less healthy) option for a special treat!
How do I core an apple without an apple corer?
If you don’t have a corer, you can slice the apple into disks first. Then, use a small, round cookie cutter or even the end of a large piping tip to carefully press out the core from the center of each slice.
Final Thoughts: Your New Go-To Snack
There is such a beautiful simplicity in a snack that is fun, healthy, and genuinely loved by kids and adults alike. These Apple Sandwiches are a perfect example of how creative you can be with simple, wholesome ingredients. I hope this easy recipe becomes a happy and delicious staple in your snack rotation. Enjoy!