The Ultimate Creamy Almond Custard Danish Pastries
Oh, my friends, get ready to experience a little piece of bakery heaven right in your own home! If you’ve ever dreamt of baking those exquisite, light, and flaky Danish pastries, but felt a tiny bit intimidated, then today at WiseRecipes, I’m here to tell you: you absolutely can do it, and it is so…
Oh, my friends, get ready to experience a little piece of bakery heaven right in your own home! If you’ve ever dreamt of baking those exquisite, light, and flaky Danish pastries, but felt a tiny bit intimidated, then today at WiseRecipes, I’m here to tell you: you absolutely can do it, and it is so worth it! This Almond Custard Danish Pastries recipe is a labor of love, yes, but the reward is utterly magnificent. Imagine: delicate layers of overnight-chilled pastry, a rich swirl of sweet, creamy custard, and a delightful crunch of toasted almonds, all finished with a delicate drizzle of icing. It’s a pastry that feels incredibly special, tastes unbelievably fresh, and delivers a profound sense of achievement.
I just adore the process of making laminated dough – it’s almost meditative, and the result? Pure magic! This isn’t a quick 30-minute bake (we do need to respect that overnight chill!), but the active time is surprisingly manageable. Whether you’re planning an indulgent breakfast, a show-stopping brunch, or a comforting dessert with a strong cup of coffee, these Almond Custard Danish Pastries are guaranteed to impress everyone who tries them. Get ready to fill your home with the most inviting aroma and your heart with pride. Trust me, every flaky, creamy bite is a testament to the joy of homemade baking!

Why These Homemade Danish Pastries Are Worth Every Delicious Moment
This isn’t just another pastry; it’s a culinary journey with an incredibly rewarding destination. Here’s why I’m absolutely obsessed with them:
- Unbelievably Light & Flaky: The magic of our overnight-chilled pastry creates dozens of delicate, buttery layers that shatter beautifully with every bite. This is the hallmark of a truly great Danish!
- Creamy Dreamy Custard Filling: Forget dry pastries! We fill these with a generous dollop of sweet, smooth, ready-made custard, ensuring a luscious, creamy center that perfectly complements the flaky dough.
- Irresistible Almond Crunch: Toasted flaked almonds on top add a delightful textural contrast and a warm, nutty flavor that’s classic in Danish pastries. It’s that perfect finishing touch!
- A Sense of Achievement (and Deliciousness!): Yes, this recipe involves a bit more effort and patience than a quick cookie, but the process of creating these stunning pastries from scratch is incredibly satisfying. And the taste? Pure, unadulterated bliss!
- Perfect for Special Occasions: These Danish pastries are elegant enough for a holiday brunch, a birthday breakfast, or any time you want to make a morning (or afternoon!) feel extra special.
Your Shopping List for Danish Pastry Perfection: Gather What You’ll Need
Creating these incredible Almond Custard Danish Pastries uses a blend of pantry staples and fresh ingredients. Here’s what you’ll want to grab to get started!
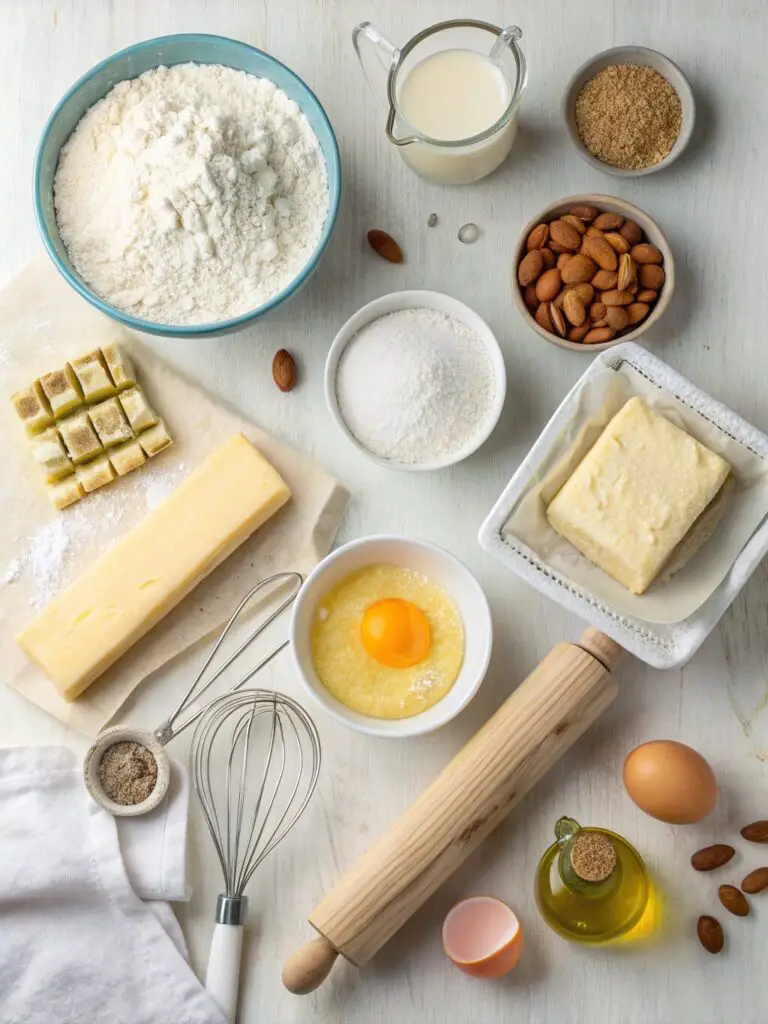
→ For the Light & Flaky Overnight Pastry
- 300g strong white bread flour: Plus extra for dusting and kneading. This flour gives our pastry its structure.
- ½ tsp fine sea salt: Balances the sweetness and enhances flavor.
- 50g golden caster sugar: Adds a touch of sweetness and helps the yeast.
- 7g fast action dried yeast: Our speedy leavening agent for a beautiful rise.
- 150ml whole milk, warm: Crucial for activating the yeast!
- 1 tsp almond extract: Adds a lovely aromatic depth to the pastry.
- 1 medium free-range egg, beaten: For the dough itself.
- 1 additional beaten egg: For egg washing the pastries before baking.
- 250g unsalted butter, softened: The star of our flaky layers!
→ For the Sweet Custard Filling
- 200g fresh ready-made custard: A fantastic shortcut to a creamy, delicious filling!
→ For the Crunchy Almond Topping & Icing Drizzle
- 50g flaked toasted almonds: For that essential nutty crunch on top.
- 50g icing sugar: For our sweet, pourable icing drizzle.
- 1 ½ tsp milk: To mix with the icing sugar for the drizzle.
- ½ tsp almond extract: A little extra almond flavor for the icing.
Let’s Bake! Crafting Your Flaky Almond Custard Danish Pastries, Step-by-Step
Making laminated pastry is a process of folding and chilling, but don’t be intimidated! Each step is straightforward, and the result is truly worth every moment.
Part 1: Making & Preparing the Overnight Pastry Dough
- Make the Dough: In a large bowl, mix together the 300g strong white bread flour, ½ tsp fine sea salt, 50g golden caster sugar, and 7g fast action dried yeast. In a separate bowl, whisk together the 150ml warm whole milk, 1 tsp almond extract, and 1 beaten medium free-range egg. Gradually add the wet ingredients to the dry, stirring until you have a smooth, slightly sticky dough.
- Knead the Dough: Tip the dough out onto a lightly floured surface. Knead for 5 minutes, dusting with more flour as necessary, until the dough is smooth, slightly springy, and no longer sticky.
- First Rise: Place the kneaded dough into a lightly oiled bowl. Cover with lightly oiled cling film and leave in a warm place for 1 hour, or until it has doubled in size.
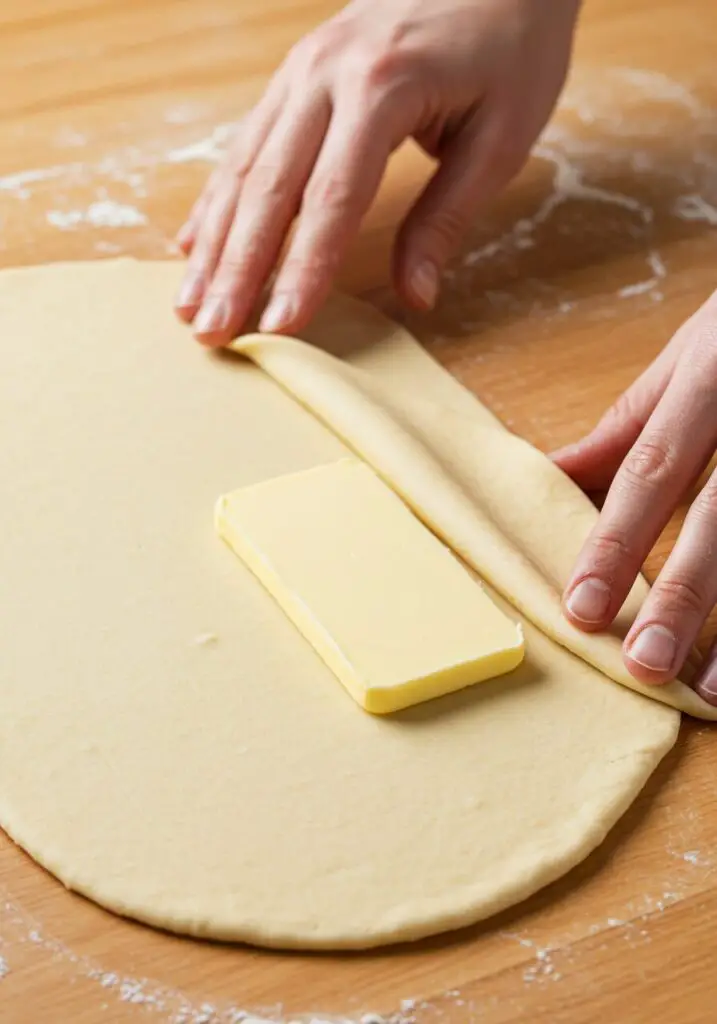
- Prepare Butter Block: While the dough rises, prepare your 250g unsalted butter. Place it on a clean board and bash it gently with a rolling pin until it’s roughly a 26cm wide, 10cm long, and 1cm deep rectangle. This makes it pliable for folding.
- First Butter Fold (The Letter Fold): On a lightly floured board, roll out the risen dough into a 5mm thick rectangle, about 30cm x 40cm, with the shorter side facing you. Place the butter block in the middle of the dough, leaving a 2cm border at the short ends and a 1cm border at the long sides clear of butter. Fold the butter-free bottom third of the dough over the middle third (covering the butter), then fold the top third of the dough over that, creating a flat, rectangular parcel (like folding a letter). Lightly press down the open ends to seal. Wrap tightly in cling film and chill for 15 minutes.
- First Turn (Roll & Fold): Remove the dough from the cling film. Lay it on a floured surface with a short side facing you. Roll out the dough in one direction into a long rectangle (don’t worry if it’s very long!). As before, fold the bottom third of the pastry over the middle third, then fold the top third over. This is your first “turn.” Wrap again in cling film and chill for 15 minutes more.
- Second Turn: Repeat the rolling and folding process described in step 6 one more time. This time, start with the longest side of the dough facing you on the floured surface. Wrap in cling film and allow the dough to rest in the fridge for another 15 minutes.
- Final Turns & Overnight Chill: Repeat steps 6 and 7 (the rolling and folding process) two more times, for a total of four turns. After the final turn, wrap the dough very well with cling film and chill overnight until firm. This crucial overnight chill develops the flavor and firms up the butter layers for perfect flakiness!
Part 2: Shaping, Baking & Icing Our Danish Pastries
- Preheat Oven & Prep Sheet: Preheat your oven to 200°C (fan 180°C / gas 6). Line a baking sheet with nonstick baking paper.
- Roll & Cut Pastry: Remove the chilled dough from the fridge. On a lightly floured surface, roll out the pastry to a 5mm thickness. Using a sharp knife or pastry wheel, trim the edges to create a neat rectangle. Then, cut the pastry into 12 x 10cm (approx. 4 x 4-inch) squares.
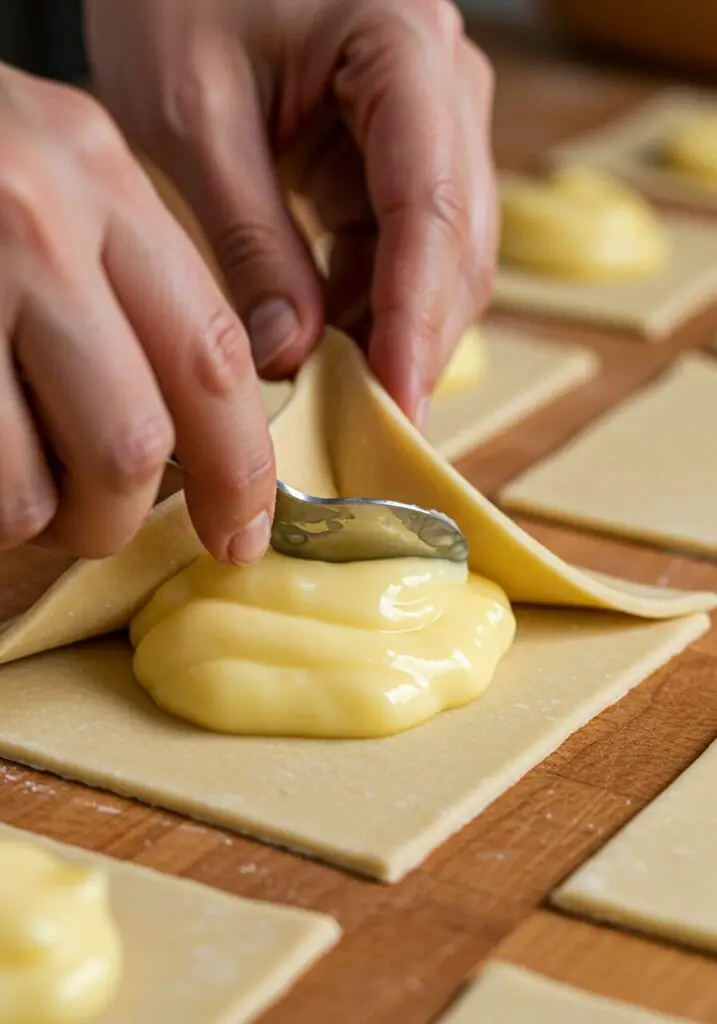
- Fill & Shape Pastries: Place a generous tablespoon of the ready-made custard into the middle of each pastry square. Brush the edges of the pastry with some of your additional beaten egg (our egg wash). Now, gently fold the pastry corners into the center, pressing firmly to enclose the filling and create that classic Danish shape. Place the pastries onto your lined baking sheet.
- Final Chill & Bake: Chill the shaped pastries, covered in cling film, for 20 minutes. Just before baking, gently brush each pastry with the remaining beaten egg wash and scatter generously with the 50g flaked toasted almonds. Bake for 15-18 minutes, or until they are beautifully puffed up, golden brown, and flaky.
- Make the Icing Drizzle: While the pastries cool, whisk together the 50g icing sugar, 1 ½ tsp milk, and ½ tsp almond extract in a small bowl until it forms a thick but pourable icing.
- Cool & Drizzle: Remove the baked Danish pastries from the oven and let them cool on a wire rack for 5-10 minutes. Once slightly cooled, generously drizzle each pastry with the almond icing. Serve immediately with strong coffee and bask in your sense of achievement!
WiseRecipes’ Best-Kept Secrets for Flaky Danish Pastry Success
Making laminated dough feels fancy, but these WiseRecipes tips will genuinely help you achieve bakery-worthy Almond Custard Danish Pastries every single time!
- Respect the Chill (and Temperature!): This is the MOST important rule for laminated pastry. Keep your butter and dough cold! If the butter gets too warm, it will melt into the dough instead of creating layers, resulting in a tough, bready pastry. Chill times are non-negotiable!
- Bash the Butter: Bashing the softened butter makes it more pliable and easier to incorporate into the dough evenly without tearing. This creates smoother layers.
- Don’t Over-Knead the Dough: While we knead initially, after the butter is incorporated, handle the dough gently. Over-working the dough can develop too much gluten, making it difficult to roll and resulting in tough pastries.
- Use a Sharp Knife for Cutting: For clean, crisp edges on your pastry squares, use a sharp knife or pastry wheel. This helps the layers puff up beautifully when baked.
- Don’t Skip the Egg Wash: The egg wash isn’t just for shine; it helps the flaked almonds adhere to the pastries and contributes to that gorgeous golden-brown color.
- Oven Temperature Matters: Ensure your oven is fully preheated to the correct temperature. A hot oven creates a burst of steam that helps the pastry layers separate and puff up beautifully.
Almond Custard Danish Pastries (Flaky, Creamy & So Rewarding!)
Ingredients
Equipment
Method
- Place the flour, salt, sugar, and yeast into a large bowl and mix together. Whisk the warm milk, 1 beaten egg, and almond extract. Gradually add to dry ingredients, stirring until smooth, slightly sticky dough forms.
- Tip onto a lightly floured surface and knead for 5 minutes until smooth and springy, not sticky.
- Place into a lightly oiled bowl, cover with lightly oiled cling film, and leave in a warm place for 1 hour or until doubled in size.
- Place the softened butter onto a board and bash with a rolling pin until approx. 26cm wide, 10cm long, and 1cm deep.
- On a lightly floured board, roll out dough to a 5mm thick, 30cm x 40cm rectangle (short side facing you). Place butter in middle, leaving 2cm border at short ends and 1cm at long sides.
- Fold the butter-free bottom third of dough over the middle third, then fold the remaining top third over to make a flat parcel. Press to seal. Chill, covered in cling film, for 15 minutes.
- Remove cling film and lay dough on floured surface (short side facing you). Roll out in one direction into a long rectangle. Fold bottom third over middle, then top third over. Wrap in cling film and chill for 15 minutes. (This is the first turn).
- Repeat the rolling and folding process 1 more time, starting with the longest side facing you. Allow to rest in fridge for another 15 minutes. (This is the second turn).
- Repeat the rolling and folding process (steps 6 & 7) two more times for a total of four turns. Wrap dough with cling film and chill overnight until firm.
- Preheat the oven to 200°C/fan180°C/gas 6. Line a baking sheet with nonstick baking paper.
- Roll out the chilled pastry to a 5mm thickness and cut into 12 x 10cm squares.
- Place a generous tablespoon of custard into the middle of each square. Brush pastry edges with beaten egg and fold corners into the centre to enclose filling.
- Place pastries on the lined baking sheet. Chill, covered in cling film, for 20 minutes.
- Brush each pastry with the beaten egg, scatter with flaked almonds and bake for 15-18 minutes or until puffed up and golden brown.
- Meanwhile, whisk the icing sugar, milk, and almond extract together in a small bowl until it forms a thick but pourable icing.
- Cool the pastries for 5-10 minutes, drizzle with the icing, and serve immediately.
Notes
Creative Twists: Delicious Ways to Customize Your Danish Pastries
These Almond Custard Danish Pastries are already pure perfection, but they’re also a fantastic canvas for your culinary creativity! Here are some ideas I love to play with:
- Fruit & Nut Swap: Instead of just flaked almonds, try adding a sprinkle of chopped pistachios, pecans, or even some dried cranberries or finely diced candied orange peel to the top with the almonds.
- Different Fillings: Get adventurous with your fillings! You could use a fruit preserve (raspberry or apricot are divine!), a cream cheese filling, or even a lemon curd. Just make sure the filling isn’t too wet.
- Chocolate Drizzle: After the icing, a fine drizzle of melted dark chocolate would be a decadent addition for serious chocolate lovers.
- Glaze Variations: Instead of plain almond icing, you could make a lemon glaze (lemon juice + icing sugar) or a simple vanilla glaze for a different flavor profile.
- Individual Shapes: Instead of just folding the corners, you could try other Danish pastry shapes like pinwheels (roll the dough with filling, then slice), or braids for a different visual appeal.
Keep ‘Em Fresh: Storing Your Homemade Almond Custard Danish Pastries
You’ve put so much love into these pastries, so let’s make sure they stay fresh and delicious!
- Room Temperature Storage: Once completely cooled, store your Almond Custard Danish Pastries in an airtight container at room temperature for up to 1-2 days. While delicious, pastries with custard filling are generally best enjoyed fresh.
- Refrigerator Storage: If you need to keep them longer, or if your kitchen is warm, you can store them in an airtight container in the refrigerator for up to 3 days. However, chilling can sometimes slightly firm up the pastry. Allow them to come to room temperature or gently warm before serving for best texture.
- Freezing Baked Pastries: You can freeze the baked and cooled Danish pastries (before icing!). Wrap them tightly in plastic wrap, then place them in a freezer-safe bag or container for up to 1 month. To reheat, thaw at room temperature, then warm gently in a low oven (around 150°C / 300°F) for 5-10 minutes until warmed through and slightly crisp. Then drizzle with fresh icing.
- Freezing Dough: The raw, laminated pastry dough can be frozen after all the turns and the overnight chill! Wrap it very tightly in plastic wrap and then foil. Freeze for up to 2-3 weeks. Thaw overnight in the fridge before proceeding with rolling, shaping, and baking.
FAQs: Your Top Danish Pastry Questions, Answered!
Q: Can I use instant yeast instead of fast action dried yeast?
A: “Fast action dried yeast” is instant yeast, so yes, you’re good to go! No need to activate it in liquid first.
Q: What if my butter breaks through the dough during rolling?
A: This happens sometimes, even to experienced bakers! Don’t panic. Gently patch any small holes with a bit of plain dough (from the border). If it’s a major tear, wrap the dough and chill it for a longer period (30-60 minutes) to allow the butter to firm up again before continuing. Cold dough is easier to work with.
Q: Can I make this dairy-free?
A: This recipe, as written, contains dairy (butter, milk, mascarpone). To make it dairy-free, you would need to use a good quality block vegan butter alternative, plant-based milk, and a dairy-free custard. Dairy-free mascarpone alternatives are also available.
Q: My pastries didn’t puff up much. What went wrong?
A: This could be due to a few reasons: your yeast might not have been active (check expiry!), the butter might have melted into the dough layers during rolling (not cold enough dough/butter), or you might have over-worked the dough. Ensuring proper chilling and gentle handling is key for those beautiful layers.
Q: Can I use homemade custard instead of ready-made?
A: Absolutely! If you have a favorite homemade custard recipe, feel free to use it. Just ensure it’s thick enough to hold its shape within the pastry and is completely cooled before filling the Danish pastries.
And there you have it, my friends—your guide to crafting the most delightful, impressive, and truly unforgettable Almond Custard Danish Pastries! This WiseRecipes creation is more than just a pastry; it’s a testament to how simple ingredients, when treated with a little love and smart steps, can come together to create something truly extraordinary. It’s a vibrant, exciting meal that you’ll genuinely look forward to eating, day after day.
I am genuinely so excited for you to try these and experience the delicious magic yourself. Please, please come back and let me know in the comments below what your favorite part of these flaky pastries was, or any fun twists you tried! Happy cooking from WiseRecipes!