Best 10 Valentine’s Day Treats: Easy & Delicious Recipes
Valentine's Day is just around the corner, and if you're anything like me, it's the perfect opportunity to whip up some delightful treats that will make hearts flutter! Whether you're surprising a loved one, sharing with friends, or simply indulging yourself, my collection of easy and delicious recipes will ensure you impress with minimal effort….
Valentine's Day is just around the corner, and if you're anything like me, it's the perfect opportunity to whip up some delightful treats that will make hearts flutter! Whether you're surprising a loved one, sharing with friends, or simply indulging yourself, my collection of easy and delicious recipes will ensure you impress with minimal effort. From decadent red velvet cupcakes to charming marbled meringue hearts, there's a sweet surprise waiting for everyone on this list. Get ready to discover mouthwatering tutorials that will elevate your Valentine's Day celebrations and leave your taste buds dancing with joy!
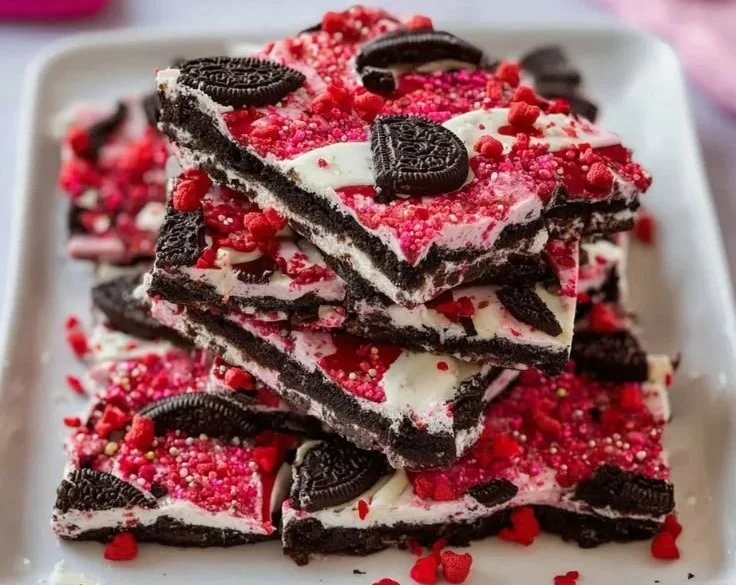
1. Epic Valentines Oreo Bark Recipe Quick Festive Treat

There’s something so enchanting about crafting a delightful treat for a festive occasion, and this Epic Valentines Oreo Bark is the perfect way to spread the love. It’s not just a treat; it’s an experience—one that fills your kitchen with the irresistible aroma of melted chocolate and dancing sprinkles, while the brilliant colors evoke joy and excitement. There’s a magical quality in sharing a sweet indulgence with those you hold dear, and this quick festive bark is just the ticket.
Why This Recipe is a Delightful Treat
- Simplicity Meets Elegance: With minimal culinary skills required, this bark looks glamorous enough to woo anyone while being fabulously easy to whip up.
- Festive Flair: The vibrant reds and pinks create a dazzling display that’s sure to catch the eye—perfect for parties, gatherings, or simply for making any day feel special.
- Customizable Goodness: You can easily adapt this recipe to suit your taste—whether you’re a classic chocolate lover or daring to try new flavor combinations.
- Crowd-Pleaser: Who doesn’t love Oreos and chocolate? This bark is a guaranteed hit with kids and adults alike, making it an ideal treat for any gathering.
- Quick and Easy: Perfect for those last-minute treats or when you want to show someone you care without spending hours in the kitchen.
Gathering Your Ingredients
To create this fabulous treat, you’ll want to have the following ingredients on hand. Each one plays a crucial role in crafting your delicious bark:
- 24 Oreo cookies, crushed: These are the heart of the recipe, bringing a sweet crunch and classic flavor that perfectly complements the chocolate.
- 2 cups of white chocolate chips: A creamy, luscious base that acts as a canvas for your toppings, melting beautifully and setting to form that gorgeous bark.
- 1 cup of pink or red candy melts: These add a splash of color and extra sweetness, bringing visual appeal and flavor to your bark.
- Heart-shaped sprinkles: The finishing touch! These cute sprinkles not only elevate the look but also embody the spirit of Valentine’s Day, making every bite a celebration.
Putting It All Together
Now that you have everything ready, let’s unveil the steps to crafting your Epic Valentines Oreo Bark. Trust me; the process is as fun as the final treat!
-
Crush the Oreos: Start by placing the Oreo cookies in a zip-top bag and using a rolling pin to break them into a mixture of chunks and fine crumbs. This texture adds interest to your bark.
-
Melt the White Chocolate: In a microwave-safe bowl, melt the white chocolate chips. Do this in 30-second intervals, stirring between each until you achieve a smooth consistency. The aroma will be heavenly!
-
Prepare Your Baking Sheet: Line a baking sheet with parchment paper, ensuring it extends beyond the edges for easy removal later. Pour the melted white chocolate onto the parchment, spreading it evenly to about 1/4-inch thick.
-
Layer on the Oreos: Sprinkle half of the crushed Oreos over the melted chocolate, pressing them gently into the layer for secure adherence.
-
Melt the Candy Melts: In a separate bowl, melt the pink or red candy melts. Once melted, drizzle them over the white chocolate mixture. Use a toothpick to swirl the two chocolates together, creating a mesmerizing marbled effect.
-
Finish with the Remaining Toppings: Sprinkle the rest of the Oreo crumbs on top, adding heart-shaped sprinkles for a festive touch.
-
Set the Bark: Place the baking sheet in the refrigerator for about 30 minutes, or until the layer is set firm.
-
Break and Serve: Once set, break the bark into irregular pieces. Serve these delightful bites and watch the smiles spread!
Pro Tips for Perfection
-
Use Quality Chocolate: Good quality chocolate makes a world of difference. I always suggest using real chocolate versus chips to achieve that silky smooth texture.
-
Stir Thoroughly: When melting your chocolate, be patient and stir thoroughly to avoid burning. A gentle hand will yield the best results!
-
Get Creative with Toppings: Consider adding nuts, dried fruits, or different colored sprinkles. Change it up based on the theme or occasion!
-
Let It Cool Gradually: If you have the time, let the bark set at room temperature before refrigerating to avoid condensation forming when it cools too quickly.
-
Size it Up: If you’re making this for a crowd, doubling the recipe is an excellent idea, just make sure you have enough space in your fridge!
Creative Twists to Try
While this recipe is a winner as is, why not mix it up a little? Here are some fun variations you can try:
-
Minty Fresh: Add some crushed mint Oreos instead of the regular ones for a refreshing mint flavor. You could also use peppermint extract in the white chocolate for a lovely twist.
-
Nutty Delight: Fold in some chopped nuts like almonds or hazelnuts for added crunch and depth.
-
Fruitful Options: Incorporate dried fruits like cranberries or cherries to introduce a sweet-tart contrast that ties beautifully with the chocolate.
-
Flavored Chocolate: Use dark chocolate instead of white for a richer flavor, or try using butterscotch chips for an unexpected twist.
-
Holiday-Themed: Change the sprinkles to fit other holidays, like orange for Halloween or green and gold for St. Patrick’s Day!
Presenting Your Treats
The best part of any dessert is how you present it! Serve your Epic Valentines Oreo Bark on a pretty platter—perhaps some rustic wood or vibrant color to contrast against the pinks and whites of the bark. You could also wrap pieces in cellophane with a cute ribbon to share with friends and loved ones. Each bite is a delightful surprise, leaving everyone with a touch of sweetness reminiscent of your warm-hearted gesture.
Keeping Your Bark Fresh
For those times when you nibble a bit too much (who can resist?), storing your bark is key to keeping it fresh and delicious:
-
Refrigeration: Keep the bark in an airtight container in the fridge for up to two weeks. This ensures it stays deliciously crunchy and avoids moisture.
-
Freezing: If you want to save some for later, you can freeze it! Just ensure each piece is separated by parchment paper in an airtight container. It can last up to three months in the freezer—great for unexpected guests!
-
Thawing Tips: When you’re ready to enjoy it again, just pull it from the fridge or freezer and let it sit at room temperature for a few minutes before enjoying for that fresh crunch.
Your Questions Answered
-
Can I use regular chocolate chips instead of white chocolate?
Absolutely! Just remember, the flavor profile will change, but it will still be delicious. Dark or milk chocolate would be fantastic choices! -
Do I need to refrigerate the bark?
It’s best to refrigerate it to ensure it sets properly. Plus, it tastes great chilled! -
What if I can’t find candy melts?
No worries! You can use more chocolate chips instead, just add a bit of shortening or coconut oil to help it drizzle better. -
Can I make this ahead of time?
Yes! This bark keeps well. You can make it a few days in advance, making it a great go-to for gatherings.
Crafting this Epic Valentines Oreo Bark is not just about satisfying a sweet tooth; it embodies the joy of creating and sharing something special with others. The vibrant colors and delectable flavors make it a treat that dazzles the senses, perfect for Valentine’s Day or any occasion that calls for a sweet touch. So, gather your ingredients, put on your favorite playlist, and indulge in this delightful treat that’s guaranteed to create lasting memories. Happy baking!
Epic Valentines Oreo Bark
Ingredients
Method
-
Crush the Oreos by placing them in a zip-top bag and using a rolling pin to break into a mixture of chunks and fine crumbs.
-
In a microwave-safe bowl, melt the white chocolate chips in 30-second intervals, stirring until smooth.
-
Line a baking sheet with parchment paper, extending beyond the edges for easy removal. Pour the melted white chocolate onto the parchment, spreading it to about 1/4-inch thick.
-
Sprinkle half of the crushed Oreos over the melted chocolate, pressing them gently into the layer.
-
Melt the pink or red candy melts in a separate bowl and drizzle them over the white chocolate mixture. Use a toothpick to swirl the two chocolates together.
-
Top with the remaining Oreo crumbs and heart-shaped sprinkles.
-
Place the baking sheet in the refrigerator for about 30 minutes, or until firm.
-
Once set, break the bark into irregular pieces and serve.
Notes
2. A Decadent Valentine’s Treat: Red Velvet Cupcakes
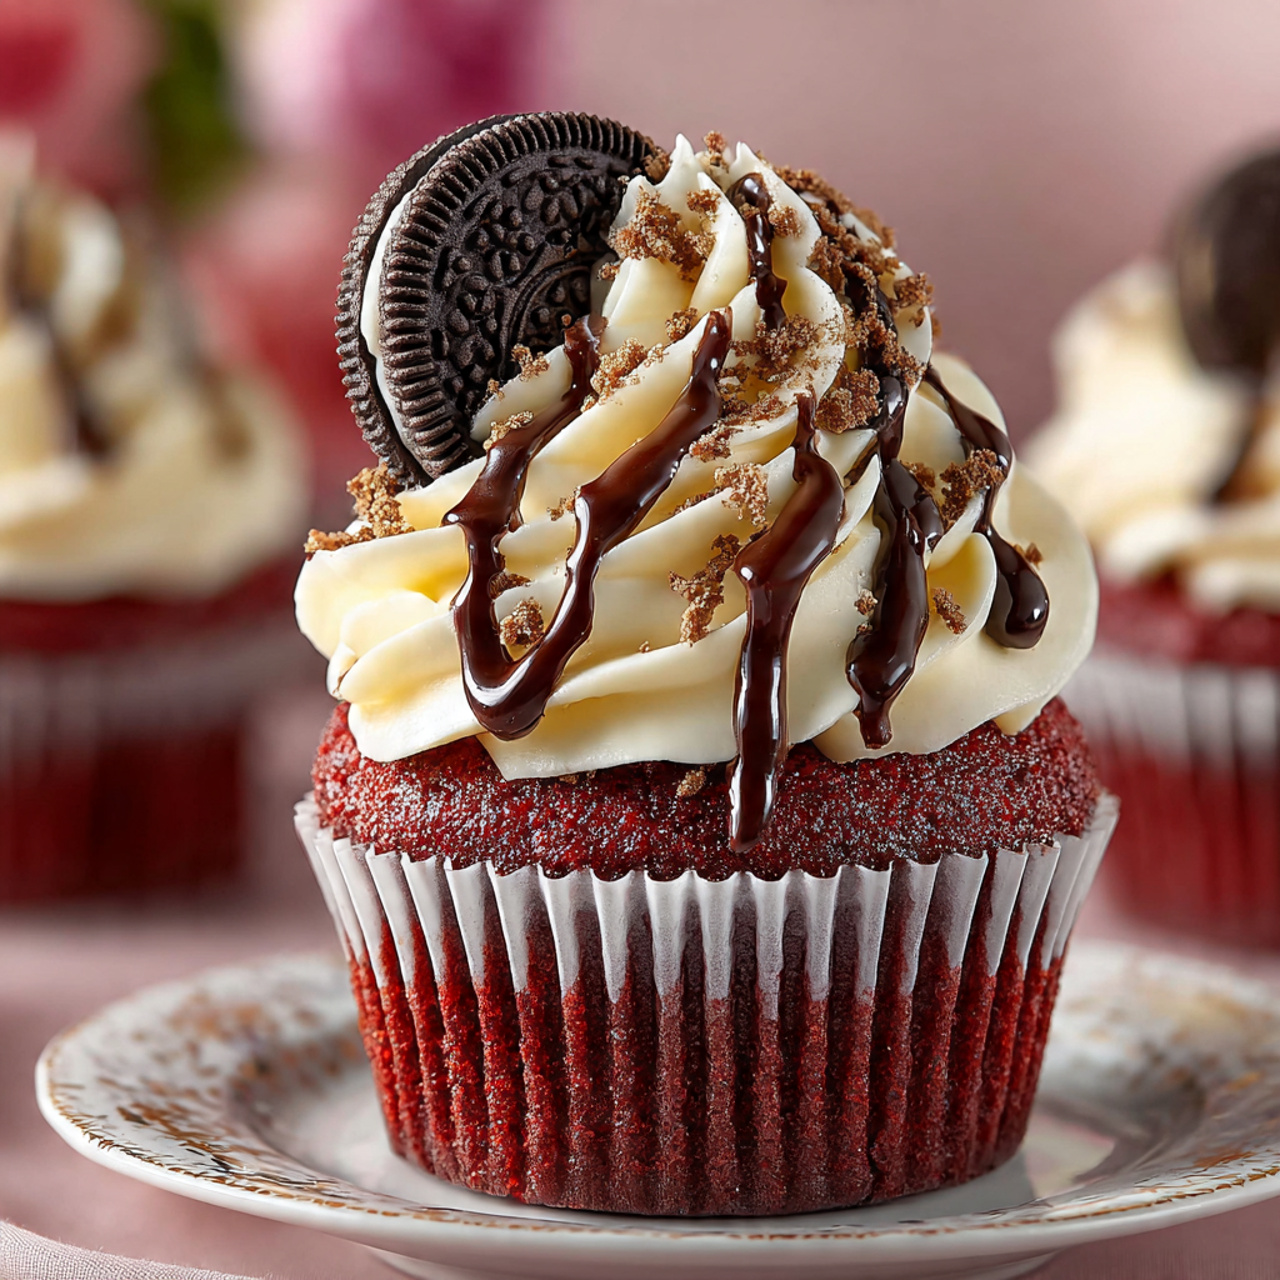
There’s a reason red velvet is the undisputed flavor of Valentine’s Day. It’s romantic, it’s a little mysterious, and it’s utterly, decadently delicious. This year, forget the store-bought desserts and create a truly special treat for your sweetheart with these incredible, over-the-top Red Velvet Cupcakes. Imagine a perfectly moist, tender red velvet cupcake with a subtle hint of chocolate, crowned with a mountain of silky, tangy cream cheese frosting, and then decorated with an array of chocolatey treasures. This isn’t just a cupcake; it’s a grand, edible declaration of love.
This recipe is my go-to when I want to make a truly impressive, bakery-level cupcake. The cake itself is a dream—the combination of butter and shortening creates an unbelievably soft crumb, and a special red velvet extract gives it that authentic, unique flavor that’s hard to place but impossible to forget. The cream cheese frosting is pure, classic perfection: tangy, sweet, and unbelievably smooth. But the real fun comes in the final, show-stopping assembly. This is more than a cupcake; it’s a full-on dessert experience.

Why These Cupcakes are the Ultimate Valentine’s Indulgence
You are going to fall completely in love with this impressive and incredibly delicious recipe. It’s the perfect way to show you care. Here’s why:
- The Ultimate Red Velvet Flavor: This from-scratch recipe delivers a perfectly moist, tender crumb with that classic, subtle chocolate and tangy flavor that makes red velvet so beloved.
- Luxurious, Silky Cream Cheese Frosting: The frosting is a perfect balance of tangy cream cheese and sweet butter, whipped into a light, fluffy, and completely irresistible topping.
- A True Show-Stopping Presentation: With a beautiful two-tone frosting swirl and an array of decadent toppings, these cupcakes look like they came from a high-end bakery.
- A Fun and Creative Decorating Project: From creating custom chocolate pieces to artfully arranging the toppings, this is a wonderfully creative project for a special occasion.
Recipe Snapshot
| Prep Time | 45 minutes |
| Cook Time | 21 minutes |
| Cooling Time | ~1 hour |
| Total Time | ~2 hours 5 minutes |
| Servings | 24 cupcakes |
| Calories | 450 kcal per cupcake (estimated) |
| Course | Dessert |
| Cuisine | American |
| Difficulty/Method | Intermediate / Baking |
Your Shopping List for These Decadent Cupcakes
This impressive dessert comes together with classic baking staples and a few fun decorating items.
→ For the Red Velvet Cupcakes
- 2 ½ cups all-purpose flour
- 1 tbsp cocoa powder → For that subtle, classic chocolate note.
Let’s Get Baking! Your Step-by-Step Guide
Ready to create the most beautiful cupcakes for your Valentine? Let’s get started.
Part 1: The Tender Red Velvet Cupcakes
- Preheat and Prep: Preheat your oven to 350°F (175°C) and line a 24-cup muffin pan with festive paper liners.
- Combine Dry Ingredients: In a large bowl, whisk together the flour, cocoa powder, baking soda, and salt.
- Cream the Fats and Sugar: In the bowl of a stand mixer, beat the softened butter, shortening, and sugar on medium-high speed until it’s very light and fluffy. Mix in the egg, vanilla, red velvet extract, and red gel food coloring until just combined.
- Make the Batter: With the mixer on low, alternate adding the dry ingredients and the milk, beginning and ending with the dry ingredients. Mix only until just combined—do not overmix!
- Bake and Cool: Scoop the batter into the prepared liners, filling each one about ¾ of the way full. Bake for about 21 minutes, or until a toothpick inserted into the center comes out clean. Let the cupcakes cool completely on a wire rack.
Part 2: The Luscious Frosting & Decorations
- Make the Frosting: In the bowl of a stand mixer, beat the softened butter and cream cheese until smooth. Gradually add the powdered sugar, then the vanilla and heavy whipping cream. Beat until the frosting is smooth, light, and forms stiff peaks.
- Create the Two-Tone Effect: Split the frosting into two bowls. Add a few drops of red food coloring to one bowl and mix until you have a nice pink or red color.
- Make the Chocolate Pieces: Follow the directions on your candy transfer sheet to place the designs into a chocolate square mold. Melt your chocolate wafers according to package directions, then carefully spoon the melted chocolate into the molds over the transfers. Let the chocolate harden completely before removing the finished decorative squares.
Part 3: The Show-Stopping Assembly
- Prepare the Piping Bag: To get the beautiful two-tone swirl, place your piping bag (fitted with a large star tip) inside a tall glass and fold the edges over. Use a spatula to create four vertical stripes of the red frosting on the inside of the bag. Then, gently fill the center of the bag with the white frosting.
- Frost the Cupcakes: Pipe a generous, beautiful swirl of the two-tone frosting on top of each of the completely cooled cupcakes.
- Decorate!: Now for the fun! Lightly drizzle some chocolate sauce over the frosting. Gently press a Red Velvet Oreo into the center of the cupcake frosting. Place one of your custom chocolate pieces in front of the Oreo, and a piece of a chocolate cookie stick behind the Oreo. Serve and watch your Valentine swoon!
Valentine’s Day Red Velvet Cupcakes with Cream Cheese Frosting
Ingredients
Equipment
Method
-
Preheat oven to 350°F and line cupcake pans. Whisk together flour, cocoa powder, baking soda, and salt.
-
In a standing mixer, beat together the butter, shortening, and sugar until light and fluffy. Mix in the egg, vanilla, red velvet extract, and red gel food coloring.
-
Alternating between the dry ingredients and the milk, gradually mix both into the batter until just combined.
-
Scoop batter into the cupcake liners, filling them 3/4 of the way. Bake for 21 minutes, or until a toothpick comes out clean. Let cool completely.
-
Make the frosting: In a standing mixer, beat together the butter, cream cheese, powdered sugar, vanilla, and heavy whipping cream until smooth and stiff peaks form.
-
Make the chocolate pieces: Following package directions, place the candy transfers in your chocolate mold. Pour melted chocolate wafers over top and allow to harden completely before removing.
-
Prepare the piping bag for a two-tone swirl: Split a portion of the frosting and color it red. Paint vertical stripes of the red frosting inside a piping bag fitted with a star tip, then fill the bag with the white frosting.
-
Pipe a generous swirl on each cooled cupcake. Drizzle with chocolate sauce. Place a Red Velvet Oreo in the center, a custom chocolate piece in front, and a cookie stick behind it.
Notes
Cool Completely: Do not frost the cupcakes until they are 100% cool to prevent the cream cheese frosting from melting.
Storage: Due to the cream cheese frosting, these cupcakes must be stored in an airtight container in the refrigerator.
WiseRecipes’ Top Tips for Perfect Red Velvet
These simple secrets will ensure your Valentine’s cupcakes are a flawless, flavorful triumph.
- Use Room Temperature Ingredients. For a smooth, emulsified batter and a lump-free frosting, it is crucial that your butter, shortening, cream cheese, egg, and milk are all at room temperature before you begin.
- Don’t Overmix the Batter! This is the key to a tender, fluffy cupcake. Once you start adding the flour and milk, mix only until the ingredients are just combined. Overmixing develops the gluten and can lead to tough, dry cupcakes.
- Cool Cupcakes Completely. The golden rule of cupcake decorating! If you try to frost a warm cupcake, your beautiful cream cheese frosting will melt into a greasy mess. Be patient.
- Use Gel Food Coloring. For a deep, vibrant red velvet color without adding a lot of extra liquid to your batter (which can change the texture), a concentrated gel or paste food coloring is a must.
- The Frosting Stripe is a Pro-Move. The technique of striping the piping bag with the colored frosting before filling it with the white is an easy way to get a stunning, professional-looking two-tone swirl with minimal effort.
Keep Them Fresh! Storing Your Cupcakes
Because of the cream cheese frosting, these beautiful cupcakes need to be stored with care.
- Refrigerator: The finished cupcakes must be stored in the refrigerator in a tall, airtight container (like a cupcake carrier) to protect the frosting. They will stay fresh and delicious for up to 4 days.
- Serving: For the absolute best flavor and texture, let the cupcakes sit at room temperature for about 20-30 minutes before serving.
FAQs: Your Red Velvet Cupcake Questions, Answered!
What is red velvet extract, and is it necessary?
Red velvet extract (or emulsion) is a specialty flavoring that has hints of vanilla, butter, and a slight tang that gives red velvet its unique, classic flavor. If you can’t find it, you can simply use all vanilla extract, and your cupcakes will still be delicious!
Can I make these without a stand mixer?
Yes, a powerful hand mixer will work perfectly for both the cake batter and the frosting. It may just take a minute or two longer to get the butter and sugar perfectly light and fluffy.
Where can I find candy transfer sheets and chocolate molds?
You can find these in the cake decorating or candy making aisle of most major craft stores (like Michaels or Jo-Ann), at specialty cake decorating supply stores, or online.
Can I make the frosting ahead of time?
Yes, cream cheese frosting can be made up to 3 days in advance and stored in an airtight container in the refrigerator. Just let it come to room temperature and then re-whip it with your mixer for a few minutes until it’s light and fluffy again before frosting.
Final Thoughts: A Cupcake Baked with Love
There is nothing more special than a truly decadent, over-the-top, homemade dessert, crafted with love for someone special. These Valentine’s Day Red Velvet Cupcakes are a perfect project to show your affection in a truly delicious and beautiful way. I hope they bring a little extra sweetness and a whole lot of love to your celebration. Happy Valentine’s Day!
3. A Sweet Valentine’s Treat: Marbled Meringue Hearts
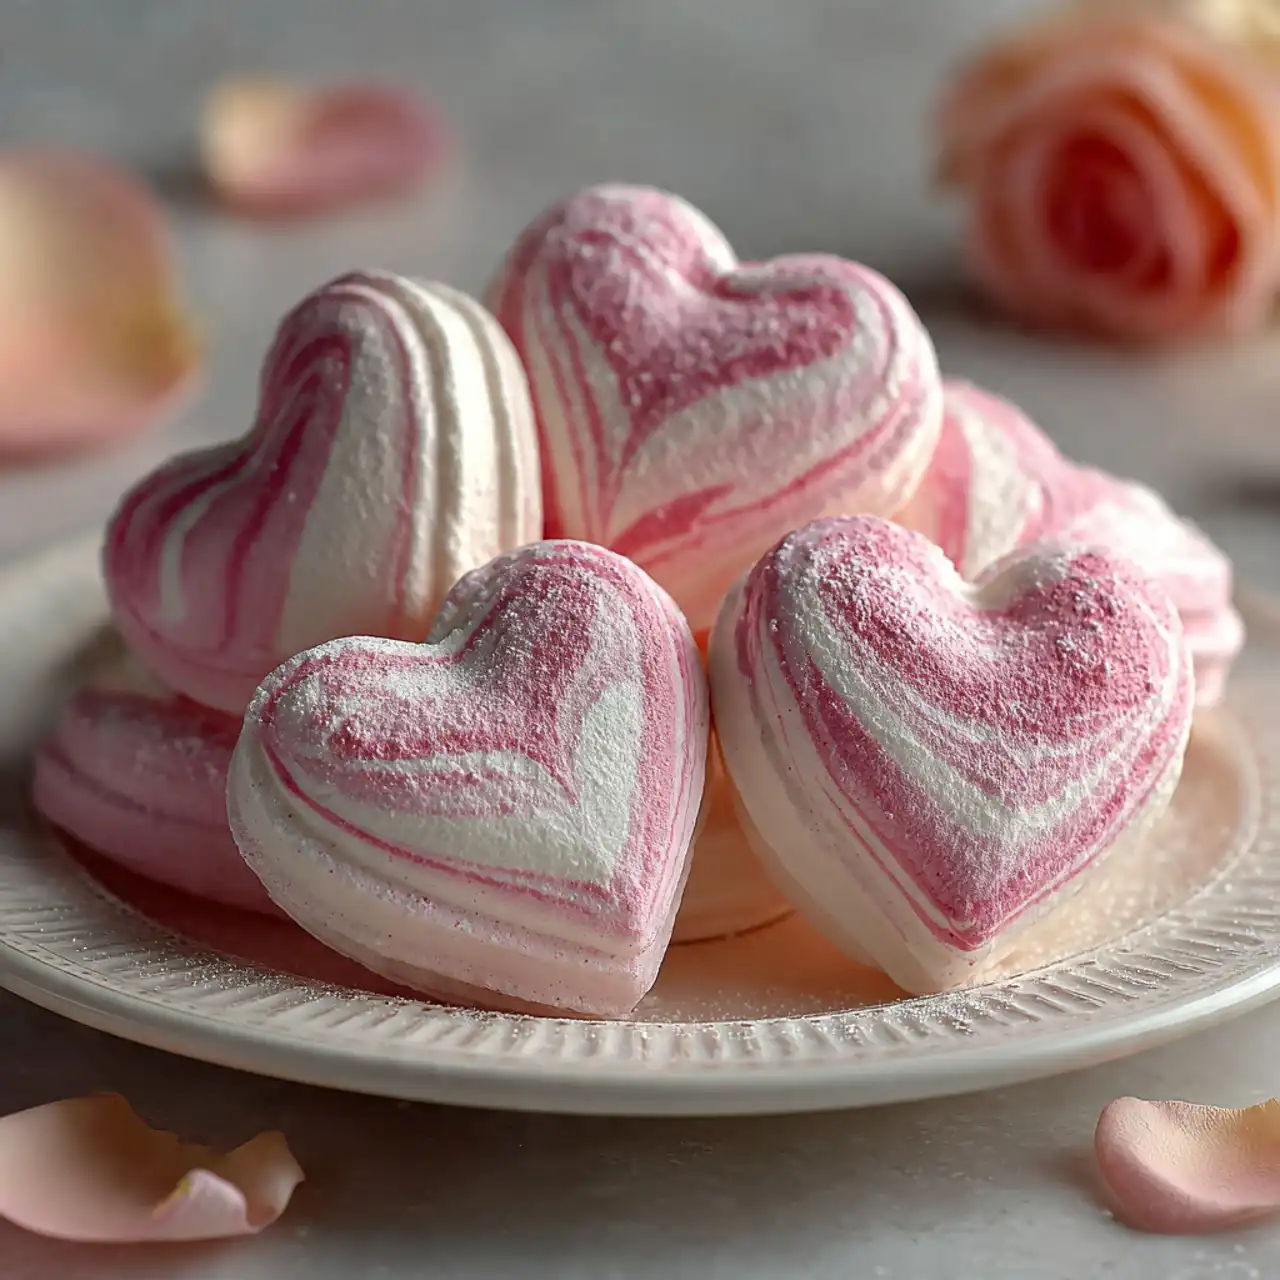
There is something utterly romantic and magical about a perfect meringue. It’s a sweet little cloud, crisp on the outside, with an airy, melt-in-your-mouth texture that feels like a whisper of a dessert. Now, imagine those little clouds piped into beautiful heart shapes, with delicate, artistic swirls of pink running through them. This, my friends, is not just a cookie; it’s a love letter you can eat. These Marbled Meringue Hearts are, without a doubt, the most elegant and impressive treat you can make for Valentine’s Day.
I know what you might be thinking—meringue seems fussy and intimidating. But I’m here to let you in on a secret: it’s one of the most rewarding and surprisingly simple things you can make, and it requires only a handful of ingredients. This recipe is my foolproof guide to creating a stable, glossy meringue that pipes beautifully every single time. The magic comes from the slow, low-heat bake and the long, patient cool-down in the oven, which is what creates that signature crisp, dry texture. It’s a process that feels like pure alchemy, transforming simple egg whites and sugar into something truly special.

Why These Meringue Hearts are a Perfect Valentine’s Gift
You are going to fall completely in love with this beautiful and delicious project. They are a true expression of affection. Here’s why:
- Stunningly Beautiful and Romantic: The delicate heart shape and the beautiful, artistic pink marble swirls make these cookies look like they came from a high-end French patisserie.
- Incredibly Light and Airy: These aren’t heavy or dense cookies. They are crisp, light as a feather, and literally melt in your mouth with a sweet vanilla flavor.
- Made with Just 5 Simple Ingredients: You only need egg whites, sugar, vanilla, cream of tartar, and a drop of food coloring to create this impressive confection.
- A Fun and Creative Baking Project: The process of creating the marble effect and piping the heart shapes is a wonderfully artistic and satisfying activity.
- Perfect for Gifting: Meringues have a great shelf life! Packaged in a beautiful box or clear bag, they make a stunning and thoughtful homemade gift for your Valentine.
Recipe Snapshot
| Prep Time | 25 minutes |
| Cook Time | 20 minutes (+ cooling time) |
| Total Time | ~3 hours |
| Servings | About 2 dozen hearts |
| Calories | 27 kcal per meringue |
| Course | Dessert |
| Cuisine | French-Inspired |
| Difficulty/Method | Intermediate / Baking |
Your Shopping List for These Sweet Hearts
The magic of meringue comes from just a few simple, powerful ingredients.
→ For the Meringues
- 3 large egg whites → It is crucial that they are at room temperature and have absolutely no trace of yolk in them.
- ¾ cup sugar → Regular granulated sugar works perfectly.
- ¼ teaspoon cream of tartar → A secret weapon that helps to stabilize the egg whites, making your meringue stronger and less likely to weep.
Let’s Get Whipping! Your Step-by-Step Guide
Ready to master the art of the perfect meringue? Let’s break it down into simple, manageable steps.
Part 1: The Foolproof Meringue
- Prep Your Station: Place your egg whites in a very clean, large bowl and let them stand at room temperature for 30 minutes. This is an important step! Line a couple of large baking sheets with parchment paper. Preheat your oven to a very low 200°F (93°C).
- Whip to Soft Peaks: Add the vanilla and cream of tartar to the room-temperature egg whites. Using an electric mixer on medium speed, beat until the mixture forms soft peaks (when you lift the beaters, a peak will form and then gently curl over on itself).
- Create the Glossy Meringue: Switch the mixer to high speed. Very gradually, add the sugar, just one tablespoon at a time, beating well after each addition. Continue to beat on high until the meringue is very thick, glossy, and holds “stiff peaks” (when you lift the beaters, the peak stands straight up).
Part 2: The Marble and Piping
- Create the Marble Effect: Scoop out about ¼ cup of the finished white meringue into a small, separate bowl. Add a drop or two of red food coloring to create a nice pink color. Gently fold this pink meringue back into the main bowl of white meringue with just one or two light swirls. Do not overmix! You want to see distinct ribbons of pink and white.
- Pipe the Hearts: Gently transfer the marbled meringue into a large pastry bag fitted with a star or round tip. On your prepared baking sheets, pipe 2-inch heart shapes, leaving about 2 inches of space between each one.
Part 3: The Low, Slow Bake and Dry
- Bake Until Dry: Place the baking sheets in the preheated oven and bake for about 20 minutes, until the meringues are set and feel dry to the touch.
- The Crucial Cool-Down: Turn the oven completely off, but do not open the door! Leave the meringues in the closed oven until it has completely cooled down. This could take a couple of hours. This long, slow drying period is what makes them perfectly crisp.
- Store or Serve: Once completely cool, you can serve your beautiful meringue hearts or store them in an airtight container.
Marbled Meringue Hearts
Ingredients
Equipment
Method
-
Place egg whites in a large, clean bowl; let stand at room temperature for 30 minutes. Preheat oven to 200°F. Line baking sheets with parchment paper.
-
Add vanilla and cream of tartar to the egg whites; beat on medium speed with an electric mixer until soft peaks form.
-
Gradually beat in the sugar, 1 tablespoon at a time, on high speed until the meringue is thick, glossy, and holds stiff peaks.
-
Remove 1/4 cup of the meringue and tint it pink with red food coloring. Gently fold the pink mixture back into the remaining white meringue with just one or two swirls to create a marbled effect.
-
Transfer the meringue to a pastry bag. Pipe 2-inch heart shapes onto the prepared baking sheets, about 2 inches apart.
-
Bake until the meringues are set and feel dry to the touch, about 20 minutes.
-
Turn the oven off completely and leave the meringues inside the closed oven until it has completely cooled. This is a crucial step for drying them out.
-
Store in an airtight container at room temperature.
Notes
Add Sugar Slowly: Adding the sugar one tablespoon at a time is the secret to a strong, stable, and glossy meringue that won’t collapse.
The Oven Cooldown: Do not skip the step of letting the meringues cool completely in the turned-off oven. This is what makes them perfectly crisp and dry.
WiseRecipes’ Top Tips for Meringue Mastery
Meringue can be delicate, but these tips will guarantee your success.
- A Completely Clean, Dry Bowl is a MUST. Meringue’s number one enemy is any trace of fat or grease (including egg yolk!). This will prevent your egg whites from whipping up to their full, airy volume. Make sure your bowl and beaters are impeccably clean and dry.
- Room Temperature Egg Whites Whip Higher. Letting your egg whites sit out for 30 minutes before you start allows them to whip up to a greater volume, resulting in a lighter, airier meringue.
- Add the Sugar SLOWLY. This is the most important step for a stable meringue. Adding the sugar one tablespoon at a time allows it to fully dissolve into the egg whites, creating a strong, glossy, and smooth structure that won’t collapse.
- Don’t Overmix the Marble! For that beautiful, artistic swirl effect, less is more. Just one or two gentle folds of the colored meringue back into the white is all you need to create the marbled look without turning the whole batch a uniform pink.
- The Oven Cool-Down is Essential. Don’t be tempted to pull the meringues out of the oven early. Letting them cool down slowly with the oven is what prevents them from cracking and ensures they dry out completely to become perfectly crisp.
Keep Them Fresh! Storing Your Delicate Creations
Meringues have a great shelf life if stored properly, making them a perfect make-ahead holiday treat.
- Storage: The key to storing meringues is keeping them away from moisture. Once they are completely cool, store them in a single layer in a completely airtight container at room temperature. They will stay crisp and delicious for up to two weeks! Do not refrigerate them, as the humidity will make them soft and sticky.
FAQs: Your Meringue Heart Questions, Answered!
Why is my meringue chewy instead of crisp?
This is almost always due to humidity or not being dried out for long enough. Meringues are like sponges for moisture in the air. Try to make them on a dry day if possible, and don’t skip that long, slow cool-down in the oven. If they are still chewy, you can pop them back into a 200°F oven for another 10-15 minutes to help dry them out further.
Can I make these without cream of tartar?
You can, but the cream of tartar provides a huge advantage. It’s an acid that helps to stabilize the egg whites, making your meringue stronger, more voluminous, and less likely to collapse or “weep.” A small amount of lemon juice or white vinegar can be used as a substitute in a pinch.
How do I know when I’ve reached “stiff peaks”?
It’s a visual cue. Stop the mixer and lift the beaters straight up out of the meringue. The peak that forms should stand up straight and tall, without the tip flopping over. The meringue should also be very thick and glossy.
Can I add other flavors to the meringue?
Yes! You can swap the vanilla extract for another oil-free extract, like ½ teaspoon of peppermint extract for a festive twist, or even almond extract. Just be sure not to use anything oil-based, as it will deflate your meringue.
Final Thoughts: A Sweet Declaration of Love
There is something truly special about creating a treat that is as delicate and beautiful as it is delicious. These Marbled Meringue Hearts are a perfect project for showing a little extra love and care. They are a light, elegant, and stunning confection that will make anyone feel special. I hope they bring a little bit of sweet, airy magic to your Valentine’s Day. Happy Baking!
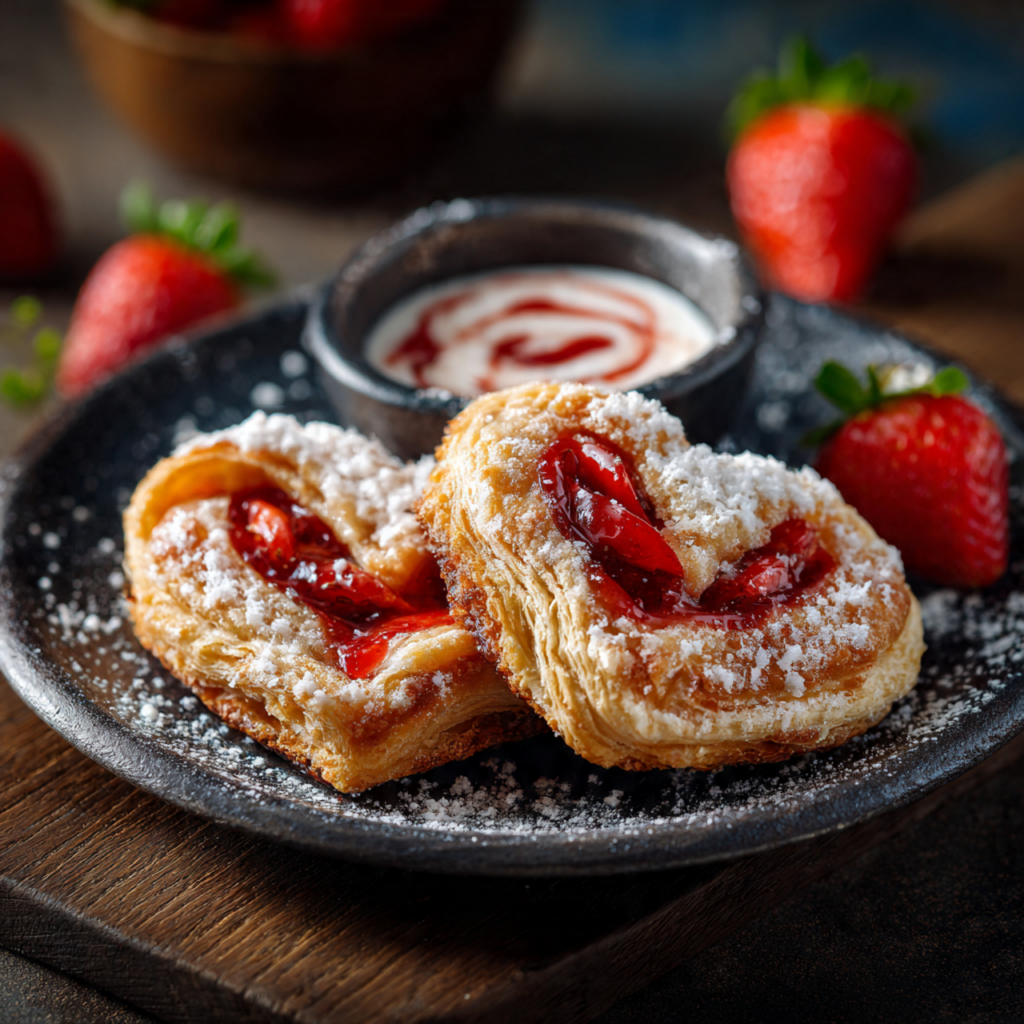
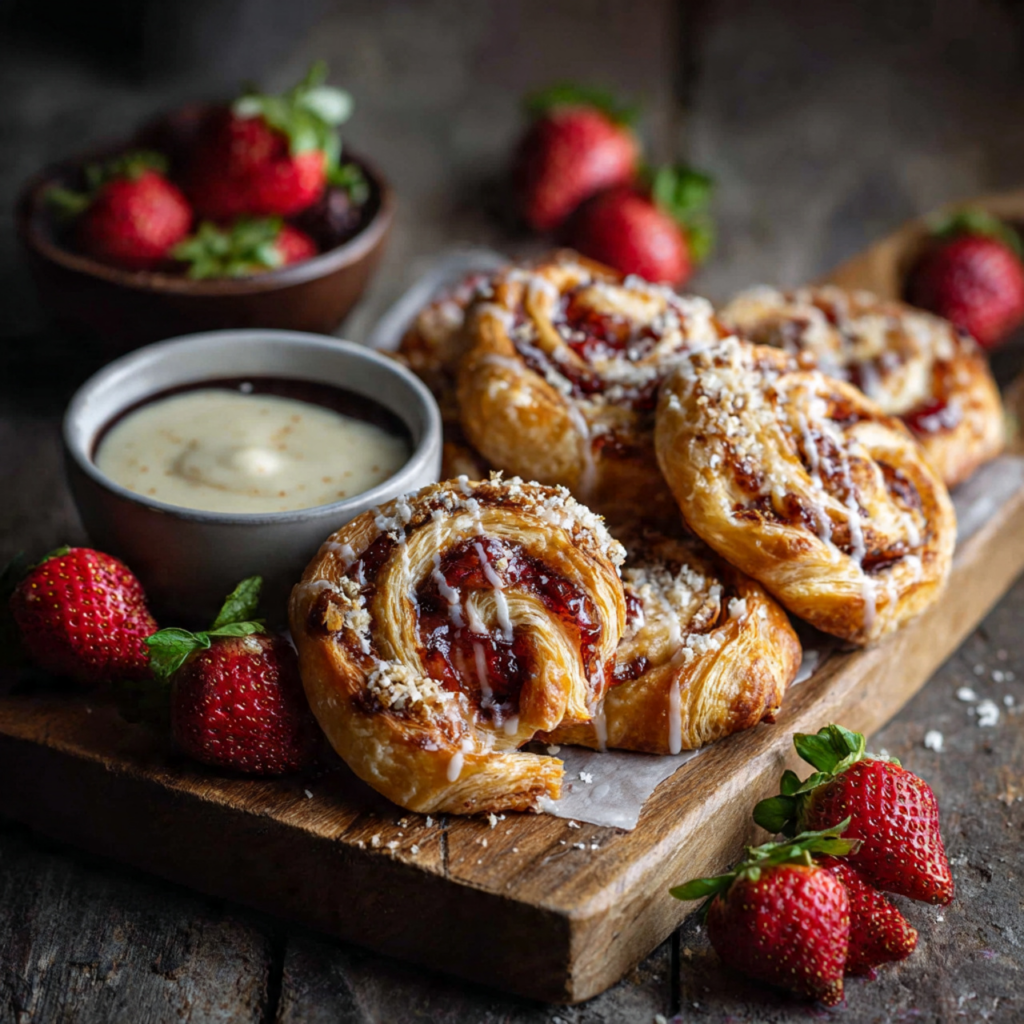
4. The Ultimate Strawberry Palmiers (Easy Valentine’s Treat!)
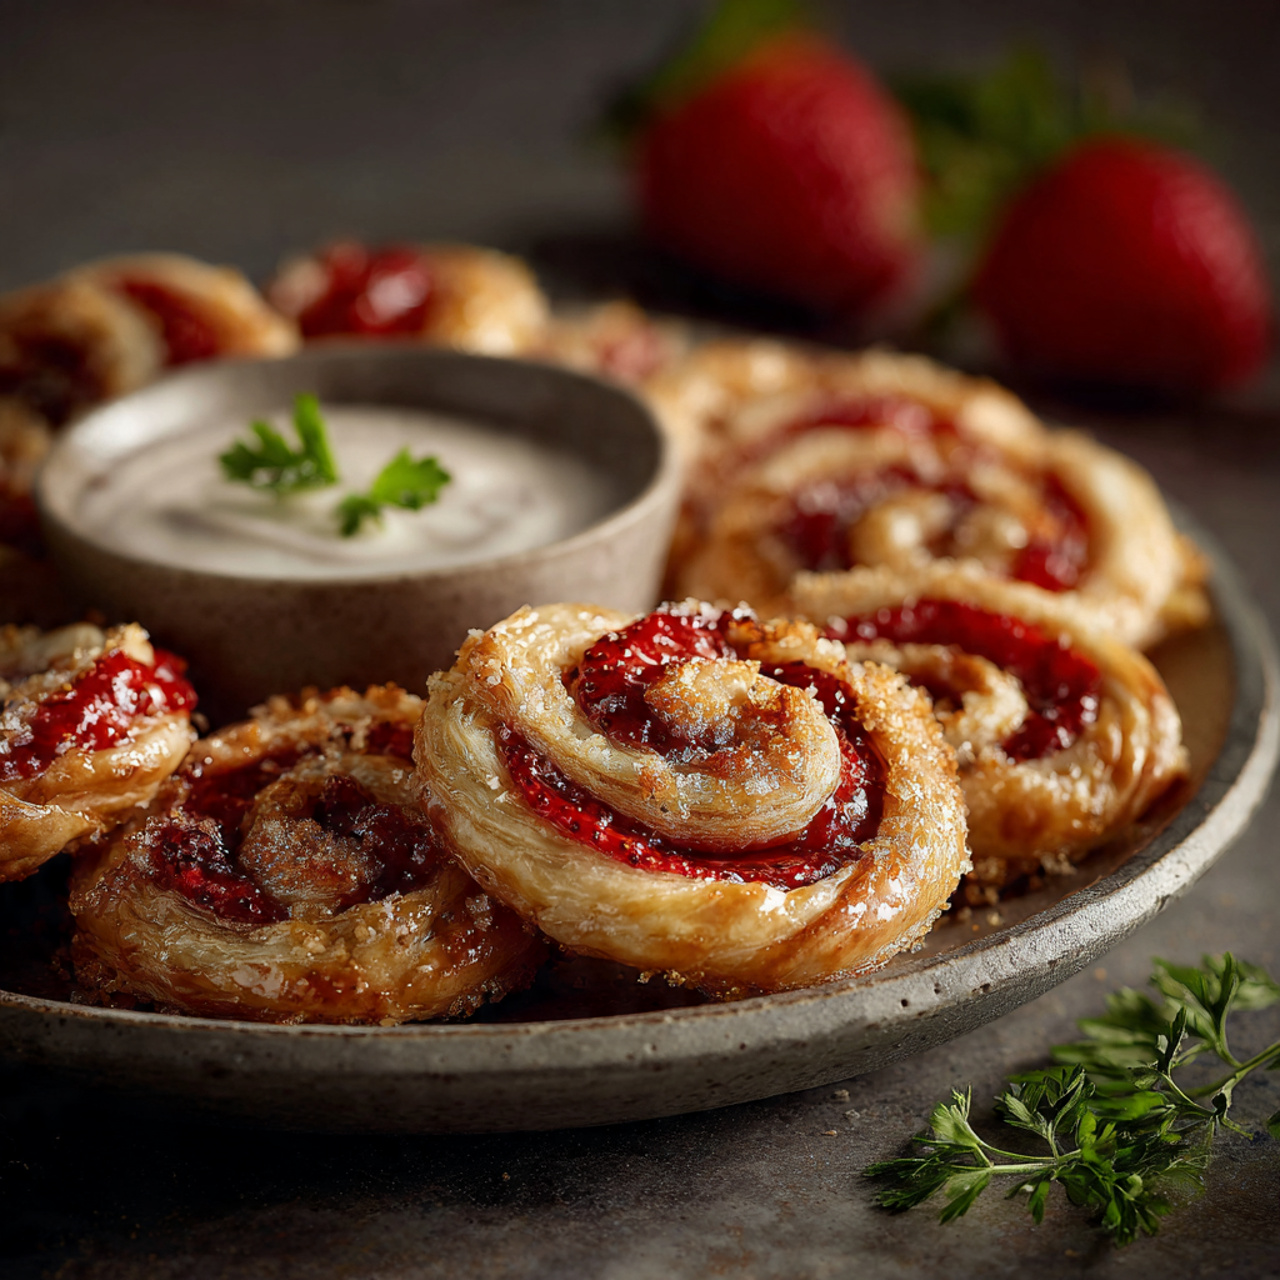
Imagine a delicate, buttery, and impossibly flaky pastry, shaped like a perfect little heart, baked to a caramelized, golden-brown perfection, and bursting with the sweet flavor of strawberries. Now, imagine it’s dipped in creamy white chocolate and finished with a sprinkle of more strawberries. That, my friends, is the elegant, bakery-worthy magic of these Strawberry Palmiers. This is, without a doubt, the most impressive and deceptively simple treat you will bake this Valentine’s Day.
I promise you, there is no greater baking triumph than watching these little scrolls puff up in the oven into their signature shape. The intense strawberry flavor, which comes from both jam and powerful freeze-dried strawberries, is a perfect match for the rich, buttery pastry. They are a true taste of luxury, made right in your own kitchen.
Get ready to master a classic pastry technique (the easy way!) and create a batch of stunning, delicious, and completely irresistible cookies that will have your Valentine swooning.
Why You’ll Fall Head Over Heels for These Palmiers
You are going to be completely amazed by how easy it is to create such a professional-looking pastry. This recipe is a true gem. Here’s why:
- A Genius Shortcut to a French Classic: Using store-bought puff pastry is the secret to getting dozens of perfectly flaky, buttery layers with almost no effort!
- Intense, Double Strawberry Flavor: We use both strawberry jam and ground freeze-dried strawberries for a sweet, tart, and intensely fruity flavor in every bite.
- Stunning, Heart-Shaped Appearance: The classic palmier fold naturally creates a beautiful heart shape, making these the perfect elegant treat for Valentine’s Day.
- Incredibly Delicious Texture: The combination of the shatteringly crisp, caramelized pastry and the creamy chocolate dip is a textural masterpiece.
- Perfect for Gifting: A beautiful stack of these palmiers tied with a ribbon makes a thoughtful and incredibly impressive homemade Valentine’s gift.
Recipe Snapshot
| Prep Time | 15 minutes |
| Cook Time | 16 minutes |
| Total Time | 50 minutes (includes cooling) |
| Servings | 30 palmiers |
| Calories | 140 kcal per palmier (estimated) |
| Course | Dessert, Snack |
| Cuisine | French-Inspired, American |
| Difficulty/Method | Easy / Baking |
Your Shopping List for These Sweetheart Pastries
This impressive dessert comes together with just a handful of simple, high-quality ingredients.

→ For the Strawberry Palmiers
- 2 (1-oz.) packages freeze-dried strawberries → Divided. This is the secret to intense strawberry flavor without adding moisture!
- ¼ cup strawberry jam → For a sweet, fruity layer inside the pastry.
→ For the Chocolate Dip
- 1 cup white chocolate → Melted, for dipping. Use good quality chips or wafers.
- 1 tsp neutral oil (like canola or vegetable) → Optional, to help thin the chocolate for a smooth coating.
Let’s Get Folding! Your Step-by-Step Guide
Ready to create these beautiful French pastries? The secret is all in the fold!
Part 1: Prepare the Strawberry Pastry
- Preheat and Prep: Arrange a rack in the center of your oven and preheat to 400°F (200°C). Line two large baking sheets with parchment paper.
- Prep the Strawberries: In a food processor or a sealed plastic bag, crush one package of the freeze-dried strawberries until they form a fine powder. Coarsely crush the second package and set it aside for garnish.
- Roll and Sugar the Pastry: Unfold one sheet of thawed puff pastry onto your work surface. Sprinkle half of the granulated sugar over the top and gently press it in with a rolling pin. Flip the pastry over so the sugar side is down.
- Add the Strawberry Layer: Spread 2 tablespoons of strawberry jam evenly over the surface. Sprinkle with 2 tablespoons of the ground, powdered strawberries. Repeat this entire process with the second sheet of puff pastry.
Part 2: The Classic Palmier Fold
- The First Folds: Working with one sheet at a time, fold the right side of the pastry in towards the center line. Then, fold the left side in to meet it in the middle.
- The Second Folds: Repeat the process. Fold the new right side in towards the center, and then the left side in towards the center.
- The Final Fold: Finally, fold the right half over the top of the left half, like closing a book. You should now have a long, layered log of pastry.
Part 3: Slice, Bake, and Decorate
- Slice the Hearts: Using a sharp knife, cut each log crosswise into 15 pieces, about ½ to ¾-inch thick. Arrange the slices on your prepared baking sheets, cut-side up, spacing them about 2 inches apart.
- Bake to Golden Perfection: Bake for 14 to 16 minutes, carefully flipping them over halfway through, until the pastries are puffed, deeply golden brown, and caramelized. Let them cool on the baking sheets for at least 15 minutes.
- Prepare the Chocolate Dips: Divide the melted white chocolate between two small, deep bowls. To one bowl, stir in 1 tablespoon of the remaining ground strawberries and 1 tsp of oil until smooth and pink.
- Dip and Garnish: Dip one edge of half of the cooled palmiers into the pink strawberry chocolate. Dip the edges of the remaining palmiers into the plain white chocolate. Place them on parchment paper, and while the chocolate is still wet, sprinkle them with the reserved crushed strawberries. Let them set completely before serving.
Strawberry Palmiers with White Chocolate Dip
Ingredients
Equipment
Method
-
Preheat oven to 400°F. In a food processor, grind 1 package of freeze-dried strawberries into a fine powder. Coarsely crush the second package and set aside.
-
Roll one puff pastry sheet to a 9 1/2″ square. Sprinkle with half the sugar and gently press it in. Flip the pastry over. Spread with 2 Tbsp. strawberry jam and sprinkle with 2 Tbsp. ground strawberries. Repeat with the second sheet of pastry.
-
Fold the right and left sides of the pastry to meet in the center. Repeat this fold again. Finally, fold the right side over the left side like closing a book to create a log.
-
Cut each log crosswise into 15 (1/2″ to 3/4″) pieces. Place on parchment-lined baking sheets, spacing them 2″ apart.
-
Bake, turning halfway through, until puffy and golden, 14 to 16 minutes. Let cool for at least 15 minutes.
-
Divide melted white chocolate between 2 small bowls. Add 1 Tbsp. ground strawberries and oil to one bowl to create a pink chocolate.
-
Dip one edge of half the palmiers into the pink chocolate and the other half into the plain white chocolate. Place on parchment paper and sprinkle with the reserved crushed strawberries. Let set completely.
Notes
Make Ahead: You can prepare the filled and folded logs, wrap them tightly, and refrigerate for up to 2 days or freeze for up to a month. Slice and bake from chilled or frozen (adding a few extra minutes for frozen).
Even Browning: Flipping the palmiers halfway through baking is the key to ensuring both sides are perfectly golden and caramelized.
WiseRecipes’ Top Tips for Perfect Palmiers
These simple secrets will help you achieve that perfect, flaky, bakery-quality result.
- Keep Your Puff Pastry COLD. Puff pastry gets its flaky layers from the pockets of butter. If the dough gets too warm, the butter will soften and you’ll lose those beautiful layers. Work quickly, and if the dough ever feels too soft or sticky, pop it back in the fridge for 10-15 minutes.
- Freeze-Dried Strawberries are the Secret. This ingredient is a game-changer! It provides an intense, concentrated strawberry flavor without adding any extra liquid, which would make the pastry soggy.
- Don’t Skip the Sugar Underneath. Sprinkling sugar on the work surface before you start isn’t just for flavor; it helps create a beautifully caramelized, crisp exterior on the palmiers as they bake.
- Flip for Even Browning. The halfway-through flip is crucial for palmiers. It ensures that both sides get equally golden brown and caramelized, and it helps them bake up evenly.
- Space Them Out! Puff pastry expands significantly in the oven. Give your palmier slices plenty of room on the baking sheet (at least 2 inches apart) so they can puff up without sticking together.
Keep Them Fresh! Storing Your Pastries
Palmiers are at their absolute, shatteringly-crisp best on the day they are made.
- Storage: If you have leftovers, they can be stored in an airtight container at room temperature for up to 2 days. Their texture will soften over time, but they will still be delicious.
FAQs: Your Palmier Questions, Answered!
Where do I find puff pastry in the grocery store?
You can almost always find frozen puff pastry in the freezer aisle, usually near the frozen desserts, pie crusts, and phyllo dough.
My palmiers spread out and didn’t hold their shape. What happened?
This is usually a sign that the dough got too warm before baking. For extra insurance, after you slice the log into individual cookies, you can place the baking sheet in the freezer for 10-15 minutes to firm them up before they go into the hot oven. This helps them hold that beautiful heart shape.
Can I use a different kind of jam or fruit?
Absolutely! This is a fantastic base recipe. Raspberry or apricot jam would be delicious. You could also try different freeze-dried fruits, like raspberries, to match your jam.
Can I make these ahead of time?
Yes, you can! The best way to make them ahead is to prepare the filled and folded logs, wrap them tightly in plastic wrap, and refrigerate for up to 2 days or freeze for up to a month. When you’re ready, just thaw (if frozen), slice, and bake for fresh palmiers!
Final Thoughts: A Taste of Parisian Romance
There is nothing more elegant than a classic French pastry, and these Strawberry Palmiers bring all that sophistication to your home kitchen in the easiest way possible. They are a beautiful, delicious, and heartfelt treat, perfect for sharing with someone special this Valentine’s Day. I hope this simple but impressive recipe brings a little bit of flaky, buttery joy to your celebration. Happy Baking!
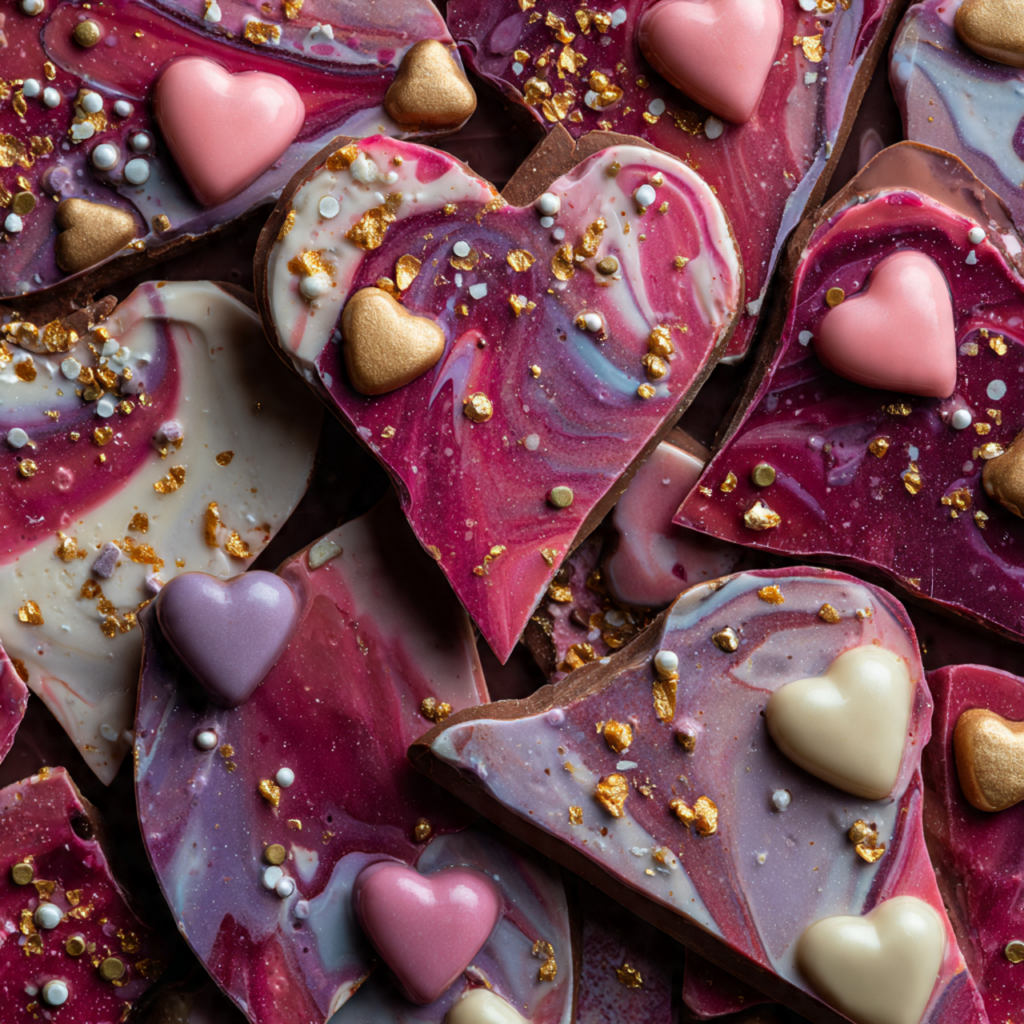
5. The Ultimate Conversation Heart Bark (Easy Valentine’s Treat!)
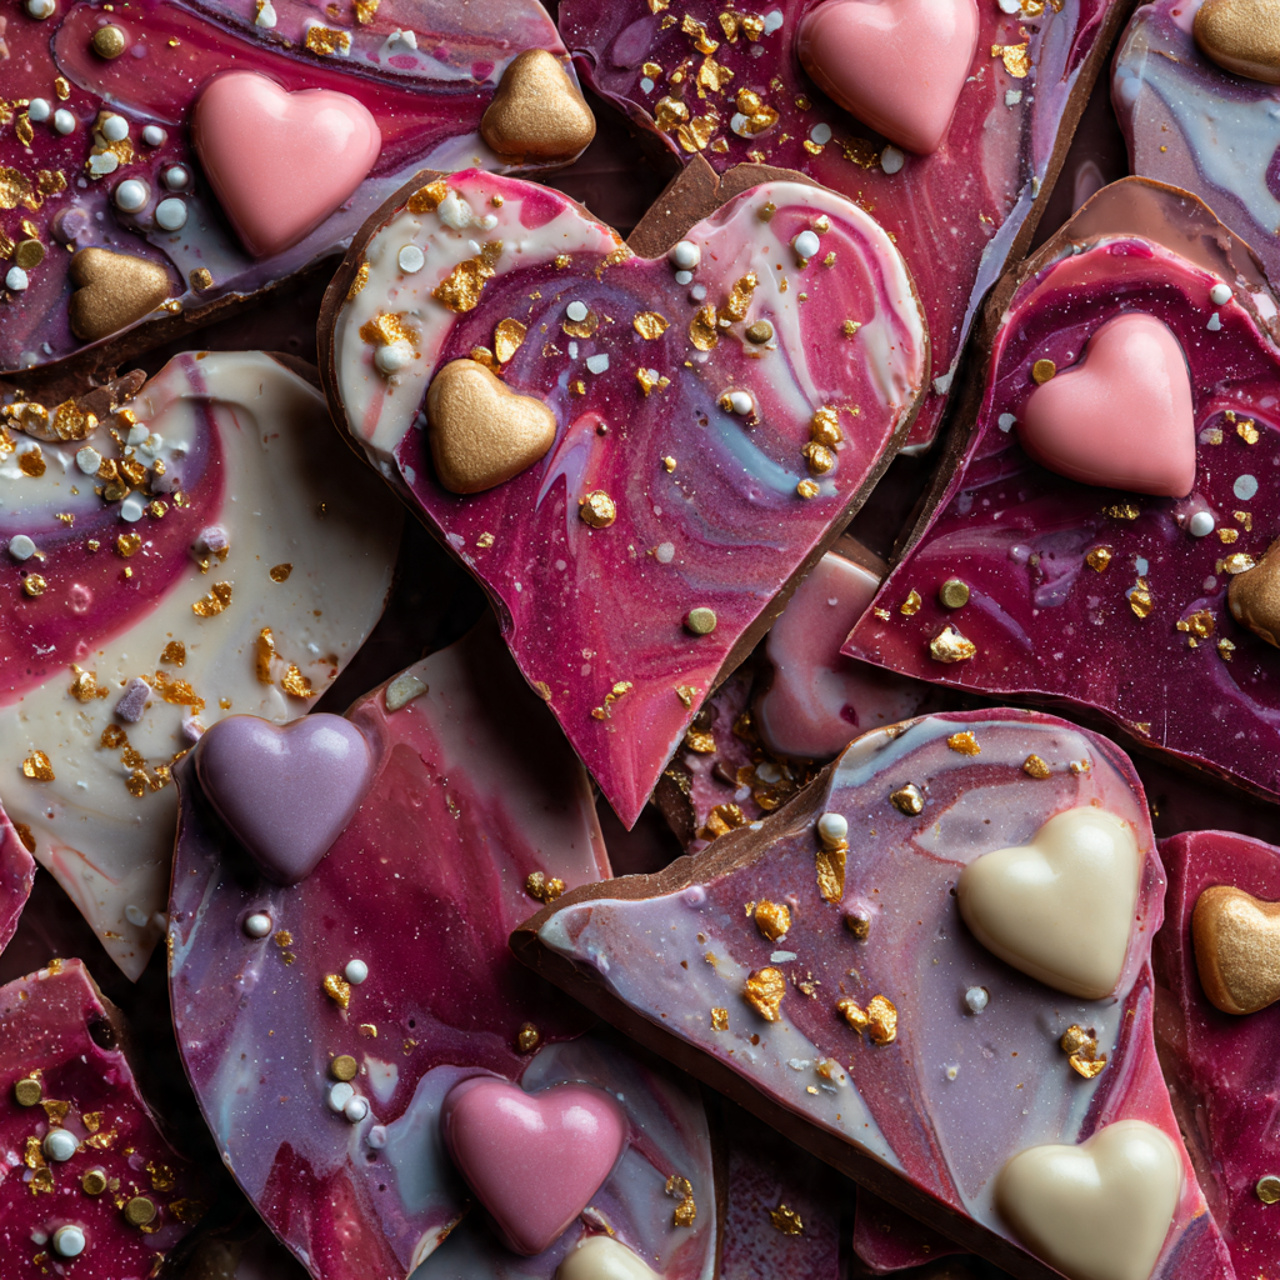
Imagine a stunning, swirled confection of rich dark chocolate and creamy, pink-tinted white chocolate, adorned with nostalgic conversation hearts and festive sprinkles. Now, imagine this beautiful, gourmet-looking candy is incredibly easy to make and requires absolutely no baking. That, my friends, is the simple, artistic magic of this Valentine’s Day Conversation Heart Bark. This is, without a doubt, the easiest and most impressive-looking treat you will make to share the love this year.
I promise you, there is no greater satisfaction than breaking apart a sheet of this beautiful, hardened bark. Each piece is a unique work of art, with a perfect snap and a delicious combination of rich semisweet and creamy white chocolate. The classic conversation hearts add a touch of whimsy, nostalgia, and a fun, crunchy texture.
Get ready to create the perfect edible gift and a stunning addition to any Valentine’s platter, a treat so easy and beautiful, it will become your new go-to for any celebration.
Why You’ll Adore This Conversation Heart Bark
You are going to be completely charmed by how simple it is to create such a beautiful and delicious treat. It’s a true Valentine’s Day hero. Here’s why:
- Incredibly Easy and No-Bake: If you can melt chocolate, you can make this recipe! It’s a completely no-bake treat that comes together with minimal effort and time.
- Stunningly Beautiful and Artistic: The simple technique of swirling the two chocolates together creates a gorgeous, marbled effect that looks incredibly professional and unique every time.
- A Perfect, Nostalgic Valentine’s Treat: Topping the bark with classic conversation hearts is a fun, whimsical touch that’s perfect for celebrating the holiday of love.
Recipe Snapshot
| Prep Time | 15 minutes |
| Chill Time | 2 hours |
| Total Time | 2 hours 15 minutes |
| Servings | 8-10 servings |
| Calories | 250 kcal per serving (estimated) |
| Course | Dessert, Snack |
| Cuisine | American |
| Difficulty/Method | Easy / No-Bake, Microwave |
Your Shopping List for This Sweet Treat
This impressive candy comes together with just a handful of simple, easy-to-find ingredients.
→ For the Conversation Heart Bark
- 8 oz. semisweet chocolate → Coarsely chopped from a bar or use high-quality chips for the rich, dark base.
- 6 oz. white chocolate → Coarsely chopped or chips. This will be part of our pink swirl.
- 2 oz. pink candy melts → The secret to a vibrant, perfect pink color that won’t seize the white chocolate.
- ¼ tsp. canola or vegetable oil → Helps make the white chocolate mixture extra smooth and fluid for swirling.
- Conversation heart candies and Valentine’s sprinkles → For that final, festive, and fun decoration!
Let’s Get Melting! Your No-Bake Guide
Ready for the easiest, prettiest candy of the season? Let’s get started.
Part 1: Melt the Chocolates
- Prep Your Pan: Line a large baking sheet with parchment paper or a silicone baking mat. This is a crucial step for easy removal.
- Melt the Pink Chocolate: In a medium, heatproof bowl, combine the white chocolate and the pink candy melts. Melt them together, either over a double boiler or in the microwave. If using the microwave, heat in 20-second intervals, stirring well after each one, until the mixture is completely melted and smooth. Stir in the oil.
- Melt the Dark Chocolate: In a separate bowl, melt the semisweet chocolate using the same method until it is smooth and fluid.
Part 2: The Art of the Swirl
- Create the Base: Pour the melted semisweet chocolate onto your prepared baking sheet. Using an offset spatula or the back of a spoon, spread it out into a large, even rectangle.
- Add the Swirl: Drizzle the pink chocolate mixture randomly over the top of the dark chocolate base.
- Make It Marble!: Take a knife, a toothpick, or a skewer and gently drag it through the two chocolates to create beautiful, artistic swirls and a marbled pattern. Don’t overmix, or the colors will become muddy!
- Decorate: While the chocolate is still wet, immediately sprinkle the top with conversation heart candies and your festive sprinkles.
Part 3: Chill, Break, and Serve
- Chill Until Firm: Place the baking sheet in the refrigerator for about 2 hours, or until the bark is completely firm and hardened.
- Break and Enjoy: Once firm, lift the parchment paper from the baking sheet and break the bark into pieces as large or as small as you’d like. Serve and enjoy!

Marbled Conversation Heart Chocolate Bark
Ingredients
Equipment
Method
-
Line a large baking sheet with parchment paper.
-
In a microwave-safe bowl, melt the white chocolate and pink candy melts together in 20-second intervals, stirring, until smooth. Stir in the oil. Set aside.
-
In a separate bowl, melt the semisweet chocolate in the same manner until smooth.
-
Pour the melted semisweet chocolate onto the prepared baking sheet and spread it into a large rectangle.
-
Drizzle the pink chocolate mixture on top. Use a knife or toothpick to gently swirl the layers together to create a marbled effect.
-
While the chocolate is still wet, sprinkle the top with conversation hearts and sprinkles.
-
Refrigerate until the bark is completely hardened, about 2 hours. Once firm, break into pieces and serve.
Notes
Work Quickly: Have your sprinkles and candies ready to go before you start, as the chocolate will begin to set quickly.
Storage: Store the finished bark in an airtight container in the refrigerator for up to 2 weeks to keep it firm and crisp.
WiseRecipes’ Top Tips for Perfect Chocolate Bark
These simple secrets will ensure your Valentine’s bark is flawless and beautiful.
- Don’t Overheat the Chocolate. The key to perfectly smooth melted chocolate is gentle heat. Whether you’re using a double boiler or a microwave, use low heat and stir frequently. Short bursts in the microwave are your best friend.
- Less is More When Swirling. To get those beautiful, distinct patterns, you only need to make a few passes with your knife or toothpick. If you swirl too much, the colors will blend together and you’ll lose the marbled effect.
- Work Quickly When Decorating. Once you’ve swirled the chocolates, they will start to set. Have your conversation hearts and sprinkles open and ready to go so you can sprinkle them on while the chocolate is still wet enough for them to adhere.
- Don’t Skip the Parchment Paper! This is a non-negotiable step. It guarantees that your beautiful, hardened bark will lift off the baking sheet in one piece with zero sticking.
- Use Pink Candy Melts for a Vibrant Color. While you could use red food coloring with the white chocolate, pink candy melts are foolproof. They provide a perfect, vibrant pink hue without any risk of causing the white chocolate to seize.
Keep It Fresh! Storing Your Valentine’s Bark
This beautiful bark is perfect for making ahead as a sweet gift.
- Storage: Once broken into pieces, the bark should be stored in an airtight container in the refrigerator. This will keep it crisp and prevent the chocolate from softening. It will stay fresh for up to two weeks.
FAQs: Your Conversation Heart Bark Questions, Answered!
Can I use different kinds of chocolate?
Absolutely! Feel free to mix and match. A milk chocolate base with a dark chocolate swirl, or a dark chocolate base with a white and red swirl for a different look would be fantastic. This recipe is all about creativity!
Can I make this on the stovetop instead of the microwave?
Yes, and it’s a great method for gentle, even melting. Simply use a double boiler (or a heatproof bowl set over a saucepan of gently simmering water) to melt each of your chocolates in separate bowls until smooth.
What if I don’t have pink candy melts?
You can create the pink color by using only white chocolate and adding a few drops of an oil-based pink or red food coloring. It’s important to use an oil-based (or “candy”) coloring, as regular water-based food coloring can cause the white chocolate to seize and become grainy.
What are some other fun topping ideas for Valentine’s Day?
So many! Freeze-dried raspberries or strawberries would be beautiful and add a tart flavor. A sprinkle of flaky sea salt would be delicious with the dark chocolate. Or, for extra sparkle, you could add some edible glitter or festive red and pink sprinkles.
Final Thoughts: Your Easiest, Most Artistic Valentine’s Treat
There is nothing more satisfying than creating a beautiful, gourmet-looking candy that was secretly the easiest thing in the world to make. This Conversation Heart Bark is a perfect, heartfelt treat for sharing with the ones you love. It’s a simple, artistic, and delicious way to spread a little sweetness this Valentine’s Day. Happy Valentine’s Day!
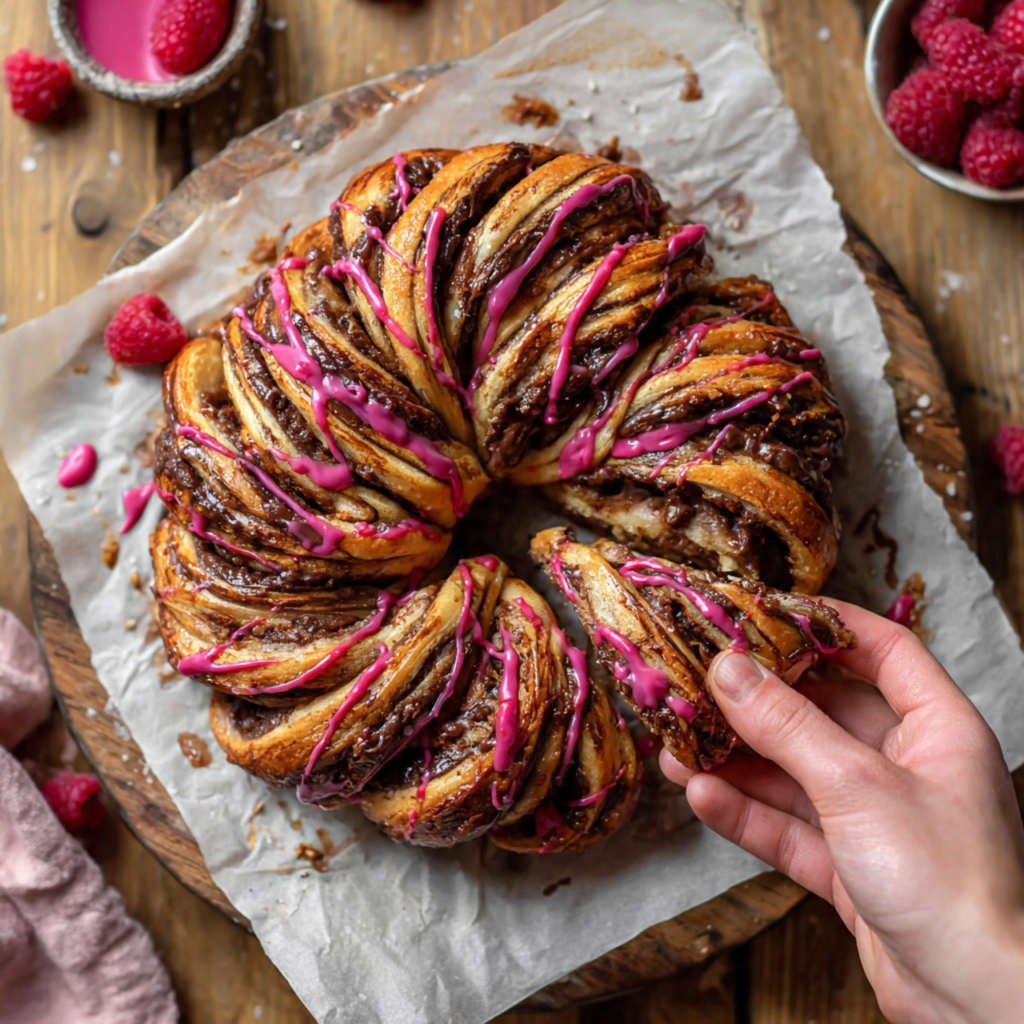
6. The Ultimate Pull-Apart Nutella Heart (Easy Valentine’s Treat!)
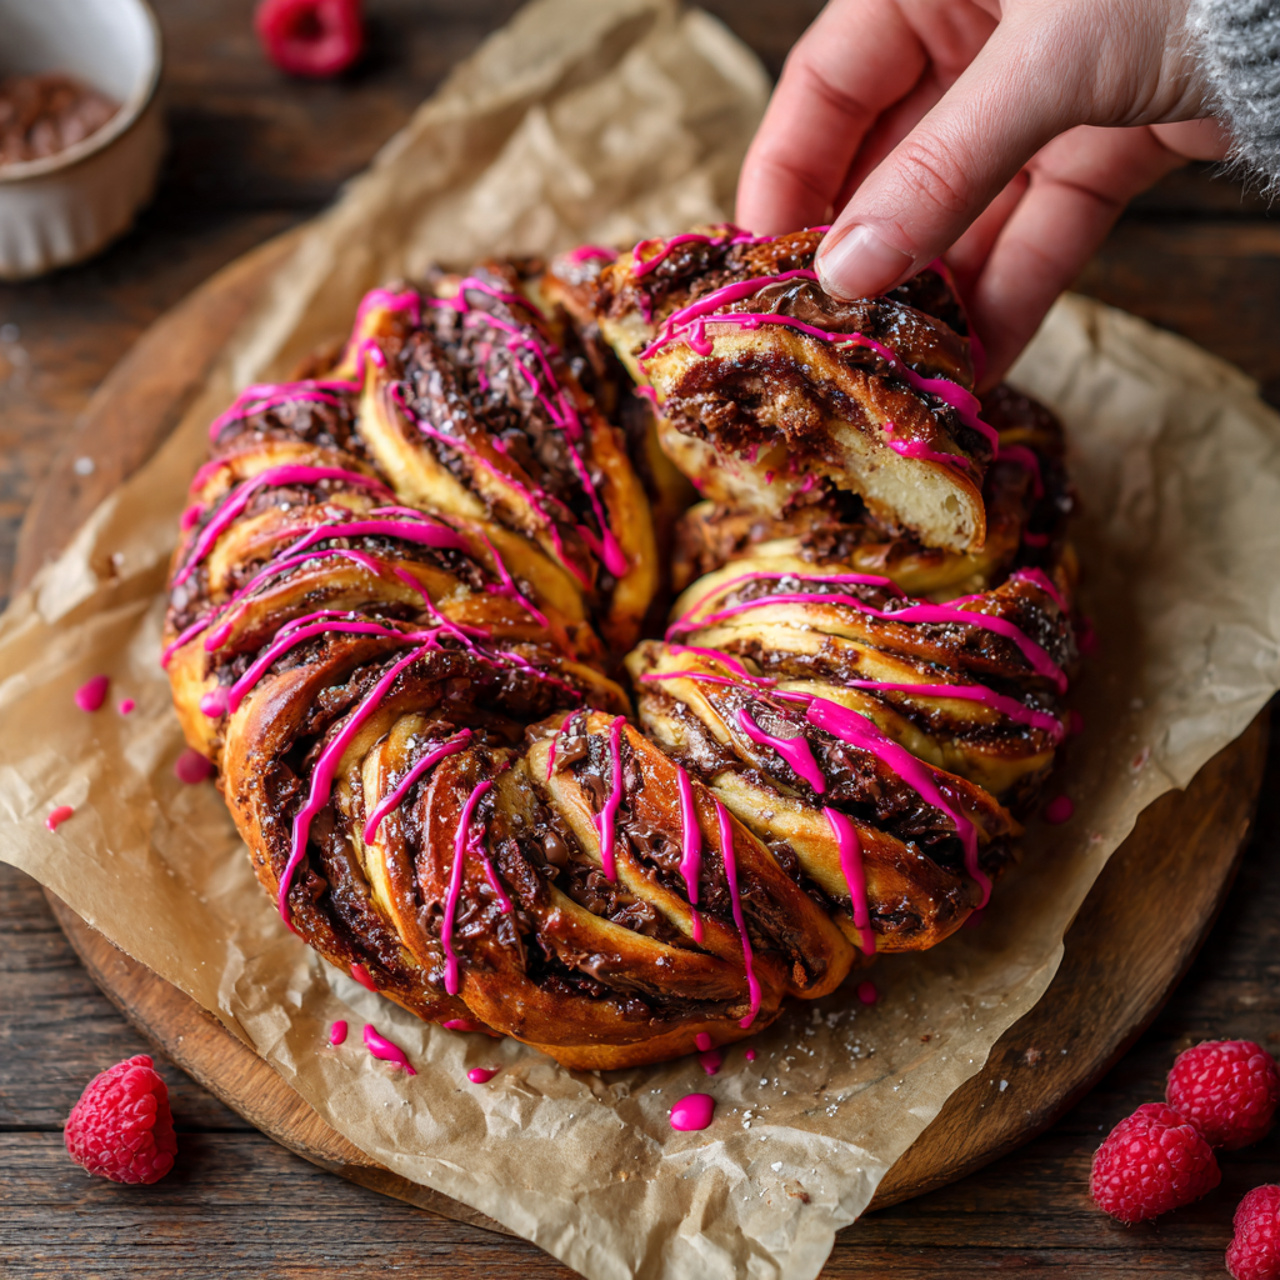
Imagine a giant, heart-shaped pastry, warm from the oven, with dozens of little twisted sections just begging to be pulled apart. Now, imagine each twist reveals a gooey, decadent layer of rich Nutella, all finished with a sweet, pink raspberry drizzle. That, my friends, is the interactive, show-stopping magic of this Pull-Apart Nutella Heart. This is, without a doubt, the most fun and impressive treat you will bake for Valentine’s Day.
I promise you, there is no greater joy than placing this warm, golden-brown heart in the center of the table and watching everyone’s eyes light up. The combination of the flaky, buttery crescent dough with the warm, melted chocolate-hazelnut spread is pure bliss. It feels incredibly special but is secretly so simple to create.
Get ready to create the ultimate centerpiece for your Valentine’s breakfast, brunch, or dessert, a treat so fun and delicious, it’s destined to become a new tradition.
Why You’ll Fall in Love with This Pull-Apart Heart
You are going to be completely amazed by how easy it is to create such a stunning and interactive treat. It’s a true Valentine’s Day show-stopper. Here’s why:
- A Genius Shortcut to an Impressive Pastry: Using refrigerated crescent roll dough is the secret to a perfect, flaky, buttery result with almost no effort!
- Incredibly Fun to Make and Eat: The process of cutting and twisting the strips is so satisfying, and the pull-apart nature makes it a wonderfully fun and interactive treat to share.
- Classic, Irresistible Flavors: The beloved combination of warm, buttery dough and rich, gooey Nutella is a guaranteed crowd-pleaser that everyone loves.
- A Stunning Valentine’s Day Centerpiece: The beautiful, oversized heart shape with its twisted details and pink drizzle looks incredibly impressive and is perfect for a romantic breakfast or party.
- Ready in Under an Hour: Despite its intricate appearance, this beautiful pastry comes together and bakes in less than 45 minutes, making it a perfect low-stress, high-reward recipe.
Recipe Snapshot
| Prep Time | 15 minutes |
| Cook Time | 12 minutes |
| Total Time | 30 minutes |
| Servings | 8-10 servings |
| Calories | 282 kcal per serving |
| Course | Breakfast, Dessert, Snack |
| Cuisine | American |
| Difficulty/Method | Easy / Baking |
Your Shopping List for This Heartfelt Treat
This impressive dessert comes together with just a handful of simple, store-bought ingredients.

→ For the Pull-Apart Heart
- 2 (8-oz.) cans crescent roll dough → The ultimate shortcut to a flaky, buttery pastry.
- ½ cup Nutella → The rich, creamy, chocolate-hazelnut filling that makes this treat irresistible.
→ For the Pink Raspberry Drizzle
- ¼ cup confectioners’ sugar → The sweet base for our simple, pretty glaze.
- 1 Tbsp raspberry jam → Adds a wonderful fruity flavor and natural color to the drizzle.
Let’s Get Twisting! Your Step-by-Step Guide
Ready to create the most impressive pastry of the season? Let’s get started.
Part 1: Shape and Fill the Heart
- Preheat and Prep: Arrange a rack in the center of your oven and preheat to 350°F (175°C). Line a large baking sheet with parchment paper.
- Roll and Cut the Dough: On a lightly floured surface, unroll one can of crescent dough and press the seams together to form a rectangle. Roll it out slightly to a 12″ x 10″ rectangle. Repeat with the second can of dough.
- Cut the Heart Shape: Using a sharp paring knife, cut a large heart shape out of both rectangles of dough, making them as identical as possible. (You can freehand this, or create a heart-shaped template from parchment paper to trace!)
- Fill the Heart: Place one of the dough hearts on your prepared baking sheet. Using an offset spatula, spread the Nutella evenly across the heart, leaving a clean ½-inch border around all the edges. Place the second dough heart directly on top.
Part 2: The Signature Twist
- Make the Center Impression: Gently press a 2-inch heart-shaped cookie cutter into the very center of the top layer of dough to make an indent. Be careful not to cut all the way through!
- Cut the Strips: Using your paring knife, cut thin strips starting from the edge of the heart indent and extending all the way out to the edge of the heart. You’ll end up with about 24 radial strips.
- Twist and Shape: Now for the fun part! Carefully take one strip at a time and twist it 5 to 6 times. Lay the twisted strip back down in its original position to maintain the overall heart shape. Repeat with every single strip.
Part 3: Bake and Drizzle
- Bake to Golden Perfection: Place the baking sheet in the preheated oven and bake until the entire heart is a deep golden brown and puffed, about 12-15 minutes. Let it cool on the pan for 5 minutes.
- Make the Drizzle: While the heart cools, whisk together the confectioners’ sugar, raspberry jam, and milk in a small bowl until smooth. Stir in a drop or two of pink food coloring until you reach your desired color.
- Decorate and Serve: Drizzle the pink glaze all over the warm pull-apart heart. Serve immediately and let everyone tear off their own twisted piece!

Pull-Apart Nutella Crescent Roll Heart
Ingredients
Equipment
Method
-
Preheat oven to 350°F. On a lightly floured surface, roll out one can of crescent dough to a 12″ x 10″ rectangle. Repeat with the second can. Using a paring knife, cut a large heart shape into both rectangles.
-
Place one dough heart on a parchment-lined baking sheet. Spread Nutella across the heart, leaving a 1/2″ border. Place the second heart on top.
-
Gently press a 2″ heart-shaped cookie cutter into the center of the heart to make an indent without cutting through.
-
Using a paring knife, cut thin strips starting from the edge of the heart indent and extending all the way to the outer edge of the heart.
-
Carefully twist each strip 5 to 6 times. Lay each twisted strip back down in its original position to maintain the heart shape.
-
Bake until golden brown, about 12 minutes. Let cool for 5 minutes on the pan.
-
In a small bowl, mix confectioners’ sugar, jam, and milk until smooth. Stir in a drop of pink food coloring. Drizzle the glaze over the warm heart and serve.
Notes
Serve Warm: This treat is at its absolute best when served fresh and warm from the oven, while the Nutella is gooey and melted.
Filling Ideas: Feel free to get creative with the filling! A cinnamon-sugar butter mixture or a different fruit jam would also be delicious.
WiseRecipes’ Top Tips for a Perfect Pull-Apart
These simple secrets will ensure your festive pastry is a huge success.
- Keep Your Dough Cold. Crescent roll dough is much easier to work with when it’s cold. Work quickly, and if the dough becomes too soft or sticky at any point, don’t hesitate to pop it back in the fridge for a few minutes to firm up.
- Seal the Seams. When you unroll the crescent dough, make sure to firmly press and seal the perforated seams to create a solid sheet of dough before you start rolling and cutting.
- Leave a Border. Don’t spread the Nutella all the way to the edge! Leaving that clean ½-inch border helps the top and bottom layers of dough seal together, preventing the filling from leaking out everywhere during baking.
- Don’t Cut Through the Center. The central heart indent is your guide. Be sure not to cut all the way through it, as this is what holds all the twisted strips together.
- Serve it Warm! This treat is at its absolute best when it’s still warm from the oven, when the dough is soft and flaky and the Nutella is perfectly gooey and melted.
Keep It Fresh! Storing Your Pastry
This pull-apart heart is truly best enjoyed fresh and warm from the oven.
- Storage: If you have leftovers, they can be stored in an airtight container at room temperature for up to 2 days. The texture will be best on the first day.
- Reheating: You can briefly reheat leftovers in a toaster oven or an oven at 350°F for a few minutes to warm the dough and re-melt the Nutella.
FAQs: Your Pull-Apart Heart Questions, Answered!
Can I use a different filling instead of Nutella?
Absolutely! This would be delicious with a variety of fillings. Try a cinnamon-sugar and butter mixture for a cinnamon roll version, or use a different fruit jam, like strawberry or apricot, for a different flavor profile.
Can I make this with puff pastry instead of crescent dough?
Yes, you can! A sheet of thawed puff pastry would create an even flakier, crispier result. The baking time may be slightly longer, so just keep an eye on it until it’s puffed and golden brown.
I don’t have a heart-shaped cookie cutter for the center. What can I do?
No problem! You can use a small, round glass or biscuit cutter to make a circular indent in the center instead. The radiating twisted strips will still look beautiful.
Can I prepare this ahead of time?
This is one recipe that’s really best assembled and baked right before serving for the best texture. However, you could cut your dough hearts and store them, separated by parchment paper, in the fridge for a few hours before you’re ready to fill, assemble, and bake.
Final Thoughts: Your Most Interactive Valentine’s Treat
There is nothing more fun than a dessert that invites you to play with your food. This Pull-Apart Nutella Heart is the perfect centerpiece for a shared Valentine’s Day experience. It’s beautiful, delicious, and so much fun to tear and share with someone you love. I hope it brings a little bit of warm, gooey, chocolatey joy to your celebration. Happy Valentine’s Day!
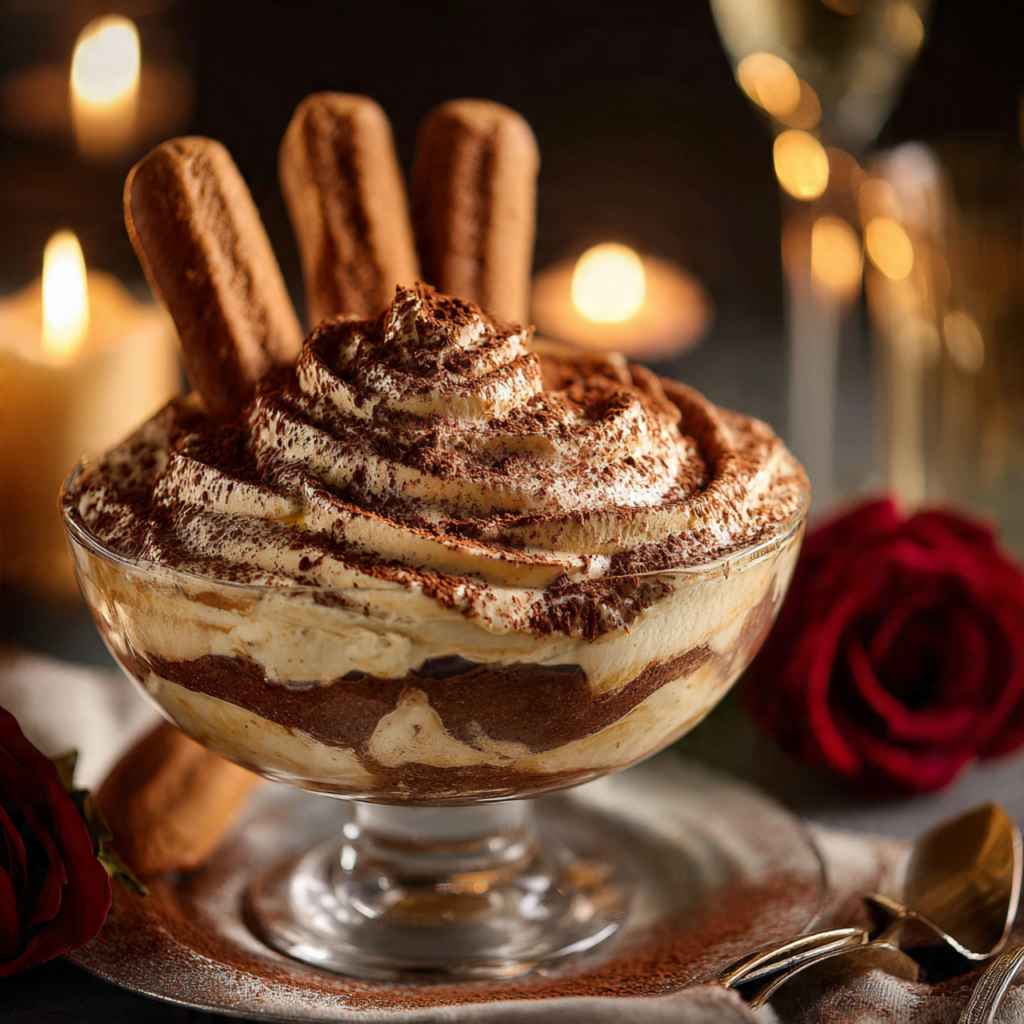
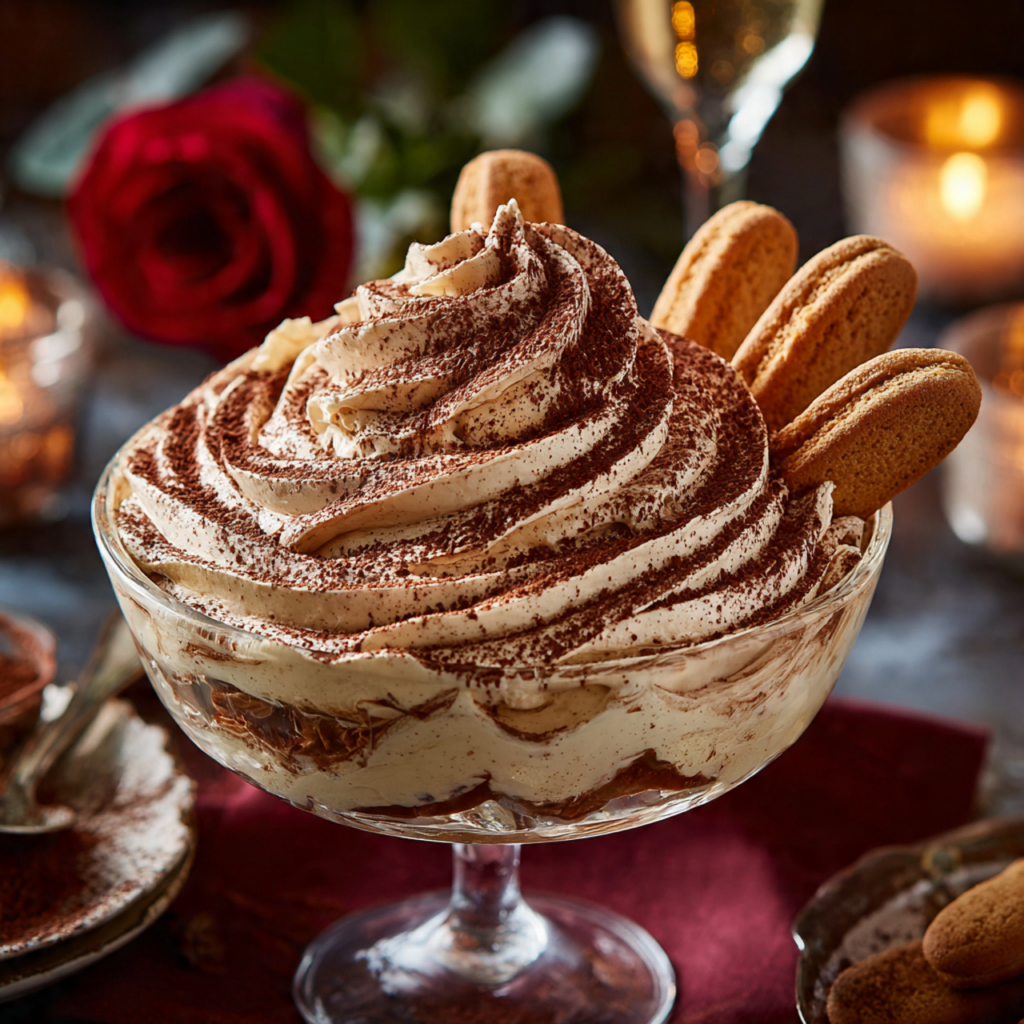
7. The Ultimate 10-Minute Tiramisu Dip (Easy Valentine’s Treat!)

Imagine all the luxurious, sophisticated flavors of a classic tiramisu—rich mascarpone, bold espresso, and a hint of cocoa—whipped into a light, fluffy, and incredibly decadent dip. Now, imagine it’s ready in just 10 minutes with no eggs and no complicated steps. That, my friends, is the pure, genius magic of this Tiramisu Dip. This is, without a doubt, the most elegant and effortless dessert you will make for your Valentine this year.
I promise you, there is no greater romantic gesture than presenting a beautiful bowl of this dip, served with crisp ladyfingers for scooping. The texture is unbelievably light and airy, and the flavor is a perfect harmony of creamy, tangy, and rich coffee notes. It’s a true taste of Italian elegance, made unbelievably simple.
Get ready to create the star of your Valentine’s dessert spread, a no-bake wonder that proves you don’t need hours in the kitchen to make something truly special and delicious.
Why You’ll Be Obsessed With This Tiramisu Dip
You are going to be completely amazed by how much authentic tiramisu flavor is packed into this simple, quick dip. It’s a true game-changer. Here’s why:
- Ready in 10 Minutes Flat: This is the ultimate impressive, last-minute dessert. From start to finish, you can have a gourmet-tasting dip ready to serve in no time.
- All the Flavor, None of the Fuss: Get the rich, complex flavors of classic tiramisu without any of the layering, soaking, or raw eggs. It’s completely foolproof!
- Incredibly Light and Fluffy Texture: The combination of whipped mascarpone, cream cheese, and cream creates a dip that is unbelievably light, airy, and cloud-like.
Recipe Snapshot
| Prep Time | 10 minutes |
| Cook Time | 0 minutes |
| Total Time | 10 minutes |
| Servings | 8-10 servings (yields 2 cups) |
| Calories | 250 kcal per serving (estimated) |
| Course | Dessert, Appetizer |
| Cuisine | Italian-American |
| Difficulty/Method | Easy / No-Bake |
Your Shopping List for This Instant Italian Classic
This impressive dessert comes together with just a handful of high-quality ingredients.
→ For the Tiramisu Dip
- ½ cup heavy cream → The key to a light, whipped, and fluffy texture.
- 2 tsp instant espresso powder → For that bold, authentic, rich coffee flavor.
- 1 tsp unsweetened cocoa powder → Adds a hint of chocolatey depth. Plus more for dusting!
Let’s Get Whipping! Your 10-Minute Guide
Ready for the fastest, most elegant dessert of your life? Grab your mixer and let’s go!
Part 1: The Coffee-Cocoa Cream
- Infuse the Cream: In a small bowl, whisk together the heavy cream, instant espresso powder, and unsweetened cocoa powder until the powders have completely dissolved and the cream is smooth. Set it aside for a moment.
Part 2: Whip the Cheesy Base
- Beat the Cheeses: In the large bowl of a stand mixer fitted with the paddle attachment (or using a hand mixer), combine the softened mascarpone, softened cream cheese, and sifted confectioners’ sugar. Beat on medium-high speed for about 2 minutes, until the mixture is completely smooth, creamy, and free of lumps. Scrape down the sides of the bowl.
- Combine and Whip: Add the coffee-infused cream mixture, the vanilla extract, and the pinch of salt to the bowl. Beat on low speed until everything is just combined.
- The Final Whip: Increase the mixer speed to medium-high and beat for 1 minute more, until the dip is beautifully light, airy, and fluffy.
Part 3: Serve and Garnish
- Plate Your Masterpiece: Transfer the finished dip to a beautiful serving bowl. Use a spoon to create some elegant swirls on top.
- Garnish and Serve: Just before serving, use a fine-mesh sieve to dust the top of the dip generously with more unsweetened cocoa powder. Arrange the crisp ladyfingers on the platter alongside the dip and serve immediately!

Creamy 10-Minute Tiramisu Dip
Ingredients
Equipment
Method
-
In a small bowl, whisk together the heavy cream, instant espresso powder, and 1 tsp. cocoa powder until smooth.
-
In the large bowl of a stand mixer, beat the softened mascarpone, softened cream cheese, and sifted confectioners’ sugar on medium-high speed until completely smooth, about 2 minutes.
-
Scrape down the bowl. Add the cream mixture, vanilla, and salt. Beat on low speed until just combined.
-
Increase the speed to medium-high and beat until the dip is light and fluffy, about 1 minute more.
-
Transfer the dip to a serving bowl. Just before serving, dust the top generously with more cocoa powder. Serve with ladyfingers alongside for dipping.
Notes
Sift the Sugar: Sifting the confectioners’ sugar prevents clumps and ensures a silky-smooth texture.
Make Ahead: The dip can be made up to a day in advance and stored in an airtight container in the fridge. Dust with cocoa powder just before serving.
WiseRecipes’ Top Tips for Perfect Tiramisu Dip
These simple secrets will ensure your dip is flawlessly smooth, light, and delicious.
- Room Temperature Cheeses are NON-NEGOTIABLE. This is the most important rule for this recipe! Both the mascarpone and the cream cheese must be fully softened to room temperature. If they are even slightly cool, you will end up with a lumpy dip, no matter how much you beat it.
- Sift Your Confectioners’ Sugar. Confectioners’ sugar is prone to clumping. Running it through a quick sieve before adding it to the bowl is a simple step that guarantees a silky-smooth, grit-free final texture.
- Don’t Overmix at the End. Once the dip becomes light and fluffy, stop mixing! Over-whipping can sometimes cause the fats in the cream and mascarpone to separate, so stop as soon as it reaches that perfect, airy consistency.
- Use High-Quality Espresso Powder. The coffee flavor is front and center here, so using a good quality, flavorful instant espresso powder will make a huge difference in the final taste.
- Get Creative with Dippers! While ladyfingers are the classic choice, this dip is also incredible with strawberries, biscotti, shortbread cookies, or even broken pieces of waffle cone.
Keep It Fresh! Storing Your Dessert Dip
This dip is a fantastic make-ahead option for a stress-free dessert.
- Make-Ahead: You can prepare the entire dip a day in advance. Store it in an airtight container in the refrigerator. Wait to add the final dusting of cocoa powder until just before you serve, as it can absorb moisture in the fridge.
- Storage: Leftovers can be stored in an airtight container in the refrigerator for up to 4 days.
FAQs: Your Tiramisu Dip Questions, Answered!
What is mascarpone, and can I substitute it?
Mascarpone is a rich, soft, and mildly sweet Italian cream cheese. It has a higher fat content and a less tangy flavor than American cream cheese, which is what gives tiramisu its signature luxurious taste. While you could use all cream cheese in a pinch, you will lose that authentic, rich tiramisu flavor. It’s worth seeking out!
Can I make this without an electric mixer?
You can, but it will require a good amount of arm strength! You can use a whisk to do all the steps, but it will take much longer to get the cheeses completely smooth and to whip the final dip until it’s light and fluffy. Make sure your cheeses are very, very soft if you’re mixing by hand.
Can I make this ahead and freeze it?
Due to the high fat content of the mascarpone and cream cheese, this dip does not freeze well. The texture can become grainy and separated upon thawing. It’s best enjoyed fresh or stored in the refrigerator.
Is there a substitute for instant espresso powder?
If you don’t have instant espresso powder, you can use 1/2 cup of very, very strongly brewed and completely chilled coffee or espresso instead of the heavy cream in the first step. The final dip might be slightly less thick, but it will still be delicious.
Final Thoughts: Your Most Elegant, Effortless Dessert
There is nothing more satisfying than creating a dessert that tastes like it took hours of painstaking work, but was secretly whipped up in just 10 minutes. This Tiramisu Dip is the ultimate entertaining secret weapon—a perfect, sophisticated, and delicious end to a romantic meal or a star on any party menu. I hope this simple recipe brings a taste of Italian elegance to your Valentine’s Day celebration. Buon Appetito!
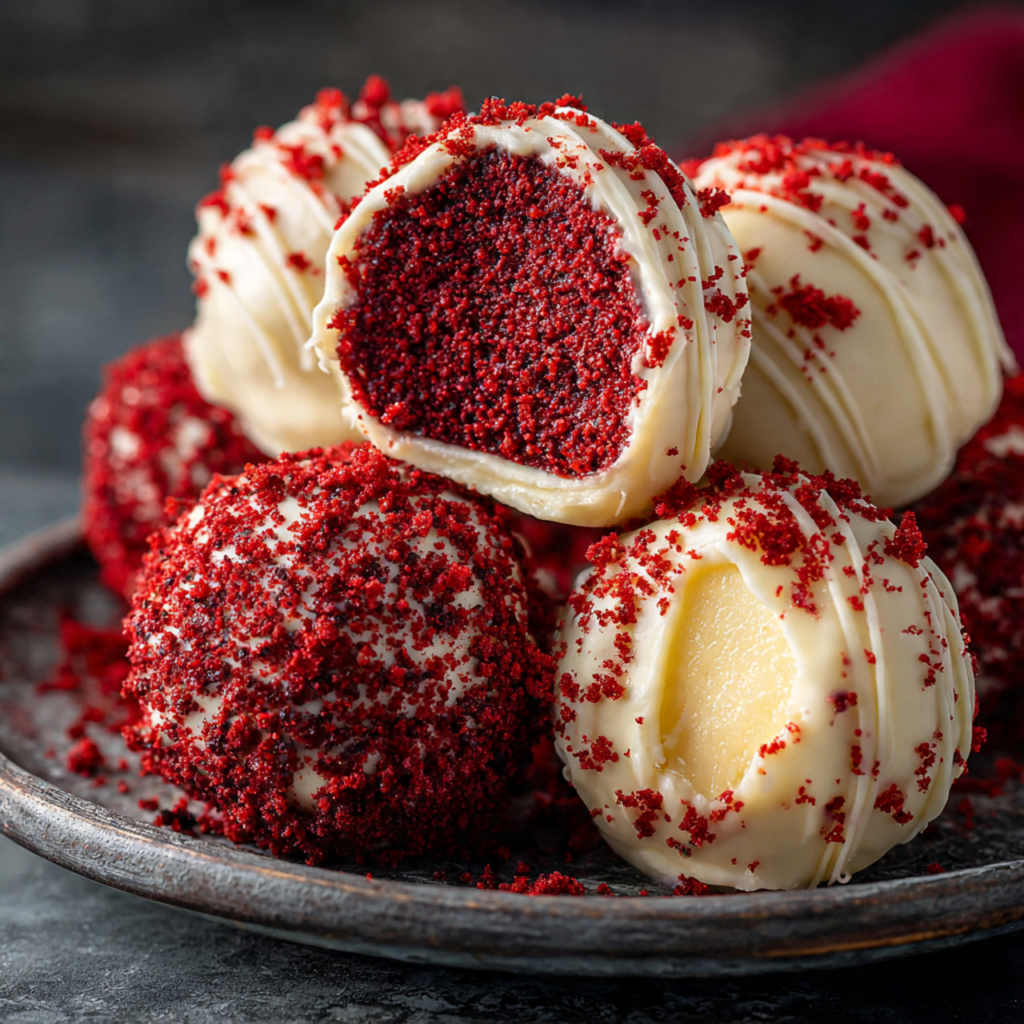
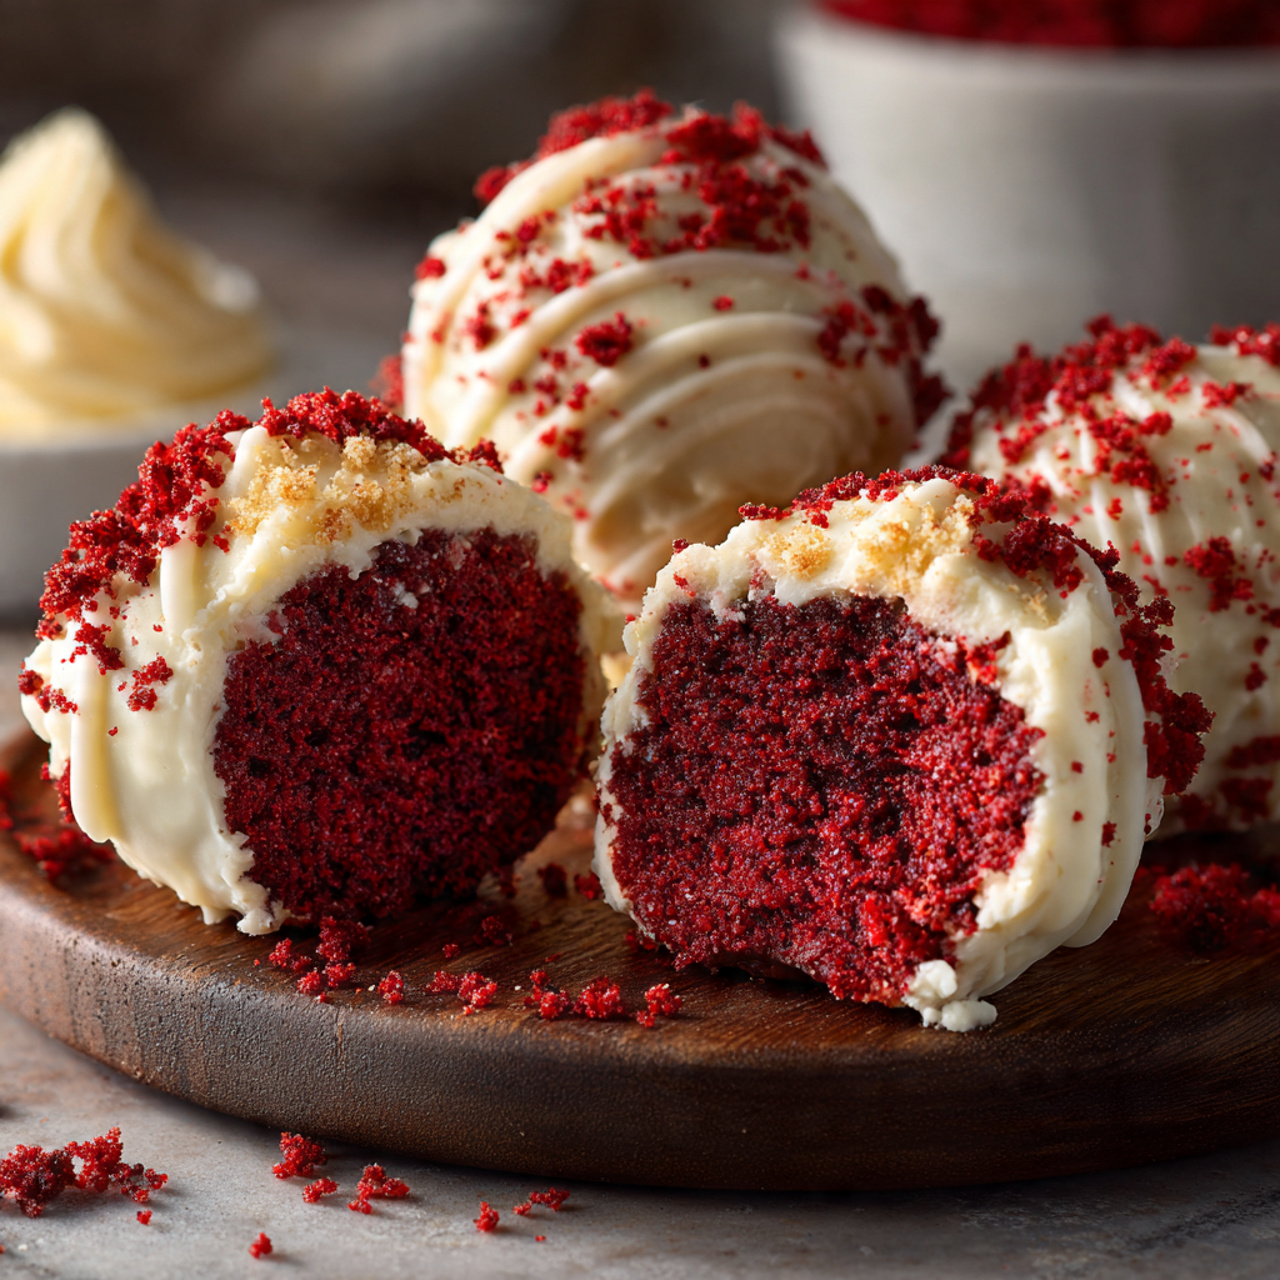
8. The Ultimate Red Velvet Cake Truffles (Easy Valentine’s Treat!)

Imagine the most decadent, romantic treat you can think of: a rich, moist, ruby-red velvet cake, blended with tangy cream cheese frosting, rolled into a perfect little sphere, and dipped in a crisp, sweet white chocolate shell. That, my friends, is the irresistible, swoon-worthy magic of these Red Velvet Cake Truffles. This is, without a doubt, the most delicious and impressive-looking treat you will make for your Valentine this year.
I promise you, there is no greater joy than presenting a box of these beautiful homemade truffles. The stunning contrast between the rich red velvet interior and the snowy white chocolate shell is a true show-stopper. They are the perfect project for a cozy afternoon and the ultimate edible way to say “I love you.”
Get ready to create the most talked-about treat of the season, a recipe so simple and delicious, it’s destined to become your new Valentine’s Day tradition.

Why You’ll Fall in Love with These Cake Truffles
You are going to be completely smitten with this easy and elegant recipe. It’s a true Valentine’s Day dream. Here’s why:
- A Genius Shortcut to a Gourmet Treat: Using a red velvet cake mix is the secret to a perfect, moist, and flavorful base every time, saving you time and effort.
- Incredibly Rich and Decadent: The combination of moist red velvet cake and tangy cream cheese frosting creates a flavor that is perfectly balanced and utterly irresistible.
- Stunningly Beautiful for Gifting: The beautiful red and white contrast, finished with festive sprinkles, makes these truffles a perfect and impressive homemade gift for your Valentine.
- A Fun and Rewarding Project: The process of crumbling the cake, rolling the balls, and dipping them in chocolate is a wonderfully satisfying and fun activity.
- Perfectly Portioned, No-Bake Feel: Once the cake is baked, the rest of the process requires no oven, just simple, fun assembly for a perfect bite-sized treat.
Recipe Snapshot
| Prep Time | 30 minutes |
| Cook Time | 30 minutes (for cake) |
| Chill Time | 2 hours |
| Total Time | 3 hours |
| Servings | ~48 truffles |
| Calories | 150 kcal per truffle (estimated) |
| Course | Dessert |
| Cuisine | American |
| Difficulty/Method | Easy / Baking & No-Bake |
Your Shopping List for These Sweethearts
This impressive dessert comes together with just a few simple, store-bought shortcuts.
→ For the Red Velvet Cake Truffles
- 1 box red velvet cake mix → Plus the ingredients listed on the box (usually oil, water, and eggs). This is our foolproof base!
- 1 (16-oz.) can cream cheese frosting → The perfect tangy and creamy binder for our cake crumbs.
- 24 oz. bright white candy melts → The secret to a beautiful, crisp, and easy-to-work-with white coating.
- 1 tbsp vegetable shortening or coconut oil → Optional, but helps to thin the candy melts for a smoother dipping experience.
- Valentine’s Day sprinkles → For that final, festive, and romantic touch!
Let’s Get Rolling! Your Step-by-Step Guide
Ready to create the most romantic treats of the season? Let’s break it down.
Part 1: The Red Velvet Cake Base
- Bake the Cake: Prepare and bake the red velvet cake according to the package directions for a 9×13-inch pan.
- Cool Completely: This is a crucial step! Let the cake cool in the pan for 15 minutes, then turn it out onto a wire rack to cool completely to room temperature. You can speed this up in the refrigerator.
- Crumble the Cake: Once cooled, crumble the entire cake into a very large bowl. You can do this with your hands or with a fork. You want to break it down into fine crumbs.
Part 2: Form and Chill the Truffles
- Make the “Dough”: Add about three-quarters of the can of cream cheese frosting to the cake crumbs. Using your hands or a sturdy spatula, mix everything together until a thick, moist, dough-like consistency is formed. If it’s too dry, add the remaining frosting.
- Scoop and Roll: Using a small cookie scoop (about 1.5 tablespoons), scoop the mixture and roll it between your palms into smooth, uniform balls. Place the rolled balls on a baking sheet lined with parchment paper.
- Chill the Truffles: Place the baking sheet of cake balls into the refrigerator or freezer for at least 2 hours (or freezer for 30-60 minutes) until they are very firm. Do not skip this step!
Part 3: Dip, Decorate, and Set
- Melt the Coating: In a microwave-safe, deep bowl, melt the white candy melts (and shortening, if using) according to package directions, usually in 30-second intervals, stirring well, until smooth.
- Dip the Truffles: Working with one chilled cake ball at a time, drop it into the melted candy. Use a fork to turn it and coat it completely. Lift the truffle out with the fork and gently tap the fork on the rim of the bowl to allow all the excess coating to drip off.
- Decorate and Set: Carefully slide the coated truffle off the fork onto the parchment-lined baking sheet. While the coating is still wet, immediately add your Valentine’s sprinkles. Repeat with all the truffles.
- Let Them Firm Up: Let the truffles sit at room temperature or in the refrigerator until the candy shell is completely hard and set.
Red Velvet Cake Truffles with Cream Cheese Frosting
Ingredients
Equipment
Method
-
Prepare and bake the red velvet cake in a 9×13-inch pan according to package directions. Let cool completely.
-
Once cooled, crumble the entire cake into a large bowl until fine crumbs form.
-
Add about three-quarters of the cream cheese frosting to the crumbs and mix with your hands until a thick, moist dough forms. Add more frosting if needed.
-
Use a small cookie scoop to portion the mixture and roll it into smooth balls. Place on a parchment-lined baking sheet. Chill until very firm, about 2 hours in the fridge or 30-60 minutes in the freezer.
-
Melt the candy melts in a deep, microwave-safe bowl in 30-second intervals until smooth. Stir in shortening if needed to thin.
-
Using a fork, dip each chilled cake ball into the candy coating, tap off the excess, and slide it back onto the parchment paper.
-
While the coating is still wet, decorate with Valentine’s sprinkles. Let the truffles set completely at room temperature or in the fridge.
Notes
Chill Truffles Firmly: The rolled balls must be very cold and firm before dipping to prevent them from falling apart in the warm coating.
Storage: Due to the cream cheese, these truffles must be stored in an airtight container in the refrigerator for up to one week.
WiseRecipes’ Top Tips for Perfect Cake Truffles
These simple secrets will ensure your truffles are beautiful and stress-free.
- Cool the Cake Completely. I cannot stress this enough. If the cake is even slightly warm when you mix it with the frosting, you’ll end up with a greasy, overly soft mess that’s impossible to roll.
- The Chill Time is Non-Negotiable. Your cake balls MUST be cold and firm before dipping. This is the secret to preventing them from falling apart in the warm candy coating and helps the shell set up quickly.
- The Fork Trick is a Game-Changer. The best way to dip truffles is by using a fork. It allows you to coat them completely and, most importantly, lets all the excess coating drip off for a clean, professional finish.
- Use Candy Melts for a Foolproof Coating. Bright white candy melts are designed to melt smoothly and set up hard and shiny. They are much more forgiving than regular white chocolate, which can be tricky to work with.
- Work in Small Batches. Keep the majority of your rolled cake balls in the fridge while you work on dipping just a few at a time. This ensures they all stay cold and firm right up until they hit the candy coating.
Keep Them Fresh! Storing Your Valentine’s Treats
These truffles are the perfect make-ahead gift or party treat.
- Refrigerator: Because of the cream cheese frosting, these must be stored in the refrigerator. Place them in an airtight container, in a single layer or separated by parchment paper, for up to one week.
- Freezer: These also freeze beautifully! Place the finished truffles on a baking sheet in the freezer until solid, then transfer them to a freezer-safe bag or container. They will keep for up to 3 months. Let them thaw in the fridge for an hour before serving.
FAQs: Your Red Velvet Truffle Questions, Answered!
Can I make my own cake and frosting from scratch?
Absolutely! If you have a favorite red velvet cake and cream cheese frosting recipe, they will work perfectly. You’ll need one 9×13-inch cake and about 12-16 ounces of frosting.
My candy coating is too thick. How do I fix it?
This is a common issue! Stir in about 1 tablespoon of vegetable shortening or coconut oil into the melted candy melts. This will thin it out into a much smoother, more fluid consistency perfect for dipping.
My cake balls are falling apart when I dip them. What went wrong?
This is almost always because the cake balls were not cold enough before dipping. Pop them back in the freezer for another 15-20 minutes to make sure they are very firm before you try again.
What are some other decoration ideas?
These are so fun to decorate! Instead of sprinkles, you could let the white coating set completely, then drizzle them with melted pink or red candy melts for a beautiful, modern look.
Final Thoughts: A Sweet Bite of Love
There is nothing more special than a homemade treat made with love, especially for Valentine’s Day. These Red Velvet Cake Truffles look and taste like they came from a high-end candy shop, but they are a simple, joyful project you can create right in your own kitchen. They are the perfect way to share a little sweetness with your favorite people. Happy Valentine’s Day!
9. The Ultimate Heart Cookies (Perfect Valentine’s Day Treat!)

Imagine the perfect Valentine’s Day cookie: a buttery, tender sugar cookie cut into a classic heart shape, baked to golden perfection, and topped with a thick, luscious swirl of tangy cream cheese buttercream in festive shades of pink and red. That, my friends, is the timeless, heartwarming magic of these Classic Heart Cookies. This is, without a doubt, the most beloved and essential cookie you will bake to share the love this Valentine’s Day.
I promise you, there is no greater feeling than presenting a platter of these beautiful, heartfelt cookies. The tangy, rich cream cheese frosting is the perfect counterpart to the sweet, buttery cookie base. They are a true classic, a stunning addition to any Valentine’s party, a perfect project for baking with kids, and the most delicious way to say “I love you.”
Get ready to master the art of the perfect cut-out cookie and create a batch of stunning, delicious, and completely irresistible heart cookies that will be the star of your Valentine’s celebration.

Why These are the Only Heart Cookies You’ll Ever Need
You are going to fall head over heels for this classic and foolproof recipe. It’s a true Valentine’s Day staple. Here’s why:
- The Perfect No-Spread Sugar Cookie Dough: This dough is specifically designed to hold its shape, so your hearts will come out of the oven with beautifully crisp, defined edges.
- Incredibly Rich and Tangy Cream Cheese Frosting: This isn’t just any frosting! The cream cheese buttercream is less sweet than traditional buttercream and has a wonderful tang that perfectly complements the buttery cookie.
- A Fun and Festive Decorating Project: Swirling on the pink, red, and white frosting and finishing with a flourish of sprinkles is a wonderfully creative and fun activity for the whole family.
- Classic Buttery, Tender Texture: The cookies are the perfect balance of soft and sturdy—tender to the bite but firm enough for decorating and gifting.
- Perfect for Gifting and Parties: A box of these beautiful, homemade cookies is the ultimate heartfelt gift for Valentine’s Day, and they are always the first to disappear from a party platter.
Recipe Snapshot
| Prep Time | 30 minutes |
| Chill Time | 1 hour 10 minutes |
| Cook Time | 10 minutes |
| Total Time | 1 hour 50 minutes |
| Servings | 4 dozen cookies |
| Calories | 153 kcal per cookie |
| Course | Dessert |
| Cuisine | American |
| Difficulty/Method | Easy / Baking |
Your Shopping List for These Sweethearts
This classic recipe uses simple, high-quality baking staples to create its magic.

→ For the No-Spread Sugar Cookies
- 3 cups all-purpose flour → Spooned and leveled for the perfect dough consistency.
- 1 tsp baking powder & ½ tsp kosher salt → For a slight lift and balanced flavor.
- 1 cup (2 sticks) butter → Softened to room temperature. This is key for a creamy dough.
- 1 cup granulated sugar → For the classic sweet flavor.
- 1 large egg → Must be at room temperature to emulsify properly.
- 1 Tbsp milk & 1 tsp pure vanilla extract → For moisture and classic, warm flavor.
→ For the Cream Cheese Buttercream
- 1 (8-oz.) block cream cheese & ½ cup (1 stick) butter → Both must be fully softened to room temperature for a lump-free frosting.
- 4 cups powdered sugar → For a sweet, smooth, and sturdy frosting.
- 1 tsp pure vanilla extract & ¼ tsp kosher salt → To perfectly flavor and balance the frosting.
- Pink and red food coloring & sprinkles → For bringing your Valentine’s vision to life!
Let’s Get Baking! Your Step-by-Step Guide
Ready to bake some love? Let’s get started on these classic heart cookies.
Part 1: The Perfect Cut-Out Cookie Dough
- Combine Dry Ingredients: In a large bowl, whisk together the flour, baking powder, and salt.
- Cream Butter and Sugar: In a separate large bowl using a hand mixer, beat the softened butter and granulated sugar together on medium-high speed until the mixture is light, fluffy, and pale in color.
- Add Wet Ingredients: Beat in the room temperature egg, milk, and vanilla until just combined.
- Finish the Dough: Gradually add the flour mixture to the wet ingredients, mixing on low speed until the dough is totally combined. Do not overmix.
- Chill the Dough: Divide the dough in half, shape each half into a flattened disc, and wrap tightly in plastic wrap. Refrigerate for at least 1 hour. This step is crucial!
Part 2: Cut, Chill, and Bake the Hearts
- Preheat and Prep: When you’re ready to bake, preheat your oven to 350°F (175°C). Line two large baking sheets with parchment paper.
- Roll and Cut: On a lightly floured work surface, roll out one disc of chilled dough until it’s about 1/8-inch thick. Use a 2 1/2-inch heart-shaped cookie cutter to cut out your shapes. Transfer the hearts to the prepared baking sheets.
- The Freezer Flash!: This is the secret tip! Place the entire baking sheet of cut-out cookies into the freezer for 10 minutes. This quick chill helps the cookies hold their sharp, beautiful heart shape perfectly while baking.
- Bake to Perfection: Bake for 8 to 10 minutes, or until the edges are just barely starting to turn a light golden brown. Let the cookies cool on the baking sheet for a few minutes before transferring them to a wire rack to cool completely.
Part 3: The Creamy Frosting & Decoration
- Make the Frosting: In a large bowl using a hand mixer, beat the softened cream cheese and butter together until completely smooth and free of lumps. Gradually beat in the powdered sugar, then add the vanilla and salt. Beat until the frosting is light, fluffy, and combined.
- Color the Frosting: Divide the frosting into three bowls. Leave one white, then add pink food coloring to the second bowl and red food coloring to the third. Stir each until you reach your desired shades.
- Decorate!: Using a small offset spatula or a butter knife, spread the different colored frostings onto the completely cooled heart cookies. Immediately top with your favorite Valentine’s sprinkles and let the frosting set.

Buttery Cut-Out Heart Cookies with Cream Cheese Frosting
Ingredients
Equipment
Method
-
Make the cookies: In a large bowl, whisk together flour, baking powder, and salt. In another bowl, beat butter and sugar until fluffy. Beat in the egg, milk, and vanilla. Gradually add the flour mixture until just combined.
-
Shape the dough into 2 flattened discs, wrap in plastic, and refrigerate for at least 1 hour.
-
Preheat oven to 350ºF. On a floured surface, roll out dough to 1/8” thick. Cut out shapes with a heart-shaped cookie cutter and transfer to parchment-lined baking sheets.
-
Freeze the cut-out cookies on the baking sheets for 10 minutes to help them hold their shape.
-
Bake until the edges are lightly golden, 8 to 10 minutes. Let cool completely on a wire rack.
-
Make the frosting: In a large bowl, beat softened cream cheese and butter until smooth. Gradually add powdered sugar, then beat in vanilla and salt until combined and fluffy.
-
Divide the frosting into 3 bowls. Tint one pink and one red with food coloring. Frost the cooled cookies and top with sprinkles.
Notes
Room Temperature Ingredients: For the smoothest dough and frosting, ensure your butter, egg, and cream cheese are all at room temperature.
Storage: Due to the cream cheese frosting, cookies must be stored in an airtight container in the refrigerator for up to 5 days.
WiseRecipes’ Top Tips for Perfect Heart Cookies
These are my essential secrets for foolproof, beautiful cut-out cookies every time.
- The Dough Chill is Non-Negotiable. Chilling the dough for at least an hour is crucial. It solidifies the butter, which makes the dough much easier to roll out and prevents the cookies from spreading into blobs in the oven.
- The Freezer Flash is Your Secret Weapon. The 10-minute freeze just before baking is a game-changing trick for cut-out cookies. It ensures your hearts will have super sharp, defined edges and won’t spread.
- Don’t Overbake. The key to a tender sugar cookie is to pull it from the oven when the edges are just beginning to turn golden. They will continue to set on the hot baking sheet, and this will keep the centers perfectly soft.
- Truly Softened Butter and Cream Cheese. For the smoothest, creamiest frosting with absolutely no lumps, your butter and cream cheese must be fully at room temperature.
- Spoon and Level Your Flour. For the most accurate flour measurement (and the best cookie texture), use a spoon to fill your measuring cup, then level it off with a straight edge. Don’t just scoop the cup into the flour bag!
Keep Them Fresh! Storing Your Valentine’s Treats
These cookies are perfect for making ahead for Valentine’s Day gifting.
- Storage: Because of the cream cheese frosting, these cookies must be stored in the refrigerator. Place them in a single layer in an airtight container or stack them carefully with layers of parchment paper in between. They will stay fresh for up to 5 days.
- Serving: For the best flavor and texture, let the cookies sit at room temperature for about 15-20 minutes before serving.
FAQs: Your Heart Cookie Questions, Answered!
Can I make the dough ahead of time?
Yes, absolutely! The cookie dough can be made and kept in the refrigerator for up to 3 days. You can also freeze the dough discs for up to 3 months. Just let it thaw in the fridge before rolling.
Can I freeze the decorated cookies?
Yes, these freeze beautifully. Place the frosted cookies on a baking sheet in the freezer until the frosting is solid. Then, you can stack them in a freezer-safe container with parchment paper between the layers. They will keep for up to 3 months.
My frosting is too soft/stiff. How do I fix it?
It’s an easy fix! If your frosting is too soft, gradually beat in a little more powdered sugar until it reaches the right consistency. If it’s too stiff, beat in a tiny splash of milk or cream (just a teaspoon at a time) until it’s perfectly smooth and spreadable.
Can I use this recipe for other holidays?
Of course! This is a fantastic, versatile cut-out cookie recipe. Use a tree-shaped cutter for Christmas, a pumpkin for Halloween, or a flower for spring. Just change up your frosting colors and sprinkles to match the occasion!
Final Thoughts: A Sweet Treat from the Heart
There is nothing more classic or heartfelt than a homemade sugar cookie, especially one shaped like a heart. These cookies are a pure and simple expression of love and care. They are a delightful project, a delicious treat, and the perfect way to share a little sweetness with the people you love this Valentine’s Day. Happy Baking!
10. Valentine Ganache Cookies Recipe
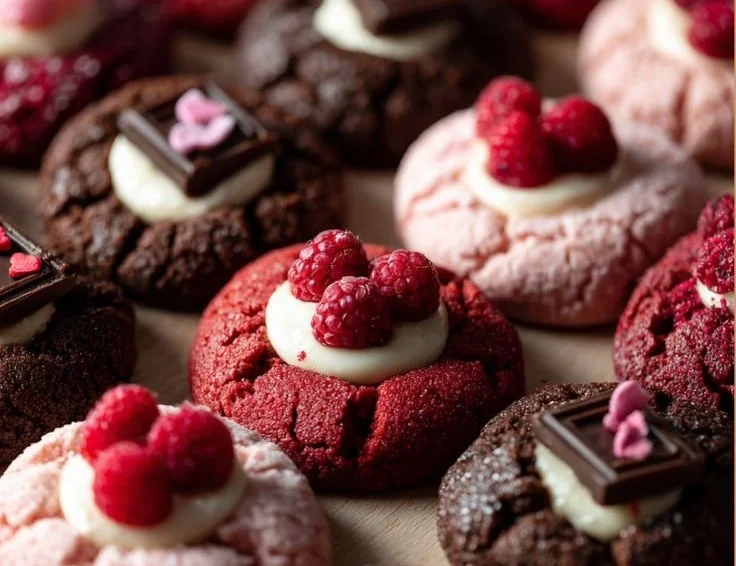
There’s something undeniably magical about cookies, especially when they’re adorned with silky ganache and the promise of indulgence. As Valentine’s Day approaches, these Valentine Ganache Cookies are the perfect treat to share with those you love—or keep all to yourself! Their alluring aroma wafting through your kitchen will make your heart soar, and each bite unveils a luscious layer of chocolatey goodness that’s simply irresistible. Let’s dive into this delightful recipe that will not only sweeten your day but also create a moment of joy for everyone around you.
Why Valentine Ganache Cookies are a Must-Make
When it comes to baking treats that bring smiles, these Valentine Ganache Cookies truly shine. Here’s why this recipe deserves a special place in your heart (and kitchen):
- Decadent Flavor: With a rich chocolate cookie base complemented by creamy ganache, each bite is a symphony of flavors that dance on your palate.
- Perfect for Any Occasion: While they’re obviously fantastic for Valentine’s Day, they’re celebratory enough for birthdays, anniversaries, or simply a cozy treat during a movie night.
- Customizable Presentation: You can dress them up with fun toppings—think sprinkles, freeze-dried raspberries, or even a drizzle of melted white chocolate for an extra touch of love.
- Easy to Make: Whether you’re a seasoned baker or a novice in the kitchen, the steps are straightforward and rewarding, making it hard to go wrong.
- Perfect for Sharing: There’s something heartwarming about gifting homemade cookies to friends and family, spreading joy one delicious bite at a time.
Your Shopping List
Before you get lost in the sweet anticipation, let’s gather the essentials for these delectable treats. Here’s what you’ll need to create your Valentine Ganache Cookies:
- ½ cup (113 g) unsalted butter, softened: This creates a rich, buttery flavor and tender texture in your cookies.
- ½ cup (100 g) granulated sugar: For that perfect sweetness that balances the chocolaty notes.
- ½ cup (100 g) brown sugar: Adds moisture and a lovely caramel undertone.
- 1 large egg: Provides structure and richness to the cookie dough.
- 1 teaspoon vanilla extract: A classic addition that enhances all the delightful flavors.
- 1 cup (125 g) all-purpose flour: The essential building block for your cookies.
- ½ cup (45 g) unsweetened cocoa powder: This is where the chocolate magic happens!
- ½ teaspoon baking soda: Helps the cookies rise and become fluffy.
- ¼ teaspoon salt: Balances the sweetness and highlights the chocolate.
- ½ teaspoon espresso powder (optional): This little gem intensifies the chocolate flavor.
- ½ cup (120 ml) heavy cream: For that velvety ganache that brings the cookies to life.
- ¾ cup (130 g) dark or white chocolate chips, finely chopped: Choose your favorite for a personal touch!
- 1 tablespoon (14 g) butter (optional): Makes the ganache extra smooth and glossy.
- Freeze-dried raspberries, chocolate squares, heart sprinkles, melted white chocolate for drizzling: Customize and decorate to your heart’s content!
Crafting Your Perfect Valentine Ganache Cookies Recipe
Now that you have all your ingredients laid out, let’s get started! Follow these simple steps to bring your cookies to life:
- In a large mixing bowl, cream the softened butter with the granulated sugar and brown sugar until the mixture is light and fluffy. The textures should come together beautifully; it’s truly a delightful sight!
- Beat in the egg and vanilla extract, mixing well until fully combined, feeling the warm, sweet aroma fill your kitchen.
- In another bowl, combine the flour, cocoa powder, baking soda, salt, and espresso powder (if using). Gradually add this dry mixture to the wet ingredients, stirring until just combined. The dough will start to come together into a beautiful chocolatey mass—it’s hard to resist tasting it at this point!
- Preheat your oven to 350°F (175°C) and line a baking sheet with parchment paper.
- Scoop tablespoon-sized amounts of dough onto the prepared sheet, spacing them about 2 inches apart. Bake for 10-12 minutes, until the edges are set but the centers are still soft. Your kitchen will be filled with a heavenly scent that you won’t forget!
- Allow the cookies to cool completely on a wire rack. Meanwhile, let’s prepare that luscious ganache!
- In a small saucepan, heat the heavy cream until it just begins to simmer. Remove from heat and stir in the chopped chocolate and butter (if using) until everything is melted and silky smooth—this is pure magic!
- Once the cookies are cool, spoon a generous dollop of the ganache over the center of each cookie, allowing it to spill enticingly to the edges. Top with freeze-dried raspberries or sprinkles for a festive touch if desired!
- Let the ganache set for a few minutes, and then prepare for the sharing (or savouring!).
Helpful Hints for the Best Cookies
- Don’t Overmix: When combining the dry ingredients with the wet, mix just until combined. Overmixing can create tough cookies—nobody wants that!
- Chill the Dough: If you find that your dough is too soft to scoop easily, pop it in the fridge for about 30 minutes to make it easier to handle.
- Switch Up Chocolate Types: You can mix and match between dark, milk, or white chocolate for the ganache, tailoring it to your preference and adding a unique twist.
- Use Quality Ingredients: Since this recipe revolves around chocolate, using high-quality cocoa powder and chocolate can make a significant difference in flavor.
- Experiment with Flavors: Add a dash of peppermint extract or some orange zest to the batter for a flavor twist that could surprise and delight your taste buds.
Creative Twists on the Classic Recipe
Feeling adventurous? Here are a few variations you might want to try:
- Nutty Delight: Fold in some chopped nuts like walnuts or pecans to the dough for added crunch and flavor contrast.
- Fruit Infusion: Swap in some mini chocolate chips or butterscotch chips for an unexpected twist.
- Spicy Affair: Add a pinch of cayenne pepper or cinnamon to the dough for a warm, spiced note that pairs beautifully with chocolate.
- Chocolate Dipped: Instead of a ganache topping, dip half of each cookie in melted chocolate for an extra luscious experience!
- Flavored Ganache: Infuse the heavy cream with peppermint or orange zest while heating for a festive twist to the ganache.
Ways to Enjoy These Lovable Treats
Presentation matters, especially for a treat as special as these Valentine Ganache Cookies! Arrange them on a decorative platter, perhaps with a sprinkling of powdered sugar for a whimsical touch, or serve them warm with a scoop of vanilla ice cream or whipped cream on the side. Imagine the joy of taking a bite, the decadent ganache oozing out, while a hot cup of coffee or cocoa complements each mouthful. For those extra-special moments, these cookies also make for charming gifts. Just package them in a cute box tied with a ribbon—who could resist such a sweet surprise?
Keep It Fresh
Storing your Valentine Ganache Cookies is straightforward. Keep them in an airtight container at room temperature for up to a week—if they even last that long! If you want to enjoy them later, they freeze beautifully. Just make sure to layer them between parchment paper to avoid sticking and place them in a freezer-safe bag. When you’re ready to enjoy a treat, let them thaw at room temperature or gently warm them up in the microwave for a few seconds. You’ll be instantly transported back to the baking day!
Got Questions?
Here are a few common questions surrounding these delightful cookies:
- Can I use different types of chocolate for the ganache? Absolutely! Feel free to use dark, milk, or white chocolate depending on your taste preference.
- What if I don’t have unsalted butter? You can use salted butter, but just reduce the salt in the recipe a pinch.
- How can I make these cookies gluten-free? Substitute the all-purpose flour with a gluten-free flour blend designed for baking, and they should turn out wonderfully!
- What should I do if my cookies spread too much while baking? You may need to chill the dough before scooping if you find that the dough is very soft.
From one cookie lover to another, these Valentine Ganache Cookies are sure to sprinkle a little joy into your life. With every ingredient combined, every delightful layer of taste blended together, they create an experience that’s hard to beat. So gather your loved ones, or treat yourself, and embark on this delightful baking expedition. Happy baking, and may your cookies turn out perfectly!
Valentine Ganache Cookies
Ingredients
Method
-
Cream the softened butter with the granulated sugar and brown sugar until light and fluffy.
-
Beat in the egg and vanilla extract until fully combined.
-
In another bowl, combine the flour, cocoa powder, baking soda, salt, and espresso powder (if using). Gradually add this dry mixture to the wet ingredients, stirring until just combined.
-
Preheat your oven to 350°F (175°C) and line a baking sheet with parchment paper.
-
Scoop tablespoon-sized amounts of dough onto the prepared sheet, spacing them about 2 inches apart.
-
Bake for 10-12 minutes, until the edges are set but centers are soft.
-
Allow cookies to cool on a wire rack.
-
In a small saucepan, heat the heavy cream until it begins to simmer.
-
Remove from heat and stir in the chopped chocolate and butter (if using) until melted and smooth.
-
Spoon ganache over the cooled cookies and top with decorative toppings if desired.
-
Let ganache set for a few minutes before serving.