A Decadent Valentine’s Finale: The Big-Batch Molten Lava Cake
There is no dessert more synonymous with romance and pure indulgence than a molten lava cake. That magical moment when your spoon breaks through the tender cake exterior to reveal a warm, liquid river of dark chocolate is a true show-stopper. But the classic, individual-sized versions can be a frantic, last-minute affair for a dinner…
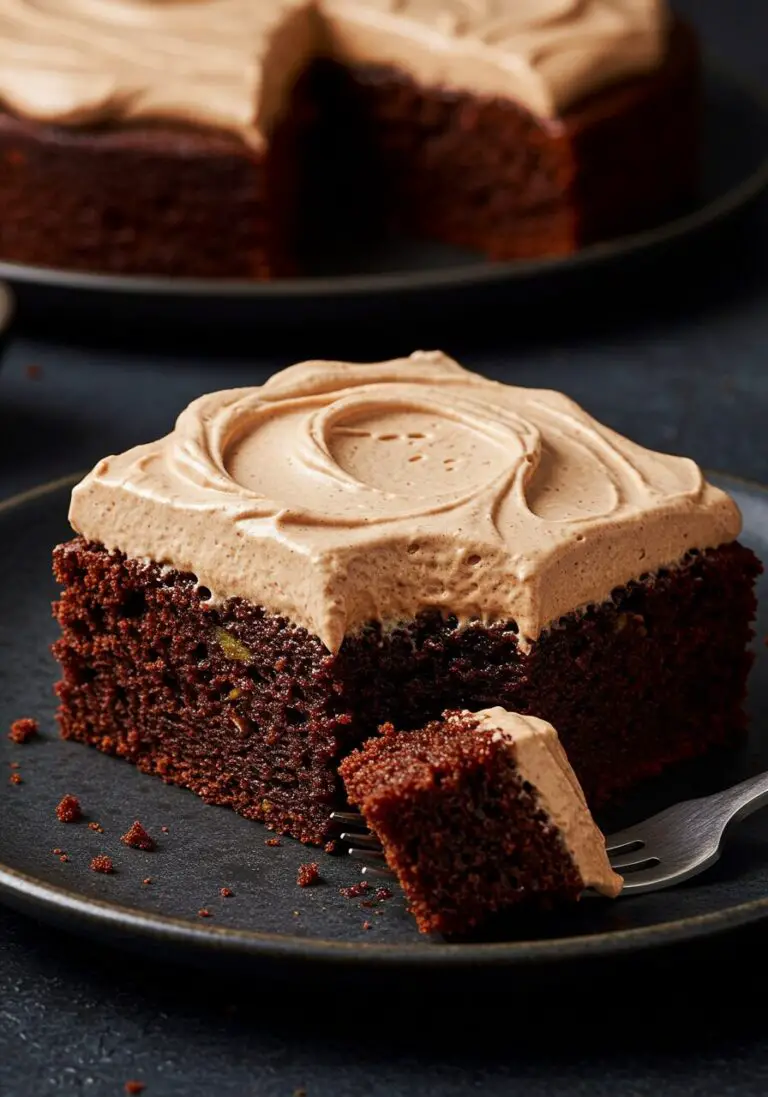
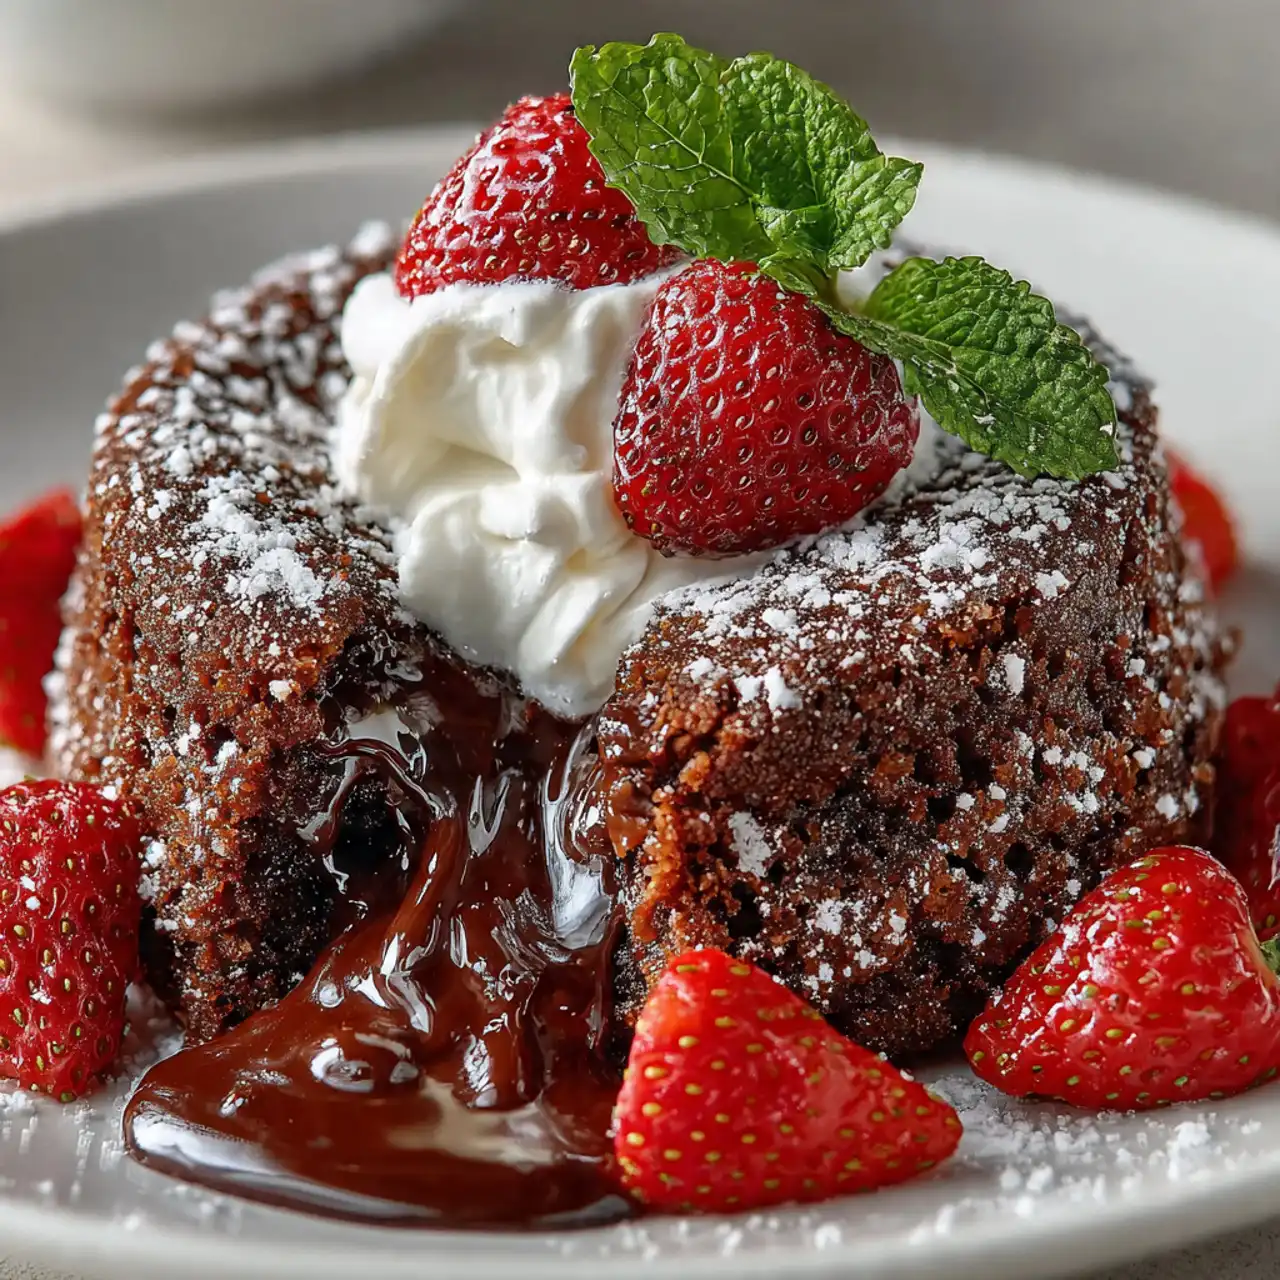
There is no dessert more synonymous with romance and pure indulgence than a molten lava cake. That magical moment when your spoon breaks through the tender cake exterior to reveal a warm, liquid river of dark chocolate is a true show-stopper. But the classic, individual-sized versions can be a frantic, last-minute affair for a dinner party. What if you could capture all that decadent, molten magic in one single, stunning, shareable cake? This, my friends, is the answer. This Big-Batch Lava Cake is a masterpiece of chocolate engineering, designed for maximum “wow” and minimum stress.
I’ve always been obsessed with lava cakes, but I dreaded the process of baking them to order. This recipe is a game-changer, a brilliant technique that I was so excited to perfect. The secret is a two-part bake: we first bake a rich, fudgy chocolate cake base until it’s just set. Then, we spread a layer of reserved, unbaked batter on top and pop it back in the oven for a final, quick bake. This creates a spectacular result—a stable, sliceable cake with a glorious, molten, lava-like layer right on top. It’s pure, unadulterated genius.

Why This Lava Cake Will Steal Your Heart
You are going to fall completely in love with this impressive and incredibly decadent dessert. It’s the perfect finale for a romantic meal. Here’s why:
- The Ultimate Molten Chocolate Experience: This cake delivers that iconic, warm, liquid chocolate “lava” center in a large, shareable format. It’s pure indulgence.
- A True Show-Stopping Presentation: Slicing into this cake and revealing the molten top layer is a dramatic and unforgettable moment for your Valentine or dinner guests.
- Intensely Rich and Chocolatey: Made with both bittersweet and dark chocolate, plus cocoa powder and a hint of coffee, the flavor is incredibly deep, complex, and not overly sweet.
- Perfectly Designed for a Dinner Party: Instead of fussing with individual ramekins, you can make one beautiful cake that’s easy to slice and serve to a group.
- Surprisingly Light and Airy Texture: The process of folding in whipped egg whites gives the cake a surprisingly light, almost souffle-like texture that balances its rich flavor.
Recipe Snapshot
| Prep Time | 25 minutes |
| Cook Time | 40 minutes |
| Total Time | 1 hour 5 minutes |
| Servings | 10 servings |
| Calories | 446 kcal per serving |
| Course | Dessert |
| Cuisine | American, French-Inspired |
| Difficulty/Method | Intermediate / Baking |
Your Shopping List for This Decadent Dessert
This impressive cake comes together with a handful of high-quality baking staples.
→ For the Lava Cake
- 1 cup (2 sticks) unsalted butter → Cut into pieces, plus more for greasing the pan.
- ½ cup (80g) each of bittersweet (70%) and dark (63%) chocolate → Coarsely chopped. Using two types adds complexity.
- ⅔ cup (70g) unsweetened cocoa powder → For a deep, rich chocolate foundation.
→ For Serving
Let’s Get Baking! Your Step-by-Step Guide
Ready to create the most impressive chocolate cake of your life? Let’s break it down.
Part 1: The Rich Chocolate Batter
- Preheat and Prep: Arrange a rack in the center of your oven and preheat to 350°F (175°C). Generously grease a 9-inch springform pan with butter, line the bottom with parchment paper, and then grease the parchment.
- Melt the Chocolate: In a medium heatproof bowl set over a pot of simmering water (a double boiler), melt the butter and both types of chocolate, stirring, until smooth. Remove from heat. (Alternatively, you can use a microwave in 30-second bursts). Stir in the cocoa powder, instant coffee, kosher salt, and vanilla until smooth.
- Whip the Egg Whites: In the large bowl of a stand mixer fitted with the whisk attachment, beat the egg whites on medium-low until frothy. Increase the speed to medium-high and gradually add ¾ cup of the sugar. Increase the speed to high and beat for about 3 minutes, until stiff, glossy peaks form. Transfer the meringue to another large bowl.
- Whip the Yolks: In the now-empty mixer bowl, beat the egg yolks and the remaining ¾ cup of sugar on medium-high speed for about 2 minutes, until the mixture is pale, thick, and fluffy.
- Combine the Batter: Gently fold the chocolate mixture into the egg yolk mixture until no streaks remain. Then, add the whipped egg whites and fold them in, mixing as little as possible, until just a few white streaks remain.
Part 2: The Two-Step Bake for Molten Magic
- Reserve the “Lava”: This is the secret! Scoop out 1 ½ cups of the finished batter and set it aside in a small bowl, covered, in the refrigerator.
- The First Bake: Pour the remaining batter into your prepared springform pan and smooth the top. Bake for 22 to 24 minutes. The cake should be firm on top but still feel slightly soft in the center when you press it. Let the cake cool in the pan for 10 minutes, but leave the oven on.
- The Second Bake: Spread the reserved, chilled batter evenly over the top of the warm cake. Sprinkle with a little flaky sea salt, if you’re using it.
- Create the Lava!: Return the cake to the oven and bake for another 14 to 16 minutes. The top should have a thin, delicate crust, but it will be very soft underneath.
- Rest and Serve: Let the cake cool for just 5 minutes. Carefully run a knife around the edge and release the springform pan. Transfer the cake to a platter and serve immediately, warm, with a big scoop of vanilla ice cream alongside.
Big-Batch Molten Chocolate Lava Cake
Ingredients
Equipment
Method
- Preheat oven to 350°F. Grease a 9″ springform pan, line the bottom with parchment, then grease the parchment.
- In a heatproof bowl over simmering water, melt the butter and both chocolates until smooth. Remove from heat and stir in the cocoa powder, coffee, kosher salt, and vanilla.
- In a large bowl, beat the egg whites until frothy. Gradually add 3/4 cup sugar and beat on high speed until stiff, glossy peaks form. Transfer to another bowl.
- In the now-empty mixer bowl, beat the egg yolks and the remaining 3/4 cup sugar until pale and fluffy, about 2 minutes.
- Fold the chocolate mixture into the egg yolk mixture. Then, gently fold the whipped egg whites into the chocolate mixture until just a few streaks remain.
- Transfer 1 1/2 cups of the batter to a small bowl, cover, and refrigerate. Pour the remaining batter into the prepared pan.
- Bake the cake until the top is firm but the center is still slightly soft, 22 to 24 minutes. Let cool for 10 minutes (leave oven on).
- Spread the reserved, chilled batter over the top of the warm cake. Sprinkle with sea salt, if using.
- Return to the oven and bake until the top has a thin crust but is very soft underneath, 14 to 16 minutes more.
- Let cool for 5 minutes. Carefully remove the cake from the pan and transfer to a platter. Serve warm with vanilla ice cream.
Notes
WiseRecipes’ Top Tips for a Perfect Lava Cake
This impressive cake is all about technique. These tips will ensure your success.
- Don’t Scorch Your Chocolate. Whether you’re using a double boiler or a microwave, the key to melting chocolate is gentle heat. Stir frequently and pull it from the heat just before it’s completely melted—the residual heat will finish the job.
- Whip Your Egg Whites Properly. The lightness of this cake comes from the air you whip into the egg whites. Make sure your bowl is impeccably clean (fat is the enemy of meringue!) and whip until the peaks stand straight up without curling over.
- Fold, Don’t Stir. When you’re combining the chocolate mixture and the whipped egg whites, you must use a gentle folding motion with a spatula. This keeps all the air you just whipped into the whites. If you stir or whisk, you will deflate the batter and the cake will be dense.
- Don’t Overbake the First Layer. It’s crucial that the first bake is slightly underdone. The center should still be soft. This is what allows the top “lava” layer to stay molten instead of just baking into a second solid layer.
- Serve it Warm! The magic of a lava cake is the contrast between the warm, tender cake and the hot, liquid center. It is absolutely at its peak when served within minutes of coming out of the oven, paired with cold, creamy vanilla ice cream.
Keep It Fresh! Make-Ahead & Storing Instructions
This cake is designed to be served fresh, but here are some tips.
- Make-Ahead: This cake is best made and served fresh to preserve the molten effect. However, you can make the batter up to 4 hours in advance and keep it in the refrigerator before proceeding with the first bake.
- Refrigerator: Leftovers can be stored, covered, in the refrigerator for up to 3 days. Note that the molten “lava” layer will solidify when chilled.
- Reheating: You can gently reheat individual slices in the microwave for about 20-30 seconds. This will re-melt the top layer and bring back some of that wonderful lava-like texture!
FAQs: Your Big-Batch Lava Cake Questions, Answered!
Do I have to use a springform pan?
A springform pan is highly recommended because it allows you to easily remove the sides of the pan without having to invert the delicate cake. If you don’t have one, you could try it in a deep 9-inch regular cake pan, but be prepared that it may be very difficult to remove from the pan in one piece.
Why do I need to separate the eggs?
Separating the eggs and whipping the whites into a meringue is a classic technique for creating a light, airy, almost souffle-like texture in a flourless or low-flour chocolate cake. It’s what gives this rich cake its delicate structure.
Can I make this with different kinds of chocolate?
Yes, but the quality and cacao percentage matter. This recipe is designed for the deep, complex flavor of dark and bittersweet chocolate. Using milk chocolate would result in a much, much sweeter cake and may affect the final texture.
Why is there instant coffee in the recipe?
Coffee is a secret weapon in chocolate desserts! A small amount doesn’t make the cake taste like coffee; instead, it enhances and deepens the flavor of the chocolate, making it taste even richer and more “chocolatey.”
Final Thoughts: The Ultimate Romantic Dessert
There is nothing more special, more decadent, or more romantic than a perfect molten chocolate lava cake. This big-batch version allows you to share that incredible experience with the one you love, or with a whole table of friends, without any of the last-minute stress. It’s a true show-stopper and the perfect, unforgettable finale to a special Valentine’s Day dinner. I hope you love every single molten bite. Happy Baking!