Brown Sugar Pop Tart Cookies: A Delicious Twist on a Classic Treat
I still get a little giddy when the smell of caramelized brown sugar and warm butter fills the kitchen; these Brown Sugar Pop Tart Cookies are exactly that kind of comforting treat. They capture the flaky, nostalgic feel of a pop tart but as a tender, hand-held cookie—glistening with a simple glaze and, if you…
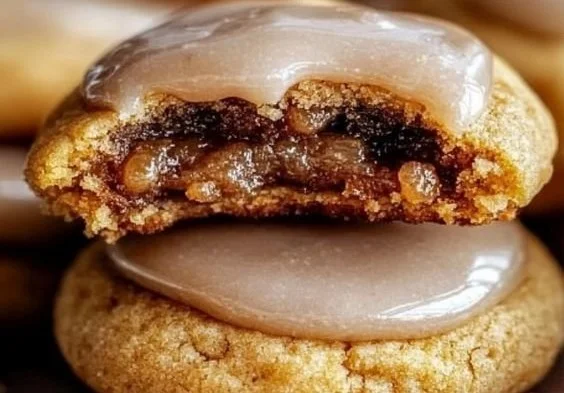
I still get a little giddy when the smell of caramelized brown sugar and warm butter fills the kitchen; these Brown Sugar Pop Tart Cookies are exactly that kind of comforting treat. They capture the flaky, nostalgic feel of a pop tart but as a tender, hand-held cookie—glistening with a simple glaze and, if you like, a playful sprinkle of color on top. I love how they bring childhood breakfasts and grown-up pastry technique together in one irresistible bite.
Why You’ll Fall for These Brown Sugar Pop Tart Cookies
- They combine two beloved things: the nostalgic pop tart filling and a buttery, cookie-like crust for the best of both worlds.
- The brown sugar filling cooks into a soft, molten center that contrasts beautifully with the flaky cookie edges.
- They’re surprisingly approachable: no fancy equipment required, just a rolling pin and a little patience.
- Make-ahead friendly: the dough chills well, so you can prep in stages for a relaxed baking day.
Before you dive in, if you’re the kind of baker who experiments across sweet and savory, you might also enjoy a rich seafood main as a contrast; I often plan a simple dinner around sweets and like this brown-butter glazed salmon recipe for evenings when guests are coming over brown butter honey glazed salmon.
Gathering Your Ingredients (and why each one matters)
- 2 ½ cups all-purpose flour — Provides structure while keeping the dough tender.
- 1 teaspoon baking powder — Adds just enough lift so the cookie isn’t too dense.
- ½ teaspoon baking soda — Balances the brown sugar and helps lightness.
- ½ teaspoon salt — Heightens all the sweetness and deep flavors.
- 1 cup unsalted butter, softened — The backbone of a flaky, rich crust; softened makes creaming easy.
- 1 cup brown sugar, packed — Gives the dough a warm caramel note and moisture.
- ½ cup granulated sugar — Helps the dough set and contributes a clean sweetness.
- 2 large eggs — Bind the dough and add richness.
- 1 teaspoon vanilla extract — Rounds out the flavors with aromatic warmth.
- 1 cup brown sugar (for filling) — The star of the filling; becomes lusciously gooey when baked.
- 1 tablespoon cornstarch — Thickens the filling so it doesn’t run out during baking.
- 1 teaspoon cinnamon — Adds a subtle spice that complements brown sugar beautifully.
- 1 tablespoon milk (for brushing) — Helps the tops brown lightly and gives a little sheen.
- 1 cup powdered sugar (for icing) — For that classic frosted pop tart finish.
- 2 tablespoons milk (for icing) — Creates a pourable glaze that sets with a soft sheen.
- Sprinkles (optional, for decoration) — For a playful, nostalgic touch.
If you like turning cookies into fun dessert displays, you might enjoy other playful treats I pull out for parties like these caramel apple donut cake pops caramel apple donut cake pops.
Let’s Get Cooking: Step-by-Step Instructions
These steps are straightforward; take your time with chilling and rolling for the best flaky texture.
- In a medium bowl, whisk together the all-purpose flour, baking powder, baking soda, and salt. This will be our dry mixture.
- In a large mixing bowl, cream together the softened butter, brown sugar, and granulated sugar using an electric mixer on medium speed. Beat until the mixture is light and fluffy, about 2-3 minutes.
- Add the eggs, one at a time, mixing well after each addition. Then, stir in the vanilla extract until fully incorporated.
- Gradually add the dry mixture to the wet mixture, mixing on low speed until just combined. Be careful not to overmix; we want a tender dough.
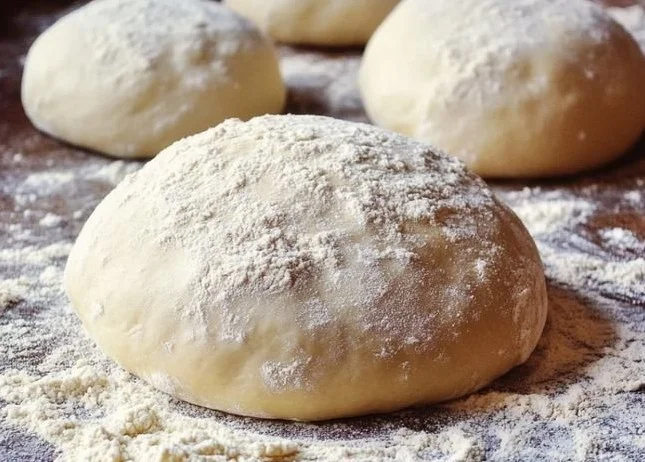
- Once the dough is formed, divide it into two equal portions. Shape each portion into a disk, wrap them in plastic wrap, and refrigerate for at least 1 hour.
- While the dough is chilling, prepare the brown sugar filling. In a small bowl, combine the brown sugar, cornstarch, and cinnamon. Mix well until all the ingredients are evenly distributed.
- Set the filling aside.
- After the dough has chilled, preheat your oven to 350°F (175°C) and line two baking sheets with parchment paper.
- Take one disk of dough out of the refrigerator. On a lightly floured surface, roll out the dough to about ¼ inch thick.
- Using a sharp knife or a pizza cutter, cut the rolled-out dough into rectangles, approximately 3×4 inches. Aim for about 12 rectangles from each disk, giving you a total of 24 rectangles.
- Repeat the rolling and cutting process with the second disk of dough.
- Take one rectangle of dough and place about 1 tablespoon of the brown sugar filling in the center.
- Take another rectangle of dough and place it on top of the filled rectangle. Press the edges together to seal. Use a fork to crimp the edges for a decorative touch.
- Repeat this process until all the rectangles are filled and assembled. Place the assembled cookies on the prepared baking sheets, leaving some space between each cookie.
- Brush the tops of the cookies with a little milk.
- Place the cookies in the preheated oven. Bake for 12-15 minutes, or until the edges are lightly golden and the tops are set.
- After baking, remove the cookies from the oven and let them cool on the baking sheets for about 5 minutes. Then, transfer them to a wire rack to cool completely.
- In a small bowl, whisk together the powdered sugar and 2 tablespoons of milk until smooth. Adjust the consistency with more milk if necessary.
- Drizzle the icing over the cooled cookies and add sprinkles if desired.
My Favorite Tricks for Bakery-Style Results
- Chill thoroughly: The dough needs that hour in the fridge so the butter firms and rolling doesn’t smear the layers.
- Don’t overfill: A tablespoon of filling keeps the centers gooey without bursting the seams.
- Use parchment or silicone mats: They ensure bottoms brown evenly and make cleanup easy.
- Press edges gently but firmly: A fork crimp not only looks charming but seals in the filling—no leaks.
- If your kitchen is warm, pop the sheet pan in the refrigerator for 10 minutes before baking to help the cookies hold their shape.
If you enjoy creative cookie ideas, I sometimes pair these tips with spooky sandwich cookies like the Jack Skellington Oreo Pops for a seasonal twist Jack Skellington Oreo Pops.
Mix It Up: Fun Variations to Try
- S’mores twist: Add mini marshmallows and a few chopped graham crackers to the filling for a campfire vibe.
- Apple-cinnamon filling: Fold in a tablespoon of finely chopped, cooked apples for fall warmth.
- Chocolate-hazelnut: Swap the brown sugar filling for a spoonful of chocolate-hazelnut spread if you want instant indulgence.
- Boozy glaze: Stir a teaspoon of dessert wine into the icing for grown-up complexity.
- Savory-sweet: For a party, try a salted-crumb topping for contrast.
Love playful snacks? You can also whip up nostalgic treats like these monster popcorn balls for a fun pairing at gatherings monster popcorn balls.
Perfect Pairings and the Best Way to Serve
Serve these warm or at room temperature on a simple platter with a scattering of colorful sprinkles for a cheerful breakfast spread. They shine next to a steaming mug of coffee or a frothy chai, where the spice in the cinnamon filling echoes the tea’s warmth. For a brunch, place them on tiered cake stands with fresh fruit and mini pastries—visually delightful and irresistibly snackable. If you’re serving kids, let them decorate with sprinkles and practice crimping edges for a fun activity.
Saving These Cookies for Later
- Room temperature: Store in an airtight container at room temperature for up to 3 days, with layers separated by parchment.
- Refrigeration: Keep them refrigerated for up to a week, but bring to room temperature before serving for best texture.
- Freezing: Freeze un-iced cookies flat on a sheet pan until solid, then transfer to a freezer bag for up to 2 months. Thaw on the counter and then glaze.
- Reheating: Warm gently in a 300°F oven for 5-7 minutes to revive that just-baked feeling.
Your Questions, Answered
Q: Can I make the dough ahead and freeze it?
A: Yes. Wrap the disks tightly and freeze for up to 2 months. Thaw overnight in the fridge before rolling.
Q: How do I prevent the filling from leaking?
A: Use the cornstarch to thicken the filling, press edges firmly, and avoid overfilling. A quick egg wash or milk brush helps seal the edges too.
Q: Can I substitute margarine or a butter alternative?
A: Butter gives the best flavor and texture. Margarine can work but may change the flakiness and flavor. For a dairy-free version, use a high-quality vegan butter substitute.
Q: Are these kid-friendly to make together?
A: Absolutely. Kids can scoop filling, place tops, and crimp edges. Let them decorate with sprinkles after chilling the glaze.
Conclusion
These Brown Sugar Pop Tart Cookies bring a little magic to any morning or dessert table with their flaky cookie crusts and caramelized, cinnamon-kissed centers. I adore how they look like tiny pastries but are utterly approachable to bake at home; they’ve become my go-to when friends drop by unannounced. If you want to explore playful pop tart variations, check out a S’mores take on the theme at S’mores Pop Tart Cookies on My Messy Kitchen, or a frosted brown sugar cinnamon version that inspired my glaze approach at Frosted Brown Sugar Cinnamon Pop Tart Cookies from Sugar Spun Run. For a cheeky beverage pairing or themed party idea, this rosé pop tart recipe is delightful reading Hampton Water Rosé Pop Tart Recipe You’ll Love, and if you enjoy experimenting with desserts, this chocolate-twist egg tart concept is fun inspiration Delicious Homemade Egg Tarts: Chocolate Twist Recipe. Give these cookies a try, and let the golden, caramel-scented kitchen be your favorite kind of cozy.
Brown Sugar Pop Tart Cookies
Ingredients
Method
- In a medium bowl, whisk together the all-purpose flour, baking powder, baking soda, and salt.
- In a large mixing bowl, cream together the softened butter, brown sugar, and granulated sugar using an electric mixer on medium speed until light and fluffy, about 2-3 minutes.
- Add the eggs one at a time, mixing well after each addition, then stir in the vanilla extract.
- Gradually add the dry mixture to the wet mixture, mixing on low speed until just combined.
- Divide the dough into two equal portions, shape each into a disk, wrap in plastic wrap, and refrigerate for at least 1 hour.
- In a small bowl, combine brown sugar, cornstarch, and cinnamon, and mix well.
- Preheat your oven to 350°F (175°C) and line two baking sheets with parchment paper.
- Roll out one disk of dough to about ¼ inch thick on a lightly floured surface.
- Cut the rolled-out dough into rectangles, approximately 3×4 inches, aiming for 12 rectangles from each disk.
- Place 1 tablespoon of filling in the center of each rectangle, then top with another rectangle of dough, pressing edges to seal. Crimp edges with a fork.
- Brush tops with milk, place on prepared baking sheets, and bake for 12-15 minutes until golden.
- Remove and cool on sheets for 5 minutes before transferring to a wire rack.
- Whisk together powdered sugar and milk until smooth, then drizzle over cooled cookies.
- Add sprinkles if desired.