Buffalo Chicken Sliders: Your Teen’s New Favorite Lunchbox!
Oh, my friends, who here isn’t always on the hunt for that perfect lunch solution for ravenous teens (or hungry adults!)? Something that’s healthy, utterly delicious, and fun enough to actually get devoured (no sad, uneaten lunches coming home!). And ideally, something that helps you brilliantly use up those delicious leftover bits from dinner last…
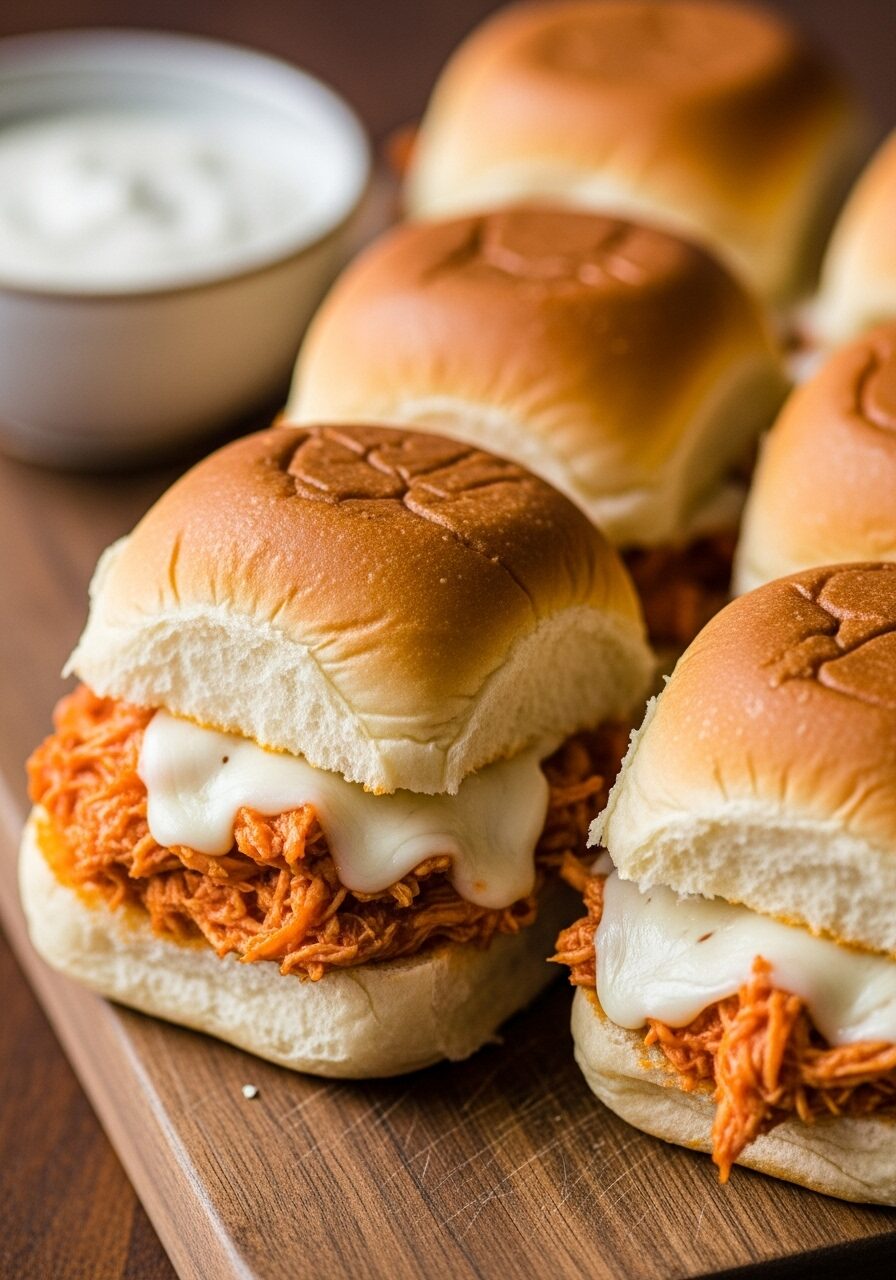
Oh, my friends, who here isn’t always on the hunt for that perfect lunch solution for ravenous teens (or hungry adults!)? Something that’s healthy, utterly delicious, and fun enough to actually get devoured (no sad, uneaten lunches coming home!). And ideally, something that helps you brilliantly use up those delicious leftover bits from dinner last night! Well, today at WiseRecipes, I’m absolutely thrilled to share a recipe that perfectly fits the bill: these incredible Buffalo Chicken Sliders! Seriously, prepare for pure bliss – tender, savory shredded chicken coated in tangy Buffalo sauce, gooey melted mozzarella, all squished between soft Hawaiian rolls. They’re spicy, they’re cheesy, they’re oh-so-squishy, and they are pure joy in every single bite!
I just adore a recipe that feels incredibly special and satisfying but is secretly super simple and quick to pull together. This recipe is exactly that! It’s a fantastic way to transform humble leftover chicken into an epic, deli-style lunch that feels like a real treat, but without any fuss. Forget complicated meal prep; we’re talking about a ridiculously flavorful and satisfying sandwich that comes together in a lightning-fast 25 minutes from start to finish! Whether you’re packing school lunches for a hungry teen, needing a quick and healthy office meal, or just craving a delicious, speedy bite right now, these Buffalo Chicken Sliders are your answer. They’re a fantastic way to make your midday meal something to truly look forward to. Trust me, once you try this incredible combination, you’ll be making them again and again!

Why These EPIC & EASY! Buffalo Chicken Sliders Are Your New Lunchtime MVP!
This isn’t just another sandwich idea; it’s a healthy, convenient, and incredibly satisfying solution for busy lives. Here’s why I’m absolutely smitten with it:
- Lightning-Fast & Flavor-Packed: Seriously, this recipe comes together in just 25 minutes! It’s the ultimate “healthy lunch NOW” solution for busy mornings and hungry teens, delivering bold, spicy, and cheesy deliciousness in record time.
- Brilliant Leftover Transformation: This recipe is a genius way to repurpose leftover cooked chicken! It turns what might be a mundane ingredient into the star of an exciting, flavorful meal.
- Spicy, Cheesy, Squishy Perfection: The combination of tangy Buffalo sauce, savory shredded chicken, gooey mozzarella, and soft rolls creates an irresistible flavor and texture profile that is pure comfort food heaven.
- Teen-Approved & Kid-Friendly: Sliders are inherently fun to eat! This recipe is a guaranteed hit with teens, making healthy lunches exciting and ensuring those lunchboxes come home empty.
- Customizable & Versatile: This recipe is a fantastic blank canvas! You can easily swap cheeses, add different veggies, adjust the spice level, or try various dressings to suit individual tastes or what you have on hand.
Your Simple Shopping List for Slider Bliss: Gather What You’ll Need
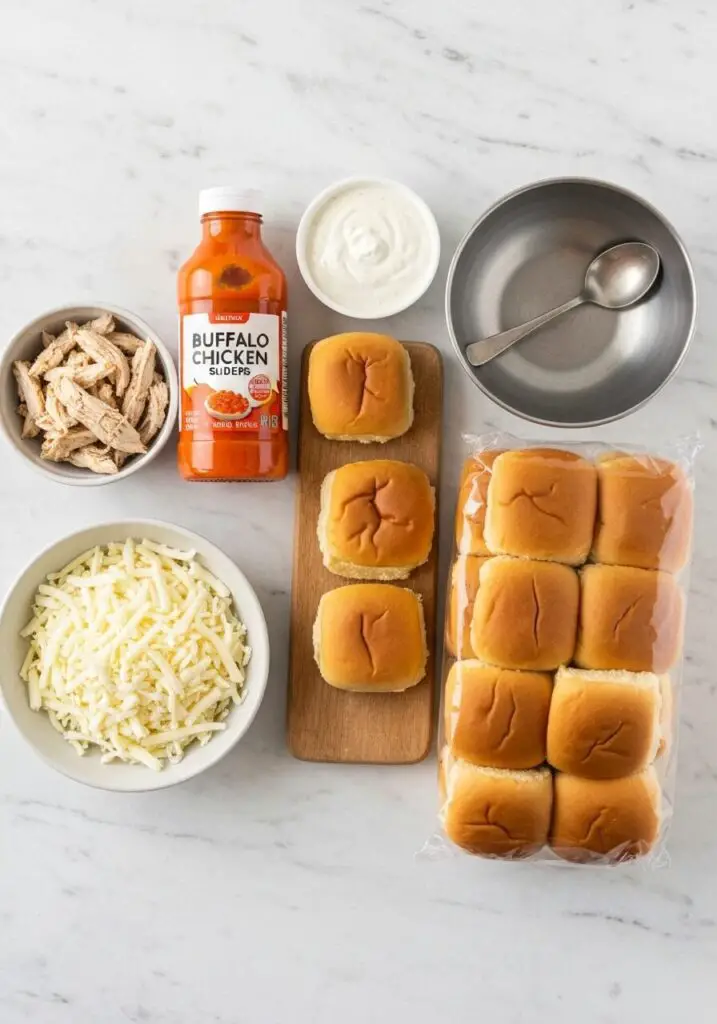
Creating these incredible Buffalo Chicken Sliders uses just a handful of simple, wholesome ingredients you likely already have! Here’s what you’ll want to grab to get started!
→ For the Spicy Buffalo Chicken Filling
- 2 cups shredded rotisserie or cooked chicken: Our lean protein base! Perfect for using up leftovers.
- ¼ cup Buffalo sauce: Your favorite brand! Adjust to your preferred spice level.
→ For the Squishy Slider Base & Gooey Cheese
- 6 slider rolls: Hawaiian rolls, dinner rolls, or any soft bun. Hawaiian rolls add a lovely sweetness!
- Shredded mozzarella cheese: For that perfect gooey, melty goodness.
→ For Dipping (Optional, but Recommended!)
- Ranch or blue cheese dressing, for dipping: The classic creamy cool-down for spicy Buffalo flavors!
Let’s Bake! Crafting Your Perfect Buffalo Chicken Sliders, Step-by-Step
This recipe is incredibly quick and straightforward. You’ll be making delicious, satisfying sliders in no time!
Part 1: Prepping Our Spicy Chicken Filling
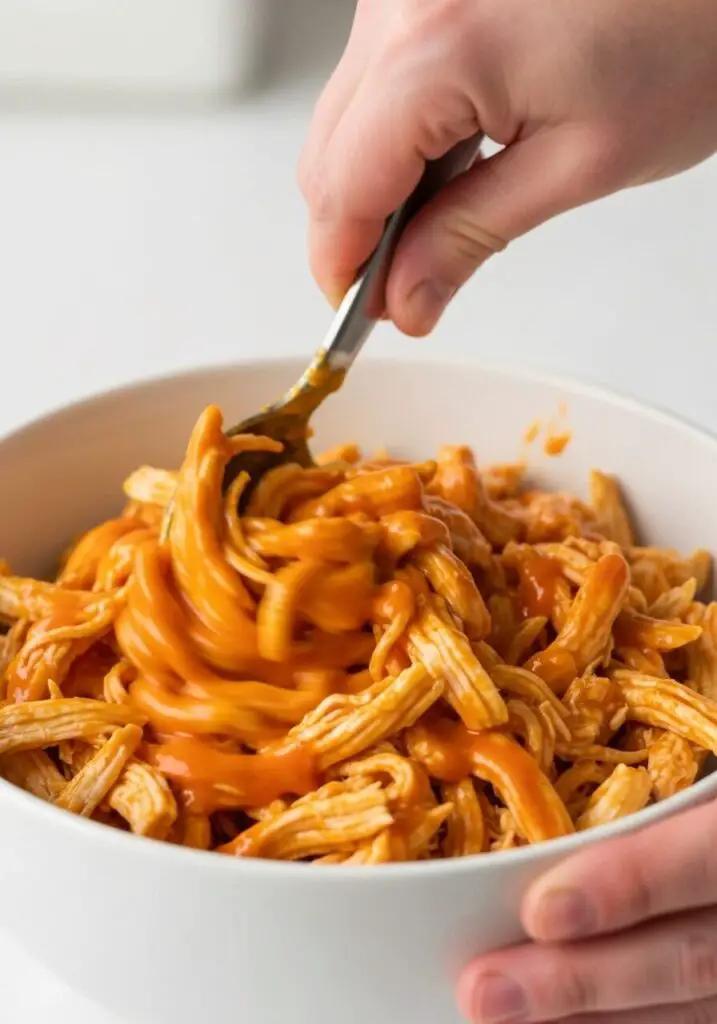
- Make the Filling: In a medium bowl, combine your 2 cups of shredded rotisserie or cooked chicken with ¼ cup of Buffalo sauce. Stir until the chicken is fully coated with that delicious, tangy, spicy flavor.
Part 2: Assembling & Baking Your Delicious Sliders!
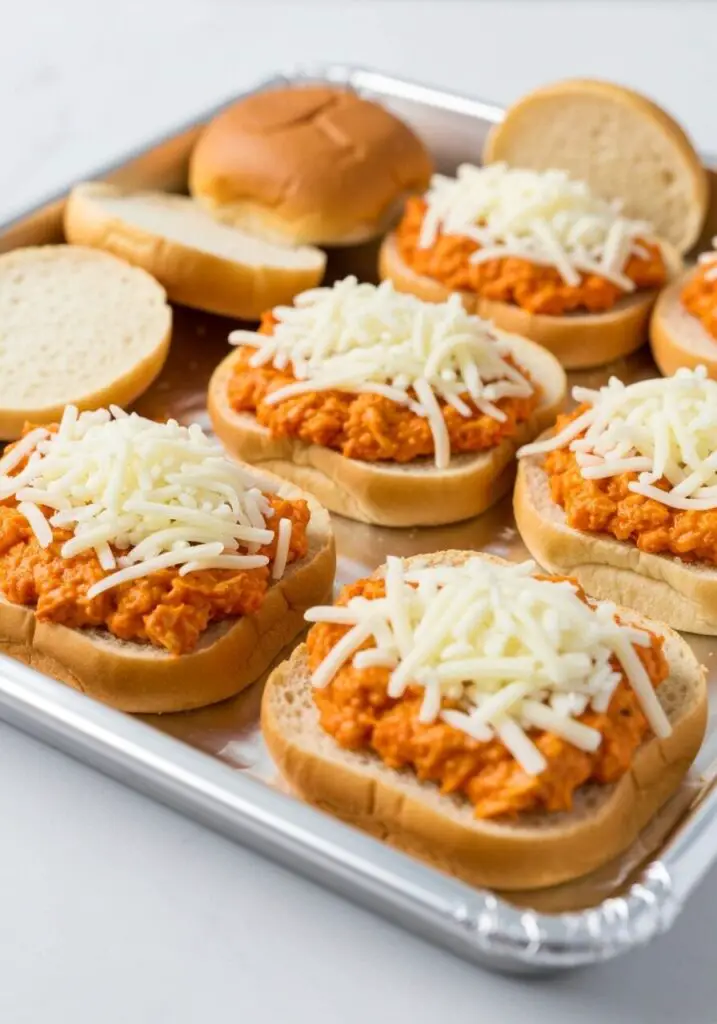
- Prep Rolls: Preheat your oven to 350°F (175°C). Take your 6 slider rolls (Hawaiian rolls, dinner rolls, or soft buns) and carefully slice them in half horizontally, keeping all the bottom halves attached if possible, and all the top halves attached. Place the bottom halves of the rolls on a foil-lined baking sheet.
- Layer Chicken & Cheese: Spoon the buffalo chicken mixture evenly over the bottom halves of the rolls, spreading it right to the edges. Top generously with shredded mozzarella cheese.
- Close & Bake: Place the tops of the rolls back on. Lightly cover the entire baking sheet with foil (this helps the cheese melt and keeps the rolls soft). Bake for 10–12 minutes, or until the cheese is beautifully melted and bubbly, and the sliders are warmed through.
- Cool & Slice: Remove the sliders from the oven. Let them cool slightly before slicing them apart into individual sliders.
- Pack for Lunchbox (or Serve Warm!): Enjoy warm, or pack them up! For a lunchbox, let the sliders cool completely before placing them in a hard lunch container. Add healthy lunch sides (like fresh fruit and veggies) and an ice pack, if necessary, to keep them cool.
- Pack Dressing Separately: Pour the Ranch or blue cheese dressing into a small, leak-proof container and pack it separately. Remember to drizzle it over the sliders (or dip!) right before eating!
WiseRecipes’ Top Tips for Slider Brilliance!
These easy lunchbox sliders are incredibly simple, but these WiseRecipes tips will help you achieve Buffalo Chicken Slider mastery every single time!
- Room Temp Rolls: If using rolls from the fridge, let them come to room temperature briefly. This helps them stay soft and not tear when slicing or assembling.
- Don’t Over-Sauce the Chicken: While you want the chicken coated, avoid drowning it in Buffalo sauce. Too much sauce can make the rolls soggy. Aim for a nice, even coating.
- The Power of Leftovers: This recipe is a fantastic way to use up leftover cooked chicken (like rotisserie chicken, grilled chicken, or baked chicken breast). It’s a zero-waste win!
- Cover for Melty Cheese: Lightly covering the sliders with foil while baking helps trap the heat, ensuring the cheese gets beautifully melted and gooey without the rolls getting too toasted too quickly.
- Cool Completely Before Packing: If packing for lunchboxes, allow the sliders to cool completely before placing them in a sealed container. Packing warm food can create condensation, leading to soggy rolls.
Creative Twists: Delicious Ways to Customize Your Epic Sliders!
These Buffalo Chicken Sliders are already fantastic, but they’re also a wonderful canvas for your culinary creativity! Here are some ideas I love to play with:
- Cheese Please: Swap mozzarella for provolone, cheddar, Monterey Jack, or even a blend of cheeses. A little sprinkle of crumbled blue cheese inside the sliders would also be delicious!
- Veggie Crunch: Add a thin layer of finely shredded lettuce or coleslaw mix on top of the chicken mixture before adding the top buns for extra crunch and freshness.
- Spicy Kick: If you love extra heat, add a pinch of cayenne pepper or extra red pepper flakes to the chicken mixture, or choose a hotter Buffalo sauce.
- Blue Cheese Boost: Stir a small amount of crumbled blue cheese directly into the Buffalo chicken mixture for an even more intense tangy flavor.
- Pickle Perfection: Thinly sliced dill pickles or bread and butter pickles tucked into the sliders would add a fantastic tangy crunch.
- Sweetness & Glaze (for Hawaiian Rolls): If using Hawaiian rolls, brush the tops of the assembled sliders with a melted butter and garlic powder mixture (or butter and brown sugar!) before baking for an extra savory-sweet crust.
Keep It Fresh: Storing Your Delicious Buffalo Chicken Sliders (Perfect for Lunch!)
You’ve created something truly delicious and healthy, so let’s make sure it stays fresh and ready for easy meals!
- Refrigerator Storage (Baked Sliders): Once completely cooled, store any leftover Buffalo Chicken Sliders in an airtight container in the refrigerator for up to 3 days.
- Refrigerator Storage (Filling): You can prepare the Buffalo chicken filling (Step 1) up to 2 days in advance and store it in an airtight container in the refrigerator. Assemble and bake the sliders just before serving or packing.
- Reheating Tips: To best revive that squishy texture and melted cheese, reheat sliders (covered with foil) in a preheated oven (around 160°C / 325°F) for 10-15 minutes, or in a toaster oven. Microwaving is an option, but the rolls might get a bit chewy.
- Packing Tips: For lunchboxes, make sure the sliders are completely cool before packing them in a hard container. Pack dressing separately, and include an ice pack in the insulated lunch bag.
- Freezing? Not Recommended: I do not recommend freezing these Buffalo Chicken Sliders. The rolls and cheese can become soggy or change texture upon thawing and reheating. The chicken filling, however, can be frozen (see FAQs for cooked chicken freezing!).
EPIC & EASY! Buffalo Chicken Sliders
Ingredients
Equipment
Method
- In a medium bowl, combine the shredded chicken with Buffalo sauce until fully coated.
- Slice the rolls in half horizontally. Place the bottom halves on a foil-lined baking sheet.
- Spoon the buffalo chicken mixture evenly over the rolls and top with shredded cheese. Place the tops of the rolls back on.
- Lightly cover with foil and bake at 350F for 10–12 minutes, or until the cheese is melted and the sliders are warmed through.
- Let them cool before slicing them apart. Enjoy warm or pack in a hard lunch container.
- Pour the dressing into a small leak-proof container and pack separately (with healthy lunch sides and an ice pack, if necessary).
Notes
FAQs: Your Top Buffalo Chicken Sliders Questions, Answered!
Q: What kind of rolls are best for sliders?
A: Soft, slightly sweet rolls work best! Hawaiian rolls are a fantastic choice due to their tender texture and hint of sweetness. Dinner rolls or other soft brioche-style buns also work wonderfully.
Q: Can I make these vegetarian?
A: Yes! To make them vegetarian, substitute the shredded chicken with shredded jackfruit (cooked in BBQ sauce), or crumbled firm tofu (sautéed and tossed in Buffalo sauce), or even seasoned roasted chickpeas.
Q: How can I adjust the spice level?
A: To make them milder, use less Buffalo sauce or choose a mild variety. You can also mix some creamy Ranch or blue cheese dressing directly into the chicken with the Buffalo sauce. For spicier, add a pinch of cayenne pepper to the chicken mixture or use a hotter Buffalo sauce.
Q: What are some good healthy sides to pack with these sliders for lunch?
A: Crunchy veggie sticks (carrots, celery, cucumber, bell pepper), fresh fruit (grapes, apple slices, orange segments), a small container of hummus, a handful of pretzels, or a small yogurt cup would all be fantastic and healthy accompaniments.
Q: Can I use fresh chicken breast that isn’t pre-cooked?
A: Yes, you can! If using raw chicken breast, dice it and cook it in a skillet until browned and cooked through. Then shred or chop it finely and proceed with mixing with the Buffalo sauce. This will add about 10-15 minutes to your prep and cook time.
And there you have it, my friends—your guide to crafting the most delightful, impressive, and truly satisfying Buffalo Chicken Sliders! This WiseRecipes creation is more than just a meal; it’s a testament to how simple ingredients, when treated with a little love and smart steps, can come together to create something truly extraordinary. It’s a vibrant, exciting meal that you’ll genuinely look forward to eating, day after day.
I am genuinely so excited for you to try these and experience the delicious magic yourself. Please, please come back and let me know in the comments below what your favorite part of these epic sliders was, or any fun twists you tried! Happy cooking from WiseRecipes!