Burnt Basque Cheesecake Loaf Pan – Simply Divine
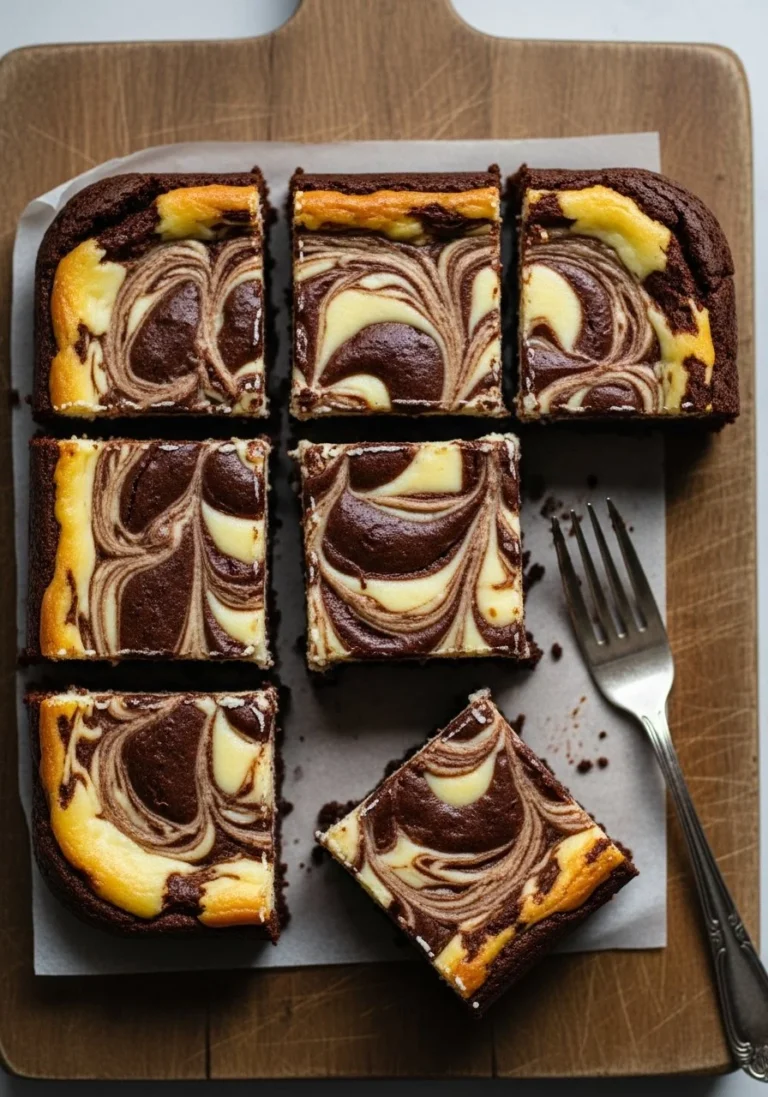
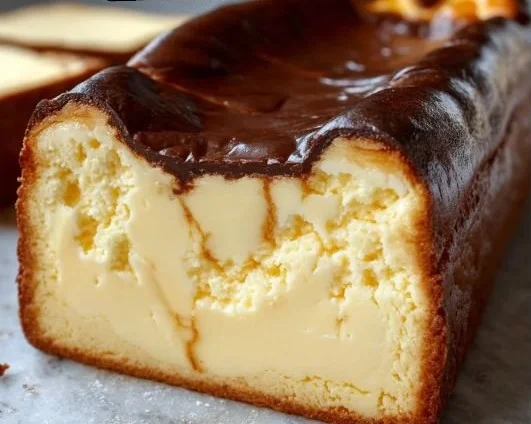
There’s something utterly enchanting about the Burnt Basque Cheesecake, especially when you transform it into a lovely loaf pan version. This dessert takes everything we adore about classic cheesecake—creamy texture, sweet richness—and adds a theatrical touch with its caramelized, slightly charred top. The moment you slice into it, you’ll be met with a stunning contrast:…
There’s something utterly enchanting about the Burnt Basque Cheesecake, especially when you transform it into a lovely loaf pan version. This dessert takes everything we adore about classic cheesecake—creamy texture, sweet richness—and adds a theatrical touch with its caramelized, slightly charred top. The moment you slice into it, you’ll be met with a stunning contrast: the deeply bronzed exterior giving way to a creamy, custard-like interior that dances on your palate. It’s a dessert that never fails to impress, whether it’s for a dinner party or a cozy evening at home.
The Best Parts About This Dish
-
A Simple Yet Stunning Presentation: Its rustic appearance makes it a striking centerpiece at any gathering. The deep caramel hue and rustic loaf shape offer a charm that says, “I put in the effort,” while keeping things effortlessly relaxed.
-
Creamy Delight with a Unique Twist: This cheesecake is rich, smooth, and just sweet enough, with the toasted notes of the burnt top providing an incredible depth of flavor you won’t find in regular cheesecake.
-
Minimal Effort, Maximum Reward: With just a handful of ingredients and straightforward steps, you can create a showstopper dessert without feeling like you spent hours in the kitchen. It’s the perfect beginner-friendly recipe for anyone wanting to impress!
-
Versatile for Any Occasion: Whether you’re celebrating a birthday, hosting a brunch or simply having a Friday night in, this cheesecake can adapt to any mood. Dress it up or down with toppings, and it’s sure to be loved.
-
A Nod to Tradition with a Modern Spin: Since the Basque region in Spain has become a culinary highlight, this recipe embraces tradition while transforming it into something new and personal. Each bite tells a story of its origins while feeling entirely fresh.
Your Shopping List
Gather these ingredients for a delightful treat that you’ll want to whip up over and over again:
-
16 oz Full-Fat Cream Cheese: The base of this cheesecake, it creates that luscious creamy texture we crave—make sure it’s at room temperature for the best results.
-
3/4 cup Granulated Sugar: Sweetening it just right, this sugar also helps in creating that delightful caramelization on top—perfection in every bite.
-
3 large Eggs: They lend structure and richness, aiding in that smooth, custard-like finish we want in every slice.
-
1 cup Heavy Cream: Adds decadence and a silky mouthfeel; it’s essential for achieving the right flavor and texture.
-
1/4 cup All-Purpose Flour: Just a touch to help stabilize the batter, allowing it to set beautifully without becoming overly dense.
-
1/4 teaspoon Salt: A pinch brings harmony to the sweetness, enhancing the overall depth of flavor.
-
1 cup Whipped Cream: Serve it with this fluffy topping to balance the richness and add a light, airy quality.
-
1 cup Fresh Berries: These vibrant jewels add a pop of color and a refreshing tartness that complements the cheesecake beautifully.
-
1/2 cup Caramel Sauce: Drizzled over the top, it adds an extra layer of indulgence that you simply can’t resist.
Let’s Get Cooking
Now that you’ve collected everything, it’s time to dive into this delightful culinary adventure. Follow these simple steps to create your very own Burnt Basque Cheesecake loaf.
-
Preheat oven to 425°F (220°C). Line a 9×5 inch loaf pan thoroughly with parchment paper, ensuring it extends at least two inches above the rim to allow for easy removal later.
-
In a large bowl, beat softened cream cheese with an electric mixer until completely smooth and creamy. Gradually add granulated sugar and continue beating until well incorporated and no sugar granules are visible.
-
Beat in the three large eggs, one at a time, ensuring each is fully incorporated before adding the next. Pour in the heavy cream and mix on low speed until just combined. Avoid overmixing; we want it smooth, not fluffy.
-
In a separate small bowl, whisk together the all-purpose flour and salt. Gradually add this dry ingredient mixture to the cream cheese batter, mixing on the lowest speed or by hand until just combined and no streaks of flour remain.
-
Pour the batter into the prepared loaf pan and smooth the top. Place the pan on a baking sheet. Bake for 30-40 minutes, or until the top is deeply golden brown and set with a slight wobble in the center. The dark color is intentional—don’t be afraid of it!
-
Remove from the oven and let the cheesecake cool completely in the pan on a wire rack. Once at room temperature, lift it out using the parchment paper overhangs and transfer to a serving platter. Refrigerate for at least 4 hours, or preferably overnight, before serving.
-
Slice the cheesecake and serve with a dollop of freshly whipped cream, fresh berries, and a drizzle of caramel sauce.
Tips for Success
-
Room Temperature Ingredients: This is key for a smooth batter. Room temperature cream cheese and eggs blend seamlessly, ensuring no lumps ruin your cheesecake.
-
Don’t Skimp on the Cooling Time: Allowing it to cool completely before refrigerating helps achieve the ideal texture. It sets beautifully when chilled overnight.
-
Mind the Baking Time: Since every oven is different, keep an eye on your cheesecake while it bakes. The wobbly center is a good sign—don’t overbake! The burnt top is a hallmark, but we want it to still be soft and creamy inside.
-
Use Quality Cream: Heavy cream makes a big difference; the richer the cream, the richer the flavor! Your taste buds will thank you.
-
Experiment with flavors: Consider adding a splash of vanilla extract or a hint of citrus zest to the batter for an extra twist. Vanilla adds softness, while citrus brings brightness!
Creative Twists
Ready to make this cheesecake your own? Here are a few fun ideas to mix things up:
-
Flavored Cream Cheese: Try using flavored cream cheese, such as vanilla or chocolate, for a unique spin.
-
Lemon or Orange Zest: Adding citrus zest into the batter can brighten the flavor and bring a refreshing twist to each slice.
-
Chocolate Drizzle: Swap caramel for chocolate sauce or create a swirled effect by folding melted chocolate into half of the cheesecake batter before baking.
-
Nut Crust: For a crunchy texture, you can create a nut base by pulsing your favorite nuts into a coarse meal and mixing them with melted butter.
-
Fruit Toppings: Experiment with other fruits like peaches, mangoes, or even compotes to complement the creamy richness of the cheesecake.
Bringing It to the Table
To present this exquisite cheesecake, slice it into thick pieces to showcase its creamy interior and burnt top. Serve each slice elegantly on dessert plates, dolloped with freshly whipped cream and a handful of fresh berries— their bright colors will beautifully contrast against the rich, golden tones of the cheesecake. Add a drizzle of caramel or chocolate sauce for that extra touch of indulgence. Imagine the moment when guests take their first bite; the combination of textures and flavors will surely lead to a chorus of "Mmm’s."
How Long Does It Last
Storing leftovers is a breeze!
-
Refrigeration: Cover any uneaten cheesecake tightly with plastic wrap and store it in the fridge. It should stay fresh for about 4-5 days, but let’s be honest—this one’s likely to disappear much faster!
-
Freezing: For longer storage, slice your cheesecake and wrap individual pieces in plastic wrap, then place them in a freezer-safe container. It can last for up to 3 months in the freezer. Just thaw it overnight in the fridge before serving.
-
Reheating: If you prefer it warm, gently heat slices in the microwave for about 10-15 seconds. Just enough to take the chill off!
Your Questions Answered
-
Can I make this without a loaf pan? Absolutely! You can use an 8-inch round cake pan, but remember to adjust the baking time—you may need a few extra minutes.
-
What’s the best way to serve this? It pairs wonderfully with coffee or tea, making it a perfect dessert for brunch, afternoon gatherings, or even just a treat for you!
-
Is this gluten-free? Unfortunately, the flour does make it gluten-containing. However, you can try substituting it with a gluten-free flour blend for a gluten-free version.
-
Why does it end up burnt? The burnt top is a beloved characteristic of this cheesecake! The caramelization enhances the flavor, adding depth to the sweetness and richness.
You’re sure to make an impression with this Burnt Basque Cheesecake Loaf Pan, Simple Divine. Whether you’re treating yourself or entertaining friends, it’s a dessert that embodies comfort and sophistication. Don’t hesitate to dive in, explore the variations, and let your creativity shine—because every bite is a celebration of flavor! Enjoy every moment of this scrumptious adventure in baking!
Burnt Basque Cheesecake Loaf
Ingredients
Method
- Preheat oven to 425°F (220°C). Line a 9x5 inch loaf pan with parchment paper.
- In a large bowl, beat softened cream cheese until smooth. Gradually add granulated sugar.
- Beat in eggs one at a time. Add heavy cream, mixing on low speed until just combined.
- In a separate bowl, whisk together flour and salt. Gradually add to cream cheese mixture.
- Pour batter into prepared loaf pan and smooth the top. Bake for 30-40 minutes until top is deeply golden brown.
- Remove from oven and let cool completely in the pan before refrigerating.
- Slice the cheesecake and serve with whipped cream, fresh berries, and caramel sauce.