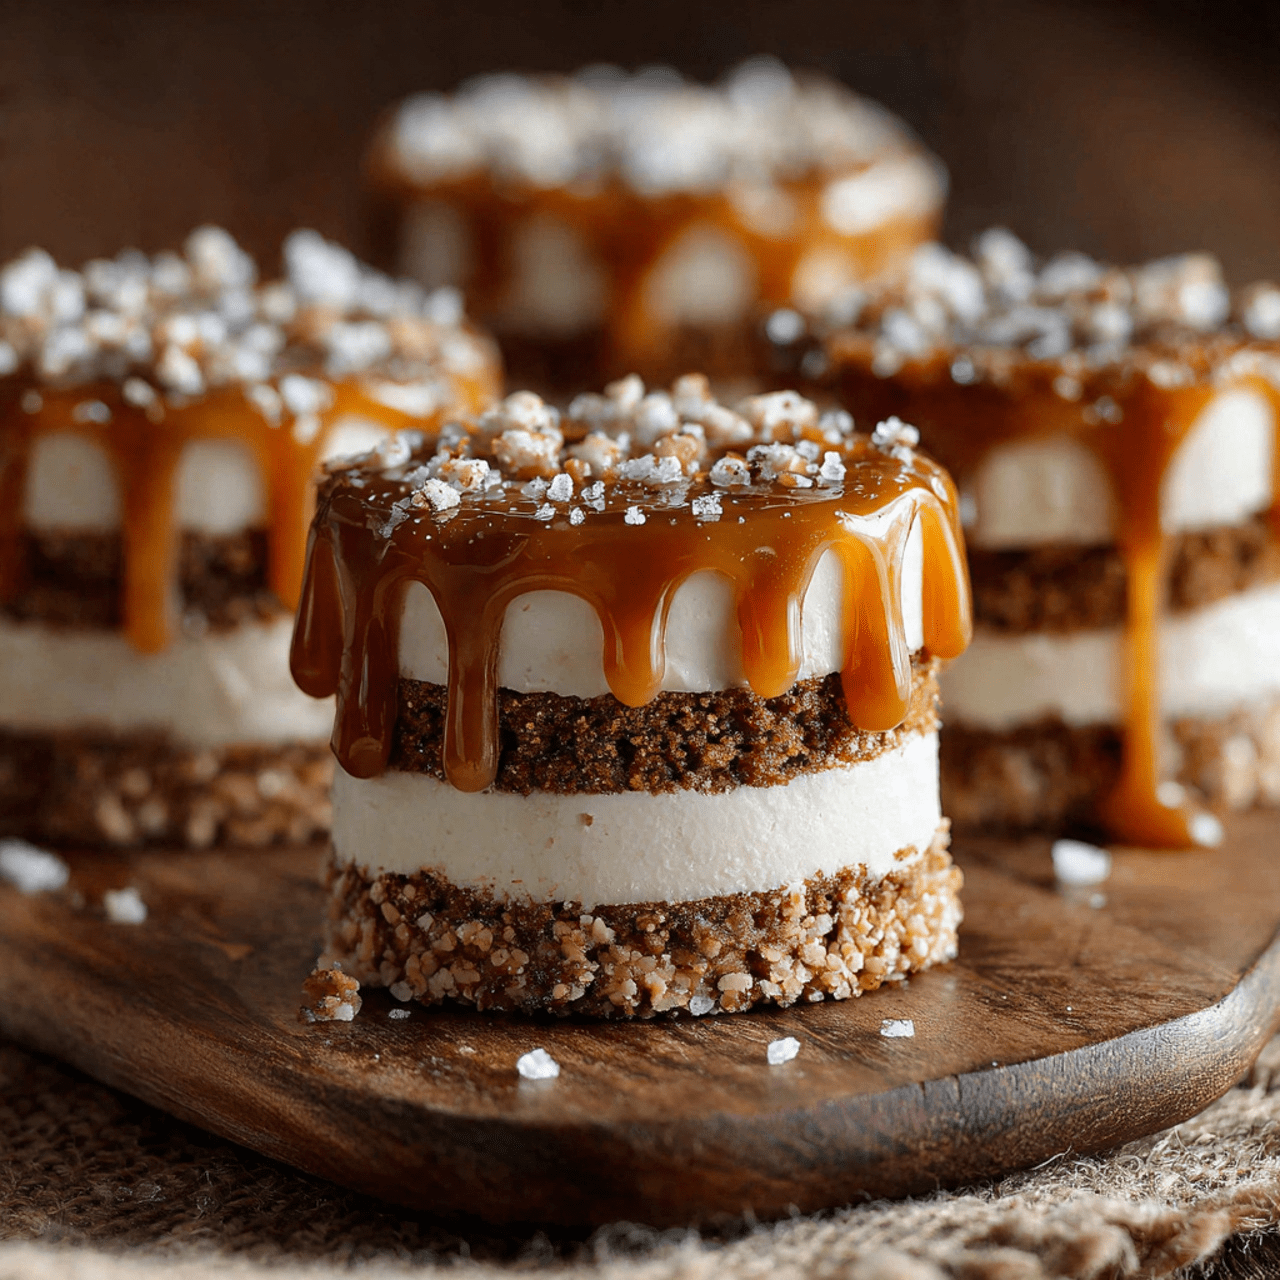
The Best Caramel Apple Crumb Bars (with Shortbread Crust!)
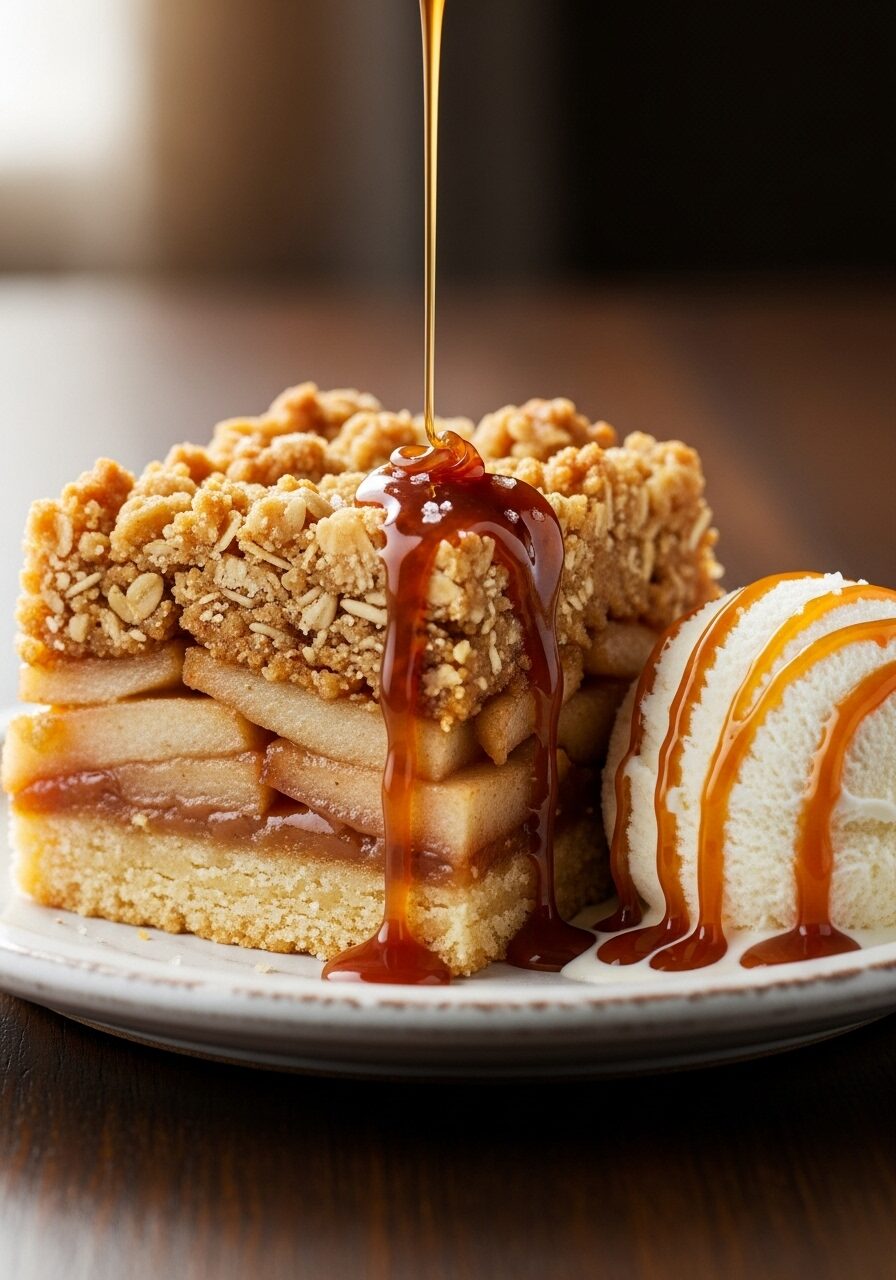
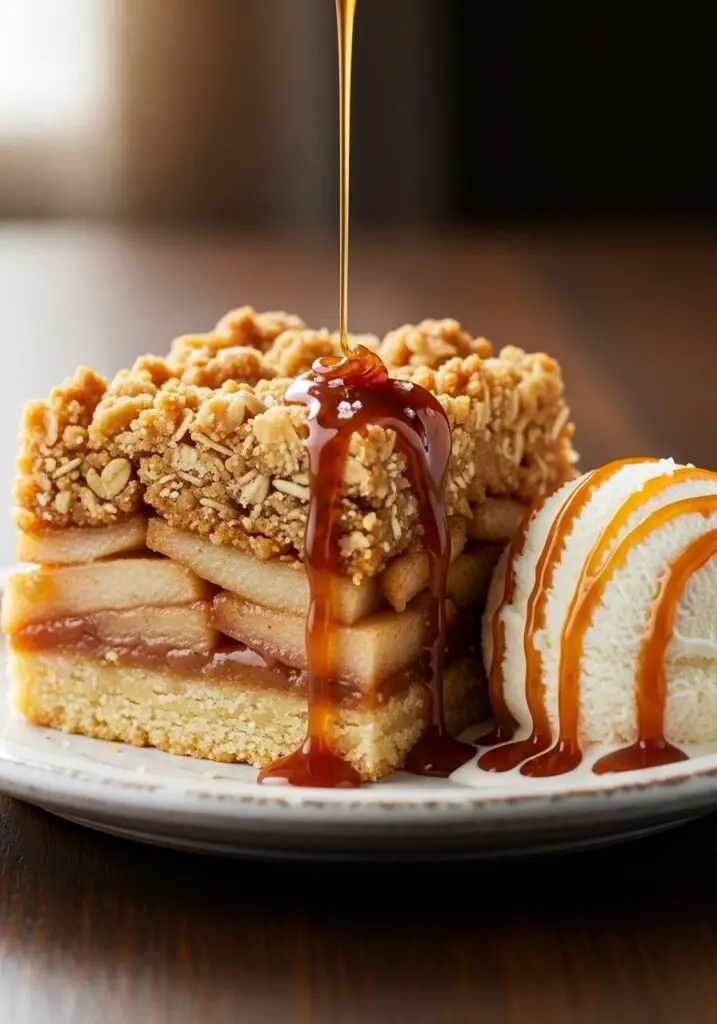
Imagine the most perfect bite of fall: a buttery, melt-in-your-mouth shortbread crust, topped with a layer of tender, cinnamon-kissed apples, and finished with a crunchy, oat-strewn crumble. Now, imagine that whole glorious creation gets a generous drizzle of rich, salted caramel. That, my friends, is not a dream. That is this incredible Caramel Apple Crumb…
Imagine the most perfect bite of fall: a buttery, melt-in-your-mouth shortbread crust, topped with a layer of tender, cinnamon-kissed apples, and finished with a crunchy, oat-strewn crumble. Now, imagine that whole glorious creation gets a generous drizzle of rich, salted caramel. That, my friends, is not a dream. That is this incredible Caramel Apple Crumb Bar recipe.
Here’s the thing about me and fall baking: I love the flavor of apple pie, but I’m not always in the mood for the whole process of making and chilling a pie crust. This recipe is my genius shortcut. It delivers all that same cozy, apple-cinnamon goodness in an easy-to-make, easy-to-serve bar form. The best part? The dough for the crust and the crumb topping are made from the exact same mixture. It’s a brilliant, time-saving trick!
I promise you, these bars are the perfect balance of textures and flavors. They’re sweet but not too sweet, with a buttery crust that is simply to die for. They are the absolute star of any fall gathering, Thanksgiving dessert table, or just a Tuesday afternoon when you need a little something special with your coffee.
Get ready to bake up a pan of the most delicious, crowd-pleasing apple bars that will have everyone convinced you’re a baking superstar.
Why These Are the Best Apple Bars You’ll Ever Bake!
I don’t say this lightly, but this recipe is a true show-stopper. It’s the one I get asked for again and again every single autumn. Here’s why:
- Three Perfect Layers of Texture: You get a soft yet sturdy shortbread crust, a layer of tender, juicy apples, and a crunchy, crumbly oat topping. It’s a symphony in every bite!
- The Easiest Crust & Topping Ever: You make one simple, buttery mixture and use part of it for the base and the rest for the crumble. It’s an incredibly clever and easy technique.
- That Salted Caramel Finish: The final drizzle of good quality caramel sauce is what takes these bars from delicious to absolutely unforgettable.
- Perfect for a Crowd: They’re so much easier to slice and serve than a traditional apple pie, making them perfect for parties, potlucks, and holiday gatherings.
- Your Kitchen Will Smell Like Heaven: The aroma of baking cinnamon, apples, and butter is the absolute best part of the fall season, and this recipe delivers.
Recipe Snapshot
| Prep Time | 20 minutes |
| Cook Time | 55 minutes |
| Total Time | 1 hour 15 minutes |
| Servings | 9-12 bars |
| Calories | 228 kcal per serving |
| Course | Dessert |
| Cuisine | American |
| Difficulty/Method | Easy / Baking |
Your Shopping List for These Irresistible Bars
This recipe uses classic, simple ingredients to create something truly magical. Let’s break it down.
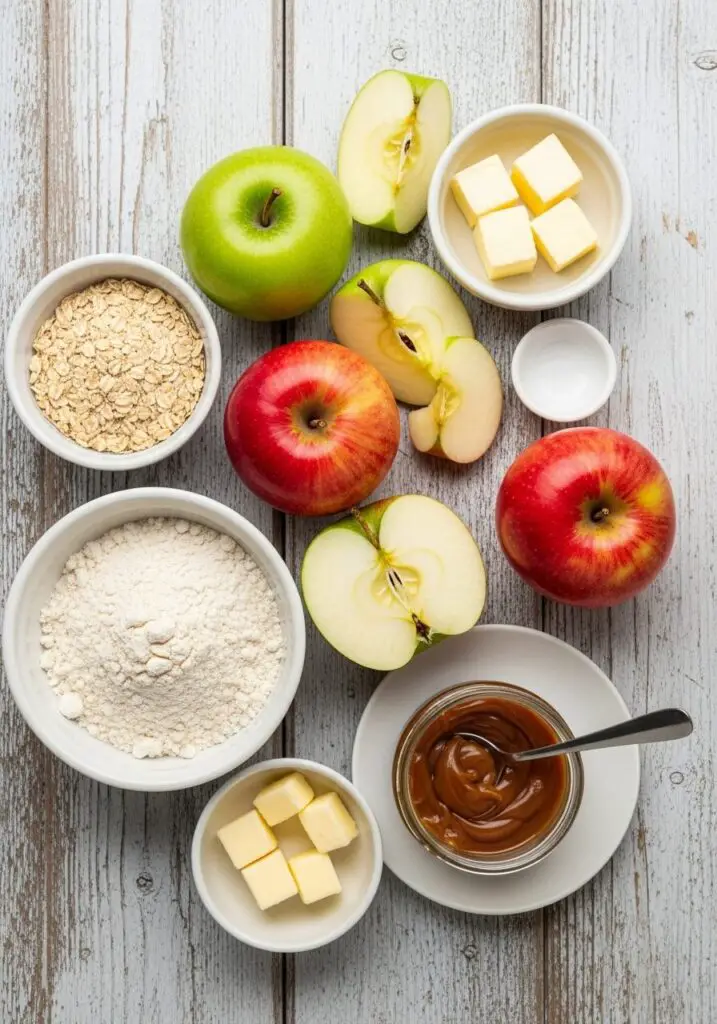
→ For the Crust & Crumb Topping
- Granulated sugar & light brown sugar → The combination gives the perfect sweetness and a hint of molasses flavor.
- 1 ½ cups all-purpose flour → The foundation of our buttery shortbread.
- ½ teaspoon baking powder & ¼ teaspoon salt → For texture and flavor balance.
- 10 tablespoons chilled unsalted butter → It MUST be cold! This is the secret to a perfect shortbread texture.
- ½ teaspoon pure vanilla extract → A must for that warm, bakery flavor.
- ⅓ cup old fashioned oats & ¼ teaspoon ground cinnamon → These get mixed into the topping portion for that classic crumble finish.
→ For the Cinnamon Apple Filling
- 3-4 cups thinly sliced apples → About 3-4 medium apples. A firm, crisp variety like Granny Smith or Honeycrisp is perfect.
- 1 tablespoon all-purpose flour → To help thicken the apple juices as they bake.
- 2 tablespoons granulated sugar & 1 teaspoon cinnamon → The classic, cozy apple pie spice duo.
- 1 teaspoon lemon juice → Brightens the flavor of the apples and prevents them from browning.
→ For the Grand Finale
- ⅓ cup good quality caramel sauce → The thicker, the better! This is where you want to use the good stuff.
Let’s Get Baking! Crafting Your Apple Crumb Bars
Ready to make the best dessert of the season? This process is so satisfying, especially the part where you make one mixture for two jobs!
Part 1: The Magical Crust & Topping Mixture
- Prep Your Oven and Pan: First, get your oven preheating to 350°F (177°C). Line an 8×8-inch baking pan with parchment paper, leaving an overhang on the sides to act as handles. This is a lifesaver later!
- Make the Crumb Mixture: In a large bowl (using a stand mixer or hand mixer is easiest), beat together the granulated sugar, brown sugar, flour, baking powder, and salt. Add the cubes of chilled butter and the vanilla. Beat on low speed until the butter is broken up and the mixture looks like coarse, crumbly sand with some pea-sized butter bits. Place this bowl in the fridge while you prep the apples.
Part 2: The Apple Filling & Assembly
- Mix the Filling: In a separate bowl, toss together your thinly sliced apples, the tablespoon of flour, sugar, cinnamon, and lemon juice until the apples are evenly coated.
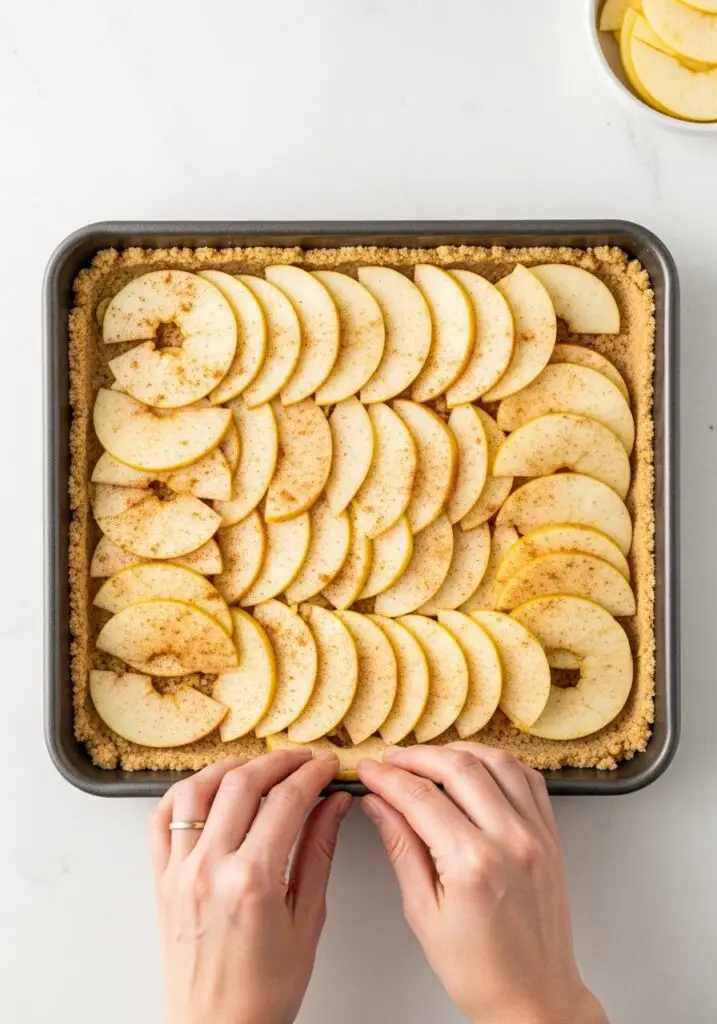
- Form the Crust: Take your crumb mixture out of the fridge. Scoop out about 2 loosely measured cups and dump it into your prepared pan. Use the back of the measuring cup or your fingers to press it down into a firm, even layer. This is your crust!
- Layer the Apples: Arrange the coated apple slices tightly over the crust in overlapping layers. You want a nice, compact layer of apples.
- Make the Topping: Add the ⅓ cup of oats and ¼ teaspoon of cinnamon to the remaining crumb mixture in your bowl. Use your fingers to toss it all together.
- Top and Bake: Sprinkle this oat crumble mixture evenly over the layer of apples. I like to squeeze some of it in my fist to create bigger, chunkier clumps.
Part 3: The Two-Stage Bake & Caramel Finish
- First Bake (Covered): Cover the pan with foil and bake for 30 minutes. This step gently steams the apples, making them perfectly tender without the topping burning.
- Second Bake (Uncovered): Remove the foil and bake for another 25-30 minutes. Now we’re getting that beautiful, light golden brown color on the crumble. The apples should be tender when pierced with a knife.
- Cool and Drizzle: Let the bars cool in the pan on a wire rack. While they’re still a little warm, drizzle that glorious caramel sauce all over the top. Let them cool further before slicing for the neatest cuts.

WiseRecipes’ Top Tips for Perfect Apple Crumb Bars
I’ve baked countless batches of these. These are the little secrets that guarantee a perfect result every single time.
- Your Butter MUST Be Cold. I cannot stress this enough! Using chilled, cubed butter is the secret to a tender, shortbread-like crust and a crumbly topping. Melted or soft butter will result in a greasy, tough crust.
- Press the Crust Firmly. For a sturdy base that won’t crumble when you cut it, really pack that first layer of the crumb mixture down into the pan. Use the bottom of a glass or measuring cup to get it nice and compact.
- Slice Your Apples THINLY. Thin, uniform slices (about 1/8-inch thick) will cook down evenly and create beautiful, distinct layers in your bars. Layer them tightly to get as much apple goodness in there as possible.
- Don’t Skip the Foil! That initial 30-minute covered bake is crucial. It traps steam and perfectly cooks the apples until they’re tender. Baking uncovered the whole time would likely burn the topping before the apples are soft.
- Chill for Clean Cuts. I know it is pure torture to wait, but these bars will slice much more cleanly if you let them cool completely, or even chill them in the fridge for an hour. If you serve them warm, they will be more gooey and crumbly (which is also delicious, just different!).
Creative Twists: Delicious Ways to Customize Your Bars
This recipe is a fantastic starting point for your own creative baking adventures. Here are some ideas:
- Add Toasted Pecans: Add a half-cup of toasted, chopped pecans to the crumb topping mixture for a wonderful nutty crunch.
- Warm Spices: Add a pinch of nutmeg, cardamom, or allspice to the apple filling for a more complex spice profile.
- Add a Salted Finish: If you use regular caramel sauce, a tiny sprinkle of flaky sea salt on top is an absolute must.
- Make it with Pears: Firm, ripe pears would be a fantastic substitute for the apples.
- Cranberry Apple: Toss a half-cup of fresh or frozen cranberries in with the apple filling for a beautiful, tart contrast.
- Orange Zest: Add the zest of one orange to the crumb mixture for a bright, citrusy note.
- Add a Drizzle of White Chocolate: Once cooled, add a second drizzle of melted white chocolate over the caramel.
- Make it Gluten-Free: Substitute the all-purpose flour with a good quality, 1-to-1 measure gluten-free baking flour blend that contains xanthan gum.
Keep Them Fresh! Storing Your Apple Crumb Bars
These bars are fantastic for making a day ahead. Here’s how to store them to keep them tasting their best.
- Storage: Once the bars have cooled completely, cover them tightly and store them in the refrigerator for up to 3 days. The crust and topping will soften a bit over time, so they are at their absolute best within the first 24 hours.
- Serving: You can serve them chilled straight from the fridge, let them come to room temperature, or my personal favorite: warm up an individual bar in the microwave for about 20 seconds and serve it with a scoop of vanilla ice cream.
- Freezing: You can freeze these bars, too! Let them cool completely, then slice them and wrap individual bars in plastic wrap before placing them in a freezer-safe bag. They will keep for up to 3 months. Thaw in the fridge or at room temperature.
Caramel Apple Crumb Bars
Ingredients
Method
- Preheat oven to 350°F (177°C). Line and grease an 8×8 baking pan with parchment paper.
- Using a mixer, beat both sugars, flour, baking powder, and salt. Add the cubed chilled butter and vanilla and beat until the mixture is crumbly with pea-sized butter pieces.
- Reserve this mixture. Place the bowl in the refrigerator while you prepare the filling.
- In a separate bowl, combine the sliced apples, 1 tablespoon flour, 2 tablespoons sugar, 1 teaspoon cinnamon, and lemon juice. Stir to coat.
- Scoop 2 cups of the chilled crumb mixture into the prepared pan. Press firmly into an even layer to form the crust.
- Arrange the apple slices in tight, overlapping layers on top of the crust.
- To the remaining crumb mixture, add the 1/3 cup oats and 1/4 teaspoon cinnamon. Toss to combine. Sprinkle this topping over the apples.
- Cover the pan with foil and bake for 30 minutes.
- Remove the foil and bake for another 25-30 minutes, until the topping is light golden brown and the apples are tender.
- Let cool on a wire rack. Drizzle with caramel sauce. For neatest cuts, chill the bars before slicing.
Notes
FAQs: Your Apple Crumb Bar Questions, Answered!
What are the best apples to use for baking?
You want a firm apple that will hold its shape during baking and not turn into applesauce. A good balance of sweet and tart is also ideal. My top choices are Granny Smith (for a tarter flavor), Honeycrisp, Braeburn, and Gala. A mix of two different kinds is also fantastic!
Can I double this recipe for a 9×13 inch pan?
Yes, you can! Doubling the recipe will work perfectly for a 9×13 inch pan. The baking time should be roughly the same, but I would start checking it at the 50-minute mark just to be sure.
My crust/topping seems too dry and sandy. What did I do wrong?
It’s supposed to be quite crumbly! The mixture comes together when you press it into the pan for the crust and when you squeeze it in your hands for the topping. If it seems exceptionally dry, it might just mean your butter was a little too cold or needed to be worked in a bit more. You can use your fingertips to rub the last few pieces of butter into the flour until it has that perfect, coarse sand texture.
Can I use a different kind of oats?
Old-fashioned rolled oats are best for this recipe because they provide a wonderful, chewy, distinct texture in the crumble. Quick-cooking oats are thinner and will create a denser, less crumbly topping, so I recommend sticking with old-fashioned if you can.
My Final Thoughts: A Perfect Slice of Autumn
These Caramel Apple Crumb Bars are everything I love about fall baking, all wrapped up in one easy, delicious package. They are a true crowd-pleaser and the perfect way to celebrate apple season. I hope you bake a batch, fill your home with the incredible smell of cinnamon and apples, and share them with the people you love!