Cheesecake Factory Brown Bread
The Aroma of Nostalgia There’s something undeniably comforting about fresh bread during the colder months. The sweet, warm scent wafts through the kitchen and wraps around you like a beloved blanket. I remember visiting the Cheesecake Factory with friends and eagerly anticipating the moment a basket of their signature brown bread would arrive at our…
The Aroma of Nostalgia
There’s something undeniably comforting about fresh bread during the colder months. The sweet, warm scent wafts through the kitchen and wraps around you like a beloved blanket. I remember visiting the Cheesecake Factory with friends and eagerly anticipating the moment a basket of their signature brown bread would arrive at our table. Those warm, soft slices were not just an appetizer; they were the very essence of indulgence. Little did I know, recreating this beloved bread at home would unlock a whole new level of love for it.
Ingredients That Whisper Home
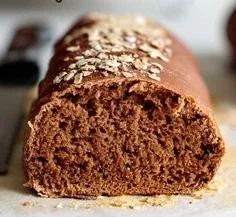
When I embarked on the journey to replicate Cheesecake Factory’s brown bread, I wasn’t just gathering ingredients; I was assembling memories. This recipe relies heavily on a blend of flours: white bread flour and whole wheat flour, which melds together to create that satisfying chewiness that we crave. Honey and molasses offer depth and sweetness, while cocoa powder gives it that characteristic dark tone—not just a flavor but a great story in every slice. Here’s everything you need:
- 1 1/4 cup lukewarm water
- 1/4 cup honey
- 2 tbsp molasses
- 2 1/4 cup white bread flour
- 1 3/4 cup whole wheat flour
- 1 tbsp brown sugar
- 1 1/2 tbsp cocoa powder
- 2 tsp instant dry yeast
- 1 tsp salt
- 3 tbsp unsalted butter, softened
- Oats for dusting on top
- Cornmeal for dusting bottom (optional)
The Process of Transformation
-
Dissolving Sweetness: Start by mixing the lukewarm water with honey and molasses in a medium bowl. It’s an important step as that warmth helps activate the nice flavors, just like the warmth of memory.
-
Combining the Flours: In a large bowl, whisk together the white bread flour, whole wheat flour, salt, brown sugar, cocoa powder, and yeast. This combination is crucial because it builds the structure of your bread while also layering in flavors.
-
Bringing It All Together: Pour the honey mixture into the flour mix and stir until the dough starts to form. Next, add in the softened butter — it’s where the magic happens! Knead the dough for about 8 to 10 minutes if you’re using a stand mixer, or longer if you’re doing it by hand. The dough should feel tacky yet smooth; it should adhere to the bowl when you stop kneading but not stick to your fingers.
-
Time to Rise: Transfer the dough to a clean bowl, covering it with plastic wrap or a damp towel. Leave it in a warm spot to rise. This is where patience plays its part; it may take 1 to 2 hours for the dough to double in size, just as memories grow deeper over time.
-
Shape and Second Rise: Once your dough has puffed up, deflate it gently before transferring it onto a floured surface. Divide it into four pieces. Shape each piece into a rectangle, then roll it into a cylinder, pinching the edges to seal. Place the shaped loaves onto a baking sheet lined with parchment paper—feel free to sprinkle cornmeal underneath to aid with an extra crunch!
-
Prepping for the Oven: Let the loaves rise for another 40 minutes, covered loosely with plastic wrap. The goal is to have puffy, light loaves, ready to be baked to perfection. Preheat the oven to 350°F, then reveal those loaves and pop them into the oven for about 30 to 35 minutes. You’ll know they’re done when they sound hollow when tapped.
-
Cooling Moment: Allow the loaves to cool on a wire rack for 15 minutes before slicing. This is crucial because it helps finish the cooking process gently and ensures a delightful texture.
Little Lessons Learned Here
- Kneading Technique: Use your body weight while kneading; it makes it easier to develop gluten while ensuring consistency in your dough.
- Soul of Bread: Don’t rush the rising phase. Let the dough develop fully; the flavors deepen and the texture improves with time.
- Visual Cues: Trust your instincts. If your dough hasn’t risen enough, it won’t yield that airy texture you want.
Adding Your Personal Twist
Sometimes I swap the honey for agave syrup or even maple syrup, depending on what I find in my pantry or what flavor mood I’m in. You could also experiment with seeds like flaxseed or sunflower seeds folded into the dough for added nutrition and crunch.
A Bread with Purpose
This brown bread not only serves as a delightful companion to your favorite soups and salads but also stands on its own. Picture yourself setting the table for a cozy dinner, with a loaf resting in the center, surrounded by roasted veggies or a hearty stew. Each slice, a reminder of those cherished moments at the Cheesecake Factory, becomes a part of your own home-cooked stories.
Storage for Future Indulgence
If you have leftovers (which is rare in my house), store them in an airtight container at room temperature for 2 to 3 days. You can also freeze the loaves for up to 3 months—just make sure they are wrapped tightly to avoid freezer burn. When you’re ready to indulge again, let them thaw, then pop them in the toaster for a quick refresh.
A Nostalgic Reminder
The beauty of this recipe is not just in its ingredients or method — it’s embedded in the memories we create while making it.
Each time I bake this bread, I’m not merely following a recipe; I’m reliving fond moments, adding layers to my culinary story, and creating future ones around the table with loved ones. It reminds us that even the simplest things, like a loaf of warm brown bread, can hold exquisite slices of life and nostalgia.
Cheesecake Factory Brown Bread
Ingredients
Method
- Mix the lukewarm water with honey and molasses in a medium bowl to activate the flavors.
- In a large bowl, whisk together the white bread flour, whole wheat flour, salt, brown sugar, cocoa powder, and yeast.
- Pour the honey mixture into the flour mix and stir until the dough starts to form.
- Add in the softened butter and knead for about 8 to 10 minutes using a stand mixer, or longer by hand until the dough feels tacky yet smooth.
- Transfer the dough to a clean bowl, covering it with plastic wrap or a damp towel and let it rise in a warm spot for 1 to 2 hours until doubled in size.
- Deflate the dough gently on a floured surface. Divide it into four pieces, shape each into a rectangle and roll into a cylinder, pinching the edges to seal.
- Place the shaped loaves on a baking sheet lined with parchment paper and sprinkle cornmeal underneath for crunch.
- Allow the loaves to rise for another 40 minutes covered loosely with plastic wrap.
- Preheat the oven to 350°F (175°C) and then bake the loaves for about 30 to 35 minutes until they sound hollow when tapped.
- Let the loaves cool on a wire rack for 15 minutes before slicing to finish cooking gently and ensure texture.