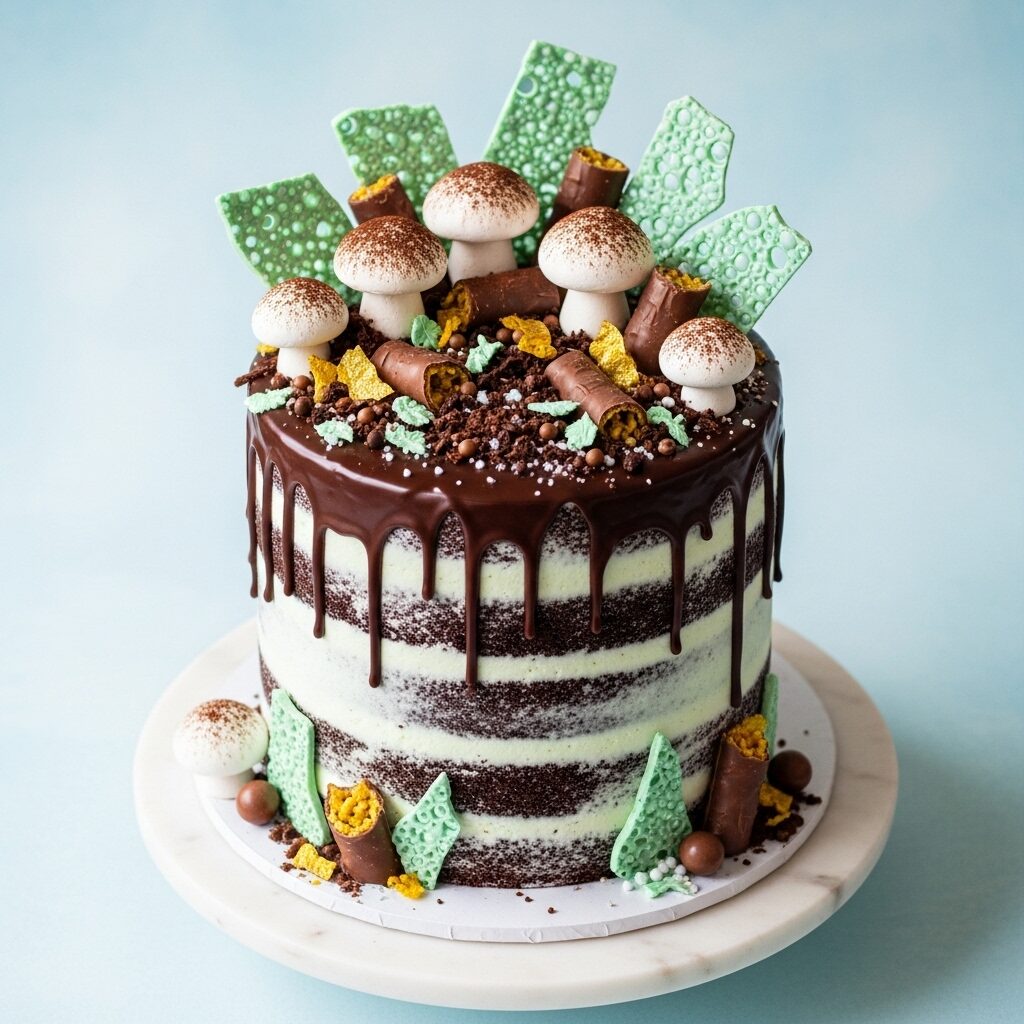
The Ultimate Choc Mint Forest Naked Cake (A Show-Stopper!)
Imagine a stunning, multi-layered chocolate cake, frosted with a delicate mint green buttercream and crowned with a dark, glistening chocolate drip. Now, picture that cake transformed into an enchanted forest floor, adorned with whimsical meringue mushrooms, shards of bubbly chocolate “bark,” and a scattering of sweet, edible treasures. This, my friends, is not just a…
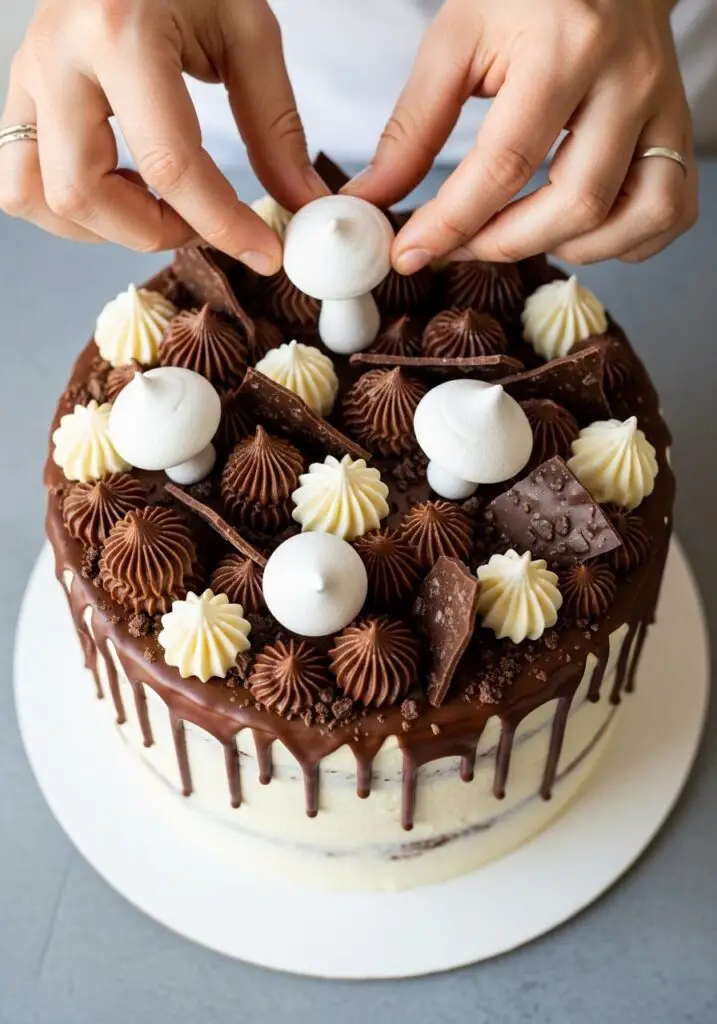
Imagine a stunning, multi-layered chocolate cake, frosted with a delicate mint green buttercream and crowned with a dark, glistening chocolate drip. Now, picture that cake transformed into an enchanted forest floor, adorned with whimsical meringue mushrooms, shards of bubbly chocolate “bark,” and a scattering of sweet, edible treasures. This, my friends, is not just a cake; it’s a magical, edible secret garden, and you are about to become its creator.
Here’s the thing about me: I believe that a celebration cake should be a true centerpiece, a work of art that tastes as incredible as it looks. This recipe was born from my love of creating whimsical, beautiful desserts that tell a story. The combination of deep, dark chocolate cake and cool, refreshing mint buttercream is a classic for a reason, but it’s the magical “forest” decorations that truly elevate this bake into something unforgettable.
I promise you, while this cake looks incredibly intricate, it’s actually a series of simple, achievable components. We’ll walk through making the moist chocolate cake, the fluffy mint buttercream, and those adorable meringue mushrooms step-by-step. It’s a fun and deeply rewarding baking project that is perfect for a special birthday, a holiday, or any time you want to create a little bit of edible magic.
Get ready to unleash your inner artist and bake a stunning, delicious show-stopper that will have everyone at the party completely spellbound.
Why This Enchanted Forest Cake is So Magical!
You are going to be so incredibly proud of this cake. It’s a true baking adventure with a spectacular result. Here’s why it’s so special:
- A True Show-Stopping Centerpiece: This is more than a dessert; it’s a conversation piece. The whimsical, edible forest decorations make it an unforgettable focal point for any celebration.
- Classic, Crowd-Pleasing Flavors: The combination of rich, dark chocolate cake and cool, creamy peppermint buttercream is a flavor match made in heaven that everyone loves.
- Incredibly Moist Chocolate Cake: The cake recipe is a dream—it’s rich, tender, and uses condensed milk and buttermilk for an unbelievably moist crumb that stays fresh for days.
- Adorable Meringue Mushrooms: We’ll walk through the simple steps to create your own whimsical, magical meringue mushrooms. They’re so much easier than they look!
- Fun & Creative Decoration: This is your chance to be an artist! Arranging the chocolate “bark,” edible pearls, and mushrooms to create your own unique forest scene is the best part.
Recipe Snapshot
| Prep Time | 1 hour |
| Cook Time | 1 hour 30 minutes |
| Total Time | 2 hours 30 minutes |
| Servings | 16 servings |
| Calories | Not Provided |
| Course | Dessert |
| Cuisine | American / Australian |
| Difficulty/Method | Advanced / Baking |
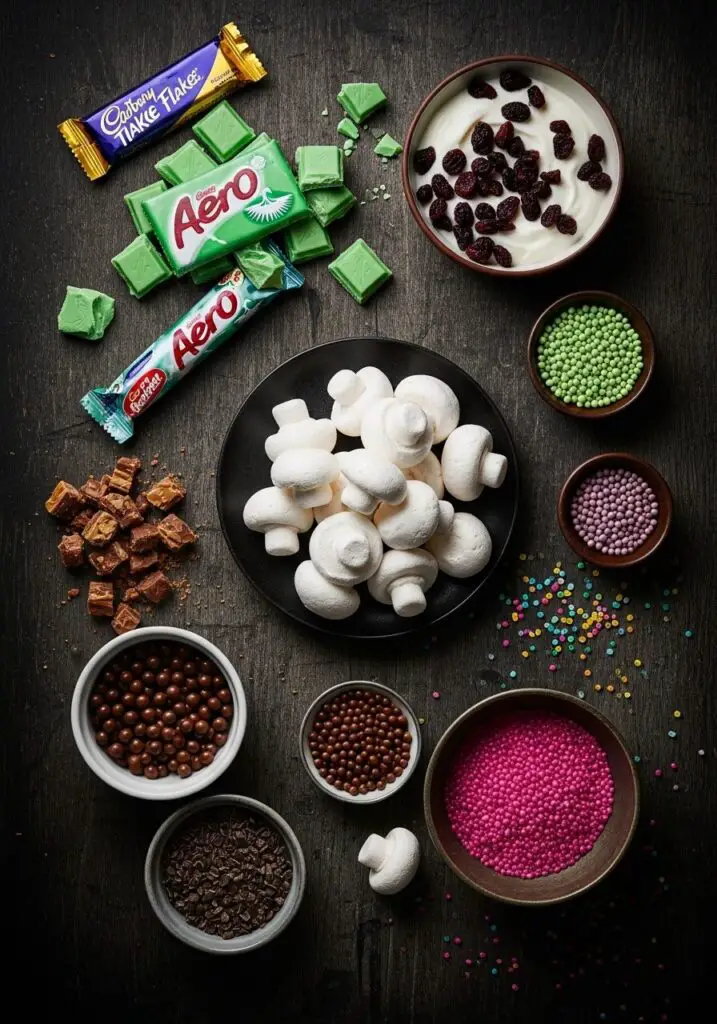
Your Shopping List for This Enchanted Bake
This show-stopper is made up of a few key components. Let’s get our ingredients in order!
→ For the Rich Chocolate Cake
- 200g dark chocolate & 200g butter → Melted together to create a rich, decadent base.
- 125ml (½ cup) boiling water → Helps to melt the chocolate and bloom the cocoa.
- 215g (1 cup) caster sugar → Superfine sugar dissolves beautifully.
- Flours & Cocoa: 150g self-raising flour, 120g potato flour, and 35g dark cocoa powder. The potato flour is a secret to a tender crumb!
- 390g can sweetened condensed milk & 185ml (¾ cup) buttermilk → These are the keys to an ultra-moist cake.
- 4 eggs → For structure and richness.
→ For the Magical Meringue Mushrooms
- 2 egg whites, at room temperature → Essential for a stable meringue.
- Pinch of cream of tartar → Helps the egg whites whip up beautifully.
- 100g (½ cup) caster sugar
- 40g dark chocolate, melted & cocoa powder → For assembling and dusting our mushrooms.
→ For the Mint Buttercream & Drizzle
- 400g butter, at room temperature → The base of our fluffy frosting.
- 230g (2 ½ cups) icing sugar mixture
- 1 tbsp milk
- Green food coloring & peppermint essence → To create that signature color and flavor.
- For the Drizzle: 100g dark chocolate, 1 tbsp liquid glucose, and 125ml (½ cup) pouring cream.
→ For the Enchanted Forest Decorations
- An assortment of your favorite mint chocolates (like Aero Peppermint, Mint Chocolate Balls, Peppermint Crisp), chocolate flakes (like Cadbury Flake), yogurt-coated craisins, chocolate pearls, and colored sugar crystals.
Let’s Bake! Crafting Your Choc Mint Forest Cake
Ready for a magical baking adventure? Don’t be intimidated! We’ll tackle this one simple, rewarding step at a time.
Part 1: The Rich, Moist Chocolate Cake
- Prep Your Pans & Oven: Preheat your oven to 170°C (150°C fan). Grease two deep 17.5cm (approx. 7-inch) round cake pans and line them fully with parchment paper.
- Melt the Chocolate Base: In a heatproof bowl, combine the chopped dark chocolate, butter, and boiling water. Microwave in short bursts or set over a pot of simmering water, stirring until completely melted and smooth.
- Mix the Batter: In a large bowl, whisk together the sugar and all the flours/cocoa. Make a well in the center. Pour in the melted chocolate mixture, condensed milk, buttermilk, and eggs. Use a balloon whisk to mix everything together until it’s just smooth.
- Bake: Divide the batter evenly between your two prepared pans. Bake for 50-55 minutes, or until a skewer inserted into the center comes out clean. Let the cakes cool completely in their pans.
Part 2: The Whimsical Meringue Mushrooms
- Make the Meringue: Reduce your oven temperature to 120°C (100°C fan). In a clean, dry bowl, use an electric mixer to beat the room-temperature egg whites and cream of tartar until firm peaks form. Gradually add the sugar, one tablespoon at a time, beating well after each addition until the meringue is thick, stiff, and glossy.
- Pipe and Bake: Spoon the meringue into a piping bag with a 5mm round tip. On a lined baking sheet, pipe an equal number of small “kisses” (for the mushroom stalks) and larger “kisses” (for the caps). Bake for 25-30 minutes until they are crisp, then turn the oven off and let them cool completely in the oven with the door ajar.
- Assemble the Mushrooms: Once cool, dab a little melted chocolate on the flat tops of the “stalks” and use it as glue to attach the “caps.” Dust with a little cocoa powder for a realistic, earthy look.

Part 3: The Buttercream, Assembly, & Decoration
- Make the Buttercream: Beat the room-temperature butter until it’s soft and pale. Gradually beat in the icing sugar, then the milk, until smooth and creamy. Add a few drops of green food coloring and peppermint essence to your taste and beat until combined. Reserve about a half-cup for piping later.
- Level, Stack, and Crumb Coat: Once the cakes are cool, use a large serrated knife to level the tops and then slice each cake in half horizontally to create four layers. Place one layer on your serving plate, spread with a layer of buttercream, and repeat with the other layers. Apply a thin “crumb coat” of buttercream all over the top and sides, then chill for 15 minutes to firm up.
- Final Frosting (Naked Style): Spread the remaining buttercream over the top and sides of the cake, using a scraper to smooth the sides while allowing some of the dark cake to peek through for that trendy “naked” look. Chill again.
- The Chocolate Drip: Gently melt the chocolate, glucose, and cream together until smooth. Let it cool to room temperature. Pour the drizzle onto the center of the chilled cake, using a spatula to gently nudge it over the edges to create beautiful, dramatic drips.
- Create Your Forest!: Use your reserved buttercream to pipe little peaks on top of the cake. Now for the best part—get creative! Arrange your meringue mushrooms, chocolate shards, and other edible goodies on top to create your own magical, enchanted forest scene.
WiseRecipes’ Top Tips for a Magical Cake
A show-stopper like this has a few key secrets. These are my essential tips for success!
- Read the Recipe All the Way Through First. This cake has a few different components. Reading the entire method before you start will help you plan your time and feel confident as you go.
- Room Temperature Ingredients are Your Friend. For the cake batter and the buttercream, using room temperature butter, buttermilk, and eggs is crucial for a smooth, well-emulsified result.
- Don’t Open the Oven Door! While the cakes and meringues are baking, avoid opening the oven door as much as possible. This can cause them to sink or crack. Trust the timing and use the skewer test at the end.
- The Crumb Coat is a Non-Negotiable. Applying a thin “crumb coat” of frosting and chilling it before the final layer is the professional secret to a clean, crumb-free finish on your cake.
- Chill Your Cake Before the Drip. For those perfect, defined chocolate drips that don’t run all the way to the bottom of the cake, your frosted cake must be cold. The cold surface will help the room-temperature ganache set up faster as it drips.
Keep It Fresh! Storing Your Masterpiece
Because of the buttercream, this cake needs to be refrigerated, but it stores beautifully.
- Make-Ahead Plan: This is a perfect cake to make over two days! You can bake the cake layers and make the meringue mushrooms on day one. On day two, make the buttercream, assemble, and decorate.
- Refrigerator: Store the finished cake in a cake carrier or loosely covered in the refrigerator for up to 4 days. The cake is actually even moister on day two!
- Serving: For the best flavor and texture, I recommend taking the cake out of the refrigerator about 30-60 minutes before you plan to serve it to let the buttercream soften slightly.
Choc Mint Forest Naked Cake
Ingredients
Method
- Preheat oven to 170°C (150°C fan). Grease and line two deep 17.5cm (7-inch) round cake pans.
- Melt 200g dark chocolate, 200g butter, and boiling water until smooth. In a large bowl, whisk sugars, flours, and cocoa. Make a well, then add chocolate mixture, condensed milk, buttermilk, and eggs. Whisk until smooth.
- Divide batter between pans and bake for 50-55 minutes, until a skewer comes out clean. Cool completely in the pans.
- Reduce oven to 120°C (100°C fan). Beat egg whites and cream of tartar to firm peaks. Gradually beat in 100g caster sugar until meringue is thick and glossy.
- Pipe equal numbers of small (stalks) and large (caps) meringue kisses onto lined baking sheets. Bake for 25-30 minutes until crisp. Turn off oven and let cool completely inside with the door ajar.
- Assemble mushrooms by dabbing melted chocolate on the flat tops of the stalks and attaching the caps. Dust with cocoa powder.
- Beat 400g softened butter until pale. Gradually add icing sugar, then milk, beating until smooth. Add green food coloring and peppermint essence to taste. Reserve 1/2 cup.
- Level the cooled cakes and slice each in half horizontally to make four layers. Layer the cakes on a serving plate with buttercream between each layer.
- Apply a thin ‘crumb coat’ of buttercream to the top and sides, then chill for 15 minutes. Apply a final, thicker layer of buttercream, leaving it semi-naked on the sides. Chill again.
- For the drizzle, melt 100g dark chocolate, glucose, and cream until smooth. Cool to room temperature. Pour over the chilled cake, nudging it to create drips.
- Use the reserved buttercream to pipe peaks on top. Decorate with meringue mushrooms and assorted chocolates to create a ‘forest’ effect.
Notes
FAQs: Your Enchanted Cake Questions, Answered!
What is potato flour, and do I really need it?
Potato flour (sometimes called potato starch) is a fine, gluten-free powder that helps create an incredibly soft, tender, and moist crumb in cakes. While you could substitute it with more all-purpose flour or cornstarch in a pinch, using it will give you the best, most tender result for this chocolate cake.
My meringue is weeping/soft. What did I do wrong?
This usually happens for one of two reasons. First, the sugar wasn’t fully dissolved. You have to add it very slowly and beat well after each addition. You can test it by rubbing a little meringue between your fingers—if it feels grainy, keep beating! Second, humidity is the enemy of meringue. Try to make your meringues on a dry, low-humidity day for the best, crispest results.
Can I make this in different-sized pans?
Yes, but you’ll need to adjust the baking time. For example, if you use two 8-inch or 9-inch round pans, the layers will be thinner, and the baking time will likely be shorter. Just keep a close eye on them and use a skewer to test for doneness.
What if I can’t find all the specific candies for decorating?
Don’t worry at all! The fun of the “forest floor” is using whatever you can find. Any kind of mint chocolate, chocolate-covered nuts, crumbled cookies (for “dirt”), or interesting sprinkles will work. Get creative and build your own unique enchanted forest!
My Final Thoughts: Your Own Edible Masterpiece
This Choc Mint Forest Naked Cake is so much more than a dessert; it’s a joyful, creative baking project that results in a truly spectacular centerpiece. It’s a delicious reminder that baking can be a form of art. I hope you have an absolutely magical time creating—and sharing—this incredible cake!