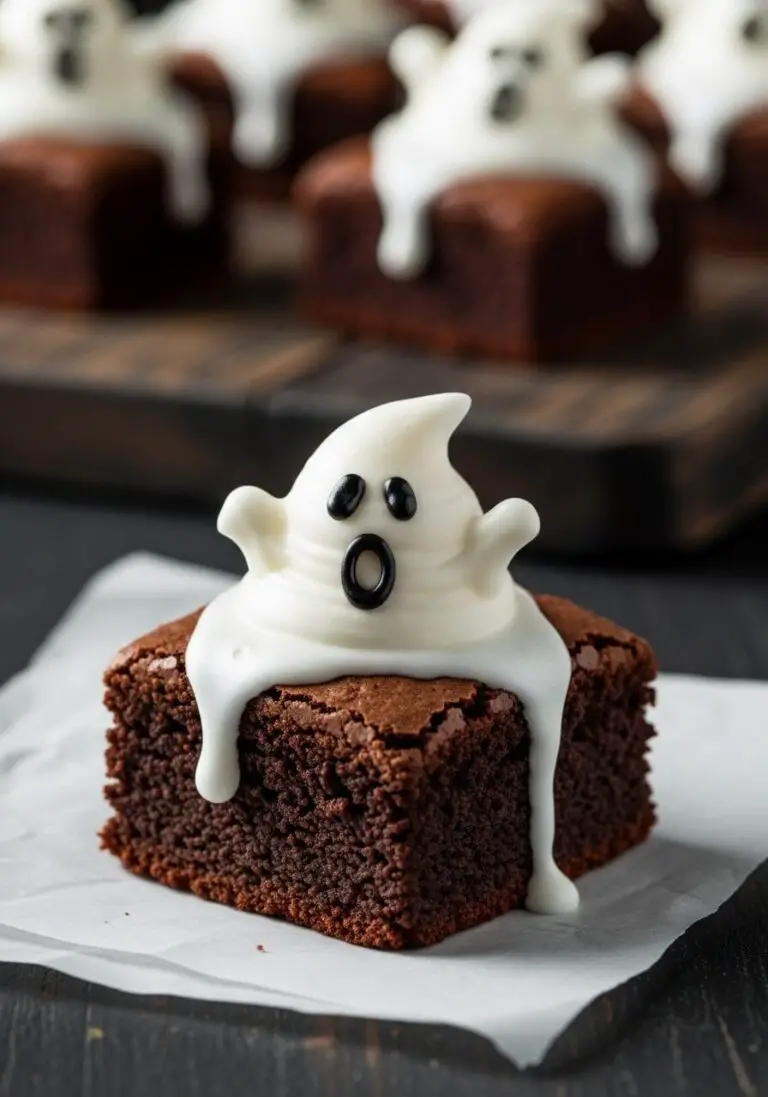
My Ultimate Chocolate-Cinnamon Skeleton Cookies (Halloween Fun!)
Oh, my friends, who here isn’t utterly charmed by the playful, slightly spooky magic of Halloween? It’s the perfect excuse to get creative in the kitchen, especially with treats that are as delightful to look at as they are to eat. Today at WiseRecipes, I’m beyond excited to share a recipe that perfectly embodies that…
Oh, my friends, who here isn’t utterly charmed by the playful, slightly spooky magic of Halloween? It’s the perfect excuse to get creative in the kitchen, especially with treats that are as delightful to look at as they are to eat. Today at WiseRecipes, I’m beyond excited to share a recipe that perfectly embodies that spirit: these incredible Chocolate-Cinnamon Skeleton Cookies! Seriously, prepare your taste buds for pure bliss – tender, dark chocolate cookies, warmly spiced with cinnamon, and then expertly decorated with eerie white icing to create the cutest (or creepiest!) little skeletons. They’re fun to make, a joy to decorate, and they are pure happiness in every single bite!
I just adore a recipe that feels incredibly special and playful but is secretly super simple to make. This Halloween cookie recipe is exactly that! It’s a fantastic way to transform humble pantry staples into a powerhouse party food that will have everyone reaching for more. Forget complicated baking; we’re talking about ridiculously flavorful and satisfying treats that come together with just 45 minutes of active prep (plus a little chilling, which is your friend!). This isn’t just a cookie; it’s a mood-lifter, a fantastic Halloween party staple, and honestly, a guaranteed hit every single time. This Chocolate-Cinnamon Skeleton Cookies recipe yields about 14 adorable (or spooky!) cookies, making it perfect for school parties, trick-or-treat gatherings, or any time you crave amazing, effortless fun. Trust me, once you try this incredible combination, you’ll be making them again and again!
Why These Chocolate-Cinnamon Skeleton Cookies Will Be Your Halloween MVP!
This isn’t just another cookie recipe; it’s a creative, sweet, and incredibly satisfying culinary delight. Here’s why I’m absolutely smitten with it:
- Spooky Fun, Made Easy: These cookies look incredibly imaginative and festive, yet they’re surprisingly simple to make! Kids (and adults!) will adore decorating their own skeletons, making it a fantastic Halloween activity.
- Rich Chocolate & Warm Cinnamon: The cookie base isn’t just chocolate; it’s infused with aromatic cinnamon, creating a warm, comforting flavor that perfectly complements the dark cocoa. It’s a delicious twist on a classic!
- Perfectly Chewy & Tender: We’re aiming for cookies that are set but still beautifully soft and tender in the center, with slightly crisp edges. They’re incredibly satisfying to bite into!
- Fun & Interactive Decorating: Piping on the white “bones” is so satisfying and surprisingly easy to make look realistic. It’s a fantastic way to get creative and personalize each cookie.
- Perfect for Parties & Gifting: Yielding about 14 delightful cookies, these are ideal for Halloween parties, school events, or even as a fun homemade gift for friends and neighbors.
Your Shopping List for Skeleton Cookie Bliss: Gather What You’ll Need
Creating these incredible Chocolate-Cinnamon Skeleton Cookies uses a blend of classic baking ingredients and fun decorations. Here’s what you’ll want to grab to get started!
→ For the Rich Chocolate-Cinnamon Cookies
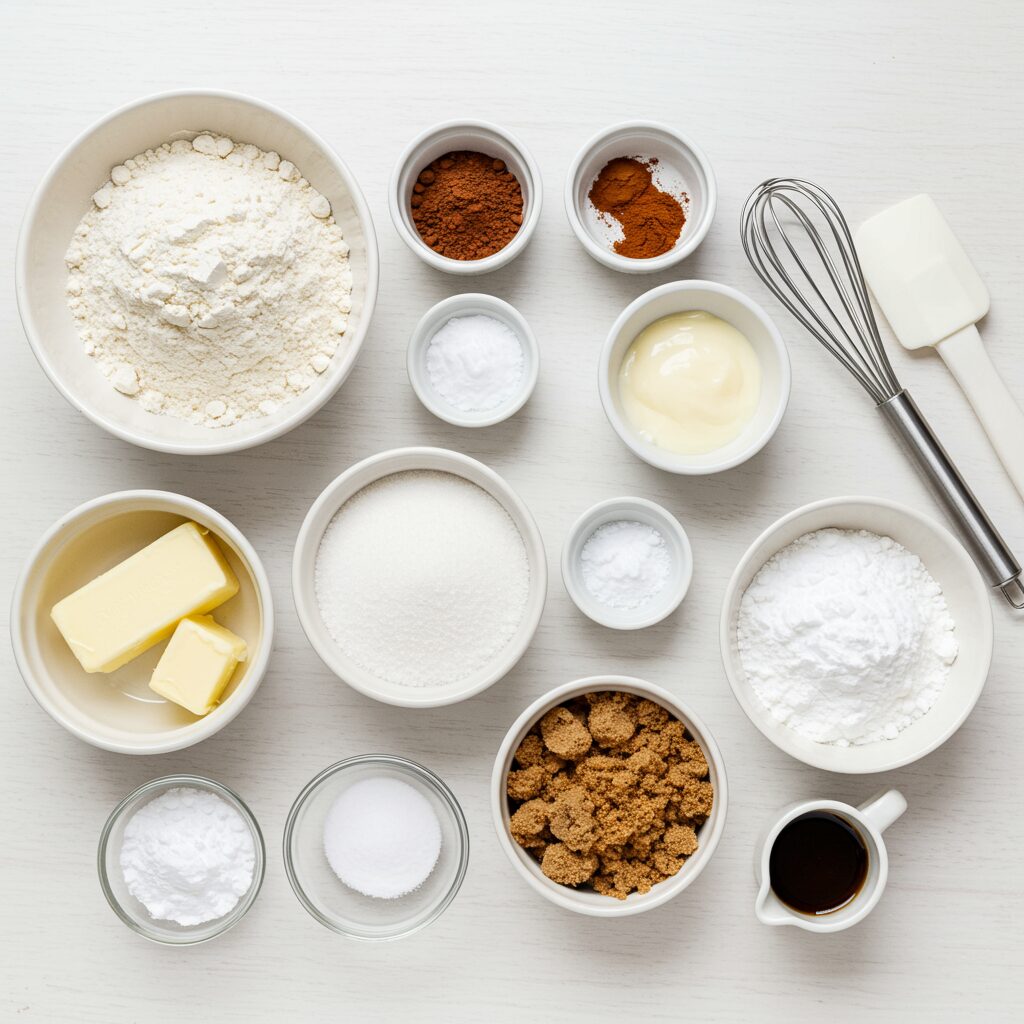
- 1 ¾ cups all-purpose flour: Our base for tender cookies.
- ¾ cup unsweetened Dutch-process cocoa powder: For deep chocolate flavor and a beautiful dark color.
- 1 tablespoon ground cinnamon: Our key spice for that warm, aromatic flavor!
- ¾ teaspoon baking soda: Our leavening agent for a soft, chewy texture.
- ¼ teaspoon baking powder: For a little extra lift.
- ½ teaspoon salt: Balances sweetness and enhances flavor.
- 2 sticks unsalted butter, at room temperature: For richness and a tender crumb.
- 1 ¼ cups granulated sugar: For sweetness and crisp edges.
- ½ cup packed dark brown sugar: Adds moisture, chewiness, and a lovely molasses note.
- 1 large egg: Binds the dough and adds richness.
- 1 teaspoon pure vanilla extract: Enhances all the sweet and spiced flavors.
→ For the Eerie White Royal Icing
- 1 cup confectioners’ sugar: The base for our smooth, pipeable icing.
- 1 tablespoon meringue powder: Helps stabilize the icing, allowing it to dry hard and shiny.
- 1 to 2 tablespoons water: To achieve the perfect icing consistency.
→ Essential Equipment
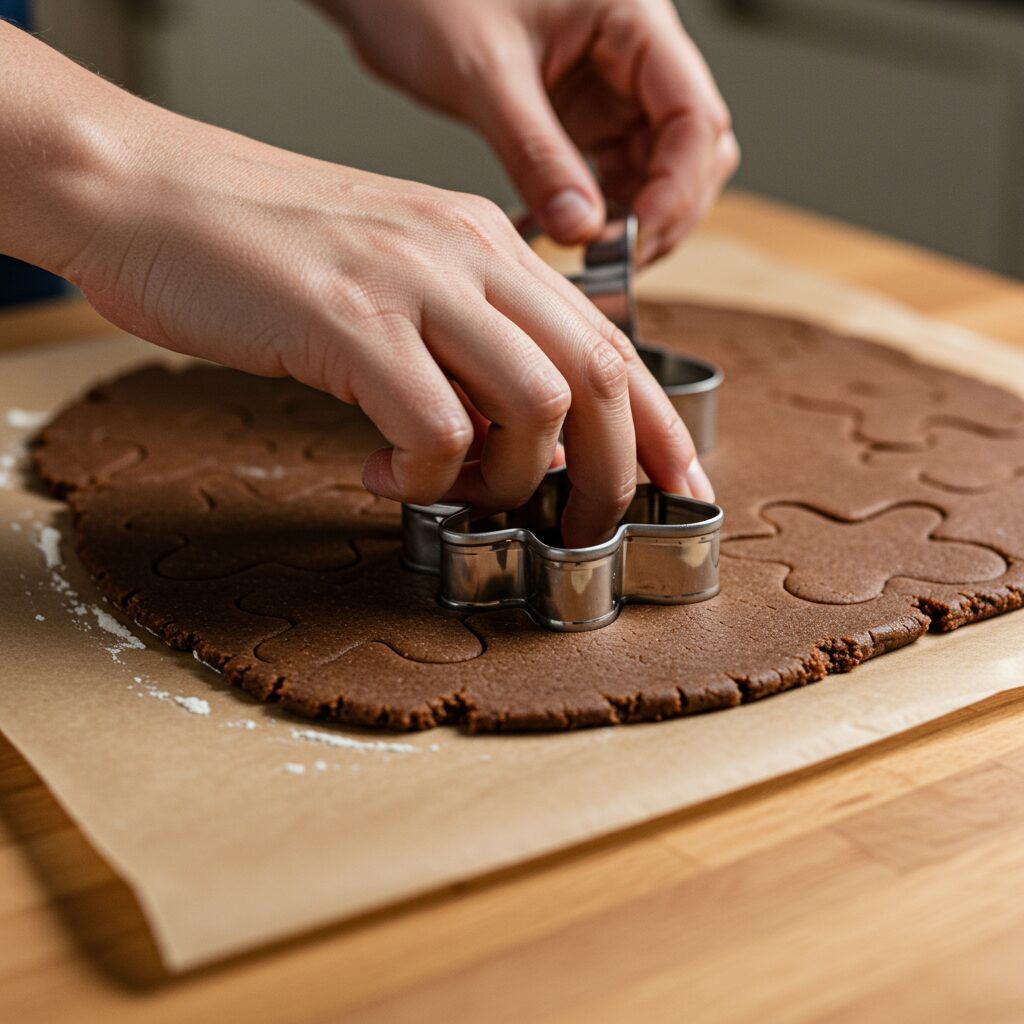
- 4 ½-inch gingerbread man cookie cutter: Our secret for perfectly shaped skeletons!
Let’s Bake! Crafting Your Perfect Chocolate-Cinnamon Skeleton Cookies, Step-by-Step
This recipe has a few components and requires some chilling, but each step is straightforward and builds to an incredibly impressive result. Plan for the chilling time, as it’s crucial for perfect cookies!
Part 1: Making & Chilling Our Spiced Cookie Dough
- Whisk Dry Ingredients: In a medium bowl, whisk together the 1 ¾ cups all-purpose flour, ¾ cup unsweetened Dutch-process cocoa powder, 1 tablespoon ground cinnamon, ¾ teaspoon baking soda, ¼ teaspoon baking powder, and ½ teaspoon salt. Set aside.
- Cream Butter & Sugars: In a large bowl, beat the 2 sticks of softened unsalted butter, 1 ¼ cups granulated sugar, and ½ cup packed dark brown sugar with an electric mixer on medium-high speed until the mixture is beautifully light and fluffy, about 5 minutes.
- Add Egg & Vanilla: Beat in the 1 large egg and 1 teaspoon pure vanilla extract until the mixture is creamy, about 1 to 2 minutes.
- Combine Wet & Dry: Reduce the mixer speed to low. Gradually add the whisked flour mixture to the butter mixture, beating just until combined, about 2 minutes. Be careful not to over-mix!
- Chill Dough (First Time!): Divide the dough in half. Pat each piece into a flat disk and wrap tightly in plastic wrap. Refrigerate until the dough is firm, at least 1 hour. This makes it much easier to roll!
Part 2: Rolling, Cutting & Baking Our Spooky Cookies
- Roll Out Dough: On a lightly floured surface, take one disk of chilled dough (keep the other chilled). Roll out the dough between two large sheets of parchment paper until it’s ¼ inch thick.
- Chill Again: Transfer the rolled-out dough (still between parchment) to a baking sheet and refrigerate until firm, about 2 hours. This prevents the cookies from spreading too much! Repeat with the second disk of dough.
- Preheat Oven & Prep Pans: Position racks in the upper and lower thirds of your oven and preheat to 350°F (175°C). Line two baking sheets with fresh parchment paper.
- Cut & Arrange Cookies: Remove one chilled dough rectangle from the fridge. Cut the dough into shapes using your 4 ½-inch gingerbread man cookie cutter. Carefully arrange the cut-out cookies 2 inches apart on the prepared baking pans. Re-roll any dough scraps and cut out more cookies (if the dough gets too soft, pop it back in the freezer for 10 minutes!).
- Final Chill: Refrigerate the cut-out cookies on the baking sheets for 15 minutes. This last chill helps them hold their shape during baking!
- Bake Cookies: Bake the chilled cookies in the preheated oven for 15 minutes, switching the pans halfway through (top to bottom, front to back). The cookies should be set but still soft.
- Cool Completely: Let the cookies cool on the pans for 10 minutes. Then, carefully transfer them to wire racks to cool completely, about 20 minutes. This is crucial before decorating!
Part 3: Decorating Our Eerie Skeletons!
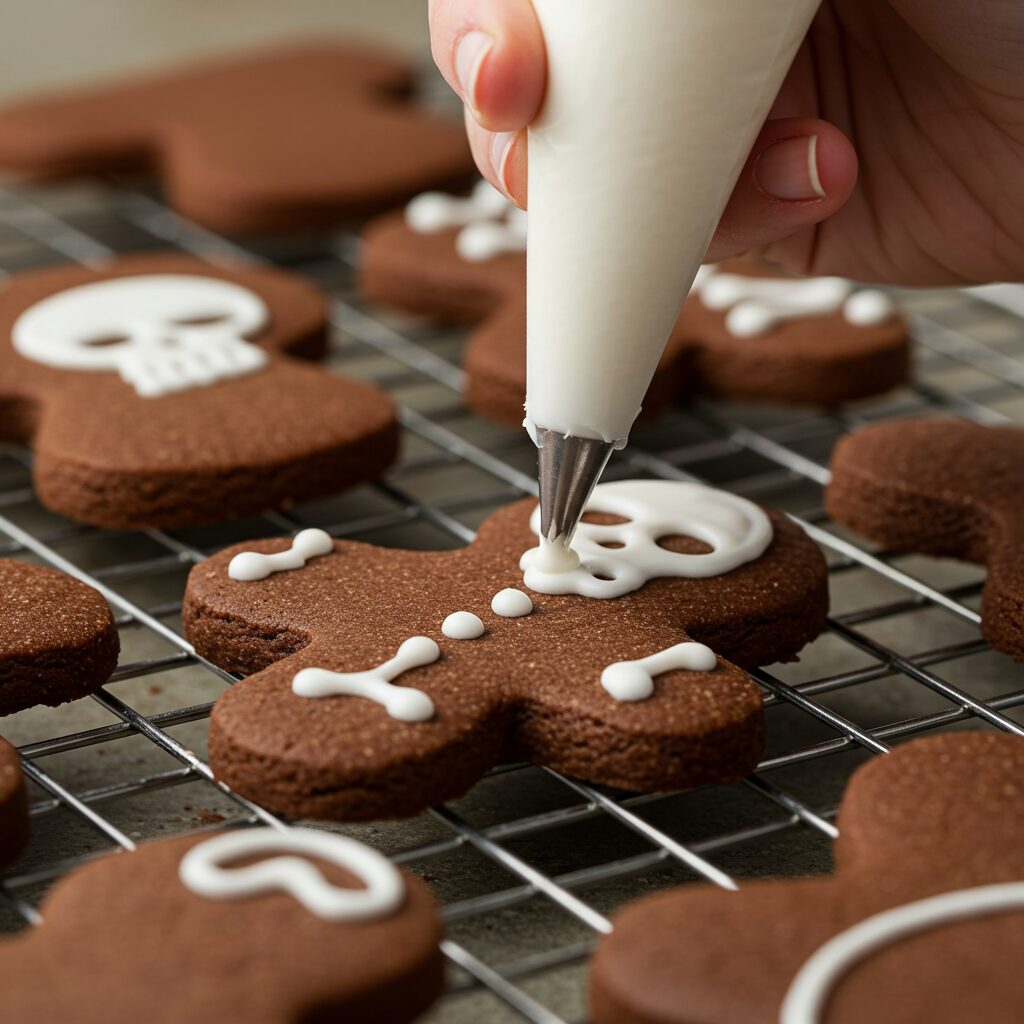
- Make the Icing: While the cookies cool, make the icing! In a bowl, beat 1 cup confectioners’ sugar, 1 tablespoon meringue powder, and 1-2 tablespoons of water with an electric mixer on high speed until the icing is smooth, thick, and holds stiff peaks. Add water slowly to reach desired consistency – for piping outlines and then a slightly thinner consistency for flooding (see tip!).
- Outline Skulls & Bones: Transfer some of the thick icing to a resealable plastic bag (or a piping bag fitted with a small round tip) and snip off a tiny corner. First, pipe the outline of the skull, eyes, nose, and mouth onto each cookie. Then, pipe the outlines of the bones (rib cage, arm bones, leg bones).
- Flood Skulls: Thin some of the remaining thick icing with a tiny bit of water (add a few drops at a time) until it’s the consistency of thick syrup (when you drizzle it, it should disappear in about 10-15 seconds). Transfer this thinner icing to another piping bag. Carefully pipe it into the outline of the skulls, using a toothpick to help spread it to the edges. Let this “flooded” icing set completely for at least 30 minutes.
- Pipe Bones & Final Details: Once the skull icing is set, use your thicker white icing to pipe on the details of the bones, making them look defined. You can also add more details to the skull (like tiny dots for teeth). Let all the icing set completely for at least 30 minutes before handling or storing. Enjoy your spooky treats!
WiseRecipes’ Top Tips for Skeleton Cookie Mastery!
These fun Halloween cookies are incredibly easy, but these WiseRecipes insights will help you achieve Chocolate-Cinnamon Skeleton Cookie perfection every single time!
- Chill Dough is CRUCIAL (Multiple Times!): Seriously, don’t skip any of the chilling steps! Chilling the dough after mixing, after rolling, and again after cutting prevents the cookies from spreading too much in the oven, ensuring they hold their perfect skeleton shape. Cold dough = crisp edges, tender centers.
- Dutch-Process Cocoa for Color: Using Dutch-process cocoa powder (instead of natural cocoa) gives these cookies a much darker, richer chocolate color, which is perfect for contrast with the white skeleton icing!
- Don’t Overbake! This is the golden rule for chewy cookies. You want to pull them from the oven when the edges are set but the centers still look soft. They will continue to set as they cool. Overbaking leads to dry, crunchy cookies.
- Meringue Powder for Royal Icing: Meringue powder is key for classic royal icing! It helps the icing dry hard and shiny, preventing smudges and allowing for detailed decoration that sets beautifully.
- Icing Consistency is Everything: For decorating, you’ll need two icing consistencies: a thicker one for piping outlines and a slightly thinner one (often called “flood” consistency) for filling in shapes. Adjust by adding tiny drops of water.
- Gingerbread Man Cutter is a Must! This cookie cutter is essential for the skeleton shape! It’s the perfect base to transform into a spooky bone buddy.
Creative Twists: Delicious Ways to Customize Your Spooky Cookie Bites!
These Chocolate-Cinnamon Skeleton Cookies are already fantastic, but they’re also a wonderful canvas for your culinary creativity! Here are some ideas I love to play with:
- Red “Bloody” Details: After the white skeleton is set, use red gel icing (thinned slightly if needed) to pipe small “blood” drips or splatters for a truly gruesome effect!
- Glow-in-the-Dark Skeletons: Use edible glow-in-the-dark icing for the bones for a super spooky surprise!
- Different Cookie Flavors: Experiment with other cookie doughs! A simple vanilla sugar cookie or a gingerbread cookie would also be fantastic as a skeleton base.
- Sprinkle Embellishments: After the icing is set, you could add tiny edible silver or black sprinkles as “jewels” in the eye sockets or on the bones.
- Mini Skeletons: Use smaller gingerbread man cutters to make mini skeleton cookies for a bite-sized treat!
- Graveyard Scene: Arrange the finished cookies on a dark platter with crushed chocolate cookie crumbs (for “dirt”) and maybe some gummy worms for a full graveyard scene!
Chocolate-Cinnamon Skeleton Cookies (Halloween Fun!)
Ingredients
Equipment
Method
- Whisk the flour, cocoa powder, cinnamon, baking soda, baking powder, and salt in a medium bowl.
- Beat butter, granulated sugar, and brown sugar in a large bowl with a mixer until light and fluffy (about 5 minutes). Beat in the egg and vanilla until creamy (1-2 minutes).
- Reduce mixer speed to low. Gradually add the flour mixture and beat until combined (about 2 minutes).
- Divide dough in half; pat each piece into a disk and wrap in plastic wrap. Refrigerate until firm (1 hour).
- Roll out each dough disk between 2 sheets of parchment paper until 1/4 inch thick. Refrigerate until firm (about 2 hours).
- Position racks in upper and lower thirds of oven and preheat to 350 degrees F (175C). Line 2 baking sheets with parchment paper.
- Cut dough into shapes using a 4 1/2-inch gingerbread man cookie cutter and arrange 2 inches apart on pans. Reroll scraps. (Freeze 10 min if dough is too soft). Refrigerate 15 minutes.
- Bake, switching pans halfway through, until cookies are set but still soft (15 minutes). Let cool 10 minutes on pans, then transfer to racks to cool completely.
- Make the icing: Beat confectioners’ sugar, meringue powder, and water in a bowl with a mixer on high speed until smooth and thick. Transfer to a resealable plastic bag and snip off a corner.
- Pipe skull and bone outlines onto cookies. Thin some icing with water and pipe into skull outline (use a toothpick to help). Let set 30 minutes.
- Once skull icing is set, pipe bones and additional features onto cookies. Let set 30 minutes.
Notes
Keep It Spooky! Storing Your Halloween Treats
You’ve created something truly special, so let’s make sure it stays fresh and delicious!
- Room Temperature Storage: Once the icing is completely set and hardened, store your Chocolate-Cinnamon Skeleton Cookies in an airtight container at room temperature for up to 1 week. They will maintain their tender texture and the icing will stay firm.
- Avoid Refrigeration: Storing royal icing decorated cookies in the refrigerator can sometimes cause the icing to “weep” or become sticky due to condensation. Room temperature is best for storage.
- Freezing Baked Cookies (Un-iced): You can freeze the baked and completely cooled (un-iced) cookies! Wrap them tightly in plastic wrap, then place them in a freezer-safe bag or container. Freeze for up to 2-3 months. Thaw at room temperature before icing.
- Freezing Cookie Dough: The raw cookie dough disks can be frozen! Wrap them very tightly in plastic wrap and then foil. Freeze for up to 1 month. Thaw overnight in the fridge before rolling and cutting.
- Perfect for Gifting: These beautifully decorated cookies make fantastic homemade gifts during the Halloween season! Pack them in cellophane bags tied with festive ribbons.
FAQs: Your Top Chocolate-Cinnamon Skeleton Cookies Questions, Answered!
Q: What is Dutch-process cocoa powder? Can I use regular cocoa powder?
A: Dutch-process cocoa powder has been treated with an alkali to reduce its acidity. This gives it a darker color and a milder, less bitter chocolate flavor. You can use regular (natural) unsweetened cocoa powder, but your cookies will have a lighter brown color and a slightly sharper chocolate taste.
Q: My cookie dough is too sticky/crumbly. What went wrong?
A: Dough consistency can vary slightly. If it’s too sticky, try chilling it a bit longer. If it’s too crumbly and not holding together, your butter might not have been soft enough, or your egg wasn’t room temperature. You can try adding a tiny splash (½ to 1 teaspoon) of milk or water to bring it together, being careful not to overdo it.
Q: My icing is too runny/thick. How do I get the right consistency?
A: The key is gradual adjustment! If too thick for outlining, add water tiny drops at a time. For flooding, it needs to be thinner (like thick syrup). If too runny, gradually beat in more sifted confectioners’ sugar. Practice with a small amount first!
Q: How do I prevent my cookies from spreading too much?
A: Excessive spreading is usually due to the dough being too warm, insufficient flour, or old leavening agents. The multiple chilling steps are crucial! Ensure your butter is softened but not melted, measure flour accurately, and always chill the dough as directed.
Q: Can I make these ahead of time?
A: Yes, this recipe is fantastic for making ahead! You can bake and cool the cookies up to 3-4 days in advance, then store them in an airtight container. Make the icing and decorate the day before your event, allowing ample time for the icing to set.
And there you have it, my friends—your guide to crafting the most delightful, impressive, and truly satisfying Chocolate-Cinnamon Skeleton Cookies! This WiseRecipes creation is more than just a dessert; it’s a testament to how simple ingredients, when treated with a little love and smart steps, can come together to create something truly extraordinary. It’s a vibrant, exciting meal that you’ll genuinely look forward to eating, day after day.
I am genuinely so excited for you to try these and experience the delicious magic yourself. Please, please come back and let me know in the comments below what your favorite part of these spooky cookies was, or any fun twists you tried! Happy cooking from WiseRecipes!