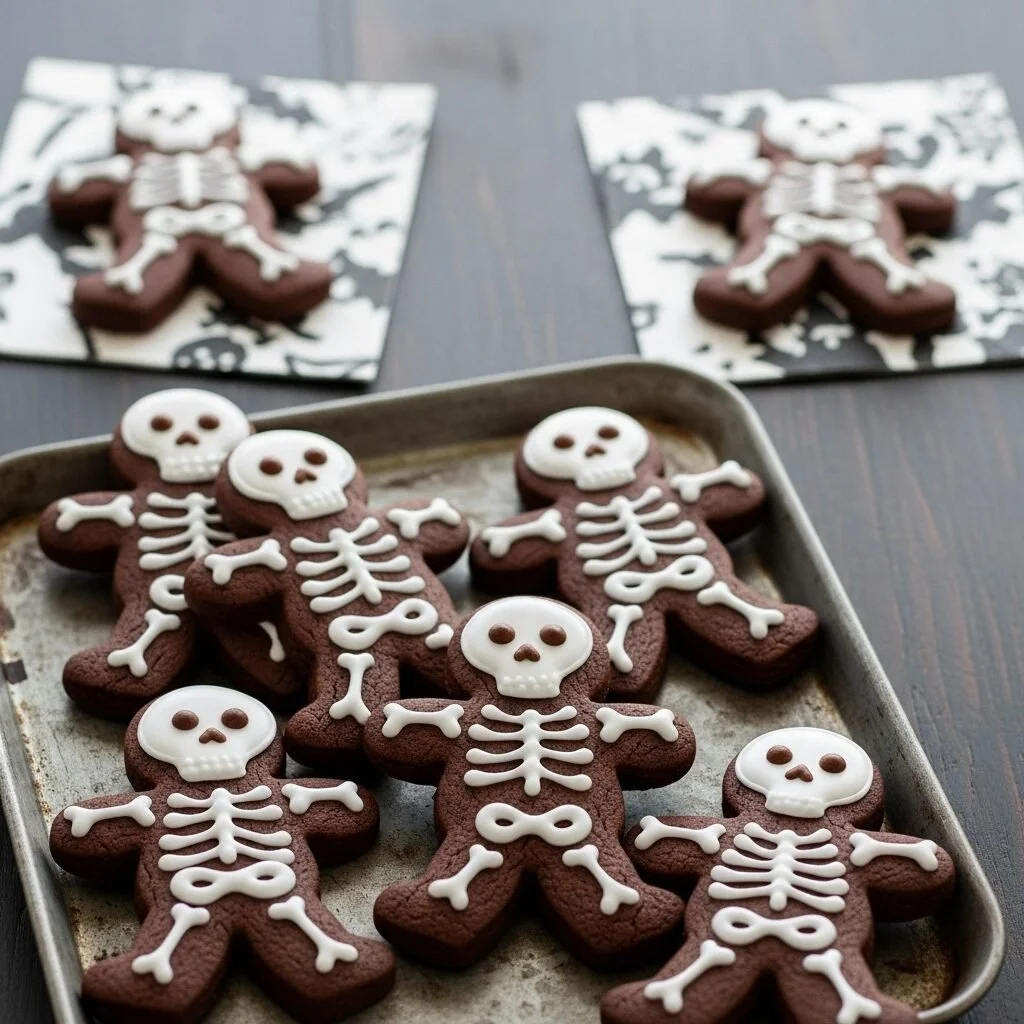
Chocolate-Cinnamon Skeleton Cookies
A Memory and a Smell The first time I made Chocolate-Cinnamon Skeleton Cookies, my kitchen smelled exactly like the sort of cozy mystery you want to curl up with on a rainy afternoon: dark chocolate, warm cinnamon, and butter melting into something comforting. I actually found a version online and then played with it until…
A Memory and a Smell
The first time I made Chocolate-Cinnamon Skeleton Cookies, my kitchen smelled exactly like the sort of cozy mystery you want to curl up with on a rainy afternoon: dark chocolate, warm cinnamon, and butter melting into something comforting. I actually found a version online and then played with it until it felt like mine — if you want to see another take that inspired me, take a peek at a Chocolate-Cinnamon Skeleton Cookies write-up. Every year around spooky season these are the cookies I bring to parties and the ones my neighbors ask about when they see the silly cookie cutters hanging from my ribbon-wrapped tin.
The Ingredient Roll Call
If you were to peek into my bowl when I’m getting ready, you’d see the essentials lined up: 1 ¾ cups all-purpose flour, ¾ cup unsweetened Dutch-process cocoa powder, 1 tablespoon ground cinnamon, ¾ teaspoon baking soda, ¼ teaspoon baking powder, and ½ teaspoon salt. For the richer part of the dough I use 2 sticks unsalted butter at room temperature, 1 ¼ cups granulated sugar, and ½ cup packed dark brown sugar. There’s a single large egg and 1 teaspoon pure vanilla extract that tie the whole thing together. For the icing I keep it simple and old school: 1 cup confectioners’ sugar, 1 tablespoon meringue powder, and 1 to 2 tablespoons water to get it to the right flow.
I like to say the cinnamon is the little ghost in the room — you notice it more after the first bite. The Dutch-process cocoa makes the cookie taste like something between a soft brownie and a classic chocolate cookie, which is exactly the texture I aim for.
Making the Dough and Cutting the Skeletons
Start like I do: whisk the dry ingredients — the flour, cocoa powder, cinnamon, baking soda, baking powder, and salt — in a medium bowl so everything is evenly married. Then in a large bowl cream together the butter, granulated sugar, and brown sugar until light and fluffy. I usually crank the mixer for about five minutes; the texture change is part of the magic. Beat in the egg and vanilla until the mixture is creamy and glossy. From there, gradually add the dry mixture to the wet mixture until combined. That gentle folding keeps the dough tender.
I always chill the dough for at least 1 hour. This is not optional in my book. It firms up the butter so the shapes hold when you cut them. When it is firm, roll the dough out to ¼ inch thick and cut into shapes with a gingerbread man cookie cutter — these become my skeleton canvases. If you want little hand bones instead of full figures, use smaller cutters or trim slightly with a knife. After cutting, refrigerate the cut cookies for 15 minutes — this helps them keep their silhouette in the oven — and then bake at 350°F for 15 minutes. You’ll hear a soft little nibble of sound when you press the center right after they come out: the cookies should feel set at the edges and just a tad tender in the middle. They continue to firm as they cool, which is how you avoid overbaking.
A few tricks I’ve learned: use parchment or a silicone mat to prevent spreading, and if you want razor-sharp edges, transfer cut shapes to the baking sheet using a wide spatula. If the dough is sticky when you try to roll it, pop it back into the fridge for another 10 minutes. Also, weigh your flour if you can; my cookies are far more consistent that way.
The Sweet Paint: Icing and Decorating
While the cookies cool, make the icing by beating the confectioners’ sugar, meringue powder, and water until smooth. Start with 1 tablespoon of water and add a little more if you need it; the goal is a pipeable but not runny icing that holds lines. I pipe little rib cages, eyes, and cheeky smiles; sometimes I thin a little portion of the icing and paint it on for a glossy base coat, then come back with thicker icing for the details.
A tip: if you want super crisp lines for skeleton bones, let the base layer crust for several minutes before piping. If you go too fast and the lines sink into the wet base, they will blur. Another small trick from my grandmother was to keep a damp towel over a bowl of icing while I work — it prevents a skin from forming on the glaze I plan to use later.
When are they done right? You want a cookie that gives a little under your teeth, with a dense chocolate flavor and a whisper of cinnamon. The edges should not be dark, and the centers should spring back slightly when touched. If they’re crisp all the way through, it means you overbaked them and you lose the brownie-like chew that makes them special.
Little Variations and Good Ways to Make Ahead
If you’re in the mood to experiment, try one of my favorite variations: add a teaspoon of orange zest to the dough for a chocolate-orange twist that pairs beautifully with cinnamon. For a tiny heat surprise, swap half the cinnamon for a quarter teaspoon of cayenne pepper. Another fun change is to skip the white skeleton icing and drizzle melted white chocolate over the cooled cookies. For a playful version that keeps the spooky theme but changes texture completely, check out how a thumbprint approach works with jam centers by looking at Spooky Skeleton Thumbprint Cookies.
I often make the dough a day ahead. After mixing, press it into a disk, wrap it tightly, and chill. You can cut and bake straight from chilled dough, or freeze the cut shapes on a tray and then move them to a bag for longer storage. Baked cookies keep best in an airtight container at room temperature for up to five days. If you need to store them longer, freeze decorated cookies between layers of parchment paper and thaw on the counter.
The Best Part About These Cookies
What I love most is the ritual: rolling, cutting, and decorating while a mug of hot cider steams on the counter. Kids in my family help with the icing, and their wild designs always make me laugh. The contrast of deep cocoa and warm cinnamon feels nostalgically festive and somehow both grown-up and childlike at once. These are the cookies I reach for when I want something a little dramatic for a party, or a quiet treat to eat with coffee on a Sunday morning.
One last tip I always tell friends: if you want the cookies to look professionally crisp, use a small paintbrush with a little cocoa powder mixed into icing to add shadow under the ribs. It is silly, quick, and convincing.
Conclusion
If you want the original inspiration and a tested reference to compare notes with, here is the Food Network’s version of the Chocolate-Cinnamon Skeleton Cookies recipe on Food Network.
Chocolate-Cinnamon Skeleton Cookies
Ingredients
Method
- Whisk together the flour, cocoa powder, cinnamon, baking soda, baking powder, and salt in a medium bowl.
- In a large bowl, cream the butter, granulated sugar, and brown sugar until light and fluffy, about five minutes.
- Beat in the egg and vanilla until the mixture is creamy and glossy.
- Gradually add the dry mixture to the wet mixture until combined.
- Chill the dough for at least 1 hour.
- Roll the chilled dough out to ¼ inch thick.
- Cut out shapes with a gingerbread man cookie cutter.
- Refrigerate the cut cookies for 15 minutes.
- Preheat the oven to 350°F (175°C).
- Bake the cookies for 15 minutes.
- Allow cookies to cool before decorating.
- Beat together the confectioners' sugar, meringue powder, and water until smooth.
- Adjust the water for desired consistency.
- Pipe designs onto cooled cookies while letting base layer crust for several minutes.