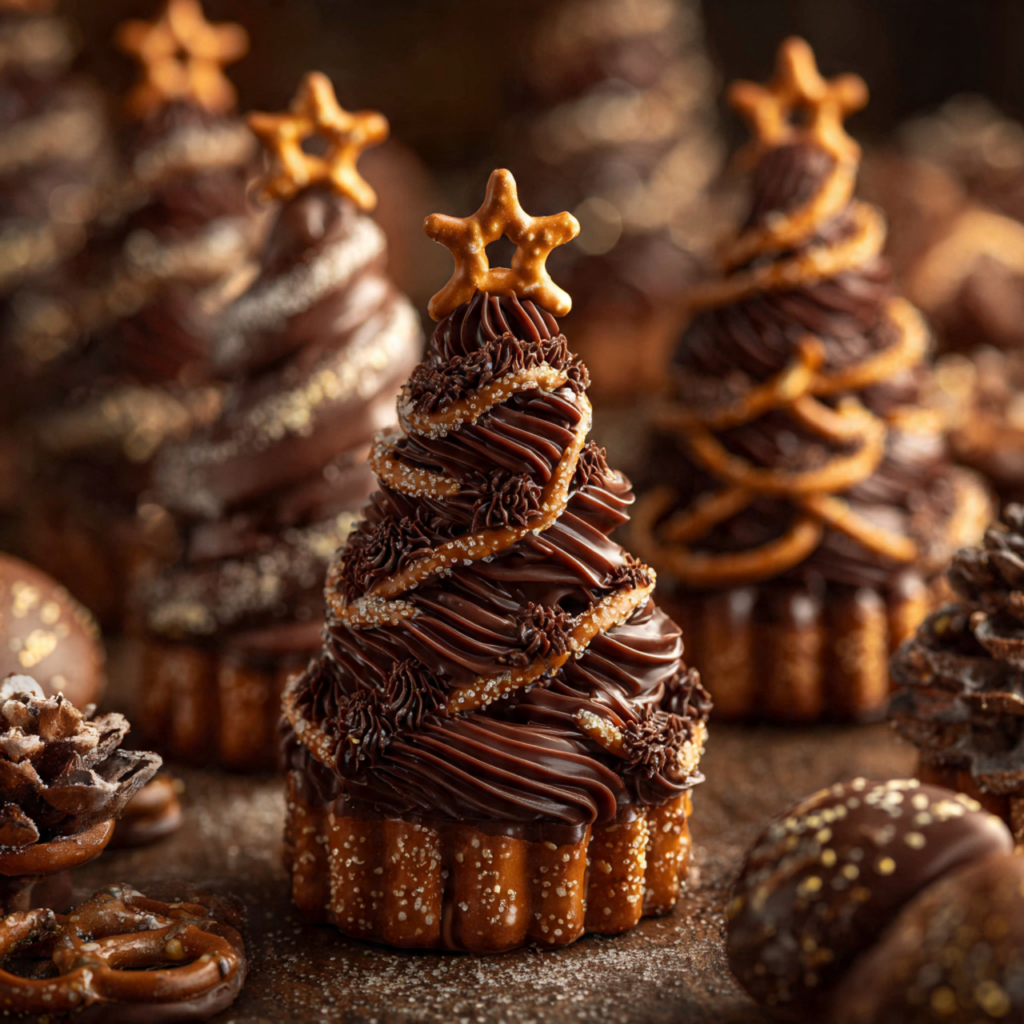
The Ultimate Christmas Chocolate Trees (Easy Decorated Holiday Treat!)
Imagine the most charming, whimsical little Christmas trees, crafted entirely from rich, dark chocolate, drizzled with snowy white chocolate, and decorated with a colorful shower of festive sprinkles, all standing on a crunchy pretzel trunk. Now, imagine this stunning holiday treat is completely no-bake and ready in just 20 minutes. That, my friends, is the…
Imagine the most charming, whimsical little Christmas trees, crafted entirely from rich, dark chocolate, drizzled with snowy white chocolate, and decorated with a colorful shower of festive sprinkles, all standing on a crunchy pretzel trunk. Now, imagine this stunning holiday treat is completely no-bake and ready in just 20 minutes. That, my friends, is the simple, brilliant, and utterly delicious magic of these Christmas Chocolate Trees. This is, without a doubt, the easiest and most impressive-looking holiday candy you will make this season.
I promise you, there is no greater holiday delight than creating and sharing these beautiful little trees. The rich, snappy dark chocolate is the perfect canvas for the sweet white chocolate “snow” and the crunchy, colorful sprinkles. They are a true show-stopper on a dessert platter, a fantastic edible gift, and the perfect festive topper for a Christmas cake or cupcakes.
Get ready to create the most talked-about treat of the season, a recipe so easy, fun, and delicious, it’s destined to become a new holiday tradition.
Why These Chocolate Trees are a Holiday Must-Make
You are going to be completely charmed by how easy and beautiful this recipe is. It’s the perfect festive project. Here’s why you’ll love it:
- Completely No-Bake and Ready in 20 Minutes: This is the ultimate fast and easy holiday treat! Just melt, pipe, decorate, and chill. It’s perfect for a last-minute party.
- A Fun, Creative, and Kid-Friendly Craft: “Painting” with chocolate is a wonderfully artistic and satisfying activity. Kids will absolutely love helping to pipe the trees and add the sprinkles.
- Stunningly Festive and Impressive: These little trees look so intricate and beautiful, your guests will think they came from a gourmet chocolate shop.
Recipe Snapshot
| Prep Time | 10 minutes |
| Cook Time | 5 minutes |
| Chill Time | 15 minutes |
| Total Time | 30 minutes |
| Servings | 8 trees |
| Calories | 185 kcal per tree (estimated) |
| Course | Dessert, Snack |
| Cuisine | American |
| Difficulty/Method | Easy / No-Bake |
Your Simple Shopping List for This Edible Forest
This impressive dessert comes together with just a handful of simple, easy-to-find ingredients.
→ For the Christmas Chocolate Trees
- 200 grams dark chocolate → About 1 ¼ cups of chips. Use a good quality chocolate for the best flavor and smoothest melting.
- 50 grams white chocolate → About ⅓ cup of chips, for the perfect “snow” drizzle.
- ¼ cup mini colorful sprinkles → For decorating the trees like they have ornaments.
- 8 pretzel sticks → These will be the sturdy, salty “trunks” for our trees.
Let’s Get Piping! Your No-Bake Guide
Ready to create the easiest, most artistic treat of the holiday season? Let’s go!
Part 1: Melt and Pipe the Trees
- Prep Your Station: Line a large baking tray with parchment paper. This is essential for ensuring your finished trees lift off cleanly.
- Melt the Dark Chocolate: In a microwave-safe bowl, melt the dark chocolate in 30-second intervals, stirring well after each one, until it is completely smooth and fluid.
- Pipe the Trees: Transfer the melted dark chocolate into a piping bag or a sturdy zip-top bag. Snip a small tip off the corner. On the parchment paper, pipe your tree shapes. Start at the top with a small point and pipe back and forth in a zigzag motion, getting wider as you go down, to create a classic triangle tree shape. Make each tree about 3 inches tall.
- Add the Trunks: Before the chocolate sets, gently press a pretzel stick into the base of each piped tree to act as the trunk. Make sure the chocolate overlaps the pretzel to secure it.
Part 2: Decorate and Chill to Perfection
- Melt the White Chocolate: In a separate small bowl, melt the white chocolate in the microwave until smooth.
- Add the “Snow” and “Ornaments”: Using a spoon or a small piping bag, drizzle the melted white chocolate back and forth over the dark chocolate trees to create a snowy effect.
- Decorate!: While the chocolate is still wet, immediately scatter the colorful mini sprinkles all over the trees to look like festive ornaments.
- Chill and Set: Let the chocolate trees set at room temperature, or for a faster result, place the baking tray in the refrigerator for 15-20 minutes, until the chocolate is completely firm.
- Serve: Once firm, carefully peel the chocolate trees from the parchment paper and arrange them on a festive platter to enjoy!
Piped Christmas Chocolate Trees with Pretzel Trunks
Ingredients
Equipment
Method
- Line a baking tray with parchment paper. Melt the dark chocolate in a microwave-safe bowl in 30-second intervals, stirring until smooth.
- Spoon the melted dark chocolate into a piping bag or a zip-top bag with a small tip cut off.
- Pipe tree shapes onto the parchment paper, about 3 inches tall, starting narrow at the top and widening in a zigzag pattern. Before the chocolate sets, press a pretzel stick into the base of each tree to create the trunk.
- Melt the white chocolate and drizzle it back and forth over the dark chocolate trees for a snow effect.
- While the chocolate is still wet, immediately scatter mini sprinkles over the trees to decorate.
- Allow the chocolate trees to set completely at room temperature or in the refrigerator for 15-20 minutes until firm.
- Carefully peel the finished trees from the parchment paper and serve.
Notes
WiseRecipes’ Top Tips for Perfect Chocolate Trees
These simple secrets will help you make your festive creations flawlessly.
- Don’t Overheat Your Chocolate. The key to perfectly smooth, glossy chocolate is to melt it gently. Use short intervals in the microwave and stir well in between. The residual heat will melt the remaining pieces.
- Parchment Paper is Non-Negotiable. Do not try to make these directly on a baking sheet! The parchment paper is what allows you to easily and cleanly peel the delicate, firm trees off the pan without breaking them.
- Work Quickly When Decorating. Have your white chocolate melted and your sprinkles open and ready to go before you even start piping the trees. The dark chocolate will begin to set, and you want to get the drizzle and sprinkles on while it’s all still wet so they adhere properly.
- Don’t Snip Too Big a Hole. When you’re ready to pipe, start by snipping a very tiny corner off your zip-top bag. You can always make it bigger, but you can’t make it smaller! A smaller hole gives you more control for a neater tree shape.
- Get Creative! This is a fantastic base for your creativity. You could use different colored candy melts for the trees, add a sparkling sanding sugar for a frosty look, or even use a star-shaped sprinkle for the top of each tree.
Keep Them Fresh! Storing Your Chocolate Creations
These beautiful chocolate trees are perfect for making ahead for parties or as a gift.
- Storage: Once the trees are completely firm, you can store them in an airtight container at a cool room temperature or in the refrigerator. Place them in a single layer or separated by sheets of wax paper to prevent them from breaking. They will stay fresh for up to a week.
FAQs: Your Christmas Chocolate Tree Questions, Answered!
Can I use a different kind of chocolate?
Absolutely! This would be beautiful with milk chocolate for the trees, or even green or red candy melts for a more colorful forest. You can also swap the white chocolate drizzle for a different color.
My trees are breaking when I try to lift them off the parchment. What did I do wrong?
This usually means the chocolate isn’t fully set and hardened yet. Give them a little more time in the refrigerator. It can also happen if your trees are piped too thinly. Make sure you’re creating a solid, connected zigzag of chocolate, not just a lacy outline.
Can I make these without a piping bag?
Yes! A sturdy zip-top freezer bag is a perfect substitute. Just spoon the melted chocolate in, seal it, and snip a tiny bit off one of the bottom corners. For the drizzle, you can simply use a spoon to flick the white chocolate back and forth over the trees.
What are some other ways to use these trees?
They are fantastic as decorations! You can stand them up on top of a frosted Christmas cake to create a 3D forest scene, or place one on top of each cupcake for a stunning and easy holiday decoration.
Final Thoughts: Your Easiest, Most Artistic Holiday Treat
There is nothing more satisfying than creating a treat that looks truly impressive but was secretly a breeze to make. These Christmas Chocolate Trees are the perfect example of a simple idea with a huge visual impact. They are a delightful, creative, and delicious addition to any holiday celebration. I hope this easy recipe helps you create a little bit of edible magic this Christmas. Happy Holidays!