Adorable Penguin Slice-and-Bake Cookies (The Cutest Christmas Cookies Recipes!)
If you are looking for the absolute star of your holiday baking lineup, look no further. These Penguin Slice-and-Bake Cookies are not just treats; they are edible art that will steal the show at any cookie swap. When it comes to unique Christmas cookies recipes, this one takes the prize for charm and creativity. We…
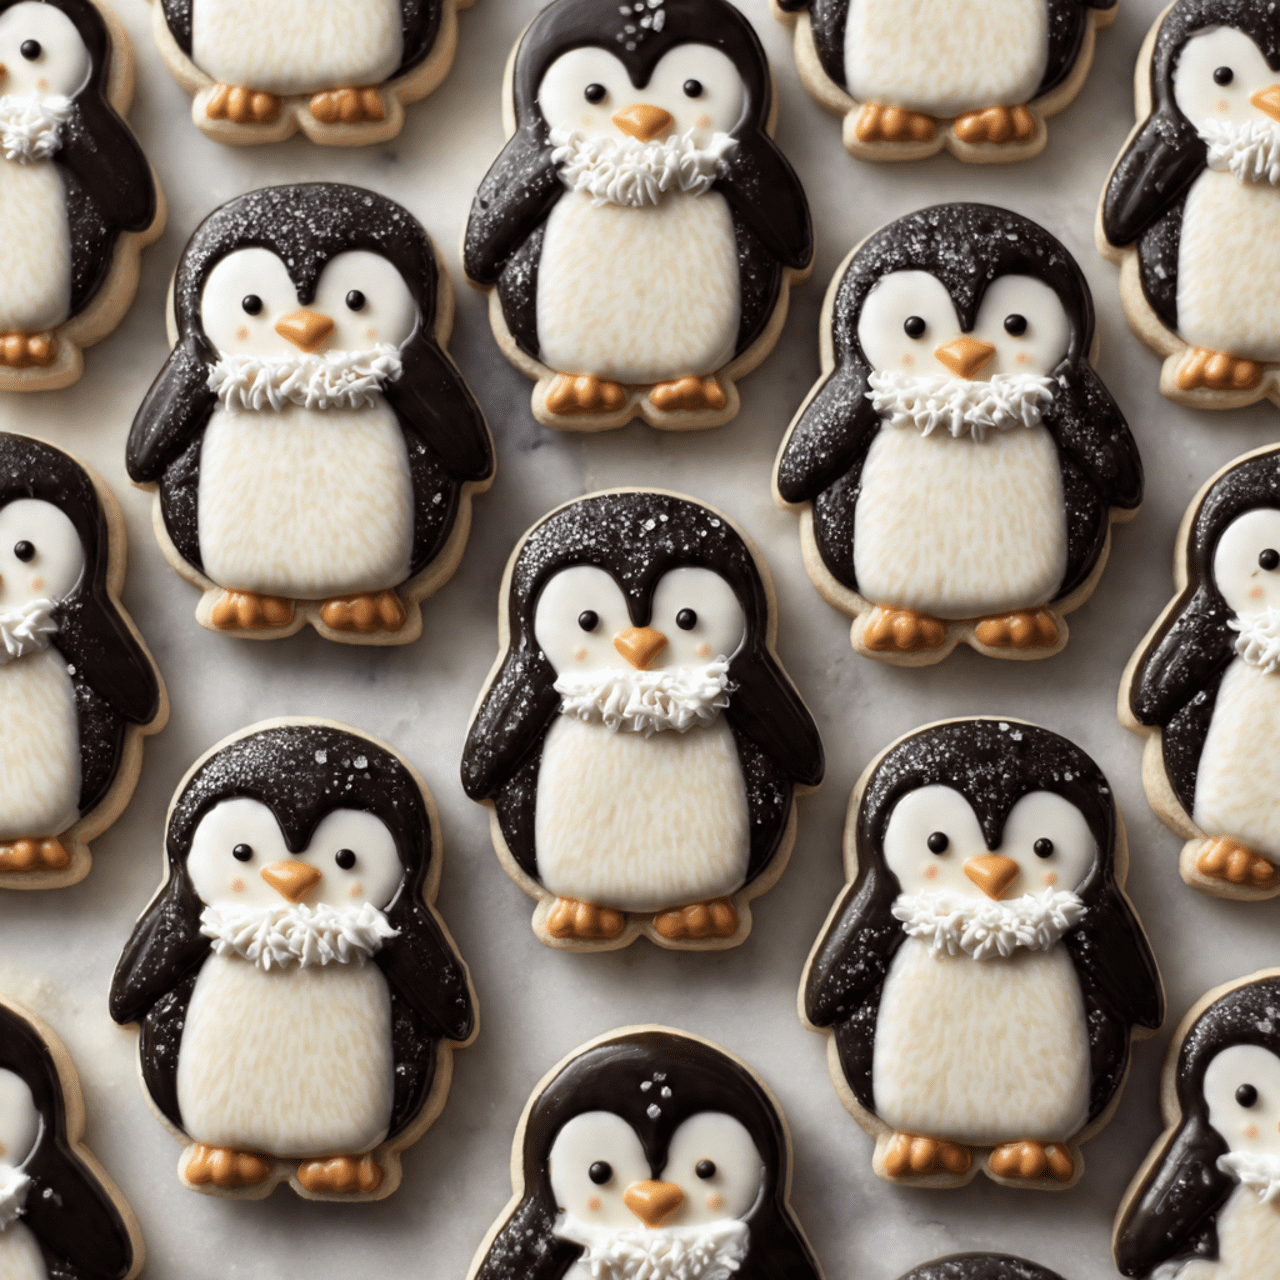
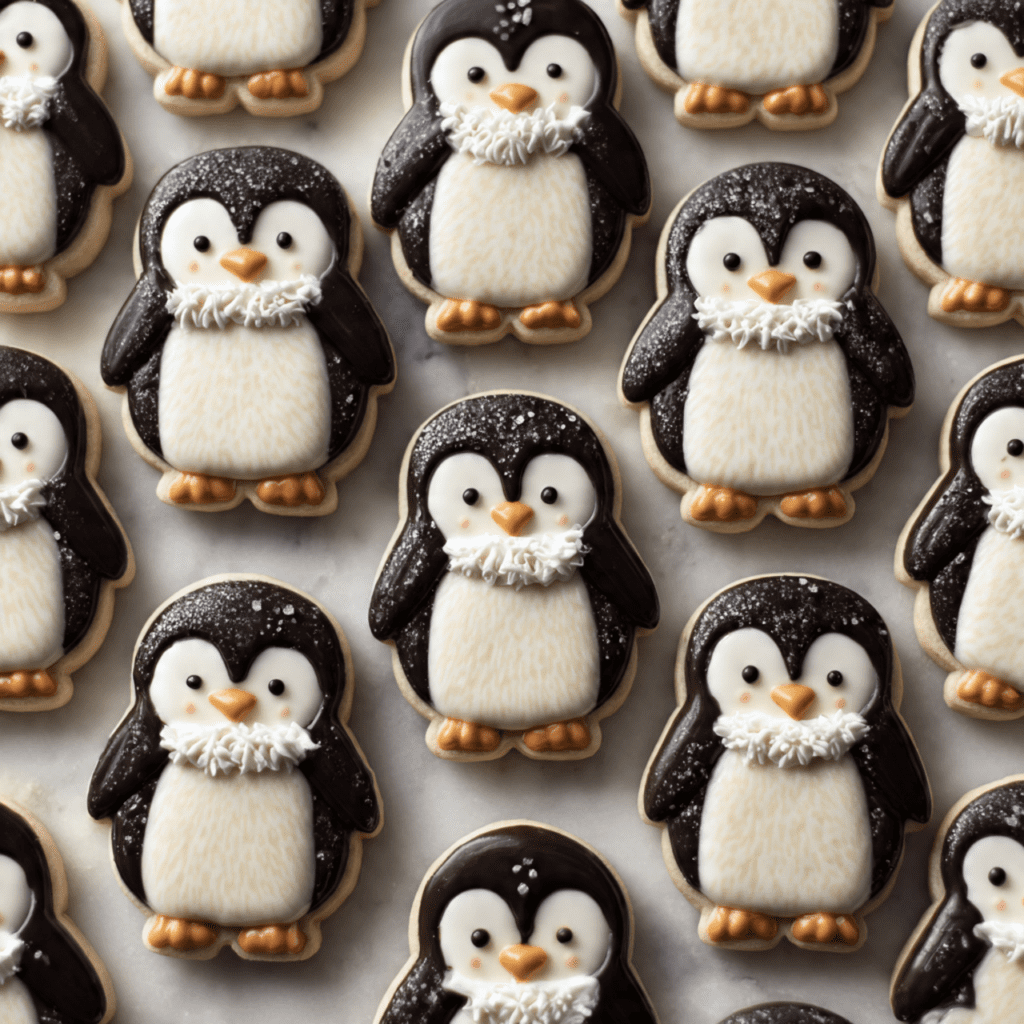
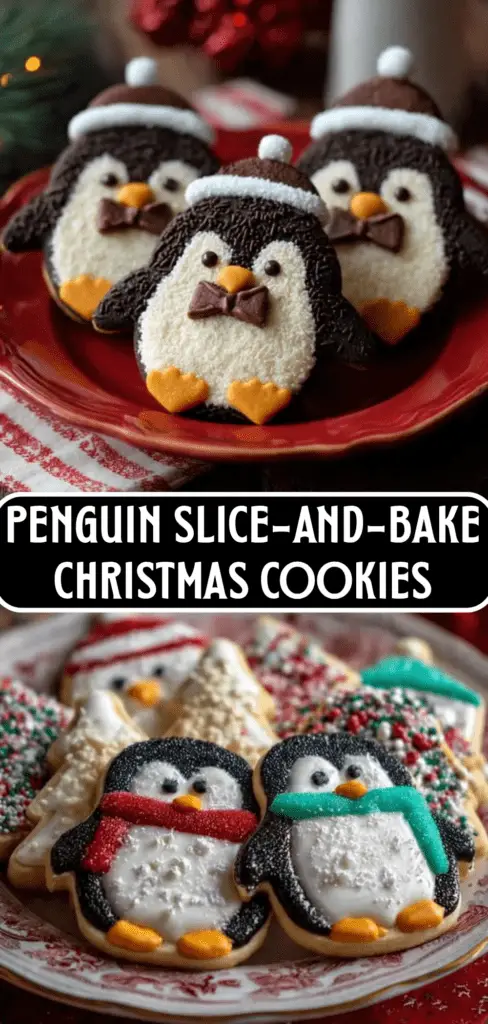
If you are looking for the absolute star of your holiday baking lineup, look no further. These Penguin Slice-and-Bake Cookies are not just treats; they are edible art that will steal the show at any cookie swap. When it comes to unique Christmas cookies recipes, this one takes the prize for charm and creativity. We are talking about a buttery vanilla sugar cookie dough, tinted and assembled into a log, then sliced to reveal a perfect little penguin face inside. It’s like a magic trick in cookie form!
I promise you, the reaction you will get from these cookies is worth every minute of chilling and rolling. Dipped in red candy melts to create jaunty winter hats and finished with a marshmallow pompom, these cookies are sweet, buttery, and brimming with personality. They are sturdy enough to package as gifts and tasty enough that you won’t want to give them all away.
Get ready to roll up your sleeves and create the most adorable winter mascot your kitchen has ever seen.
Why These Penguins Are the Ultimate Holiday Cookie!
You are going to fall in love with these little guys. They are a labor of love that pays off big time. Here is why they deserve a spot in your oven:
- The “Wow” Factor: Slicing the log to reveal the penguin design is a moment of pure magic. It’s a technique that looks incredibly professional and intricate.
- A Classic Buttery Base: Beneath the cute design is a solid, delicious vanilla sugar cookie that holds its shape perfectly and tastes comforting and sweet.
- Fun to Decorate: The post-bake decoration involves dipping the heads in red candy melts for hats and adding marshmallow pompoms. It’s a fun finishing touch that brings them to life.
- Perfect Make-Ahead Dough: Because the dough log needs to freeze solid, you can make the dough days (or even weeks) in advance and just slice and bake when you need fresh cookies.
- Kid-Friendly Eating: While the assembly is an intermediate task, kids go absolutely wild for eating these character cookies. They are the hit of every Christmas party.
Recipe Snapshot
| Active Prep Time | 1 hour |
| Chill/Freeze Time | 3 hours |
| Cook Time | 12 minutes |
| Total Time | 4 hours 12 minutes |
| Servings | 24 cookies |
| Calories | 175 kcal per cookie |
| Course | Dessert, Cookies |
| Cuisine | American / Holiday |
| Difficulty/Method | Intermediate / Slice-and-Bake |
Your Shopping List for This Baking Project
This recipe requires standard baking ingredients plus specific decorations to bring the penguins to life.
→ For the Cookie Dough
- 2 ¼ cups all-purpose flour → Spooned and leveled for the right texture.
- 1 ½ sticks (12 tbsp) unsalted butter → Softened to room temperature.
- 2/3 cup sugar → For sweetness and structure.
- 1 large egg → Plus an extra egg for the egg wash “glue.”
- 2 teaspoons pure vanilla extract → For classic cookie flavor.
- ½ teaspoon baking powder & ¼ teaspoon fine salt → For a little lift and flavor balance.
- Gel food coloring → You specifically need Orange and Black. Gel is crucial so you don’t water down the dough!
→ For the Accessories
- ¼ cup red melting wafers → To create the winter hats.
- ¼ cup white melting wafers → For piping details and attaching the eyes.
- 12 mini marshmallows → Halved, for the hat pompoms.
- 48 mini chocolate chips → For the penguin eyes.
Let’s Build a Penguin! Your Step-by-Step Guide
This creates a “log” of dough that reveals the picture when sliced. Follow the steps carefully!
Part 1: Make and Color the Dough
- Mix the Base: Whisk flour, baking powder, and salt in a bowl. In a mixer, beat butter and sugar until fluffy (3-5 mins). Add 1 egg and vanilla. Beat in the flour mixture on low until just combined.
- Color Orange: Remove most of the dough, leaving about ¼ cup in the bowl. Add 3 drops of orange gel color and mix until vibrant. Flatten into a disk, wrap, and chill for 20 minutes.
- Color Black: Clean the bowl. Return ¾ cup of the uncolored dough to the bowl. Add 4 drops of black gel color and mix until deep black. Form into a rectangle, wrap, and chill for 20 minutes.
- Prep White Body: Roll the remaining uncolored (white) dough into a cylinder about 9-10 inches long and 1 ½ inches wide. Wrap and set aside at room temp.
Part 2: Construct the Center (Face & Beak)
- Shape Orange Parts: Divide orange dough into 3 pieces. Roll into 9-10 inch ropes. Shape one rope into a triangle (this is the beak/nose). Freeze all orange ropes for 15 minutes until hard.
- Insert the Beak: Slice the white dough cylinder in half lengthwise to make two long half-moons. Brush the cut sides with egg wash (1 beaten egg). Press the frozen orange triangle rope into the center of one white half. Place the other white half on top and press to seal, re-forming the cylinder.
Part 3: The Tuxedo and Feet
- Wrap in Black: Roll the black dough into a 9×6 inch rectangle. Try to keep the center slightly thicker than the edges. Brush with egg wash. Wrap this black dough around the white cylinder. Smooth it out with your hands to adhere. The thicker part of the black dough should be on top (the head).
- Add Feet: Brush the bottom (thinner black part) with egg wash. Press the two remaining orange ropes along the bottom length for feet.
- Shape and Freeze: Wrap the whole log in plastic. Use your hands to gently shape the log into an oval/egg shape, with the head being the narrow end. Freeze until solid, about 2 hours.
Part 4: Slice, Bake, and Dress Up
- Slice: Preheat oven to 350°F. Trim the ends of the log to reveal the face! Slice the log into ¼-inch thick cookies.
- Bake: Arrange on parchment-lined sheets. Bake 10-12 minutes until crisp but not browned. Cool completely on a rack.
- Dip the Hats: Melt the red wafers. Dip the top of each penguin’s head into the red candy to form a hat (tilt it for a jaunty look!). Stick a halved marshmallow on the wet red candy for a pompom.
- Add Eyes: Melt the white wafers. Use a dab of melted white candy to glue two mini chocolate chips onto the white face for eyes. You can also pipe little decorations on the hat. Let set completely.
Penguin Slice-and-Bake Cookies
Ingredients
Equipment
Method
- Whisk flour, baking powder, and salt. Beat butter and sugar until fluffy. Beat in 1 egg and vanilla. Add flour mixture on low until combined.
- Color 1/4 cup of dough orange. Wrap and chill. Return 3/4 cup dough to bowl and color black. Form into a rectangle, wrap and chill. Form remaining white dough into a 9-inch cylinder.
- Roll orange dough into 3 ropes. Press one into a triangle shape. Freeze ropes for 15 mins.
- Slice white cylinder in half lengthwise. Brush cut sides with egg wash. Press orange triangle rope into center of one half. Cover with other half and press to seal.
- Roll black dough into a 9×6 inch rectangle (thicker in center). Brush with egg wash. Wrap around white cylinder. Brush bottom with egg wash and attach remaining orange ropes for feet.
- Shape log into an egg shape. Freeze until solid, about 2 hours.
- Preheat oven to 350°F. Slice log into 1/4-inch thick cookies. Bake 10-12 minutes until crisp but not browned. Cool completely.
- Melt red wafers. Dip top of penguin heads to make hats. Attach marshmallow halves for pompoms.
- Melt white wafers. Use to attach mini chocolate chips for eyes. Let set before serving.
Notes
WiseRecipes’ Top Tips for Perfect Slice-and-Bake
This is an intermediate recipe, so here are the secrets to keeping it frustration-free.
- Use Gel Coloring. Liquid food coloring will add too much moisture to the dough, making it sticky and hard to shape. Gel coloring gives vibrant color without changing the texture.
- The Egg Wash is Glue. Don’t skip brushing the dough pieces with beaten egg before attaching them. This acts as a glue so your penguin doesn’t fall apart when you slice it.
- Keep it Cold! If the dough gets sticky or soft while you are building the log, pop it in the freezer for 10 minutes. Cold dough keeps its shape; warm dough gets squished.
- Rotate the Log. While the log is freezing for the final 2 hours, rotate it every 30 minutes or so. This prevents it from getting a flat spot on one side, keeping your penguins round and cute.
- Use a Sharp Knife. When slicing the frozen log, use a large, very sharp chef’s knife. Press down firmly and evenly. If the dough is too rock-hard to slice without cracking, let it sit on the counter for 5 minutes to temper slightly.
Keep Them Fresh! Storing Your Penguins
These sturdy cookies store very well.
- Refrigerator/Room Temp: Store baked and decorated cookies in an airtight container at room temperature for up to 5 days. Use parchment paper between layers to protect the decorations.
- Freezing Dough: The fully assembled, unsliced log can be frozen for up to 1 month! Wrap it in plastic, then foil. Thaw it in the fridge overnight before slicing.
FAQs: Your Penguin Cookie Questions, Answered!
My penguin faces look distorted. Why?
This usually happens during the slicing process. If the dough is too soft, the pressure of the knife will squish the face. Ensure the log is frozen solid, and use a sharp knife with a confident chopping motion rather than sawing back and forth.
Can I use chocolate chips for the buttons?
Yes! If you want to give the penguins buttons on their white bellies, you can gently press mini chocolate chips into the white dough slices before baking. Just be careful not to distort the shape.
What if I don’t have melting wafers?
You can use white chocolate chips dyed with oil-based candy color (do not use water-based color, or the chocolate will seize!). For the hats, you could also pipe red royal icing, though it will take longer to dry.
Why is my black dough turning grey?
Black food coloring develops over time. If it looks dark grey when you mix it, it will likely darken to black as it rests in the fridge and bakes. Use a generous amount of gel paste.
Final Thoughts: A Winter Baking Victory
There is a special kind of satisfaction that comes from slicing into a dough log and seeing a cute little character staring back at you. These Penguin Slice-and-Bake Cookies are a true baking victory—a fun challenge that results in the most adorable, delicious, and memorable treat of the season. Add them to your list of Christmas cookies recipes and watch them disappear! Happy baking!