The Ultimate Christmas Tree Cheese Ball (Easy & Festive Appetizer!)
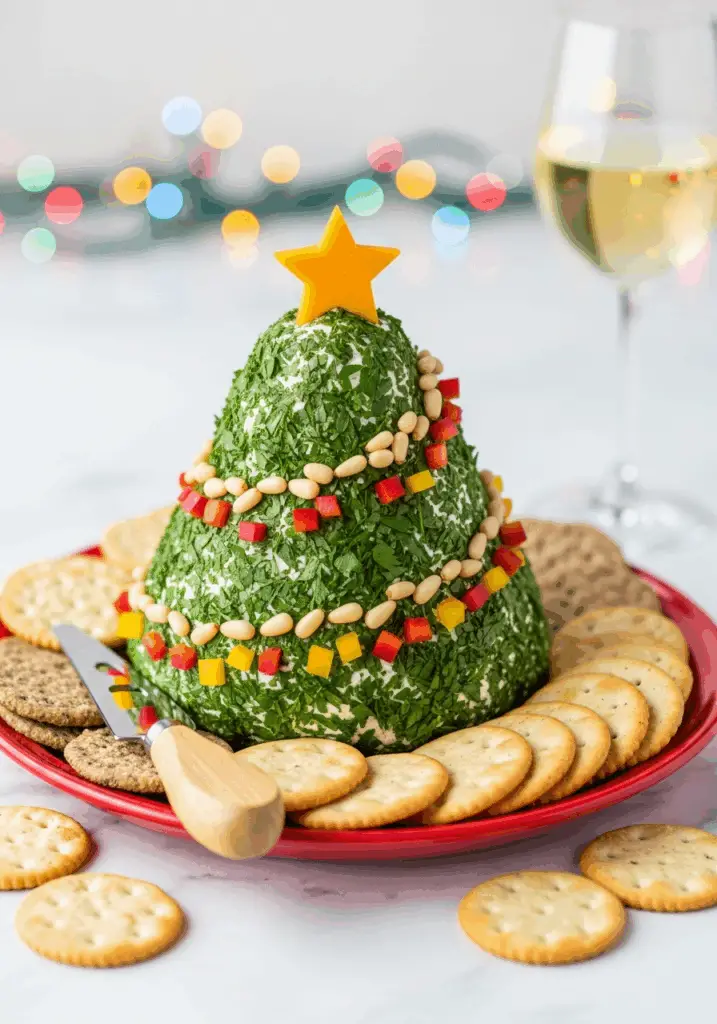
Imagine a centerpiece on your holiday table that stops everyone in their tracks—a magnificent, edible Christmas tree, sparkling with colorful “ornaments” and topped with a shining star. That, my friends, is the absolute delight of this festive Christmas Tree Cheese Ball, and it is, without a doubt, the most charming and delicious appetizer you will…
Imagine a centerpiece on your holiday table that stops everyone in their tracks—a magnificent, edible Christmas tree, sparkling with colorful “ornaments” and topped with a shining star. That, my friends, is the absolute delight of this festive Christmas Tree Cheese Ball, and it is, without a doubt, the most charming and delicious appetizer you will make all season.
Here’s the thing about holiday appetizers: they need to be impressive, but they also need to be easy. I discovered this recipe years ago when I wanted a true show-stopper that I could make entirely in advance. This isn’t just a cheese ball; it’s a work of art. It’s a savory, creamy, and utterly addictive cheese spread that you shape and decorate to become the star of your party spread.
I promise you, there is no greater joy than watching your guests’ faces light up as they gather around this festive creation, crackers in hand. Each scoop is packed with a savory blend of cheeses and seasonings, perfectly complemented by the fresh parsley and nutty “garland.” It tastes just as good as it looks.
Get ready to create the most talked-about dish at your holiday gathering—a simple, make-ahead appetizer that is pure festive fun.
Why This Christmas Tree Cheese Ball is a Holiday Essential!
You are going to be so thrilled with how this stunning appetizer comes together. It’s a guaranteed hit for any festive occasion. Here’s why you’ll love it:
- A True Show-Stopping Centerpiece: This isn’t just a snack; it’s edible decor! The whimsical Christmas tree shape is incredibly festive and makes for an unforgettable presentation.
- Perfect for Making Ahead: This recipe requires at least two hours of chilling time, making it the ideal stress-free appetizer to prepare a day or two before your party.
- Crowd-Pleasing Savory Flavors: The rich and creamy blend of cream cheese, sharp cheddar, and savory seasonings is a classic and beloved flavor combination.
- Incredibly Easy to Make: Despite its impressive appearance, this cheese ball is surprisingly simple to mix, shape, and decorate. No cooking required!
- Fun and Customizable: Decorating the tree is a fun, creative process! You can follow the recipe or get creative with your own “ornaments” and “garlands.”
Recipe Snapshot
| Prep Time | 15 minutes |
| Chill Time | 2 hours |
| Total Time | 2 hours 15 minutes |
| Servings | 12-15 servings |
| Calories | 158 kcal per serving |
| Course | Appetizer |
| Cuisine | American |
| Difficulty/Method | Easy / No-Bake |
Your Shopping List for This Festive Centerpiece
This recipe uses simple, easy-to-find ingredients to create a truly spectacular result. Here’s what you’ll need:
→ For the Cheese Ball Base
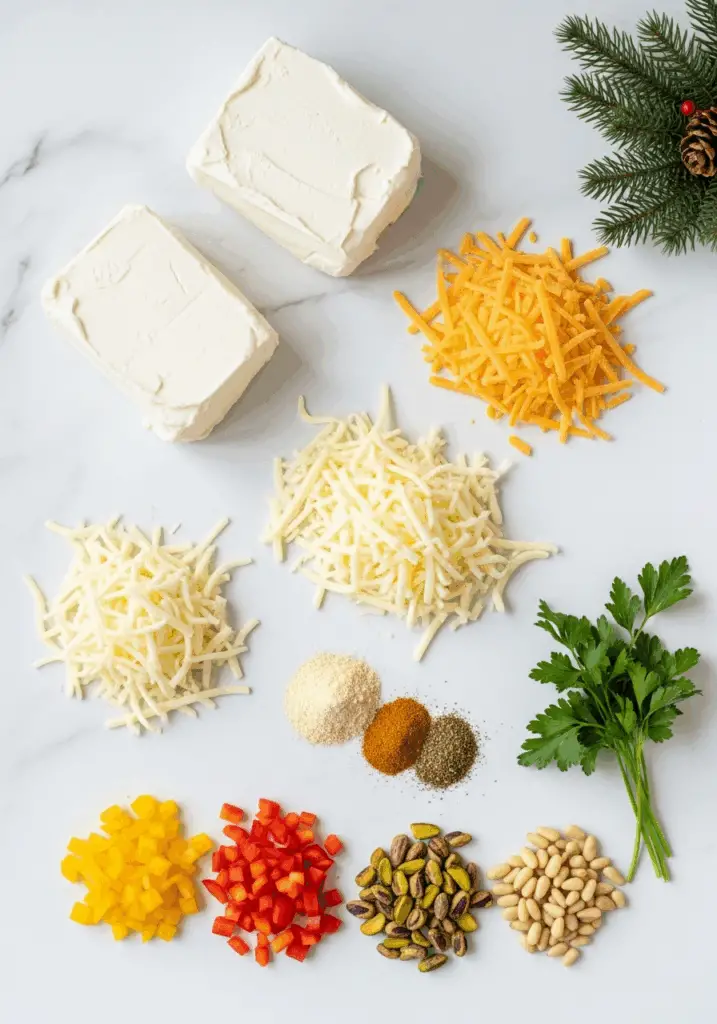
- 3 x 8 ounce (225g) packages cream cheese → It is essential that this is fully softened to room temperature for a smooth, creamy base.
- 1 cup shredded sharp cheddar cheese → Adds a tangy, savory depth of flavor.
- ½ cup shredded Monterey Jack cheese → For a mild, creamy flavor and great texture.
- 1 tablespoon chopped fresh parsley → For a hint of freshness inside the cheese ball.
- 1 teaspoon garlic powder → Adds a savory, aromatic note.
- 1 teaspoon onion powder → Provides a well-rounded savory flavor.
- 1 teaspoon Italian seasoning → A blend of herbs that complements the cheeses beautifully.
- ½ teaspoon ground black pepper → For a touch of spice.
- ½ teaspoon salt → To enhance all the flavors.
→ To Decorate
- 3 tablespoons chopped fresh parsley → This will be the green “pine needles” of our tree.
- ¼ of each a yellow and red bell pepper → Finely diced, these will be our colorful “ornaments.”
- 1 tablespoon pistachios → Roughly chopped, for more green “ornaments.” (Optional)
- 1 tablespoon pine nuts → These make a perfect, delicate “garland.” (Optional)
- A thick slice of cheddar or yellow pepper → To cut a star shape for the top of the tree.
Let’s Make a Masterpiece! Your Step-by-Step Guide
Ready to build the cutest appetizer of the season? This comes together in a few easy, fun steps.
Part 1: Mix and Shape the Cheese Ball
- Beat the Cheeses: In a large bowl, using a hand mixer or a sturdy spatula, beat the softened cream cheese, shredded cheddar, and Monterey Jack cheese together until smooth and well combined.
- Add Seasonings: Add the 1 tablespoon of parsley and all the seasonings (garlic powder, onion powder, Italian seasoning, pepper, and salt) to the bowl. Beat again until everything is fully incorporated.
- Shape the Cone: Scrape the cheese mixture onto a large piece of plastic wrap. Tightly wrap the plastic around the mixture, and use your hands to mold it into a cone shape, resembling a Christmas tree.
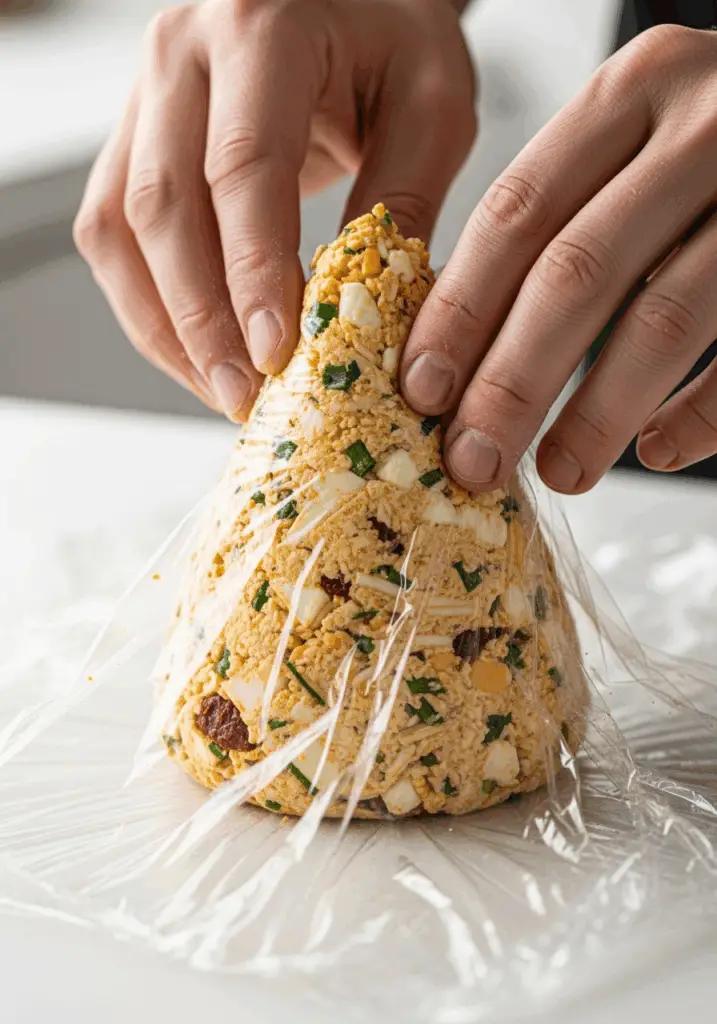
Part 2: Chill and Decorate
- Chill Until Firm: Place the plastic-wrapped cone onto a plate and refrigerate for at least 2-3 hours, or preferably overnight. The cheese ball must be very firm before you can decorate it.
- Prepare for Decorating: Once firm, unwrap the cheese ball and place it on your final serving platter.
- Decorate Your Tree: Start by gently pressing the chopped parsley all over the cheese cone to create the green “tree.” Next, carefully press the pine nuts into the cheese in a swirling line to create a “garland.” Dot the diced bell peppers and pistachios around to resemble “ornaments.”
- Add the Star: Use a small star-shaped cookie cutter to cut a star from a thick slice of cheddar cheese or yellow bell pepper. Secure it to the top of the tree with a toothpick.
- Serve: Arrange crackers, sturdy chips, or bread slices around the base of your tree and serve!
WiseRecipes’ Top Tips for a Perfect Cheese Ball Tree
These are my essential secrets for a cheese ball that’s easy to shape and stunning to serve.
- Start with Truly Softened Cream Cheese. This is the most important step for a smooth, non-lumpy cheese ball. Let your cream cheese sit on the counter for at least an hour or two until it’s completely soft. Do not try to microwave it!
- Use Plastic Wrap for Mess-Free Shaping. Shaping the cheese ball directly in plastic wrap is a game-changer. It keeps your hands clean and allows you to easily mold the mixture into a tight, uniform cone shape.
- The Chill Time is Non-Negotiable. Don’t rush the chilling! The cheese ball needs to be very firm to hold its shape and allow you to press the decorations into it without making a mess. Chilling overnight is even better if you have the time.
- Decorate Just Before Serving. For the freshest look and flavor, decorate the cheese ball on the day of your party. The parsley will be its most vibrant green, and the nuts will stay crunchy.
- Get Your Crackers Ready. A cheese ball this magnificent deserves a worthy vessel! Serve it with a variety of sturdy crackers, pita chips, pretzel thins, or even sliced veggies like cucumber and bell peppers.
Christmas Tree Cheese Ball
Ingredients
Equipment
Method
- In a large bowl, using a hand mixer, beat together the softened cream cheese, cheddar cheese, and Monterey Jack cheese.
- Add in the 1 tbsp. parsley and all seasonings; beat until well combined.
- Transfer the mixture onto plastic wrap, cover tightly, and use your hands to shape it into a cone.
- Refrigerate for at least 2-3 hours, or preferably overnight, until very firm.
- Transfer the firm cheese cone onto a serving plate. Lightly press the 3 tbsp. of chopped parsley into the cheese to cover the surface.
- Dot the pine nuts across the tree to create a ‘garland’ effect. Decorate with diced bell pepper pieces and pistachios to resemble ornaments.
- Use a small cookie cutter to cut a star from a thick slice of cheese or pepper. Attach it to the top of the tree with a toothpick.
- Serve with crackers, bread, or sturdy chips.
Notes
Keep It Fresh! Making Your Appetizer Ahead
This is the ultimate make-ahead party appetizer, saving you precious time on party day.
- Make-Ahead: You can make and shape the cheese ball (wrapped in plastic) up to 3 days in advance and keep it in the refrigerator. Decorate it on your serving platter a few hours before your guests arrive.
- Storing Leftovers: Tightly wrap any leftover cheese ball in fresh plastic wrap. It will keep in the refrigerator for up to 5 days. The decorations may soften slightly but it will still be delicious.
FAQs: Your Cheese Ball Questions, Answered!
My cheese ball is too soft to shape. What can I do?
If your mixture feels too soft, it’s likely your cream cheese was a bit too warm or your other cheeses were very soft. Simply cover the bowl and chill the entire mixture in the refrigerator for 30-60 minutes to firm it up before attempting to shape it on the plastic wrap.
Can I make this cheese ball nut-free?
Absolutely! The pistachios and pine nuts are completely optional. Simply leave them out and use more of the colorful diced bell peppers for decoration. Finely chopped green olives or roasted red peppers would also make lovely “ornaments.”
What can I use if I don’t have a star-shaped cookie cutter?
No problem! You can easily freehand-cut a star shape from a slice of cheese or yellow bell pepper with a small, sharp paring knife.
Can I freeze this cheese ball?
Yes, you can freeze the undecorated cheese ball. Wrap it tightly in plastic wrap and then in a layer of foil. It can be frozen for up to 1 month. Thaw it overnight in the refrigerator before unwrapping and decorating as usual.
Final Thoughts: Your Most Festive Creation
There is nothing more delightful than an appetizer that captures the pure fun and joy of the holiday season. This Christmas Tree Cheese Ball is a delicious, whimsical, and surprisingly easy way to add a “wow” factor to your celebration. I hope it becomes a cherished and tasty tradition on your holiday table. Happy Holidays!