The Ultimate Christmas Tree Tarts (Easy Holiday Treat!)
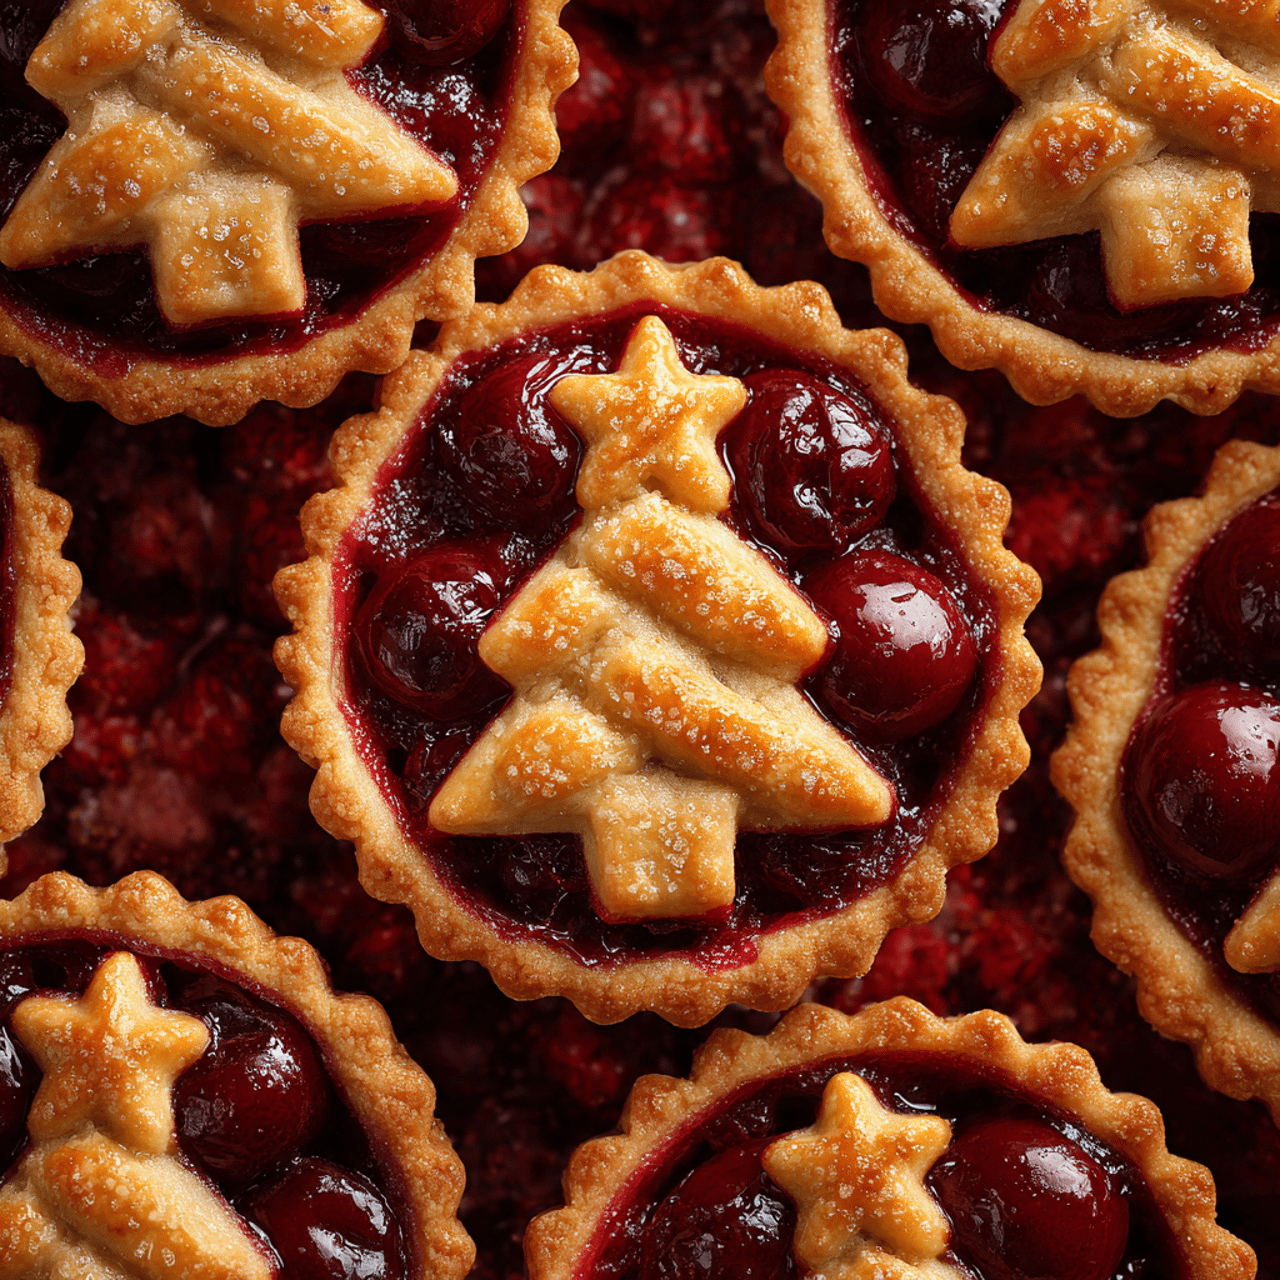
Imagine a platter of the most charming, individual little tarts, each a perfect bite of flaky, golden-brown pie crust holding a jewel-like filling of sweet cherries, and topped with an adorable little Christmas tree. That, my friends, is the simple, picture-perfect magic of these Christmas Tree Tarts. This is, without a doubt, the most delightful…
Imagine a platter of the most charming, individual little tarts, each a perfect bite of flaky, golden-brown pie crust holding a jewel-like filling of sweet cherries, and topped with an adorable little Christmas tree. That, my friends, is the simple, picture-perfect magic of these Christmas Tree Tarts. This is, without a doubt, the most delightful and impressive-looking treat you will make this holiday season using a brilliant shortcut.
I promise you, there is no greater joy than seeing these perfect little tarts come out of the oven, puffed and golden. The buttery crust, the sweet cherry filling, and the whimsical tree on top create a treat that is as delicious as it is beautiful. They are a true show-stopper for a holiday party, a cookie exchange, or a festive brunch.
Get ready to transform simple, store-bought ingredients into the most enchanting holiday treat, a recipe so clever and beautiful, it will become an instant Christmas tradition.

Why These Tarts Will Be the Star of Your Holiday Table
You are going to be completely smitten with how easy it is to create such an elegant and festive treat. This recipe is a true holiday gem. Here’s why:
- A Genius Shortcut to an Impressive Dessert: Using refrigerated rolled pie crusts saves a ton of time and effort, letting you focus on the fun, creative assembly.
- Incredibly Festive and Adorable: The little Christmas tree cutout on top of the cherry filling is a simple touch that makes these tarts look absolutely stunning and full of holiday spirit.
- Perfect Individual Portions: These mini tarts are the perfect single-serving dessert for a party, eliminating the need for cutting and serving.
- A Fun and Easy Baking Project: The process of cutting out the shapes and assembling the tarts is a wonderful and low-stress activity, perfect for getting kids involved in the holiday baking.
- Deliciously Classic Flavors: The simple, beloved combination of buttery, flaky pie crust and sweet cherry pie filling is a timeless classic that everyone loves.
Recipe Snapshot
| Prep Time | 30 minutes |
| Cook Time | 15 minutes |
| Total Time | 45 minutes |
| Servings | 8 tarts |
| Calories | 315 kcal per tart (estimated) |
| Course | Dessert |
| Cuisine | American |
| Difficulty/Method | Easy / Baking |
Your Shopping List for These Festive Tarts
This impressive dessert comes together with a surprisingly short list of simple, store-bought ingredients.
→ For the Christmas Tree Tarts
- One 14.1-ounce box refrigerated rolled pie crusts → You’ll need both crusts from the box for this recipe. This is our secret weapon!
- 1 large egg → Beaten with a little water to create an egg wash for a beautiful, golden-brown sheen.
- One 21-ounce can cherry pie filling → The sweet, jewel-toned, and delicious filling for our tarts.
- Fresh rosemary sprigs → Optional, but they create a beautiful, fragrant “forest floor” for serving.
- 2 tablespoons confectioners’ sugar → For a final, magical dusting of “snow.”
Let’s Get Baking! Your Step-by-Step Guide
Ready to create the most adorable treats of the season? Let’s get cutting and assembling!
Part 1: Cutting the Pie Crust Shapes
- Preheat and Prep: Preheat your oven to 375°F (190°C). Line a large baking sheet with parchment paper.
- Cut the Bases: Unroll one of the pie crusts onto a cutting board. Using a 2 1/2-inch round cookie cutter, cut out 8 circles. Place these circles on your prepared baking sheet. These are the bases of your tarts.
- Cut the Rings and Trees: Unroll the second pie crust. Use the same 2 1/2-inch cutter to cut out 8 more circles. Now, take a 2-inch round cutter and cut out the center of each of these circles to create 8 rings. From the 8 small inner circles you just removed, use a 1 1/2-inch Christmas tree cookie cutter to cut out 8 tiny trees.
Part 2: Assembling the Tarts
- Create the Egg Wash: In a small bowl, beat the egg with 1 tablespoon of water.
- Build the Tart Walls: Using your finger or a pastry brush, lightly brush the outer edge of the 8 full circles on your baking sheet with the egg wash. This acts as glue. Carefully place one of the pie crust rings on top of each circle, pressing gently to adhere.
- Fill with Cherries: Carefully spoon about 3 cherries from the pie filling into the center of each tart.
- Top with a Tree: Place one of the tiny Christmas tree cutouts on top of each tart, positioning it over the cherries so the trunk is touching the outer ring.
- Final Egg Wash: Gently brush the top of the pie crust ring and the little tree with more of the egg wash. This will give them a beautiful, shiny, golden-brown finish.
Part 3: Bake and Decorate
- Bake to Golden Perfection: Place the baking sheet in the preheated oven and bake for about 15 minutes, or until the dough is puffed and a deep golden brown.
- Cool and Garnish: Let the tarts cool completely on the baking sheet. To create a stunning presentation, arrange a bed of fresh rosemary sprigs on a platter. Place the cooled tarts on top.
- Add the “Snow”: Just before serving, use a small sieve to dust the tarts and rosemary generously with confectioners’ sugar. Enjoy!
Cherry Pie Tarts with Christmas Tree Crusts
Ingredients
Equipment
Method
- Preheat the oven to 375°F. Line a baking sheet with parchment paper. Unroll one pie crust and cut out 8 circles using a 2 1/2-inch round cutter. Place them on the baking sheet.
- Unroll the second pie crust. Cut 8 more 2 1/2-inch circles. Use a 2-inch cutter to cut the center out of these circles to create 8 rings. From the 8 small inner circles, use a 1 1/2-inch Christmas tree cutter to cut out 8 trees.
- Beat the egg with 1 tablespoon of water to create an egg wash. Brush the edge of the large circles on the baking sheet with the egg wash.
- Lay a crust ring on top of each egg-washed circle. Spoon about 3 cherries into the center of each tart.
- Place a tiny tree cutout on top of the cherries in each tart. Brush the top of the pie-crust ring and the tree with more egg wash.
- Bake until the dough is golden brown, about 15 minutes. Allow to cool completely.
- To serve, arrange the tarts on a bed of fresh rosemary on a platter and dust with confectioners’ sugar.
Notes
WiseRecipes’ Top Tips for Perfect Tarts
These simple secrets will ensure your festive tarts are a huge success.
- Keep Your Pie Dough Cold. Refrigerated pie dough is easiest to work with when it’s cold. If it gets too warm and sticky while you’re cutting, just pop it back in the fridge for a few minutes to firm up.
- Don’t Skip the Egg Wash “Glue”. Brushing the bottom circle with egg wash before adding the top ring is a crucial step. It ensures the two pieces bake together and create a proper “wall” to hold in the filling.
- Avoid Overfilling the Tarts. It’s tempting to load them up with cherry filling, but stick to just 2 or 3 cherries per tart. Overfilling can cause them to bubble over and make a sticky mess in your oven.
- Use a Sieve for the Sugar Dusting. For that delicate, magical “snowfall” effect, always apply the confectioners’ sugar through a fine-mesh sieve or a dedicated sugar duster.
- Get Creative with Fillings! While cherry is classic and festive, this technique would be wonderful with other canned pie fillings like apple, blueberry, or even a dollop of Nutella or lemon curd.
Keep Them Fresh! Storing Your Holiday Tarts
These tarts are a beautiful make-ahead option for your holiday festivities.
- Storage: The baked and cooled tarts can be stored in an airtight container at room temperature for up to 2 days. For longer storage, you can refrigerate them for up to 4 days.
- Make-Ahead: You can assemble the tarts completely (but unbaked) and store them on the baking sheet, covered, in the refrigerator for up to 24 hours. When you’re ready, just brush with the final egg wash and bake as directed.
FAQs: Your Christmas Tree Tart Questions, Answered!
Can I make my own pie crust for this?
Absolutely! If you have a favorite pie crust recipe, it will work beautifully. You will need a double-crust recipe to have enough dough for all the components.
What if I don’t have all the right-sized cookie cutters?
You can improvise! You can use the rims of different-sized drinking glasses to cut the circles and rings. For the tree, you can use any other small, festive cookie cutter you have, like a star or a gingerbread man, or even just leave it as a small circle on top.
Can I use a different pie filling?
Yes, this is a very versatile recipe! Apple pie filling with a sprinkle of cinnamon would be delicious, as would blueberry or peach. The key is to use a thick, canned pie filling that won’t be too runny.
Can I freeze these tarts?
Yes, they freeze quite well. You can freeze them either unbaked or baked. For unbaked, assemble them on a baking sheet and freeze until solid, then transfer to a freezer bag. Bake from frozen, adding about 5-10 minutes to the baking time. For baked, let them cool completely, then freeze and reheat in the oven.
Final Thoughts: Your Most Charming Holiday Bake
There is nothing more rewarding than creating a treat that looks as good as it tastes, especially during the holidays. These Christmas Tree Tarts are a perfect example of how a simple shortcut can lead to a truly stunning and delicious result. They are a delightful project and a beautiful addition to any celebration. I hope they bring a little bit of edible art to your holiday table. Happy Baking!