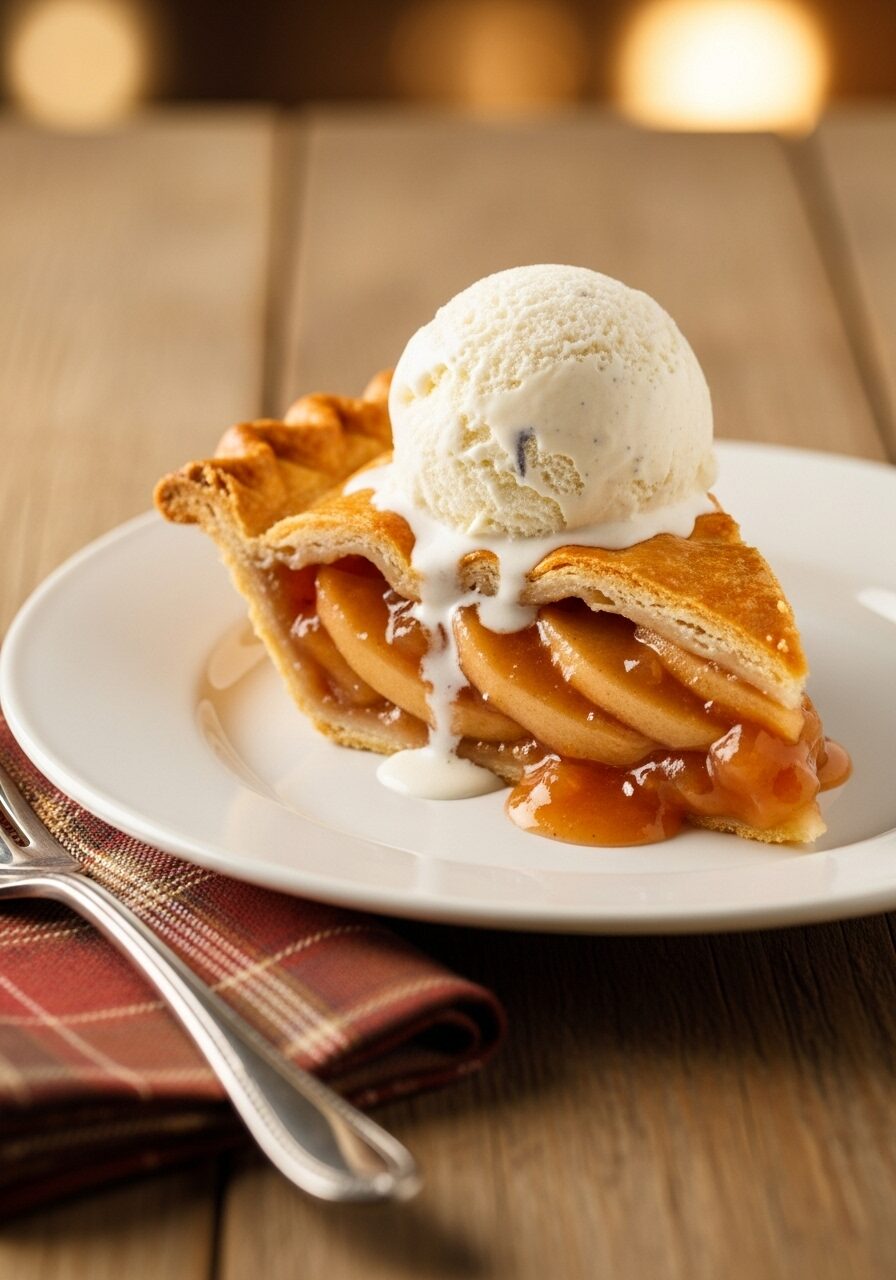
The Ultimate Classic Apple Pie (From Scratch!)
Imagine a buttery, impossibly flaky crust that shatters with the touch of a fork, revealing a warm, saucy filling of perfectly tender, spiced apples. That, my friends, is the soul-warming perfection of a truly classic, from-scratch apple pie, and today, we’re making the most foolproof and delicious version you can imagine. Here’s the thing about…
Imagine a buttery, impossibly flaky crust that shatters with the touch of a fork, revealing a warm, saucy filling of perfectly tender, spiced apples. That, my friends, is the soul-warming perfection of a truly classic, from-scratch apple pie, and today, we’re making the most foolproof and delicious version you can imagine.
Here’s the thing about homemade pie: the crust can be intimidating. I used to think a perfect, flaky, all-butter crust was something only grandmothers and professional bakers could achieve. But I’ve learned that it’s not about secret, unattainable skills; it’s about temperature and technique. This recipe is my guide to demystifying the process, breaking it down into simple, manageable steps that guarantee a tender, flaky crust every single time.
I promise you, there is no greater baking accomplishment than pulling a beautiful, golden-brown apple pie from your oven, with the sweet, cinnamon-spiced filling bubbling up through the vents. This is more than just a dessert; it’s a centerpiece, a conversation starter, and the taste of pure, unadulterated comfort. It’s the perfect crowd-pleasing dessert for any holiday, gathering, or cozy Sunday afternoon.
Get ready to master this timeless American classic and create a stunning, professional-looking pie that will become your new signature dessert.

Why This Is the Only Apple Pie Recipe You’ll Ever Need!
You are going to be so proud of this pie, from the flaky crust to the perfect filling. It’s a true labor of love that is worth every step. Here’s why this recipe is a keeper:
- A Foolproof, All-Butter Crust: This guide breaks down the steps for a perfectly flaky, buttery, and tender pie crust that is surprisingly easy to make from scratch.
- The Perfect Saucy Filling: The combination of sugars, spices, and a touch of cornstarch creates a luscious, saucy apple filling that isn’t watery or overly sweet—it’s just right.
- Completely From Scratch: Say goodbye to store-bought crusts and canned fillings. The flavor of a truly homemade pie is a world apart and a true baking triumph.
- A Crowd-Pleasing Classic: The nostalgic, comforting flavors of a classic apple pie are universally loved. It’s the perfect dessert for Thanksgiving, Christmas, or any special occasion.
- Stunningly Beautiful Results: Whether you opt for a simple top crust or a beautiful lattice, this recipe provides the foundation for a pie that looks as incredible as it tastes.
Recipe Snapshot
| Prep Time | 25 minutes |
| Cook Time | 55 minutes |
| Total Time | 1 hour 20 minutes |
| Servings | 8 servings |
| Calories | 484 kcal per serving |
| Course | Dessert |
| Cuisine | American |
| Difficulty/Method | Intermediate / Baking |
Your Shopping List for a Perfect Apple Pie
This recipe uses simple, classic ingredients to create a truly spectacular dessert.
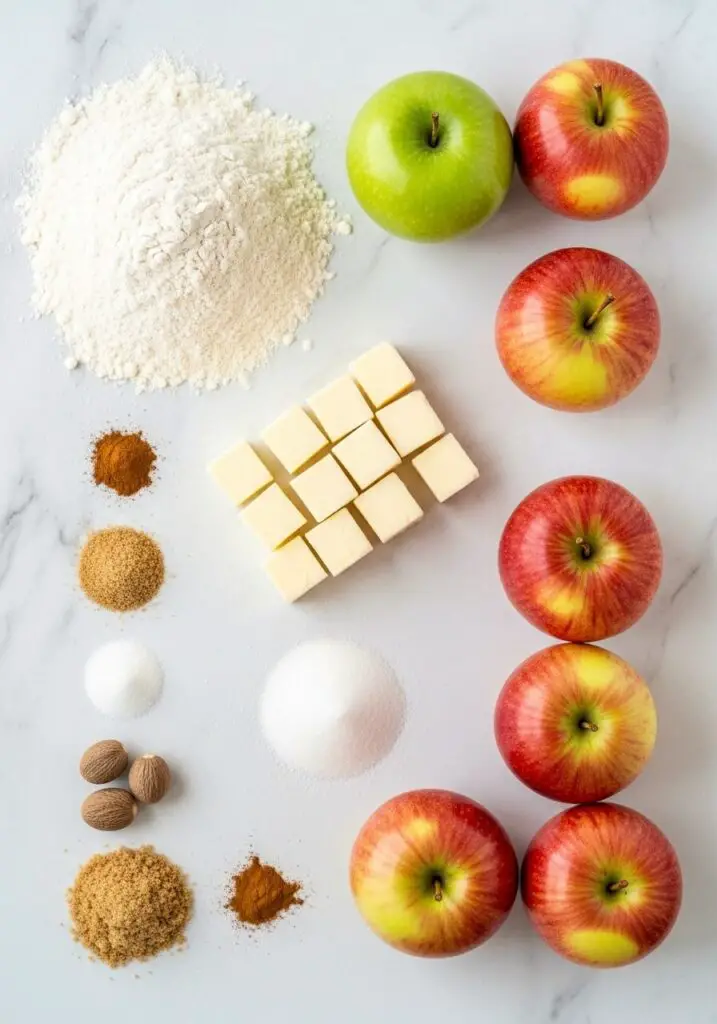
→ For the Buttery, Flaky Pie Crust
- 2 ½ cups all-purpose flour → The structural backbone of our crust.
- 1/2 teaspoon salt → To enhance the flavor of the butter.
- 1 cup (2 sticks) unsalted butter → It MUST be cold, cold, cold, and cubed. This is the secret to flakiness!
- 8-12 tablespoons ice-cold water → Keeping the water ice-cold prevents the butter from melting.
→ For the Saucy Apple Filling
- 4 large apples → Peeled and sliced 1/4″ thick. Use a mix of firm-tart and firm-sweet apples like Granny Smith and Honeycrisp.
- 1 teaspoon vanilla extract → Adds a lovely warmth and depth.
- 1/3 cup white sugar → For clean, bright sweetness.
- 1/3 cup brown sugar → Adds a wonderful caramel note.
- 3 tablespoons flour → Helps to thicken the juices.
- 1 teaspoon cornstarch → The secret weapon to prevent a watery filling!
- 1 teaspoon cinnamon → The classic, quintessential apple pie spice.
- 1/4 teaspoon nutmeg → Adds a warm, festive complexity.
- 1/4 teaspoon salt → Balances all the sweetness.
→ For the Golden Egg Wash
- 1 egg → For a beautiful, shiny, golden-brown finish.
- 1 tablespoon water → To thin the egg for easy brushing.
Let’s Bake! Your Step-by-Step Pie Guide
Ready to create a masterpiece? Read through the steps, keep your ingredients cold, and let’s bake a pie!
Part 1: The All-Butter Pie Crust
- Combine Dry Ingredients: In the bowl of a food processor, add the flour and salt and give it a quick pulse to combine.
- Cut in the Butter: Add your cold, cubed butter to the flour. Pulse 8-10 times, just until the butter is broken down into coarse, pea-sized pieces. Do not overmix!
- Add Ice Water: Sprinkle 8 tablespoons of the ice-cold water over the mixture. Pulse a few more times until the dough just begins to clump together. If it seems too dry, add more water, 1 tablespoon at a time.
- Form and Chill: Turn the dough out onto a lightly floured surface. Divide it in half and gently form each half into a ball, then flatten into a 1-inch thick disk. Wrap each disk tightly in plastic wrap and chill in the refrigerator for at least 30 minutes.
Part 2: The Perfect Apple Filling
- Mix and Macerate: In a large bowl, combine the peeled and sliced apples with all the other filling ingredients: vanilla, sugars, flour, cornstarch, spices, and salt. Toss gently until the apples are evenly coated. Set the bowl aside to allow the apples to release some of their juices while you roll out the crust.
Part 3: Assemble Your Masterpiece
- Preheat Oven: Preheat your oven to 425°F (220°C).
- Roll the Bottom Crust: On a floured surface, roll out one disk of chilled dough into a circle that’s about 12 inches in diameter. Carefully transfer it to your 9-inch pie plate. Gently press it into the bottom and sides, and trim any excess dough from the edges.
- Add the Filling: Pour the apple filling into the prepared pie crust, mounding it slightly in the center.
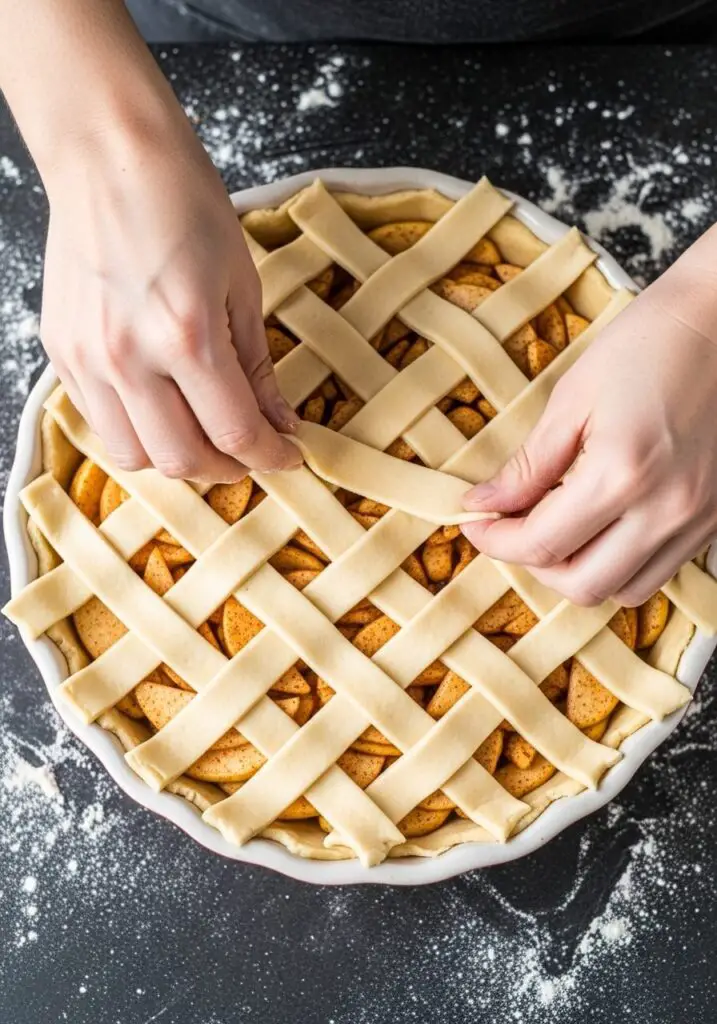
- Create the Top Crust: Roll out the second disk of dough. You can either place it over the pie as a solid top (cutting a few slits for steam to escape) or cut it into strips to create a lattice top. Trim any excess dough.
- Seal the Edges: Press the edges of the top and bottom crusts together to seal. You can create a decorative, crimped edge with your fingers or press down with the tines of a fork.
- Final Chill: Pop the assembled pie in the fridge for about 10-15 minutes to ensure the crust is firm and cold before baking.
Part 4: Bake to Golden Perfection
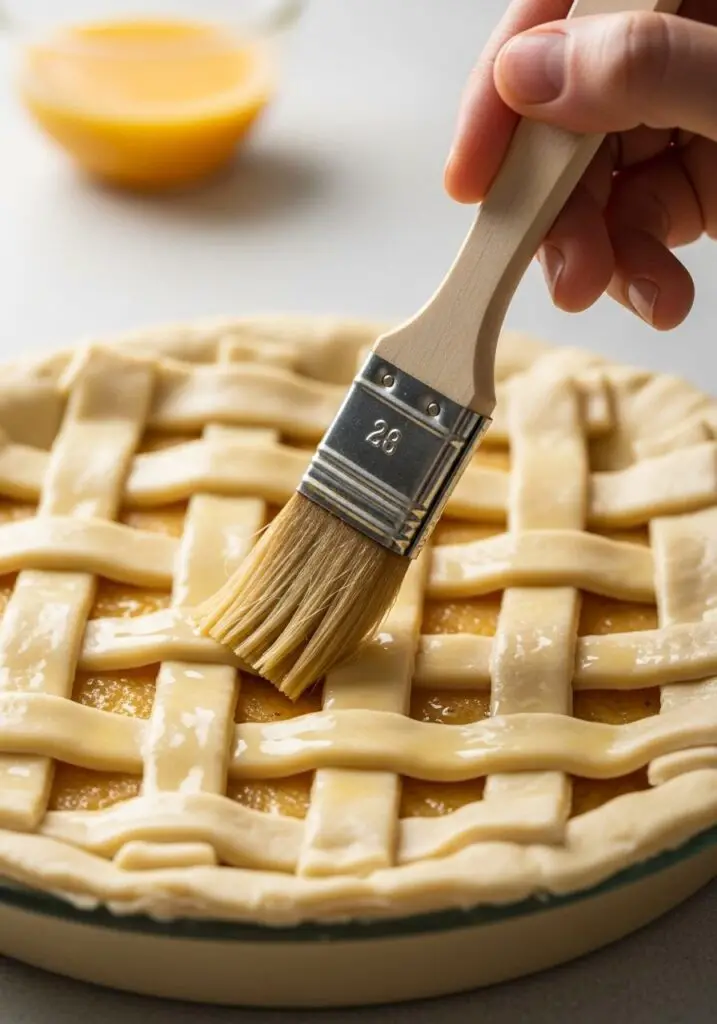
- Add Egg Wash: In a small bowl, whisk the egg and water together. Remove the pie from the fridge and brush the top crust evenly with the egg wash. This will give it a beautiful shine and color.
- Bake!: Place the pie on a baking sheet (to catch any drips) and bake at 425°F for 15 minutes. Then, reduce the oven temperature to 350°F (175°C) and continue to bake for another 40-50 minutes.
- Check for Doneness: The pie is done when the crust is a deep golden brown and the filling is thick and bubbling. If the edges of the crust are browning too quickly, you can tent them loosely with foil.
- Cool Completely!: This is a crucial step! Let the pie cool on a wire rack for at least 2-3 hours before slicing. This allows the saucy filling to set up properly.
WiseRecipes’ Top Tips for Apple Pie Mastery
These are the golden rules for a perfect from-scratch apple pie. Follow them, and you can’t go wrong.
- Keep EVERYTHING Cold. Your butter, your water, and your dough must stay as cold as possible. This is the number one secret to a flaky crust. Cold butter creates steam pockets when it bakes, which is what separates the dough into flaky layers.
- Don’t Overwork the Dough. When you’re mixing the crust, stop as soon as it comes together. Overworking the dough develops the gluten, which will make your crust tough instead of tender and flaky.
- Use a Mix of Apples. For the best flavor and texture, use a combination of apples. A firm-tart apple like Granny Smith provides structure and tang, while a firm-sweet apple like Honeycrisp or Braeburn adds sweetness and breaks down a bit to create a nice sauce.
- Let the Pie Cool Completely. I know it is torture to wait, but slicing into a hot pie is a recipe for a soupy mess. Letting the pie cool for several hours allows the filling to thicken and set, so you get clean, beautiful slices.
- Use a Pie Shield or Foil. The thin edges of the pie crust will always bake faster than the center. To prevent them from burning, cover the edges with a pie shield or strips of aluminum foil for the last half of the baking time.
Keep It Fresh! Storing Your Classic Apple Pie
Here’s how to store your beautiful creation to enjoy every last slice.
- Room Temperature: A baked apple pie can be stored, lightly covered, at room temperature for up to 2 days.
- Refrigerator: After 2 days, you should move the pie to the refrigerator, where it will last for another 2-3 days.
- Reheating: To re-crisp the crust, you can gently warm individual slices in a 350°F oven for about 10-15 minutes.
Classic Apple Pie From Scratch
Ingredients
Method
- To make the filling, add all of the filling ingredients to a large bowl and toss together to coat the apples evenly. Set aside.
- Preheat oven to 425°F. To make the crust, add flour and salt to a food processor. Add the cold, cubed butter and pulse until the mixture resembles coarse meal with pea-sized bits of butter.
- Add 8 tablespoons of ice cold water and pulse a few times until the dough begins to clump together. If it is too dry, add more water, 1 tablespoon at a time, and pulse.
- Turn the dough out onto a floured surface, divide in half, and form each half into a flattened disk. Wrap in plastic wrap and chill for at least 30 minutes.
- On a floured surface, roll the first disk out to be slightly larger than your 9-inch pie dish. Carefully transfer it to the pie plate and trim any excess dough.
- Fill the pie crust with the apple filling. Roll out the second pie crust.
- Place the second pie crust over the filling (either as a solid top with slits cut in it, or as a lattice). Trim the excess dough and press the edges down to seal the pie, crimping as desired.
- Place the assembled pie in the fridge for 10-15 minutes to chill the crust.
- Meanwhile, mix the egg with water to create an egg wash. Remove the pie from the fridge and brush the top crust with the egg wash.
- Bake the pie on a baking sheet for 15 minutes at 425°F, then reduce the oven temperature to 350°F. Bake for an additional 40-50 minutes, or until the crust is golden brown and the filling is bubbling. Tent with foil if the crust browns too quickly.
- Remove the pie and let it cool on a wire rack for at least 2-3 hours before slicing to allow the filling to set.
Notes
FAQs: Your Apple Pie Questions, Answered!
What are the best apples for apple pie?
The best pies use a mix! You want apples that hold their shape and don’t turn to mush. Excellent choices include Granny Smith, Honeycrisp, Braeburn, Golden Delicious, and Jonagold. Using at least two different varieties will give your pie the best flavor and texture.
Why was my pie filling watery?
A watery filling is usually caused by not having enough thickener or not letting the pie cool completely before slicing. This recipe uses both flour and cornstarch to create a thick, stable, saucy filling that should set up beautifully as long as you let it cool for at least 2-3 hours.
Can I make the pie dough in advance?
Absolutely! Pie dough is perfect for making ahead. You can store the wrapped dough disks in the refrigerator for up to 3 days or in the freezer for up to 3 months. Just thaw it in the fridge overnight before you plan to roll it out.
Can I use a store-bought pie crust?
You certainly can if you’re short on time. However, the flavor and texture of this all-butter, from-scratch crust is truly special and a huge part of what makes this pie so memorable. I highly encourage you to give it a try!
Final Thoughts: Your Sweetest Baking Triumph
There is no feeling quite like slicing into a perfect, homemade apple pie that you created from scratch. It’s a true labor of love, and this classic recipe is one of the most rewarding bakes you’ll ever undertake. I hope this guide gives you the confidence to create a stunning and delicious pie that will be the star of your table. Happy baking!