The Ultimate Tarte Tatin (A Stunning French Classic, Made Easy!)
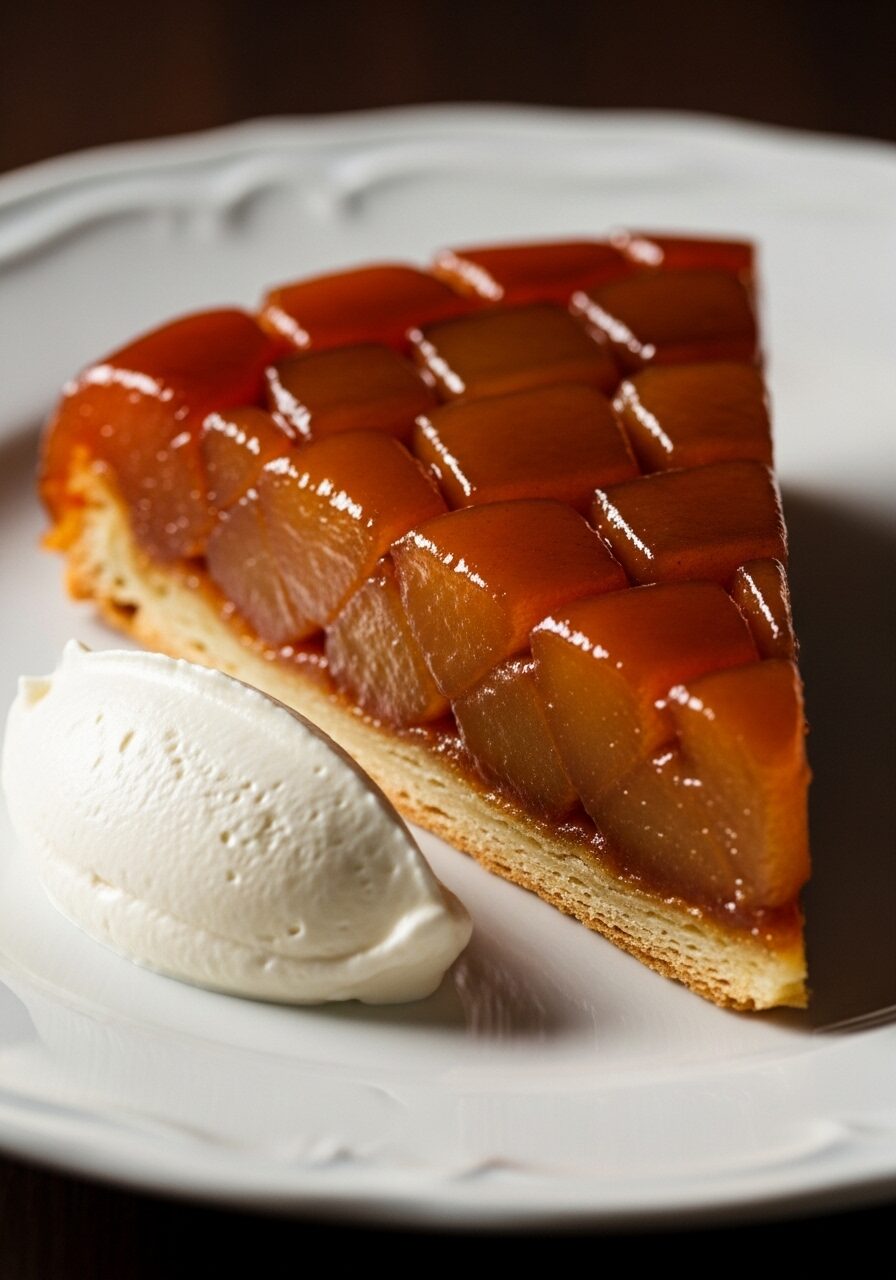
Imagine the dramatic moment of flipping a warm skillet to reveal a glistening, jewel-toned tapestry of perfectly caramelized apples, all sitting atop a shatteringly crisp, all-butter puff pastry crust. That, my friends, is not just a dessert; it is the magic and theater of a true Tarte Tatin, and it is the most impressive thing…
Imagine the dramatic moment of flipping a warm skillet to reveal a glistening, jewel-toned tapestry of perfectly caramelized apples, all sitting atop a shatteringly crisp, all-butter puff pastry crust. That, my friends, is not just a dessert; it is the magic and theater of a true Tarte Tatin, and it is the most impressive thing you will bake all year.
For years, Tarte Tatin was on my “too scared to try” list. It felt like a secret held only by French patisserie chefs, full of potential caramel disasters and the terrifying final flip. But then I discovered the truth: the secret isn’t some impossible technique; it’s a series of simple, clever steps—and a beautiful sheet of store-bought puff pastry—that lead to a spectacular result every single time.
I promise you, this recipe demystifies the legend. It’s your foolproof guide to creating that deep, amber caramel and those perfectly tender apples, all crowned with a flaky, buttery crust. This is the show-stopping dessert for your Thanksgiving or holiday table, a true centerpiece that tastes even more incredible than it looks.
Get ready to master the art of the perfect caramel and the dramatic flip, and create a legendary dessert that will leave your guests in absolute awe.

Why This Tarte Tatin is an Absolute Masterpiece!
You are going to be so incredibly proud when you serve this. It is a true baking accomplishment that is secretly so achievable! Here’s why it’s so special:
- The Ultimate “Wow” Factor: The final “flip” and reveal of the perfectly arranged, caramelized apples is one of the most dramatic and satisfying moments in all of baking.
- Incredible Depth of Flavor: The from-scratch caramel is deeply flavorful, the apples are tender and sweet-tart, and the flaky, buttery puff pastry is the perfect savory contrast.
- A Brilliant Puff Pastry Shortcut: We’re using high-quality, store-bought puff pastry, which gives you that shatteringly crisp, multi-layered result with none of the traditional effort.
- A Unique Apple Technique: The clever step of blanching the apples ensures they soften just enough to pack tightly into the pan, creating that beautiful, seamless mosaic of fruit.
- The Perfect Thanksgiving Dessert: This tart is a stunning, elegant, and unforgettable finale to any holiday meal.
Recipe Snapshot
| Prep Time | 25 minutes |
| Cook Time | 55 minutes |
| Cooling Time | 1 hour 20 minutes |
| Total Time | 2 hours 40 minutes |
| Servings | 6-8 servings |
| Calories | 555 kcal per serving |
| Course | Dessert |
| Cuisine | French |
| Difficulty/Method | Intermediate / Baking |
Your Shopping List for This French Classic
This recipe uses simple, high-quality ingredients to create its signature show-stopping flavor. Let’s get everything in order.
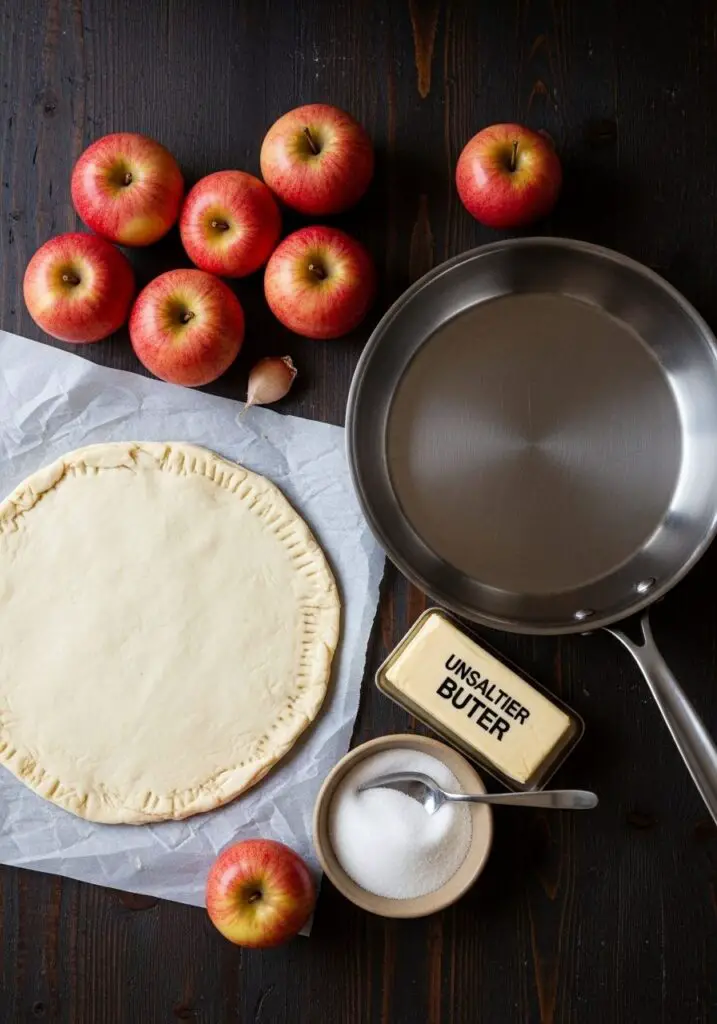
→ For the Pastry & Apples
- 1 (14-ounce) package thawed puff pastry → The brilliant shortcut! Use an all-butter version if you can find it for the absolute best flavor.
- 8 medium-large Pink Lady or Granny Smith apples → The key is a firm, crisp apple that holds its shape when cooked.
- 3 teaspoons apple cider vinegar, divided → For balancing the sweetness in the apples and the caramel.
→ For the Caramel
- 1 cup granulated sugar → The foundation of our beautiful amber caramel.
- 8 tablespoons (1 stick) unsalted butter, cubed → For a rich, buttery, and smooth caramel sauce.
- 1 teaspoon vanilla extract → For a final touch of warmth and aroma.
- Flaky sea salt, for garnish → The perfect salty finish to the sweet caramel.
- Crème fraîche or whipped cream, for serving → Optional, but highly recommended!
Let’s Bake! Crafting Your Tarte Tatin
Ready to feel like a true pastry chef? This process is all about technique, and it’s so much fun to master.
Part 1: Prep the Pastry & Apples
- Prep Your Oven and Pastry: Place a rimmed baking sheet on the lower-middle oven rack (this will catch any potential drips!) and preheat to 400°F (205°C). On a floured surface, roll your thawed puff pastry into an 11-inch circle. Prick the dough all over with a fork, place it on a piece of parchment, and pop it in the fridge to stay cold.
- The Apple Soak: Peel, core, and quarter your apples. Toss them in a large bowl with 1 1/2 teaspoons of the apple cider vinegar. Now for the clever trick: pour boiling water over the apples, cover the bowl, and let them sit for 10 minutes. This softens them just enough to pack them tightly later. Drain them well and let them cool on a wire rack.
Part 2: The Magic Caramel & Assembly
- Make the Caramel: In a 10-inch, oven-safe, stainless-steel skillet over medium heat, melt half the sugar until it becomes an amber-colored liquid. Add the remaining sugar and stir with a silicone spatula until it’s all dissolved and a beautiful, uniform amber color.
- Finish the Sauce: Whisk in the cubed butter (it will spit and bubble dramatically!), the vanilla, and the remaining 1 1/2 teaspoons of vinegar. Keep whisking constantly for about 3 minutes until the caramel is smooth, slightly thickened, and a beautiful butterscotch color. Don’t worry if it looks like it’s seizing up at first—just keep whisking!
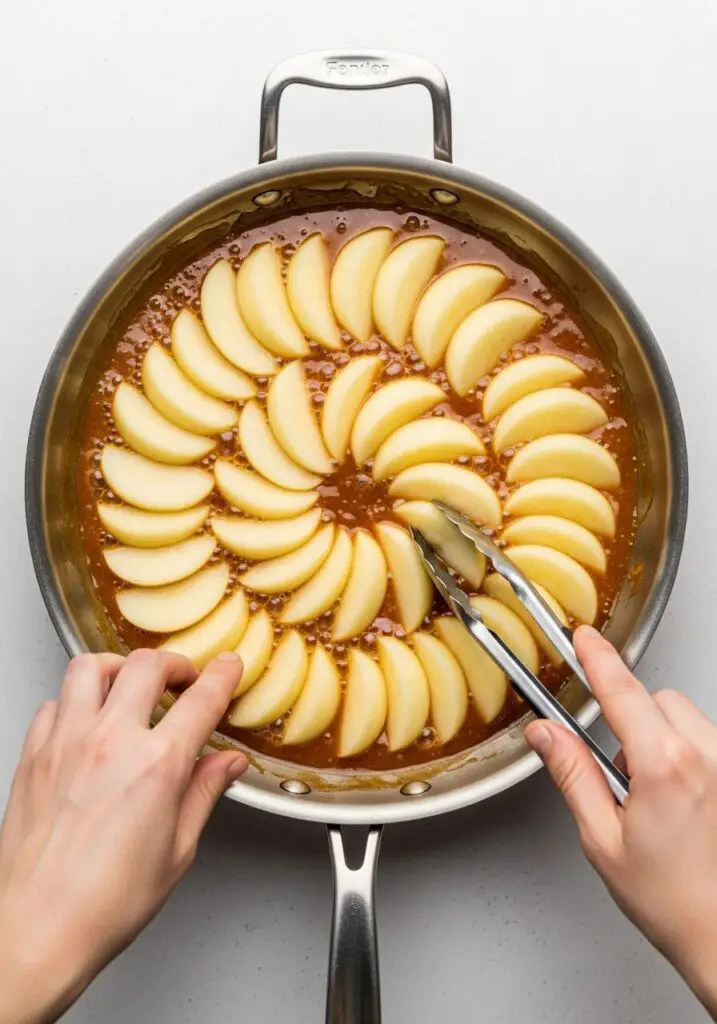
- Arrange the Apples: Remove the pan from the heat. Using tongs, carefully arrange the apple quarters, rounded-side down, in a tight ring around the edge of the skillet, making sure to coat each one in the caramel. Create a second ring of apples on top of the first, nestling them into the gaps. Fill the center hole with the remaining apple quarters.

Part 3: The Bake and the Grand Finale Flip!
- Simmer and Top: Return the pan to medium heat and bring the caramel to a simmer. Reduce the heat to low and cook for 5 minutes, until the apples are just beginning to get tender. Remove the chilled puff pastry from the fridge and lay it over the apples. Quickly tuck the edges of the pastry down around the fruit.
- Bake to Golden Perfection: Transfer the skillet to the oven and bake for 20 to 25 minutes, until the pastry is deeply golden brown, puffed, and the caramel is bubbling furiously around the edges.
- The Crucial Cool-Down (and the Flip!): Let the tart cool in the pan for about an hour, until it’s still warm but not scorching hot. This is critical! If it’s too hot, it’s liquid lava; if it’s too cold, the caramel will harden and stick. Place a large serving platter over the skillet. Take a deep breath, and in one quick, confident motion, flip the entire thing over. Lift the skillet away to reveal your masterpiece.
- Garnish and Serve: Sprinkle with flaky sea salt and serve warm with a dollop of crème fraîche or vanilla ice cream.
WiseRecipes’ Top Tips for a Perfect Tarte Tatin
This is a technique-driven dessert. These secrets will help you nail it.
- Use a Stainless-Steel Skillet. Do not use a cast-iron skillet for this! The dark color of cast iron makes it impossible to judge the color of your caramel, which is the most important visual cue. A light-colored, oven-safe skillet is your best friend here.
- The Apple Soak is a Game-Changer. That 10-minute soak in hot water is a brilliant professional trick. It makes the apple quarters slightly more pliable, allowing you to pack them into the skillet incredibly tightly, which is the key to that beautiful, seamless, mosaic-like top.
- Don’t Fear the Caramel. When you add the butter, the caramel will bubble and spit and look like it’s seizing. This is normal! Just keep your heat on medium and keep whisking confidently. It will all smooth out into a beautiful, luscious sauce.
- The Flip Window is Key. The timing of the flip is the most crucial step. It must be done when the pan is still quite warm, but cool enough to handle safely. This ensures the caramel is liquid enough to release the tart cleanly.
- Tuck That Pastry! When you place the puff pastry on top, take a moment to really tuck the edges down snugly between the apples and the side of the skillet. This creates a beautiful, contained edge when you flip it.
Creative Twists: Delicious Ways to Customize Your Tarte
This classic French tart is a wonderful canvas for your own creativity!
- Use Pears Instead: Firm Bosc or Anjou pears are the classic and most delicious substitute for apples.
- Add a Star Anise: Add one or two whole star anise to the caramel as it cooks for a beautiful, warm, licorice-like aroma. Just remember to remove them before serving!
- A Splash of Calvados: For a truly authentic French flavor, add a splash of Calvados (apple brandy) to the caramel along with the butter.
- Add a Savory Note: A few sprigs of fresh thyme added with the butter would be a wonderful, savory counterpoint to the sweet caramel.
- Use a Different Pastry: While puff pastry is a fantastic shortcut, you can absolutely use a traditional, homemade Pâte Brisée for a more classic, shortbread-like crust.
- Add a Pinch of Spice: Whisk a 1/4 teaspoon of ground cinnamon or cardamom into the sugar before making the caramel.
- Make Individual Tartes: You can make stunning individual desserts using small, oven-safe skillets or ramekins.
- Top with Nuts: Sprinkle some toasted, chopped walnuts or pecans over the top after flipping.
Keep It Fresh! Storing Your Tarte Tatin
Tarte Tatin is a dessert that is truly at its peak the day it is made. Here’s how to handle any leftovers.
- Room Temperature is Best: The finished tart is best stored, loosely covered, at room temperature for up to 1 day. Refrigerating it can make the caramel weep and the pastry soggy.
- Reheating: To revive the crispness of the pastry, gently reheat individual slices in a 325°F (160ºC) oven for about 5-10 minutes, until just warmed through. Avoid the microwave at all costs, as it will make the pastry soft and chewy.
Classic Apple Tarte Tatin
Ingredients
Method
- Preheat oven to 400°F (205°C) with a rimmed baking sheet on the lower-middle rack. Roll puff pastry into an 11-inch circle, dock with a fork, and refrigerate on parchment paper.
- Toss the peeled, cored, and quartered apples with 1 1/2 teaspoons apple cider vinegar. Pour boiling water over them, cover, and let stand for 10 minutes. Drain well and let cool.
- In a 10-inch oven-safe, stainless-steel skillet over medium heat, melt 1/2 cup of sugar until amber. Stir in the remaining 1/2 cup of sugar until dissolved and amber.
- Whisk in the butter, vanilla, and remaining 1 1/2 teaspoons vinegar. Keep whisking until the caramel is smooth and a butterscotch color, about 3 minutes.
- Remove from heat. Arrange the apple quarters, rounded-side down, in tight, concentric circles in the caramel. Return pan to low heat and simmer for 5 minutes.
- Top the apples with the chilled puff pastry, tucking the edges down around the fruit.
- Transfer the skillet to the oven and bake for 20 to 25 minutes, until the pastry is golden and the caramel is bubbling.
- Let the tart cool in the pan for 1 to 2 hours, until still warm but not hot. Place a large platter over the skillet and, in one quick motion, flip the tart over. Sprinkle with flaky salt and serve.
Notes
FAQs: Your Tarte Tatin Questions, Answered!
Why can’t I use my beloved cast-iron skillet for this?
I know, it feels counterintuitive! The reason is purely visual. Making caramel is all about judging the color, from light gold to deep amber. The black surface of a cast-iron skillet makes it impossible to see what’s happening, which makes it very easy to accidentally burn your caramel. A light-colored stainless-steel or copper skillet is essential for this recipe.
Do I have to peel the apples?
Yes, for the classic Tarte Tatin, peeling the apples is a must. The peels would create a tough, unpleasant texture and would prevent the apples from melding together into that beautiful, seamless top after you flip the tart.
My caramel crystallized and got hard! What happened?
Crystallization can happen if there are impurities in the sugar or if it’s agitated too much at the wrong time. The method in this recipe—melting half the sugar first to create a liquid base before stirring in the rest—is designed to prevent this. If it does happen, you can often save it by adding a tablespoon of water and gently heating and stirring until the crystals dissolve.
I’m scared of the flip! Any more tips?
Confidence is key! Use a platter that is significantly larger than your skillet. Wear oven mitts on both hands. Place the platter firmly on top of the skillet, hold them together tightly, and do it in one quick, fluid motion over the sink, just in case any hot caramel drips. You’ve got this!
My Final Thoughts: A Dessert Worth the Drama
The Tarte Tatin is more than just a dessert; it’s a bit of kitchen theater that ends with a spectacular, delicious finale. It’s a beautiful, impressive, and deeply satisfying recipe that proves that with a few clever techniques, you can create true French patisserie magic in your own home. I hope you have an absolute blast making (and flipping!) this incredible tart!