Classic Cherry Delight
The first time I made Classic Cherry Delight I can still remember the warm, buttery scent that filled my kitchen the first time I made Classic Cherry Delight for a small Fourth of July get together. It was one of those recipes that felt both indulgent and effortless, the kind you bring when you want…
The first time I made Classic Cherry Delight
I can still remember the warm, buttery scent that filled my kitchen the first time I made Classic Cherry Delight for a small Fourth of July get together. It was one of those recipes that felt both indulgent and effortless, the kind you bring when you want to impress without spending the whole day in the kitchen. If you like simple no bake desserts that lift a summer table, this is in the same family as some light cakes I love, like 3-Ingredient Creamy Yogurt Cake. The contrast of a crisp, toasty base and a fluffy, sweet filling topped with glossy cherries is what keeps me coming back.
The secret behind the crust
For the CRUST I melt 7 tablespoons unsalted butter and mix it with 1 1/2 cups graham cracker crumbs (about 9 whole crackers) and 3 tablespoons granulated sugar until it smells like a tiny slice of summer. Pressing that mixture into a pie plate or a springform pan gives you a base that is both sturdy and delicate, toasted with a warm, breadcrumbs aroma. I press it down firmly with the bottom of a measuring cup so the crust holds together when you slice it. If you press too lightly the filling wants to slide; press too hard and the texture becomes bricklike, so firm but even pressure is a small trick I learned from trial and error.
Once the crust is even, I pop it in the fridge for at least 15 minutes so it sets while I assemble the filling. Chilling the crust briefly helps it keep shape against the soft center, and it saves time because the rest of this dessert is fast.
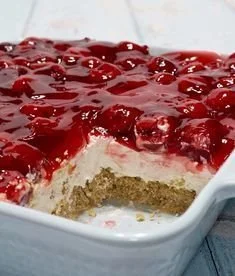
Building the filling and getting the texture just right
For the FILLING I start with 8 ounces cream cheese, softened, because a little patience at room temperature makes the whole step effortless. I beat that until smooth, then add 1 cup powdered sugar and 1 teaspoon pure vanilla extract. When those are combined the mixture is silkier, with a faint tang that balances the sweetness to come. The final cloud-like lift comes from 1 container cool whip, 8 ounces, which I fold gently into the sweetened cream cheese so it stays airy. If you whisk too aggressively you lose that pillowy texture, so I fold with a spatula using slow, sweeping motions until there are no streaks of cream cheese left.
A little tip I often share is to make sure your cream cheese is truly soft. If it resists, microwave it for 5 to 8 seconds; you want it pliable, not melted. Another trick is to sift the powdered sugar to avoid any lumps and to keep the texture ultra-smooth. When the filling is ready, spread it evenly over the chilled crust and smooth the top with a spoon. I watch the surface catch the light; when it looks even and holds its shape, I know it is ready for the final flourish: topping with the cherries.
The best part about the cherry topping and serving
The finishing touch is 1 can cherry pie filling, 21 ounces, spooned generously over the top so it makes a jewel-like layer of ruby red. The cherries glisten and the syrup pools just a touch in the nooks of the filling. When I spoon on the cherries, I leave a little of the glossy syrup to spill over for that dramatic, picture-friendly look. This is also the moment I tell friends to listen for the minor sound the cherries make as they tap against the custard-like filling; it is a small, satisfying sound that means layers are setting into place.
I usually let the assembled dessert chill for at least two hours, though overnight is even better because the filling firms and the flavors marry. You will know it is done when the filling has a slight spring to the touch and the cherries are not sinking into the cream. The crust should still feel set when you run a knife around the edge. I like to serve it with a cup of strong coffee or, on warmer days, a scoop of vanilla ice cream that melts into the cherries just a touch. For brunch, it pairs nicely with savory pastries; once I even put out a tray with an Apple Goat Cheese Croissant Sandwich and people loved the sweet-salty contrast.
A few things I’ve learned while making this
Over the years I have discovered small habits that make this recipe feel foolproof. One is to always use full-fat cream cheese for the best mouthfeel. Another is to press the crust when it is still warm from melting the butter; it molds better. If you want to make this ahead, assemble the crust and filling the day before, top with cherries only a few hours before serving so the topping stays bright and glossy. When I bring leftovers to work, I cover the dish tightly and refrigerate it; it keeps well for up to three days and honestly tastes better on day two when the flavors have had time to settle.
If you are wondering about variations, this dessert is forgiving. Try swapping the cherry topping for fresh berries mixed with a little sugar and lemon juice for a lighter, fresher take. A second option is to fold in some finely grated lemon zest into the cream cheese before adding the Cool Whip to cut through the sweetness. For a chocolate lover, sprinkle a handful of shaved chocolate on the crust before adding the filling. Once, when cherries were scarce, I used a quick blueberry compote and people asked for the recipe like it was a secret.
When things do not go as planned
There are a couple of common missteps and how I handle them. If the filling seems too loose, a short chill in the freezer — no more than 20 minutes — firms things without freezing the cream. If the crust falls apart, press the crumbs again into a new pan and let them rest longer in the fridge before filling. When the cherries bleed into the filling, it is usually because they were too warm or the filling was not chilled; next time I cool the cherries slightly and wait until the filling is nicely set.
I remember once serving this at a neighborhood potluck and a friend asked how I managed to make it look so simple and elegant. I told her it was mostly about using quality canned pie filling and not overworking the filling. The bright color and glossy shine of the cherries do half the work for presentation.
Conclusion
If you want to see a version very close to how I learned it and to compare notes, this Classic Cherry Delight – My Country Table write up is a cozy companion to what I do in my kitchen.
Classic Cherry Delight
Ingredients
Method
- Melt the unsalted butter and mix it with graham cracker crumbs and granulated sugar until combined.
- Press the mixture firmly into a pie plate or springform pan using the bottom of a measuring cup.
- Refrigerate the crust for at least 15 minutes to set.
- Beat softened cream cheese until smooth.
- Add powdered sugar and vanilla extract, mixing until well combined.
- Fold in the cool whip gently until no streaks remain.
- Spread the filling evenly over the chilled crust.
- Top the filling with cherry pie filling, allowing some syrup to spill over.
- Chill the assembled dessert for at least 2 hours, preferably overnight.