The Ultimate Classic Deviled Eggs (So Easy & Creamy!)
Imagine the perfect deviled egg. Not just a good one, but the perfect one. The egg white is tender, and the filling is impossibly creamy, ridiculously smooth, with the perfect tangy, savory flavor, all finished with a classic, smoky sprinkle of paprika. This, my friends, is that deviled egg. It is a timeless, nostalgic, and…
Imagine the perfect deviled egg. Not just a good one, but the perfect one. The egg white is tender, and the filling is impossibly creamy, ridiculously smooth, with the perfect tangy, savory flavor, all finished with a classic, smoky sprinkle of paprika. This, my friends, is that deviled egg. It is a timeless, nostalgic, and absolutely perfect bite of food.
Here’s the thing about deviled eggs: everyone thinks their family recipe is the best, and I was no different. But I was on a mission to move beyond just “good enough” and create a recipe that was truly foolproof and spectacular every single time. The secret, I discovered, isn’t some wild ingredient; it’s all about the perfect balance of a few simple, high-quality components and one little technique for the creamiest filling imaginable.
I promise you, this is the last deviled egg recipe you will ever need. It’s a masterclass in simple perfection, from how to cook the eggs so they peel like a dream to getting that lusciously smooth yolk mixture. They are the undisputed king of party appetizers for a reason.
Get ready to master a timeless classic that will have everyone at the party asking, “Seriously, what is your secret?”

Why This Is the Only Deviled Egg Recipe You’ll Ever Need!
You are going to be so proud of the beautiful, delicious platter of deviled eggs you create. This recipe is a classic for a reason! Here’s why it’s a total winner:
- Unbelievably Creamy Filling: We have a secret weapon technique that guarantees an ultra-smooth, silky, and completely lump-free yolk mixture every single time.
- Perfectly Balanced Flavor: This isn’t just mayo and mustard. The combination of creamy mayonnaise, tangy Dijon, and a splash of vinegar creates a perfectly balanced, sophisticated flavor.
- A Foolproof Method for Perfect Eggs: I’m sharing my never-fail method for hard-boiling eggs that are cooked perfectly and peel like a dream.
- The Ultimate Make-Ahead Appetizer: You can prep all the components a day in advance, making party day assembly an absolute breeze.
- A Timeless, Crowd-Pleasing Classic: There is no party, potluck, or holiday gathering where a platter of perfect deviled eggs isn’t the first thing to disappear. It’s a guaranteed hit!
Recipe Snapshot
| Prep Time | 20 minutes |
| Cook Time | 14 minutes |
| Total Time | 34 minutes |
| Servings | 12 deviled eggs |
| Calories | 125 kcal per 2 halves |
| Course | Appetizer |
| Cuisine | American |
| Difficulty/Method | Easy / Stovetop |
Your Shopping List for a Perfect Platter
The beauty of this classic recipe is its incredibly simple ingredient list. Quality is key!
- 6 large eggs → The star of the show!
- 3 tablespoons mayonnaise → Use a good quality, full-fat mayo for the best, creamiest result.
- 1 teaspoon Dijon mustard → My secret for a more complex, less harsh tang than yellow mustard.
- 1 teaspoon apple cider vinegar → Adds the perfect bright, acidic note to cut through the richness.
- Salt and pepper, to taste → To bring all the flavors into perfect harmony.
- Paprika, for garnish → The classic, beautiful finishing touch.
Let’s Get Cooking! Your Guide to the Perfect Deviled Egg
Ready to make the best deviled eggs of your life? The process is simple, and the results are spectacular.
Part 1: The Perfect Hard-Boiled Eggs
- Boil the Eggs: Bring a pot of water to a rolling boil. Reduce the heat so the water stops bubbling, and then carefully lower your eggs into the water. Turn the heat back up to high and cook for exactly 14 minutes.
- The Crucial Ice Bath: While the eggs are boiling, prepare a large bowl of ice water. As soon as the 14 minutes are up, use a slotted spoon to immediately transfer the hot eggs into the ice bath. Let them cool completely, about 10-15 minutes. This step is the secret to easy peeling!
Part 2: The Creamy Yolk Filling & Assembly
- Prep the Eggs: Once the eggs are completely cool, gently tap and peel them. Slice each egg in half lengthwise. Gently pop out the yolks into a small bowl and arrange the egg white halves on your serving platter.
- Make the Filling: Mash the yolks into a fine crumble with a fork. Add the mayonnaise, Dijon mustard, apple cider vinegar, and a pinch of salt and pepper. Stir and mash everything together until it’s as smooth as you can get it.
- Fill and Garnish: Use a small spoon or a piping bag to fill each egg white half with the yolk mixture. For that classic, beautiful finish, give them all a light sprinkle of paprika. Chill until you’re ready to serve!
WiseRecipes’ Top Tips for Deviled Egg Mastery
I’ve made thousands of deviled eggs in my life. These are the non-negotiable secrets to making them perfect.
- The Sieve is Your Secret Weapon. For the absolute smoothest, creamiest, most lump-free filling imaginable, press your cooked egg yolks through a fine-mesh sieve with the back of a spoon before you mix in the other ingredients. It pulverizes them into a fine powder. This is the number one trick for a professional-quality filling.
- The Ice Bath is NOT Optional. Plunging the hot, cooked eggs immediately into an ice bath does two crucial things: it stops the cooking instantly (preventing that ugly green ring around the yolk), and it makes the egg contract from the shell, making them a million times easier to peel.
- A Piping Bag Makes Them Pretty. For that beautiful, bakery-style swirl of filling, a piping bag with a large star tip is the way to go. If you don’t have one, a simple zip-top bag with a corner snipped off works just as beautifully and is so much neater than using a spoon.
- Taste Your Filling! Before you pipe it, always give your yolk mixture a taste. Does it need another tiny pinch of salt? A little more pepper? Adjust the seasoning until you love the flavor, and your final eggs will be perfect.
- Don’t Be a Teaspoon Terrorist. As the original notes say, it’s 1 teaspoon of vinegar, not a tablespoon! That small amount adds the perfect brightness. A whole tablespoon would make them far too acidic.
Creative Twists: Delicious Ways to Customize Your Deviled Eggs
The classic is perfect, but it’s also a fantastic canvas for your own creativity! Here are some fun ideas:
- Bacon & Chive: Stir in 2 tablespoons of crispy, crumbled bacon and 1 tablespoon of finely chopped fresh chives into the yolk mixture.
- Spicy Jalapeño: Add 1-2 tablespoons of finely minced pickled jalapeños and a dash of hot sauce to the filling.
- Avocado Deviled Eggs: Mash in half of a ripe avocado with the egg yolks for an extra creamy, delicious twist. Garnish with cilantro.
- Everything Bagel: Sprinkle the finished eggs with everything bagel seasoning instead of paprika for a savory, crunchy kick.
- Smoked Salmon & Dill: Fold in a tablespoon of finely chopped smoked salmon and a tablespoon of fresh dill.
- Southern Style: Swap the apple cider vinegar for a teaspoon of sweet pickle relish or pickle juice.
- Buffalo Blue Cheese: Add a tablespoon of buffalo sauce and a tablespoon of crumbled blue cheese to the yolk mixture.
- Curry & Cilantro: Add a 1/4 teaspoon of curry powder to the filling and garnish with fresh cilantro for a unique, delicious twist.
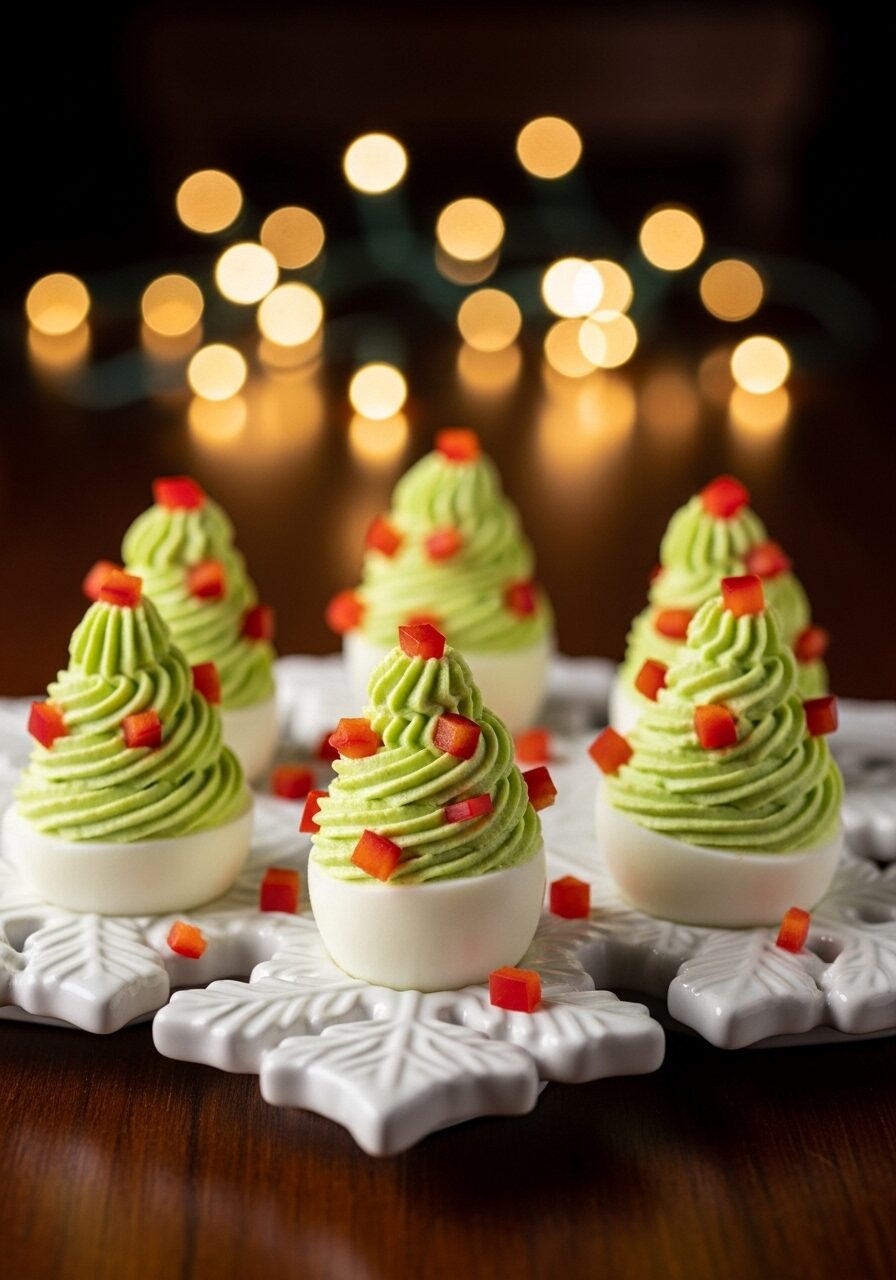
Christmas Tree Deviled Eggs
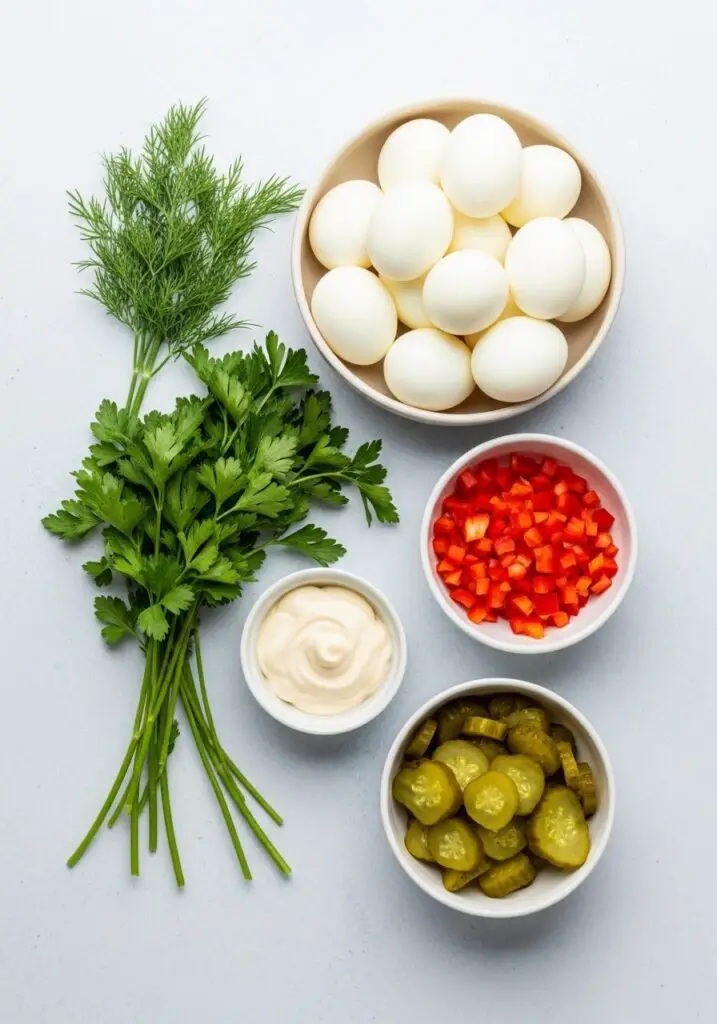
Ingredients
Method
- Place eggs in a large pot with 2 inches of boiling water. Cook for 12 minutes. Immediately transfer eggs to a large bowl of ice water and let cool completely, about 12 minutes.
- Peel the eggs, halve them lengthwise, and remove the yolks. Place the yolks in the bowl of a food processor.
- Add the mayonnaise, mustard, pickle relish, parsley, dill, optional food coloring, salt, and pepper to the food processor. Process for 1-2 minutes until completely smooth.
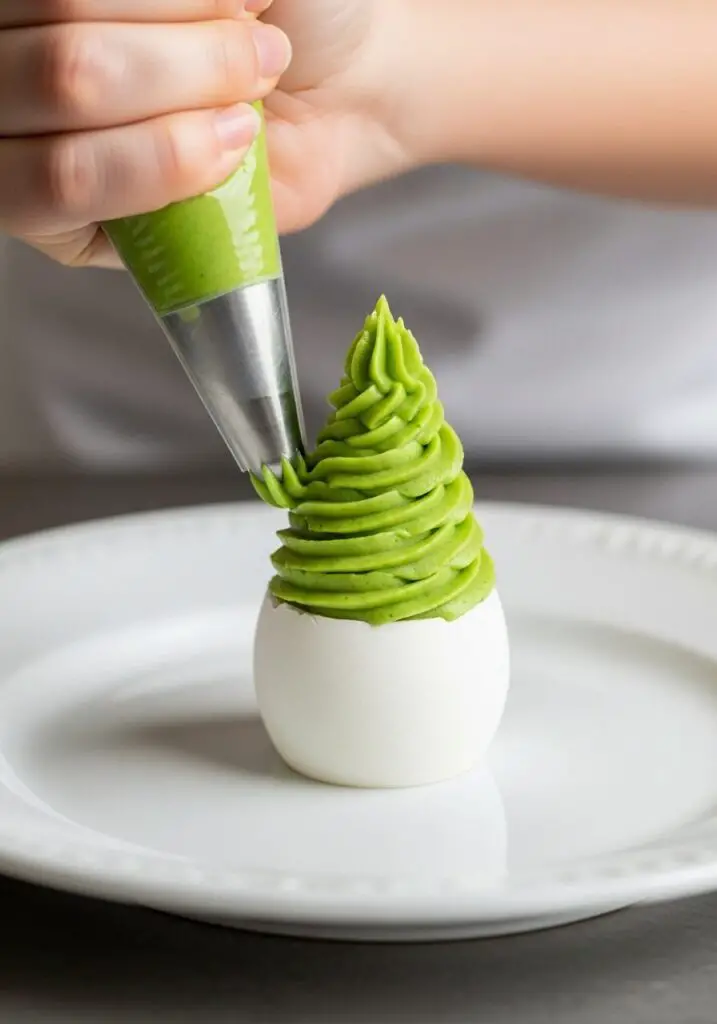
- Transfer the filling to a piping bag or zip-top bag with a 1/2-inch corner snipped off.
- Fill the hole of each egg white half, then pipe the filling in a back-and-forth motion to create a triangle (Christmas tree) shape.
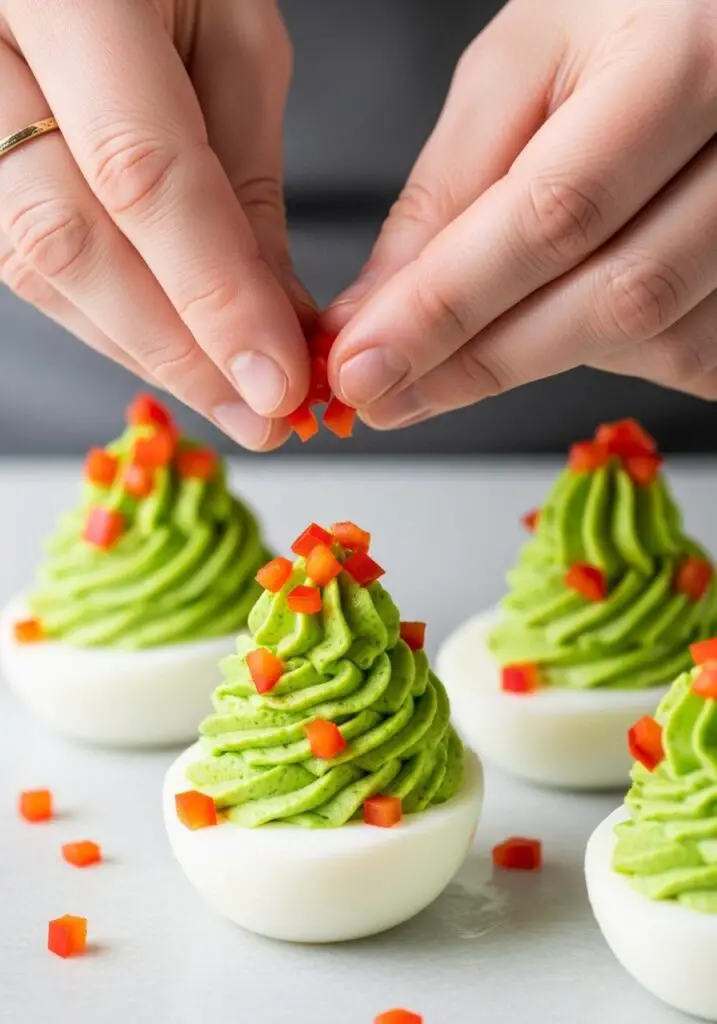
- Sprinkle the finely diced red pepper over the ‘trees’ to look like ornaments. Garnish with more fresh dill if desired. Serve immediately or chill.
Notes
Keep Them Fresh! Make-Ahead & Storing Guide
Deviled eggs are the ultimate make-ahead party appetizer! Here’s the best way to do it.
- Make-Ahead Plan (The Best Method): This is my go-to for parties. You can cook and peel the eggs a day or two in advance. Prepare the yolk filling and store it in an airtight container or your piping bag in the fridge. Keep the egg white halves in a separate airtight container. Then, just pipe and garnish right before your party for the freshest result!
- Refrigerator (Assembled): You can store the fully assembled deviled eggs in a sealed container in the refrigerator for up to 2 days. If you’re transporting them, a dedicated deviled egg carrier is a lifesaver!
FAQs: Your Deviled Egg Questions, Answered!
Help! My eggs are impossible to peel! What did I do wrong?
This is the most frustrating kitchen problem! The secret is to not use super fresh eggs—eggs that are a week or two old actually peel much more easily. My second, and most important, tip is the ice bath. Shocking the hot eggs in ice water for at least 10 minutes makes a world of difference and helps the shells slip right off.
Why did my egg yolks get a green ring around them?
That unattractive green ring is a harmless chemical reaction caused by overcooking the eggs. The 14-minute cook time followed by an immediate plunge into an ice bath is the perfect method to prevent this, giving you perfectly bright, sunny yellow yolks every time.
Can I use yellow mustard instead of Dijon?
You can, but the flavor will be different. Yellow mustard has a much sharper, more one-note vinegar flavor. Dijon mustard is made with wine and has a more complex, tangy, and slightly less aggressive flavor that I find works much better in this classic recipe.
Can I use pickle juice instead of vinegar?
Yes, absolutely! Swapping the 1 teaspoon of apple cider vinegar for 1 teaspoon of pickle juice (from a jar of dill or sweet pickles) is a classic Southern-style variation, and it is absolutely delicious!
My Final Thoughts: The Perfect Timeless Appetizer
The Classic Deviled Egg is one of those special recipes that never, ever goes out of style. It’s a simple, humble, and deeply satisfying bite that brings a little bit of nostalgic joy to any occasion. I truly hope this foolproof method helps you create the most perfect, creamy, and delicious deviled eggs you’ve ever made!