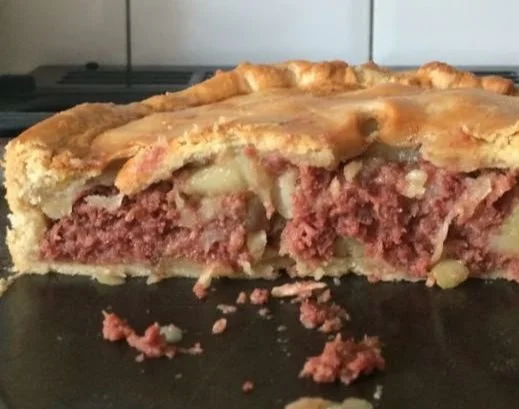
Corned beef pie
Corned Beef Pie: A Cozy Comfort Food Classic There’s something truly delightful about a home-cooked pie. It’s kind of like a hug from the inside, don’t you think? Whenever I think of comfort food, corned beef pie instantly pops into my mind. It’s the kind of dish that evokes childhood memories, filled with warm kitchens…
Corned Beef Pie: A Cozy Comfort Food Classic
There’s something truly delightful about a home-cooked pie. It’s kind of like a hug from the inside, don’t you think? Whenever I think of comfort food, corned beef pie instantly pops into my mind. It’s the kind of dish that evokes childhood memories, filled with warm kitchens and family gatherings. When I was younger, my mother would whip this up on chilly Sunday afternoons, filling the air with mouthwatering aromas that made it impossible to resist. Today, I’d love to share my take on this classic, perfect for both chilly evenings and lazy weekends.
The Heart of the Pie: Corned Beef
First, let’s talk about the star of the show—the corned beef. I always opt for a standard tin of corned beef, usually in the 340g size. It’s readily available, easy to work with, and offers that salty, savory flavor that pairs so well with the other ingredients. Once you’ve got your corned beef assembled, the rest of the ingredients follow suit quite easily.
So, what else will you need? Well, you’re going to need some good ol’ plain flour—about 400 grams—and 200 grams of butter for the pastry. Besides that, grab a pinch of salt, some cold water for binding the pastry, a medium onion, and a large potato weighing around 300 grams. Don’t forget a bit of vegetable oil for frying, and an optional beaten egg if you want a lovely golden top on your pie. Sounds manageable, right?
Making the Pastry: A Personal Touch
The first step is the pastry, which is honestly the most important part of the pie. If you have a trusted store-bought pastry, go ahead and take a shortcut. But, if you’re feeling adventurous (or nostalgic), I encourage you to make it from scratch! So, start with the butter; dice it into small chunks and mix it with the flour until it resembles fine breadcrumbs. At this stage, it’s crucial to keep things cool, so I often keep my butter in the fridge until I’m ready to use it.
Add a small splash of ice-cold water to the mix and stir until the pastry starts to come together. I usually knead it gently for just a minute or so. Remember, the less handling the better! Form the pastry into a ball, wrap it tightly in cling film, and pop it in the fridge to rest. While that’s chilling, let’s prepare the delicious filling.
Cooking the Filling: Layering Flavors
Dicing that large potato into small cubes is an easy task. I don’t peel mine; I love the rustic feeling of the skin in the pie and think it adds character. Get a pot of salted water boiling, toss in those potato chunks, and cook them for just about five minutes until they’re tender but still firm. Overcooking will lead to mushy potatoes, and nobody wants that! Once they’re just right, drain them and set them aside.
Using the same saucepan, heat a teaspoon of vegetable oil over medium heat and fry the diced onion until it’s nicely caramelized. There’s nothing like the scent of frying onions to get your stomach rumbling, right? Once those start turning golden, toss in the potato and let them cool together.
Now, it’s time for the corned beef! Open your tin and chop it into bite-sized chunks. Combine it with the potato and onion mixture to create a rustic filling that’s both savory and satisfying. Trust me, this combination never disappoints.
Bringing It All Together
While the filling cools, preheat your oven to 180°C if you’re using a fan or 190°C otherwise (gas mark 6). Now, take your trusty pastry out of the fridge. Remove a third of it to set aside for the lid. Roll out the larger piece to around 3mm thick and use it to line your prepared pie dish, which I like to grease lightly with a splash of vegetable oil—this helps everything come out smoothly later.
Pour the corned beef mixture into your pastry shell and flatten it down. If you’re using the egg wash, now’s the time to brush the edges with a beaten egg or a splash of milk to help seal the pie. Roll out the smaller piece of pastry for the top, carefully placing it over the filled pie. This is where you can get creative! Press the edges together to seal, and then crimp them with your fingers or a fork—whatever feels right.
Don’t forget to poke a little hole in the center for steam to escape. If you want to add that beautiful golden sheen, brush the top with egg wash before sliding it into the oven. Bake for approximately 45 minutes, until the crust is golden brown and inviting.
The Waiting Game: Time to Cool
Here’s the hardest part: waiting for it to cool! I know, the smell wafting through your kitchen can be nearly unbearable, but allowing it to rest for a few minutes will make it easier to remove from the pie dish. Once it’s slightly cooled, tuck in with a slice of warm pie or set it aside for later. It keeps beautifully in the fridge for up to three days, making it ideal for leftovers during the week.
Making It Your Own
As much as I adore the traditional filling, there are countless ways to remix this pie. For instance, you could add some frozen peas or carrots to the filling for a little color and sweetness. Playing with spices can also change the flavor profile entirely—try adding a pinch of mustard powder or Worcestershire sauce for depth. If you’re in the mood for something more adventurous, consider incorporating some cheese to make it extra indulgent!
Final Thoughts: A Keeper in the Kitchen
This corned beef pie, with its flaky pastry and hearty filling, is like a warm embrace on a plate. It’s incredibly satisfying and versatile, perfect for any occasion, and delicious whether served warm or cold. I encourage you to give it a try and, who knows, it might just become a beloved dish in your home as it is in mine. So, gather your ingredients and enjoy the process; food is just as much about the journey as it is about the destination. Happy cooking!
Corned Beef Pie
Ingredients
Method
- In a bowl, mix the chilled butter and plain flour until it resembles fine breadcrumbs.
- Add a splash of ice-cold water and mix until the pastry comes together. Knead lightly, then wrap in cling film and refrigerate.
- Boil a pot of salted water and cook the diced potato for about 5 minutes until tender but firm. Drain and set aside.
- In the same saucepan, heat vegetable oil over medium heat and fry the diced onion until caramelized.
- Mix the cooled potato with the caramelized onion and add the chopped corned beef to create the filling.
- Preheat oven to 180°C (fan) or 190°C (conventional).
- Roll out the larger piece of pastry to line the greased pie dish and pour the filling mixture into it.
- Roll out the smaller piece of pastry to cover the filling, seal the edges well, and poke a hole on top for steam to escape.
- Brush the top with beaten egg for a golden finish and bake for approximately 45 minutes or until crust is golden brown.
- Allow the pie to cool slightly before removing from the dish. Serve warm or refrigerate for later use.