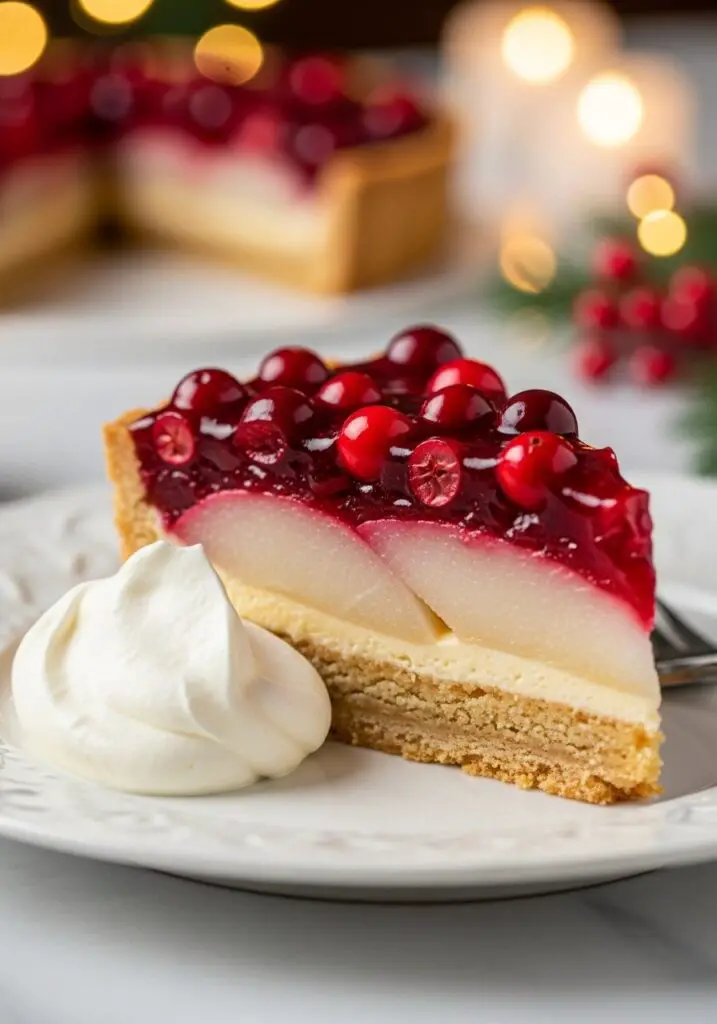
The Ultimate Cranberry Tart with Pears (A Holiday Show-Stopper!)
Imagine a dessert that is the absolute essence of the holidays: a buttery, sweet, cookie-like crust, filled with a vibrant, sweet-tart cranberry filling and layered with fragrant, thinly-sliced pears. That, my friends, is the stunning elegance of this Cranberry Tart. It is, without a doubt, the most beautiful and delicious dessert you will place on…
Imagine a dessert that is the absolute essence of the holidays: a buttery, sweet, cookie-like crust, filled with a vibrant, sweet-tart cranberry filling and layered with fragrant, thinly-sliced pears. That, my friends, is the stunning elegance of this Cranberry Tart. It is, without a doubt, the most beautiful and delicious dessert you will place on your festive table this year, a true departure from the usual pies.
Here’s the thing about a beautiful tart: it looks like it belongs in a French patisserie window, a project for only the most skilled bakers. I used to feel that exact intimidation! But this recipe is my proof that a show-stopping tart is completely achievable at home. The crust is a simple, press-in crumble, and the filling comes together in one pot. It’s a wonderfully rewarding process that results in a truly spectacular dessert.
I promise you, there is no greater feeling than lifting that perfect, fluted tart from its pan and presenting it to your guests. The flavor is a masterpiece of balance—the rich, buttery crust, the bright pop of the cranberries, the subtle sweetness of the pears, and a hint of warm spice. It’s a sophisticated, memorable dessert that tastes even better than it looks.
Get ready to create a stunning, professional-looking tart that will become the new star of your holiday celebrations.
Why This Cranberry Tart Will Dazzle Your Guests!
You are going to be so incredibly proud of this beautiful dessert. It’s a true holiday triumph that is as delicious as it is gorgeous. Here’s why you’ll love it:
- A Show-Stopping Centerpiece: With its vibrant red filling and beautiful crust, this tart is a visual masterpiece that will be the focal point of any dessert table.
- Incredible Flavor and Texture: The buttery, “cookie-like” crust, the jammy cranberry filling, and the soft, fragrant pear slices create a perfect harmony of sweet, tart, and rich flavors.
- Easier Than It Looks: Don’t let its beauty fool you! The press-in crust requires no rolling, and the filling is a simple one-pan affair. This guide makes it foolproof.
- The Perfect Make-Ahead Dessert: This tart needs to chill completely, making it an ideal dessert to prepare the day before a big event, freeing up your time and oven.
- A Sophisticated Twist on Holiday Flavors: The addition of pears and orange zest elevates the classic cranberry flavor into something truly special and elegant.
Recipe Snapshot
| Prep Time | 25 minutes |
| Cook Time | 1 hour 8 minutes |
| Chill Time | ~3 hours |
| Total Time | ~4 hours 33 minutes |
| Servings | 8 servings |
| Calories | 409 kcal per serving |
| Course | Dessert |
| Cuisine | American |
| Difficulty/Method | Intermediate / Baking |
Your Shopping List for This Festive Tart
This recipe is built in two main parts: the crust and the filling. Here’s what you’ll need to create this masterpiece:
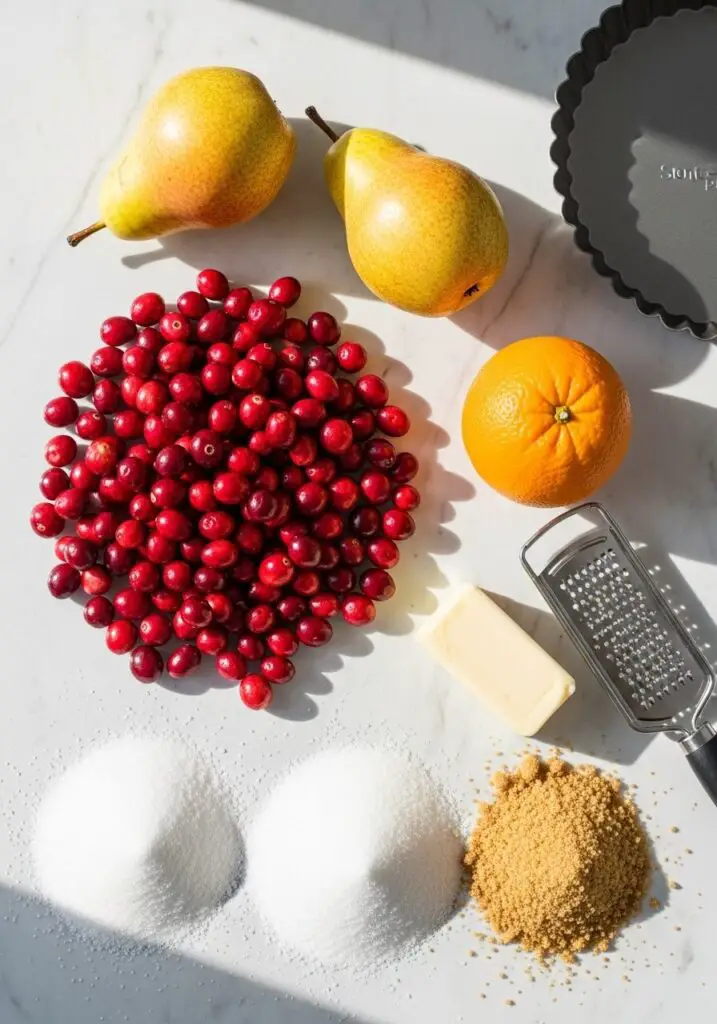
→ For the Sweet Cookie-Like Crust
- 1 ¼ cup all-purpose flour
- 1 tsp ground cinnamon, ½ tsp salt, ¼ tsp baking powder → Our dry blend for flavor and structure.
- 8 tbsp unsalted butter → Must be at room temperature for a light, fluffy creamed base.
- ½ cup granulated sugar & ¼ cup brown sugar → The combination provides sweetness and a hint of molasses flavor.
- 1 tsp pure vanilla extract → For warm, classic flavor.
- 1 tbsp water → To bring the crumble together perfectly.
→ For the Cranberry-Pear Filling
- 12 ounces fresh, whole cranberries → The star of the show! Frozen can also be used.
- ¼ cup plus 2 tbsp granulated sugar → To balance the tartness of the cranberries.
- 1 tsp orange zest → Adds a beautiful, bright citrus aroma.
- 1 tsp, plus ¼ tsp, ground cinnamon → Divided for the filling and the pears.
- ½ cup plus 2 tbsp water
- 2 small Bartlett pears → Their sweetness and soft texture are a perfect match for cranberries.
- ¼ tsp ground ginger & 1 (scant) tsp flour → For seasoning the pears and absorbing excess juice.
Let’s Get Baking! Your Step-by-Step Guide
This recipe is a rewarding process of building layers. Let’s start with the vibrant filling!
Part 1: The Juicy Cranberry Filling
- Combine and Simmer: In a large pan, combine the cranberries, sugar, orange zest, 1 teaspoon of cinnamon, and water. Bring the mixture to a boil over medium heat.
- Pop and Thicken: Once it’s boiling, reduce the heat slightly and let it simmer for 6 to 8 minutes. You’re looking for the cranberries to just start popping and releasing their juices. Don’t overcook them into mush; you want them to remain mostly whole.
- Cool Completely: Pour the cranberry mixture into a large bowl and let it cool completely. It will thicken as it cools. You can place it in the fridge to speed this up.
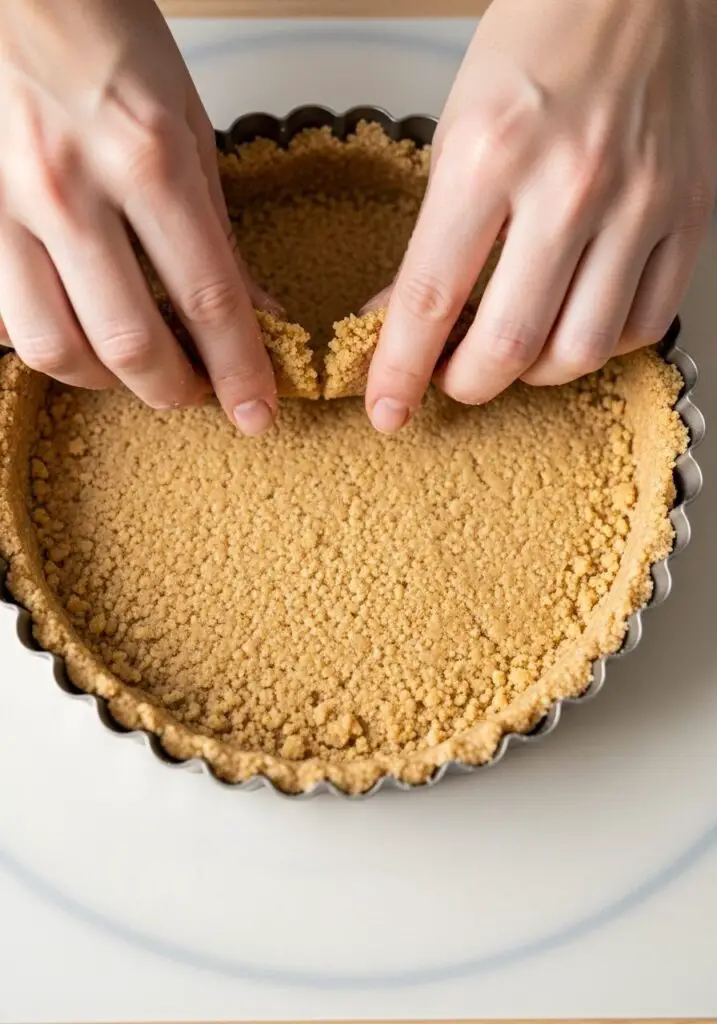
Part 2: The Buttery Press-In Crust
- Mix Dry Ingredients: While the filling cools, make the crust. In a large bowl, whisk together the flour, baking powder, salt, and the other teaspoon of cinnamon.
- Cream Butter and Sugars: In a stand mixer with a paddle attachment, beat the room-temperature butter, granulated sugar, and brown sugar for about 2 minutes, until light and fluffy. Mix in the vanilla.
- Form the Crumble: Add the dry ingredients to the mixer and mix on low until the mixture just begins to come together. Add the 1 tablespoon of water and mix for another moment until a moist, crumbly dough forms.
- Press and Chill: Turn the crumble out into a 9 ½ inch non-stick tart pan with a removable bottom. Use your fingers or the bottom of a flat measuring cup to press the crumble firmly and evenly into the bottom and up the fluted sides of the pan. Place the crust in the freezer to chill for 15 minutes.
Part 3: Assemble and Bake
- Prep Oven and Pears: Preheat your oven to 350°F. Line a baking sheet with foil. Peel, core, and slice your pears as thinly as you can. In a bowl, gently toss the pear slices with the ground ginger, the remaining ¼ teaspoon of cinnamon, and the scant teaspoon of flour.
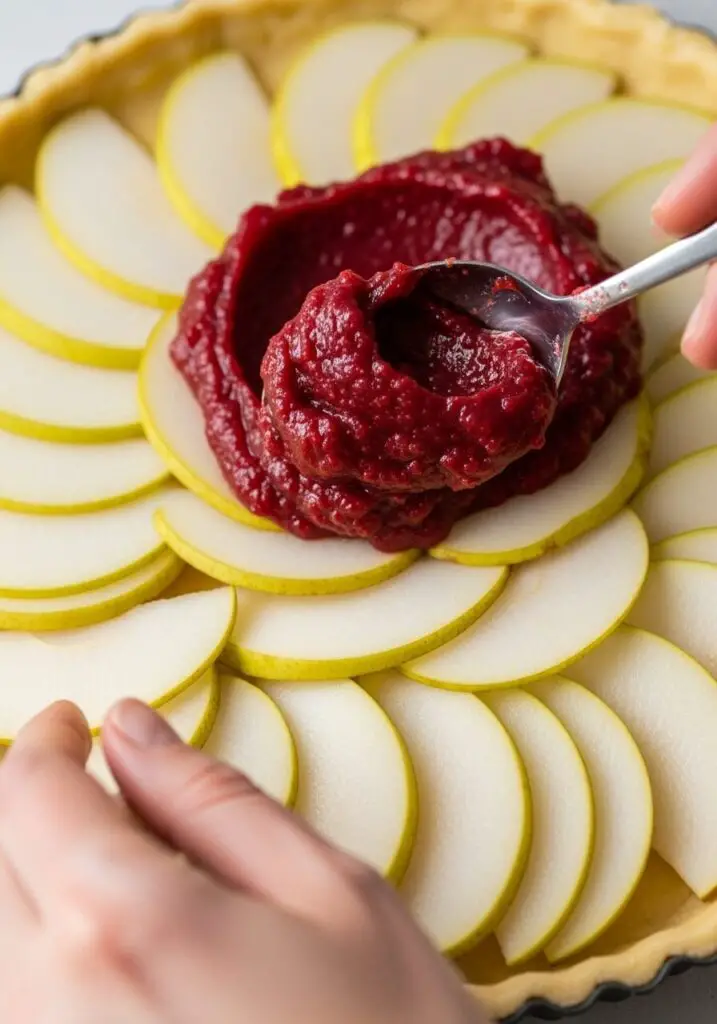
- Layer the Tart: Remove the chilled crust from the freezer. Arrange the spiced pear slices in an even layer across the bottom of the crust.
- Add the Filling: Spoon the cooled cranberry filling over the pears, reserving about two tablespoons for the final glaze. Gently spread the filling evenly to the edges.
- Bake: Place the tart on your foil-lined baking sheet (to catch any potential drips). Bake for 1 hour, turning the pan once halfway through.
- Cool and Chill: Let the baked tart cool in its pan on a wire rack for about 30 minutes. Then, carefully push up the removable bottom to release the tart from the outer ring. Let it cool completely to room temperature, then gently cover with plastic wrap and place in the fridge to chill thoroughly.
- The Final Glaze: When you’re ready to serve, mix the reserved 2 tablespoons of cranberry filling with a teaspoon of water. Gently brush this glaze over the top of the chilled tart for a beautiful, glossy finish. Garnish with extra orange zest if desired.
WiseRecipes’ Top Tips for a Perfect Tart
These are the secrets to ensuring your tart has a sturdy crust, a perfect filling, and a beautiful finish.
- Don’t Overcook the Cranberries. The goal for the filling is to have the cranberries pop and release their juices and natural pectin, but not turn into complete mush. Cook them just until they soften and the sauce begins to thicken.
- Room Temperature Butter is a Must. For the crust, starting with properly softened butter is key to the creaming process, which creates a light, tender, cookie-like texture.
- Use a Measuring Cup for an Even Crust. The flat bottom and straight sides of a ½ cup measuring cup are the perfect tools for pressing the crust crumble firmly and evenly into the pan, ensuring a uniform thickness.
- Don’t Skip Chilling the Crust. Freezing the crust for 15 minutes before filling is crucial. It helps the butter firm up, which prevents the crust from slumping down the sides of the pan during baking.
- The Final Glaze is Worth It. That simple step of brushing the reserved, watered-down filling over the top of the chilled tart makes a huge difference. It adds a professional, glossy shine that makes the tart look spectacular.
Cranberry Tart with Pears
Ingredients
Equipment
Method
- To prepare the cranberry filling, add cranberries, sugar, orange zest, 1 tsp. ground cinnamon, and water to a large pan. Bring to a boil, then reduce heat and simmer for 6-8 minutes, until cranberries begin to pop and soften. Pour into a bowl and cool completely.
- To prepare the crust, whisk together flour, baking powder, salt and 1 tsp. ground cinnamon in a large bowl.
- In a stand mixer, cream together the butter, granulated sugar, and brown sugar until light and fluffy. Add in the vanilla.
- Add the dry ingredients and mix until it begins to come together. Add 1 Tbsp. water and mix until a moist crumble forms.
- Turn the crumble out into a 9 ½ inch non-stick tart pan and press evenly to form a crust on the bottom and up the sides. Place the crust in the freezer to chill for 15 minutes.
- Preheat the oven to 350°F. While the crust chills, peel, core, and thinly slice the pears. Toss them in a bowl with the ground ginger, remaining ¼ tsp. cinnamon, and the flour.
- To assemble, arrange the pear slices on the bottom of the chilled tart crust. Spoon the cooled cranberry filling over the pears (reserving 2 tablespoons for later), spreading it evenly.
- Place the tart on a foil-lined baking sheet and bake for 1 hour. Let the tart cool in its pan on a wire rack for 30 minutes, then remove the outer ring. Cool completely, then cover and chill thoroughly in the fridge.
- When ready to serve, mix the reserved 2 tablespoons of cranberry filling with a teaspoon of water and brush over the top of the tart for a glossy finish.
Notes
Keep It Fresh! Storing Your Cranberry Tart
This tart is an excellent make-ahead dessert for the holidays.
- Refrigerator: Once completely cooled and chilled, the tart can be stored, covered, in the refrigerator for up to 3 days. The flavors will continue to meld and deepen. Add the final glaze just before serving for the best look.
FAQs: Your Cranberry Tart Questions, Answered!
Do I have to use a tart pan with a removable bottom?
It is highly recommended. A tart pan with a removable bottom is what allows you to easily and cleanly remove the tart from the outer ring for that beautiful, free-standing presentation. You could bake it in a 9-inch pie plate, but you would have to serve it in slices directly from the dish.
Can I use frozen cranberries?
Yes, frozen whole cranberries work perfectly in this recipe. There is no need to thaw them first; just add them to the saucepan straight from the freezer and proceed with the instructions. The initial cooking time might be a minute or two longer.
Can I substitute the pears with apples?
Absolutely! As the recipe notes suggest, thinly sliced Honeycrisp, Gala, or Jonagold apples would be a delicious substitute for the pears. They provide a similar sweet, firm-textured counterpoint to the cranberries.
Why did my crust crumble when I tried to serve it?
A crumbly crust can be caused by a couple of things: not pressing the crumble mixture firmly enough into the pan, or trying to remove it from the pan and slice it before it has cooled and chilled completely. Be sure to press firmly and be patient with the cooling and chilling steps!
Final Thoughts: Your New Holiday Centerpiece
There is such a rewarding feeling in creating a dessert that is as beautiful as it is delicious. This Cranberry Tart with Pears is a true celebration of the season’s best flavors, wrapped up in a buttery, irresistible package. I hope it becomes a cherished part of your holiday tradition for years to come. Happy baking!