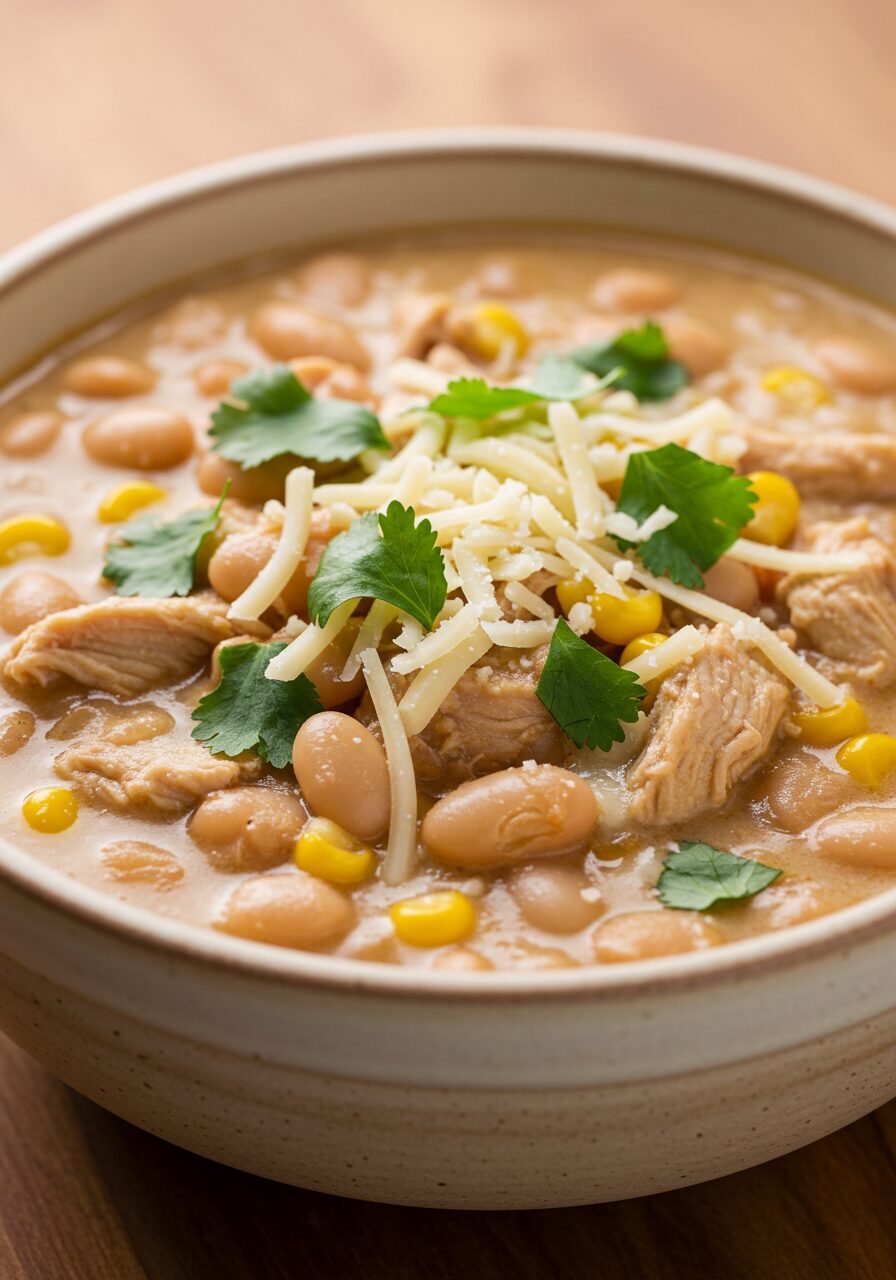
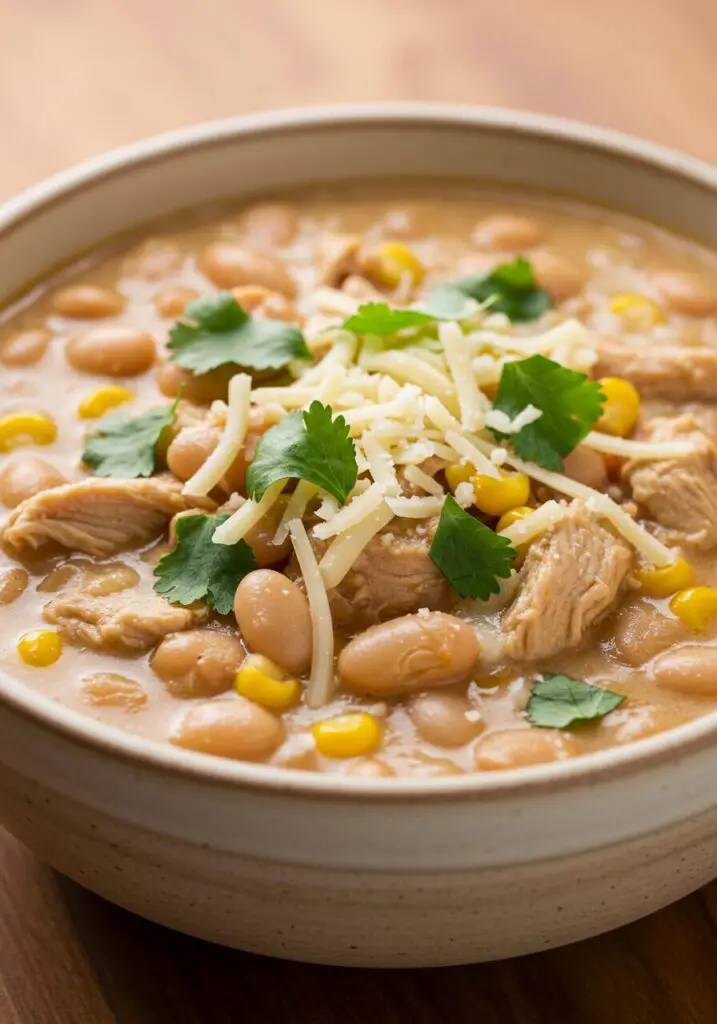
Cozy Comfort in 30 Minutes: My Go-To Creamy White Chicken Chili!
Oh, friends, there’s just nothing like a bowl of warm, comforting chili on a chilly evening, is there? And if you’re anything like me, busy weeknights demand something quick, easy, and undeniably delicious. That’s exactly where this Creamy White Chicken Chili recipe shines its brightest! Seriously, this isn’t just any chili; it’s a bowl of…
Oh, friends, there’s just nothing like a bowl of warm, comforting chili on a chilly evening, is there? And if you’re anything like me, busy weeknights demand something quick, easy, and undeniably delicious. That’s exactly where this Creamy White Chicken Chili recipe shines its brightest! Seriously, this isn’t just any chili; it’s a bowl of pure, wholesome joy, brimming with tender chicken, savory beans, a hint of sweet corn, and a glorious, velvety finish that just makes you want to curl up on the couch and savor every single spoonful.
I’ve made this recipe countless times, and it consistently surprises me with how much flavor we can pack into a mere 30 minutes. It feels like a hug in a bowl, yet it’s made with healthy ingredients, it’s naturally gluten-free, and it truly comes together faster than takeout. Forget complicated, all-day simmering recipes – this Creamy White Chicken Chili is your new weeknight hero. Get ready to fall in love with its rich taste and simple charm. Trust me, your taste buds (and your busy schedule) will thank you!
Why This Creamy White Chicken Chili Will Be Your Weeknight Winner
This recipe isn’t just convenient; it’s genuinely special. Here’s why I keep coming back to it, and why I think you will too:
- Lightning-Fast Flavor: Seriously, 30 minutes from start to finish! This recipe is a magician when it comes to delivering deep, satisfying flavors in record time, making it ideal for those busy evenings.
- Velvety, Dreamy Creaminess: The secret to that irresistible texture? A touch of plain yogurt stirred in at the end! It makes the chili unbelievably creamy without needing heavy cream, keeping it lighter and healthier.
- Wholesome & Hearty: Loaded with lean chicken breast, protein-packed cannellini beans, and sweet corn, this chili is incredibly filling and nutritious, making it a meal you can feel genuinely good about eating.
- Naturally Gluten-Free Goodness: If you’re avoiding gluten, rejoice! This recipe is naturally gluten-free, so everyone at the table can enjoy a hearty, delicious bowl without any fuss.
- Easy Customization: This chili is a fantastic base for all sorts of delicious additions and tweaks. It’s forgiving, flexible, and always ready for your personal touch!
Your Shopping List for Cozy Chili Nights: Gather What You’ll Need
Creating this quick and delicious chili uses simple, accessible ingredients. Here’s what you’ll want to grab from the store!
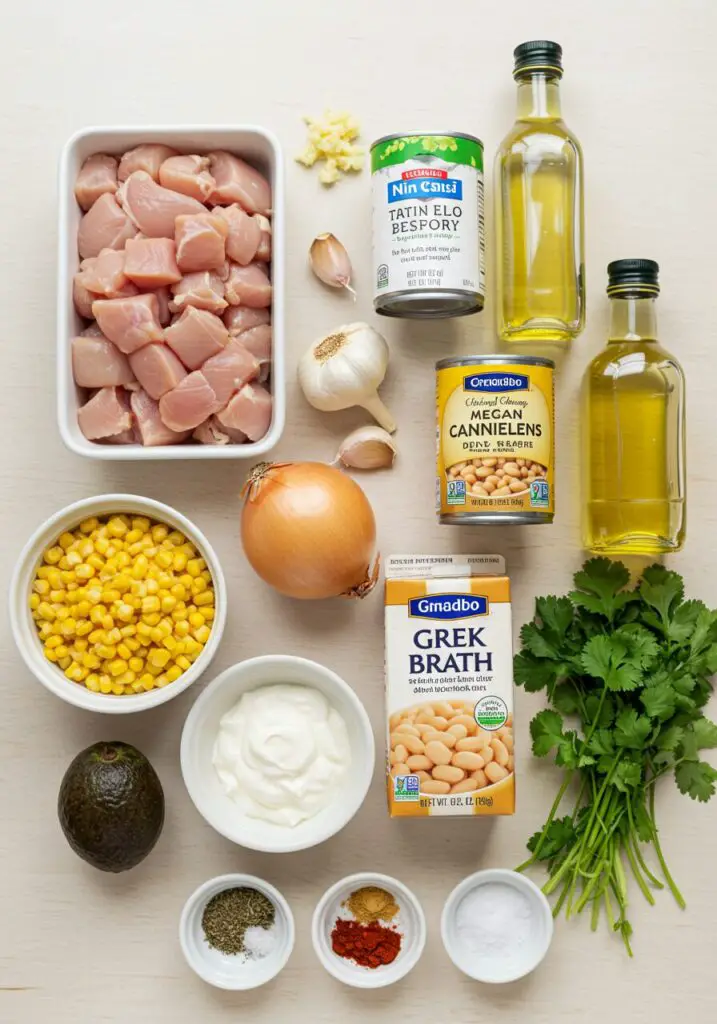
→ For the Chili Base
- 1 Tbsp avocado oil (or olive oil): My go-to for sautéing; you can use any mild-flavored oil.
- 1 lb chicken breast: Cubed into bite-sized pieces for quick cooking.
- 1 tsp garlic, minced (about 2 cloves): Fresh garlic adds so much aromatic flavor!
- 1/2 small yellow onion, diced: A foundational aromatic for our chili.
- 2 15.5 oz. cans cannellini beans, drained: These white beans are wonderfully creamy and hearty.
- 2 cups chicken broth: The liquid base for our chili.
- 1/2 cup corn: Adds a touch of sweetness and texture. (Frozen corn works perfectly here!)
→ For the Rich Flavor & Creaminess
- 2 tsp cumin: Essential for that classic chili warmth.
- 1/2 tsp coriander: A subtle, earthy partner to the cumin.
- 1 tsp paprika: Adds color and a gentle, smoky sweetness.
- 1/2 tsp oregano: Another classic herb for chili depth.
- 3/4 cup plain yogurt: This is our secret to creamy chili without heavy cream!
- Salt/pepper, to taste: To season everything perfectly.
→ For Topping (Optional, but Highly Recommended!)
- 1 cup shredded cheese: (Optional, but so good!) Choose your favorite, like Monterey Jack or cheddar.
- Cilantro, for topping: Fresh, chopped cilantro adds a burst of freshness and color.
Let’s Cook! Crafting Your Dreamy Creamy White Chicken Chili, Step-by-Step
You’re just minutes away from a truly delicious and comforting meal! This recipe moves quickly, so gather everything beforehand.
Part 1: Building the Chili Base
- Sauté Aromatics: Grab a Dutch oven or a large, heavy-bottomed pot. Add 1 tablespoon of avocado or olive oil and heat it over medium heat. Once shimmering, add your diced ½ small yellow onion and 1 teaspoon of minced garlic. Cook, stirring occasionally, for about 3-5 minutes, until the onion is softened and translucent and the garlic is fragrant. Don’t let the garlic burn!
- Brown the Chicken: Add your cubed 1 lb chicken breast to the pot. Cook for about 10 minutes, stirring occasionally, until the chicken is browned on all sides and mostly cooked through. It doesn’t need to be completely cooked at this stage.
- Simmer Beans & Broth: Drain and rinse your two 15.5 oz cans of cannellini beans thoroughly. Add them to the pot along with the 2 cups of chicken broth. Bring the mixture to a gentle simmer.
- Add Corn & Seasoning: Once simmering, stir in the ½ cup of corn and all your spices: 2 teaspoons cumin, ½ teaspoon coriander, 1 teaspoon paprika, and ½ teaspoon oregano. Give everything a good stir to combine.
- Continue Simmering: Let the chili continue to simmer gently for about 10 minutes. This allows all those wonderful flavors to meld and for the chicken to finish cooking through. Taste and season with salt and pepper as needed – remember, you’ll add more seasoning at the end if necessary.

Part 2: Finishing with Creaminess & Serving
- Temper the Yogurt: While the chili simmers, grab a small bowl. Add your ¾ cup of plain yogurt. Whisk it with about ¼ cup of warm water until it’s perfectly smooth and has a thinner, pourable consistency. This step is super important to prevent the yogurt from curdling when it hits the hot chili.
- Add Yogurt & Cheese: Remove the chili from the heat. Slowly pour the whisked yogurt mixture into the chili, stirring constantly until it’s fully incorporated and the chili is beautifully creamy. If using, stir in your 1 cup of shredded cheese now too, letting it melt into the warm chili.
- Taste & Serve: Taste the chili one last time and adjust any seasoning (salt, pepper, or even a tiny bit more cumin!) to your liking. Ladle generous portions into bowls, top with fresh chopped cilantro (and more cheese if you like!), and enjoy every warm, comforting bite!

WiseRecipes’ Best-Kept Secrets for Perfect Creamy White Chicken Chili
This chili is wonderfully straightforward, but a few simple tips from WiseRecipes can make it even better!
- Temper Your Yogurt! This is THE crucial step for that silky smooth, creamy texture. Slowly whisking the yogurt with warm water before adding it to the hot chili prevents it from separating or curdling. Always add it off the heat for the best results!
- Don’t Overcook the Chicken: Keep an eye on your chicken! Once it’s browned and mostly cooked through in the initial steps, it will finish cooking as the chili simmers. Overcooked chicken can become dry, so aim for just cooked through and juicy.
- Fresh Herbs Make a Difference: While dried spices are great for the chili base, a handful of fresh cilantro (or even a little fresh dill!) sprinkled over the top right before serving truly elevates the flavor and adds a pop of freshness.
- Taste and Adjust: As with all cooking, tasting as you go is key! Don’t be shy about adding a little more salt, pepper, or even a pinch more cumin or paprika at the end to suit your personal preference.
Creative Twists: Delicious Ways to Customize Your Creamy White Chicken Chili
This Creamy White Chicken Chili is a fantastic canvas for your creativity! Here are some ideas I love to play with:
- Amp Up the Veggies: Feel free to toss in other favorite vegetables! Diced carrots, zucchini, bell peppers, or even a handful of fresh spinach would be wonderful additions. Add heartier veggies like carrots with the onion, and softer ones like spinach at the very end.
- Make It Heartier: Want to stretch it even further? Add some cooked lentils or a small can of chickpeas (in addition to the cannellini beans) for extra plant-based protein and fiber.
- Kick Up the Heat: If you’re a fan of spice, add an extra pinch of crushed red pepper flakes with the other seasonings, or stir in a small dollop of your favorite hot sauce or a spoonful of diced jalapeño with the onion.
- Smoky Twist: For an extra layer of smoky flavor, a pinch of smoked paprika (instead of regular) goes a long way, or even a tiny bit of chipotle powder.
- Easy Ingredient Swaps: If you’re out of fresh onion and garlic, you can substitute them with ½ teaspoon onion powder and ½ teaspoon garlic powder. It won’t have quite the same fresh punch, but it works in a pinch!
Creamy White Chicken Chili (30-Minute Weeknight Winner!)
Ingredients
Equipment
Method
- In a dutch oven or large pot, cook the diced onion and minced garlic in the avocado or olive oil over medium heat for 3-5 minutes, until softened and fragrant.
- Add the cubed chicken breast and cook for about 10 minutes, stirring occasionally, until it browns on all sides.
- Add the drained cannellini beans and chicken broth, then bring the mixture to a simmer.
- Stir in the corn and all the seasonings (cumin, coriander, paprika, oregano).
- Continue to simmer for about 10 minutes, allowing the flavors to meld and the chicken to finish cooking.
- In a small bowl, whisk the plain yogurt with about 1/4 cup of warm water until completely smooth and pourable.
- Remove the chili from the heat. Slowly add the whisked yogurt and the shredded cheese (if using) to the chili, stirring constantly until smooth and creamy.
- Taste and adjust seasoning (salt and pepper) as needed. Top with fresh cilantro, serve, and enjoy!
Notes
Keep ‘Em Fresh: Storing Your Creamy White Chicken Chili
This chili is just as delicious (if not more so!) the next day, making it perfect for meal prepping.
- Refrigerator Storage: Let the chili cool completely before storing. Transfer it to an airtight container and store it in the refrigerator for up to 3-5 days. It reheats beautifully on the stove or in the microwave.
- Freezing for Later: Creamy White Chicken Chili freezes wonderfully! Once completely cooled, transfer it to freezer-safe airtight containers or heavy-duty freezer bags. It can be frozen for 1-2 months. Thaw overnight in the refrigerator, then reheat gently on the stovetop, stirring occasionally, until warmed through. You might want to add a tiny splash of broth or water if it seems too thick after thawing.
FAQs: Your Top Questions About Homemade Creamy White Chicken Chili, Answered!
Q: Can I use a different type of chicken?
A: Yes! Boneless, skinless chicken thighs would also be delicious. They’ll likely be even more tender. The cooking time might be slightly longer (around 12-15 minutes for browning), so just ensure they’re cooked through. Shredding cooked rotisserie chicken is also a fantastic shortcut – just add it when you add the beans and broth.
Q: Can I make this chili vegetarian?
A: Absolutely! To make it vegetarian, omit the chicken and use vegetable broth instead of chicken broth. You can replace the chicken with extra cannellini beans, or add cooked lentils, quinoa, or chickpeas for extra protein and heartiness.
Q: What are some good toppings for white chicken chili?
A: Oh, the possibilities! Besides cilantro and shredded cheese, I love adding sliced avocado, a dollop of sour cream or Greek yogurt, a squeeze of fresh lime juice, crushed tortilla chips, diced jalapeños, or even some thinly sliced green onions.
Q: My chili seems a bit thick/thin. How do I adjust it?
A: No problem! If it’s too thick, simply stir in a little more chicken broth or water until it reaches your desired consistency. If it’s too thin, let it simmer uncovered for a few extra minutes, stirring occasionally, to allow some of the liquid to evaporate.
Q: Can I make this chili in a slow cooker?
A: You could! Brown the chicken, onion, and garlic first. Then combine everything (except the yogurt and cheese) in the slow cooker. Cook on low for 4-6 hours or high for 2-3 hours. Stir in the tempered yogurt and cheese during the last 30 minutes of cooking or just before serving.
And there you have it, my friends—your guide to crafting the most delightful, fresh, and truly nourishing Creamy White Chicken Chili! This WiseRecipes creation is more than just a meal; it’s a testament to how simple, wholesome ingredients can come together with a little love and smart steps to create something truly extraordinary. It’s a vibrant, healthy meal that you’ll genuinely look forward to eating, day after day.
I am genuinely so excited for you to try these and experience the delicious magic yourself. Please, please come back and let me know in the comments below what your favorite part of these bowls was, or any fun twists you tried! Happy cooking from WiseRecipes!