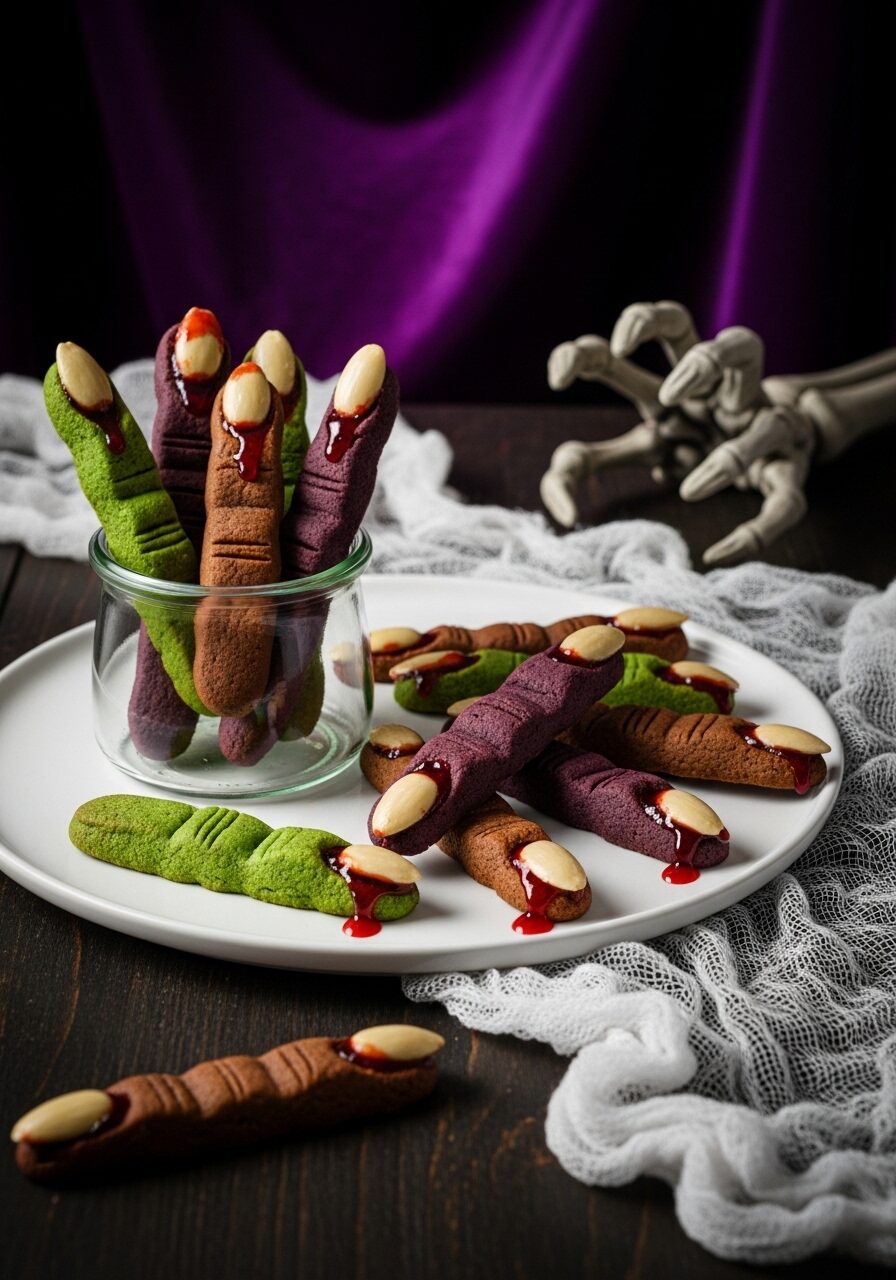
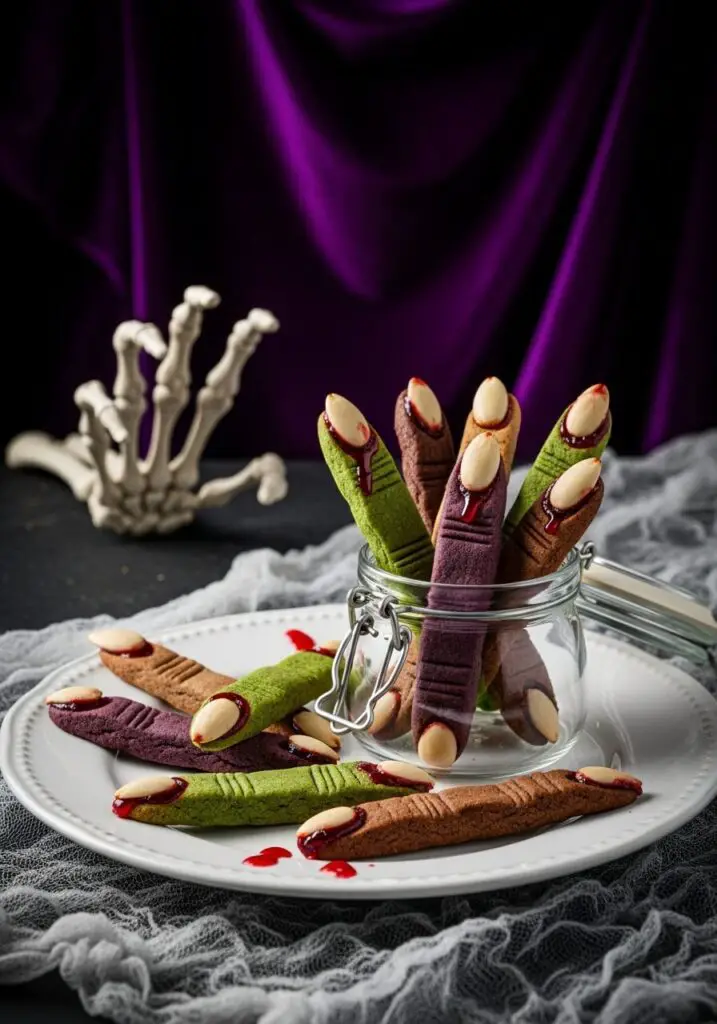
The Ultimate Witch Finger Cookies (Creepy, Buttery & So Fun!)
Imagine presenting a platter of gnarled, crooked, and delightfully creepy witch fingers at your next Halloween party, and watching with glee as your guests hesitate for a split second before taking a bite and discovering the most delicious, buttery, melt-in-your-mouth cookie. That is the incredible, spooky magic of this Witch Finger Cookie recipe. This is,…
Imagine presenting a platter of gnarled, crooked, and delightfully creepy witch fingers at your next Halloween party, and watching with glee as your guests hesitate for a split second before taking a bite and discovering the most delicious, buttery, melt-in-your-mouth cookie. That is the incredible, spooky magic of this Witch Finger Cookie recipe.
This is, without a doubt, my favorite recipe to make when October rolls around. I love it because perfection is not the goal—in fact, the more crooked, knobby, and misshapen your fingers are, the better they look! It’s a fantastic, low-stress bake that’s all about having fun and getting a little creative. The base is a rich, tender French butter cookie that is absolutely to die for.
I promise you, these aren’t just a novelty. They are genuinely one of the best-tasting cookies you’ll make all season, and the technique is surprisingly simple. We’re even using natural powders like matcha and cocoa to give them their spooky, ghoulish colors. It’s the perfect project for a chilly fall weekend!
Get ready to master the art of the creepiest, most delicious cookie that will be the undisputed star of any Halloween celebration.

Why These Are the Best Witch Fingers for Your Coven!
You are going to have so much fun making these, and even more fun watching people react to them! Here’s why this recipe is a total Halloween must-bake:
- Deliciously Deceptive: They look creepy, but they taste divine! The base is a rich, tender, buttery cookie (a French sablé) that absolutely melts in your mouth.
- So Much Fun to Shape: This is one of the few baking projects where imperfection is encouraged! Knobby knuckles and crooked shapes only add to the spooky charm.
- A Make-Ahead Dream: You can form the cookies and freeze them unbaked for up to two months, then bake them straight from the freezer. It’s a lifesaver for party planning!
- Naturally Colored & Flavored: We’re using simple powders like matcha, cocoa, and sweet potato to create those ghoulish green, brown, and purple hues without any artificial coloring.
- The Ultimate Halloween Show-Stopper: A platter of these realistic, bloody-nailed fingers is guaranteed to be the most talked-about treat at any party.
Recipe Snapshot
| Prep Time | 50 minutes (active) |
| Inactive Time | 1 hour 30 minutes |
| Cook Time | 25 minutes |
| Total Time | 2 hours 45 minutes |
| Servings | 44-48 cookies |
| Calories | 91 kcal per cookie |
| Course | Dessert |
| Cuisine | American / European |
| Difficulty/Method | Easy / Baking |
Your Shopping List for These Ghoulish Goodies
Let’s gather our magical ingredients. This recipe is broken down into the cookie dough itself, the optional colors, and the creepy decorations.
→ For the Buttery Cookie Dough
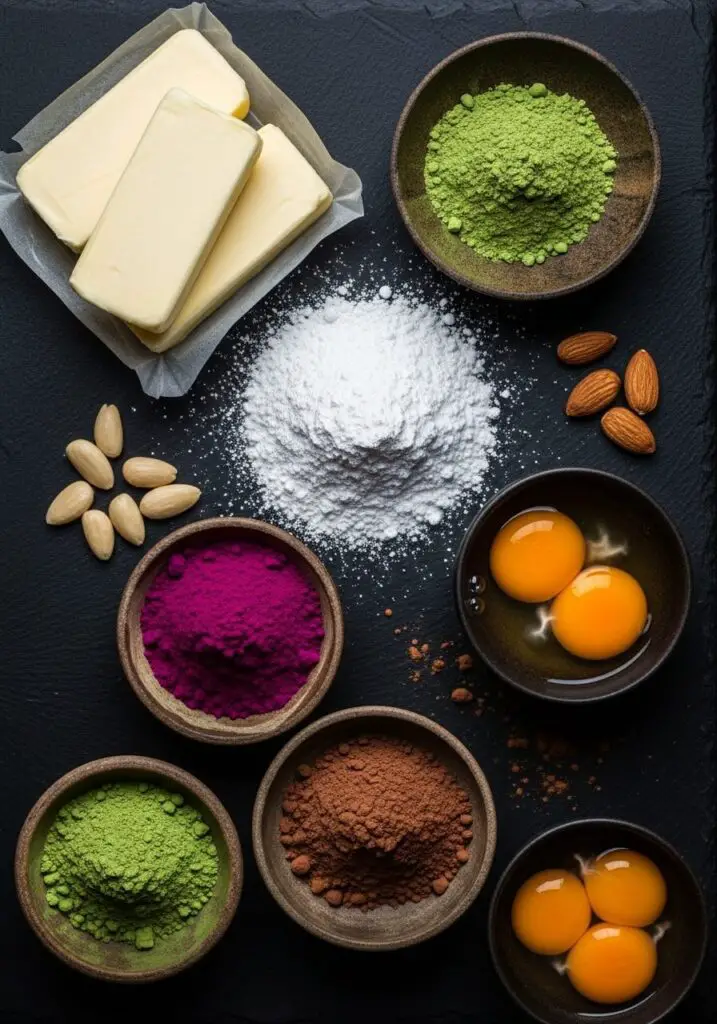
- 226 g (2 sticks) unsalted butter, softened → Make sure it’s properly softened to room temperature! This is key.
- 140 g (1 ¼ cup) confectioner’s sugar → Also known as powdered sugar, for a super smooth, tender cookie.
- 1 tsp sea salt → To balance the sweetness.
- 4 large egg yolks → At room temperature. This is what makes the cookie so rich and decadent!
- 5 mL (1 tsp) vanilla extract → For that classic, warm flavor.
- 454 g (about 3 ¾ cups) all-purpose flour → Spooned and leveled for accuracy.
- ¼ tsp baking powder → For just a little bit of lift.
- 50 whole blanched almonds → These make for perfectly creepy fingernails.
→ For Natural Coloring (Optional)
- For Green: 2-3 tsp matcha powder.
- For Purple: 2-3 tbsp purple sweet potato powder.
- For Brown: 1-3 tsp cocoa powder (more for a darker color).
→ For Creepy Decorations
- Strawberry or raspberry jam → The secret to our “bloody” nail beds.
- Cocoa powder → For brushing on to create a “dirty,” gnarled look.
- Red piping gel or melted white chocolate → Optional alternatives for decorating.
Let’s Get Baking! Crafting Your Creepy Cookies
Ready to make the spookiest, most delicious treats of the season? This is such a fun process. Let’s get our hands dirty!
Part 1: The Buttery Cookie Dough
- Cream the Butter & Sugar: In a large bowl using an electric mixer, beat the very soft butter, salt, and confectioner’s sugar until it’s very creamy, light, and fluffy. This can take a few minutes, so be patient!
- Add the Yolks: Add the room temperature egg yolks and the vanilla extract. Mix until they are just combined, scraping down the sides of the bowl to make sure everything is incorporated.
- (Optional) Color the Dough: If you want to make different colored fingers, now is the time! Divide the butter mixture into separate bowls and mix in your chosen powders (matcha, cocoa, etc.) until the color is uniform.
- Add the Flour: In a separate bowl, whisk together the flour and baking powder. Add this to your butter mixture and gently fold it in with a spatula until a soft dough forms. Do NOT overmix!
- Chill Out: Form the dough into a disc, wrap it tightly in plastic wrap, and let it chill in the fridge for at least 20-30 minutes. This makes it much easier to handle.
Part 2: Shape, Freeze, and Bake!
- Shape the Fingers: Take the chilled dough from the fridge. Using a 1-tablespoon cookie scoop, portion out the dough. Roll each portion into a sausage/finger shape. Create two knuckles by gently squeezing the dough in two spots. Use the dull side of a butter knife to create little “wrinkle” lines on the knuckles.
- Add the Nail: Press one blanched almond firmly onto the tip of each cookie to create the fingernail.
- Freeze!: This step is CRUCIAL. Place the shaped fingers on a parchment-lined baking sheet and pop them in the freezer for at least 40-60 minutes, until they are frozen solid. This is the secret to preventing them from spreading in the oven.
- Bake From Frozen: Preheat your oven to 325°F (163°C). Place the frozen cookies on a lined baking sheet with some space between them. Bake for 20-25 minutes. They should not get brown on top, just lightly golden on the very bottom. Let them cool completely on the pan.
Part 3: The Gory Decorations
- Re-attach the Nail: Don’t panic if the almonds have popped off during baking—that’s normal! This is where the fun begins. Put a small dab of red jam into the nail bed cavity on the cookie.
- Get Bloody: Gently press the almond “nail” back on top of the jam. The jam should ooze out around the edges, creating a perfectly gruesome, bloody effect.
- Add Some Dirt: For an extra creepy touch, you can use a dry, clean paintbrush to dust a little cocoa powder into the knuckle wrinkles to make them look dirty. Let the jam set, and then get ready to spook your friends!
WiseRecipes’ Top Tips for the Spookiest Cookies
I’ve made my share of creepy cookies. These are my essential secrets for getting them just right.
- Freezing Before Baking is NOT Optional. I cannot say this enough. This is a very buttery dough, and baking the cookies from a frozen state is the absolute key to them holding their beautiful, creepy finger shape without spreading into sad, flat blobs.
- Embrace the Imperfection! Seriously, the wonkier, the better. Crooked fingers, knobby knuckles, and uneven shapes only add to the spooky, realistic charm. This is one recipe where you don’t need to stress about perfection.
- Room Temperature Ingredients are a MUST. For the dough, your butter and egg yolks absolutely must be at room temperature. This is crucial for getting that light, creamy texture when you beat them with the sugar, which leads to a melt-in-your-mouth cookie.
- Don’t Overwork the Dough. Once you add the flour, mix only until it’s just combined. Overworking the dough develops the gluten and will make your tender butter cookies tough and rubbery.
- The Jam “Glue” is Genius. The red jam not only looks perfectly gruesome, but it also does a fantastic job of sticking the almond fingernails back on securely after baking.
Creative Twists: Delicious Ways to Get Creepy
This recipe is a fantastic starting point for all kinds of spooky creativity. Here are some ideas:
- Nut-Free Fingernails: Instead of almonds, you can use a pumpkin seed (pepita) for a greenish nail, or pipe a “nail” with melted white or dark chocolate after baking.
- Add a “Wart”: Place a single chocolate chip on a knuckle before baking to create a creepy wart.
- “Severed” Fingers: Dip the flat end of the baked and cooled cookies in melted red candy melts or raspberry jam for a gory, severed look.
- Different Flavors: Add a teaspoon of almond extract to the plain dough, or orange zest to the green matcha dough for a fun flavor twist.
- Make Them “Dirty”: Before baking, roll the shaped fingers in a mixture of sugar and cocoa powder for a “freshly dug up” look.
- Green Goblin Toes: Shape the matcha dough to be shorter and thicker to look like creepy monster toes.
- Add a “Ring”: Use a little bit of frosting or a piece of a licorice lace to create a ring on one of the fingers after baking.
- Use Food Coloring: If you don’t have the natural powders, you can absolutely use a few drops of gel food coloring to dye your dough.
Keep Them Fresh! Storing Your Spooky Treats
These cookies are fantastic for making ahead! Here’s how to store them for maximum freshness.
- Room Temperature: The finished, decorated cookies can be stored in an airtight container at room temperature for up to 4 days.
- Freezing Unbaked Cookies: This is the best method! After you’ve flash-frozen the shaped cookies on the baking sheet, transfer them to a freezer-safe, airtight container or bag. They will keep for up to 2 months. You can bake them straight from frozen whenever you need them!
- Freezing Baked Cookies: You can also freeze the fully baked and cooled cookies (before decorating). Store them in an airtight container for up to 1 month. Let them thaw at room temperature before you decorate them with the jam and almonds.
Creepy Witch Finger Cookies
Ingredients
Method
- In a large bowl, use an electric mixer to cream the softened butter, salt, and confectioner’s sugar until light and fluffy.
- Add the egg yolks and vanilla extract and mix until just combined.
- If coloring, divide the mixture now and stir in your desired coloring powders (matcha, cocoa, etc.) until uniform.
- In a separate bowl, whisk together the flour and baking powder. Add this to the butter mixture and fold in with a spatula until a soft dough forms. Do not overmix.
- Shape the dough into a disc, wrap in plastic, and chill in the refrigerator for 20-30 minutes.
- Take a 1-tablespoon portion of dough and roll it into a finger shape. Gently squeeze to create two knuckles. Use the dull side of a knife to press wrinkle lines onto the knuckles.
- Press a blanched almond firmly onto the tip to create a fingernail. Place the shaped cookie on a parchment-lined baking sheet. Repeat with remaining dough.
- Place the entire baking sheet in the freezer for at least 40-60 minutes, until the cookies are frozen solid. This is a crucial step.
- Preheat oven to 325°F (163°C). Place frozen cookies on a lined baking sheet with some space between them.
- Bake from frozen for 20-25 minutes. The cookies should be set and only lightly browned on the very bottom. Let cool completely on the baking sheet.
- Once cooled, gently remove an almond nail. Place a small dab of red jam in the nail bed cavity and press the almond back on, allowing the jam to ooze out for a ‘bloody’ effect. Repeat with all cookies.
Notes
FAQs: Your Witch Finger Questions, Answered!
Why do my cookies spread out in the oven?
This is the most common issue, and it almost always means the cookies weren’t frozen solid before baking. That crucial freezing step solidifies the butter, which prevents the cookies from spreading out too quickly in the hot oven and helps them keep their detailed finger shape.
Can I make these without a stand mixer?
Absolutely! An electric hand mixer works perfectly for creaming the butter and sugar. If you don’t have one of those, you can do it by hand with a whisk and a sturdy spatula—it will just take a bit more elbow grease to get the butter really light and creamy!
What if my almonds fall off after baking?
Don’t worry, that is completely normal and expected! The jam step in the decorating process is not just for the “bloody” look; it’s the delicious glue that sticks the almond fingernails back on securely after the cookies have cooled.
Are there nut-free alternatives for the “fingernail”?
Yes! For a nut-free version, you can leave the almond off before baking. After the cookies have cooled, you can pipe a “nail” shape onto the tip using melted white chocolate, dark chocolate, or colored candy melts. A single pumpkin seed (pepita) also makes a great, creepy-looking green nail.
My Final Thoughts: Your Spookiest Bake Yet!
These Witch Finger Cookies are one of those truly special recipes that are just as much fun to make as they are to eat. They’re a delicious, creative, and slightly spooky project that is guaranteed to be the hit of any Halloween party. I hope you have a blast making these creepy, buttery treats and creating some fun memories in the kitchen!