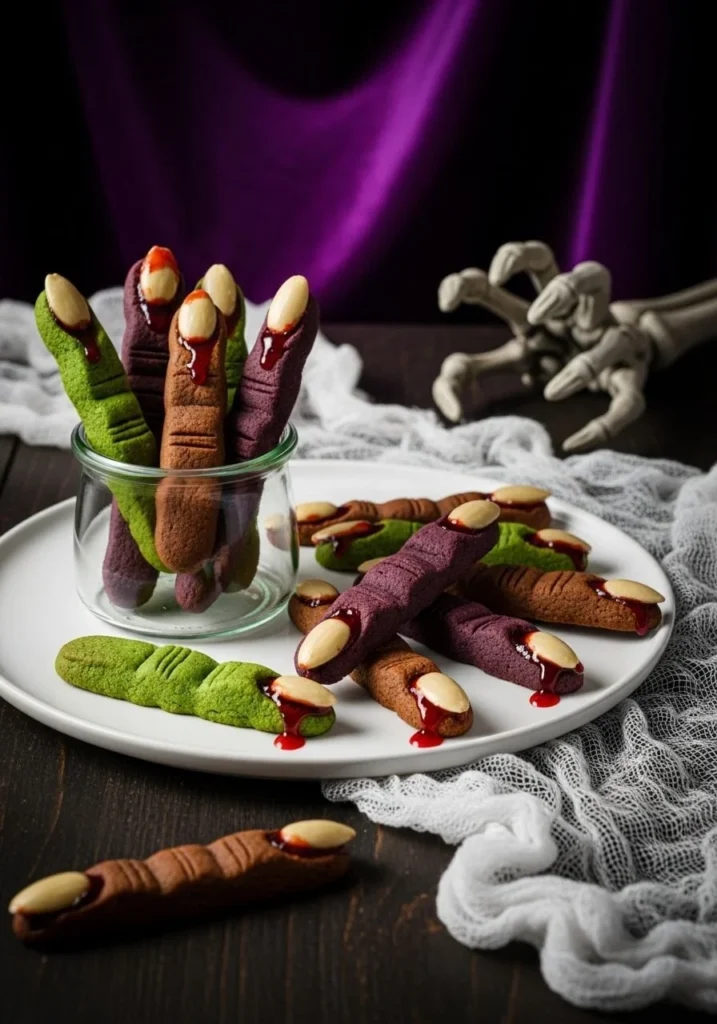
Creepy Witch Finger Cookies
A Little Story Before the Oven I have this weird fondness for anything that looks terrifying but tastes comforting, which is probably why Creepy Witch Finger Cookies became my go-to Halloween treat. I first stumbled across a version years ago and kept tinkering until the texture and look felt just right; that original recipe that…
A Little Story Before the Oven
I have this weird fondness for anything that looks terrifying but tastes comforting, which is probably why Creepy Witch Finger Cookies became my go-to Halloween treat. I first stumbled across a version years ago and kept tinkering until the texture and look felt just right; that original recipe that nudged me in the right direction was something like the creepy witch finger cookies recipe I bookmarked, and I kept its spirit while making a few changes. There’s something about the sound of almonds clicking into place and the faint scent of butter and vanilla that makes me forget I was ever afraid of witches in the first place.
What You Need (Yes, the Exact Amounts)
Let me walk you through the pantry raid, because you’ll want to have everything out before you start. For the dough I use 226 g (2 sticks) unsalted butter, softened, and 140 g (1 ¼ cup) confectioner’s sugar, plus 1 teaspoon of sea salt. The richness comes from 4 large egg yolks, at room temperature, mixed with 1 teaspoon vanilla extract. For the bulk of the cookie you’ll need 454 g (about 3 ¾ cups) all-purpose flour and 1/4 teaspoon of baking powder. For the nails, gather 50 whole blanched almonds. If you want spooky colors, have Optional coloring powders ready: 2-3 teaspoons matcha powder for green, 2-3 tablespoons purple sweet potato powder for a strange purple tint, or 1-3 teaspoons cocoa powder for brown. Finally, strawberry or raspberry jam gives you that deliciously gross “bloody” finish, and a little cocoa powder is nice for dusting as decoration.
Shaping Those Freaky Fingers
I always start by creaming the butter, salt, and confectioner’s sugar in a large bowl with an electric mixer until it’s light and fluffy. The room fills with that cozy, buttery aroma and you can tell when it’s right because the mixture becomes visibly paler and airy. Next I add the egg yolks and vanilla extract and mix until just combined; don’t overwork it or you’ll toughen the dough. If you’re coloring, now is the time to divide the mixture and stir in whichever powders you’re using — I sometimes do half green with matcha and half brown with a teaspoon of cocoa, so the batch looks like it came from a witch’s wardrobe.
In a separate bowl I whisk together the flour and baking powder, then add that to the butter mixture and fold with a spatula until a soft dough forms. This is where restraint pays off: do not overmix. Turn the dough into a disc, wrap it in plastic, and chill in the refrigerator for 20 to 30 minutes so it firms up enough to shape neatly.
When it’s time to sculpt, I take a 1-tablespoon portion of dough and roll it into a finger. I gently squeeze to create two knuckles, and then use the dull side of a knife to press wrinkle lines. Press a blanched almond firmly onto the tip to make a fingernail and place each shaped cookie on a parchment-lined baking sheet. Once the sheet is full, pop the whole tray into the freezer for at least 40 to 60 minutes so the cookies are frozen solid — this is one of my non-negotiable steps because frozen dough holds the knuckle details and prevents spreading.
A small tip I learned: keep the almonds slightly warm in your hand before pressing them on; they sit flush better if they aren’t stone cold. Another trick is to dust a tiny bit of cocoa into the knuckle lines before freezing to make them look deeper once baked.
The Bake and the Bloody Finale
Preheat your oven to 325°F (163°C) before you take the tray out. Place the frozen cookies on a lined baking sheet with some space between them and bake from frozen for 20 to 25 minutes. You’ll know they’re done when the cookies are set and only lightly browned on the very bottom; they shouldn’t be dark, just firm to the touch. Let them cool completely on the baking sheet — this prevents them from cracking from a hot-to-cold shock.
Once cooled, I gently remove an almond nail, place a small dab of strawberry or raspberry jam in the nail bed cavity, then press the almond back on just enough to let the jam ooze out. It’s oddly satisfying to see that little red bead appear; the first time I made them for a neighborhood party, some of the kids shrieked, others asked for seconds, and the adults kept asking what I did to make them so crispy on the edges yet tender in the center.
A Few Things I’ve Learned (and Other Ways to Make Them)
You can change the vibe with those optional powders. Matcha gives a witchy green that smells grassy and fresh, purple sweet potato powder lends a dusty violet and a mild earthy sweetness, and cocoa gives a classic brown that tastes like a thin shortbread cookie with chocolate undertones. If you want chewier fingers, replace a couple of tablespoons of flour with almond meal and note that baking time may shift slightly. For a nut-free version, use a slivered marzipan tip instead of an almond for the nail, and use apricot jam if you want a less tart “blood.”
Store leftovers in an airtight container. I usually keep a few fully decorated fingers in the fridge because of the jam; they’ll be fine there for up to five days, though they taste best within two. If you plan to make them far ahead, freeze the baked cookies (undecorated) in a single layer with parchment between sheets, and fill them with jam after defrosting. This way the jam doesn’t soak in and make the cookie soggy.
A common question is how to tell if they spread too much. If the knuckles have flattened into a blob, the dough was either too warm or overworked. The fix? Chill the dough longer, freeze the shaped fingers before baking, and be sure to bake them straight from frozen.
The Moment I Realized I Loved This Recipe
I love this recipe because it’s dramatic without being fussy. The smell of butter and vanilla while you cream the mixture is homely, but the look at the end is gleefully monstrous. I remember making a double batch the night before Halloween, packing a mason jar of jam and a sheet of almonds beside the tray so my roommate could finish them in the morning and deliver them to a party. The host called later to say people were still talking about the “realistic” nails.
If you want other takes on this concept, there’s a slightly different spin with similar scare factor over at a more classic witch finger version I’ve tried, which inspired me to experiment with color.
Conclusion
If you want a reliable, spooky cookie that’s as fun to make as it is to eat, these Creepy Witch Finger Cookies strike the balance perfectly. For another source of inspiration, I like to compare notes with this take on Creepy Witch Finger Cookies – Simply So Good. Happy haunting in the kitchen — and don’t forget to save one for yourself before the kids (or your friends) disappear them.
Creepy Witch Finger Cookies
Ingredients
Method
- Cream the softened butter, sea salt, and confectioner’s sugar in a large bowl with an electric mixer until light and fluffy.
- Add the egg yolks and vanilla extract and mix until just combined.
- If you want to color the dough, divide it and stir in the matcha, purple sweet potato powder, or cocoa powder as desired.
- In a separate bowl, whisk together the flour and baking powder.
- Fold the flour mixture into the butter mixture with a spatula until a soft dough forms.
- Turn the dough into a disc, wrap it in plastic, and chill in the refrigerator for 20 to 30 minutes.
- Take a 1-tablespoon portion of dough and roll it into a finger shape.
- Squeeze to create two knuckles and use a dull knife to press wrinkle lines.
- Press a blanched almond firmly onto the tip to create a fingernail and place on a parchment-lined baking sheet.
- Freeze the shaped cookies for at least 40 to 60 minutes.
- Preheat your oven to 325°F (163°C).
- Bake the frozen cookies on a lined baking sheet for 20 to 25 minutes until set and lightly browned on the bottom.
- Let cookies cool completely on the baking sheet before removing.
- Gently remove the almond nail, add a small dab of jam in the cavity, and reinsert the almond.