The Ultimate Crisp-Topped Baked Apples (Easier Than Pie!)
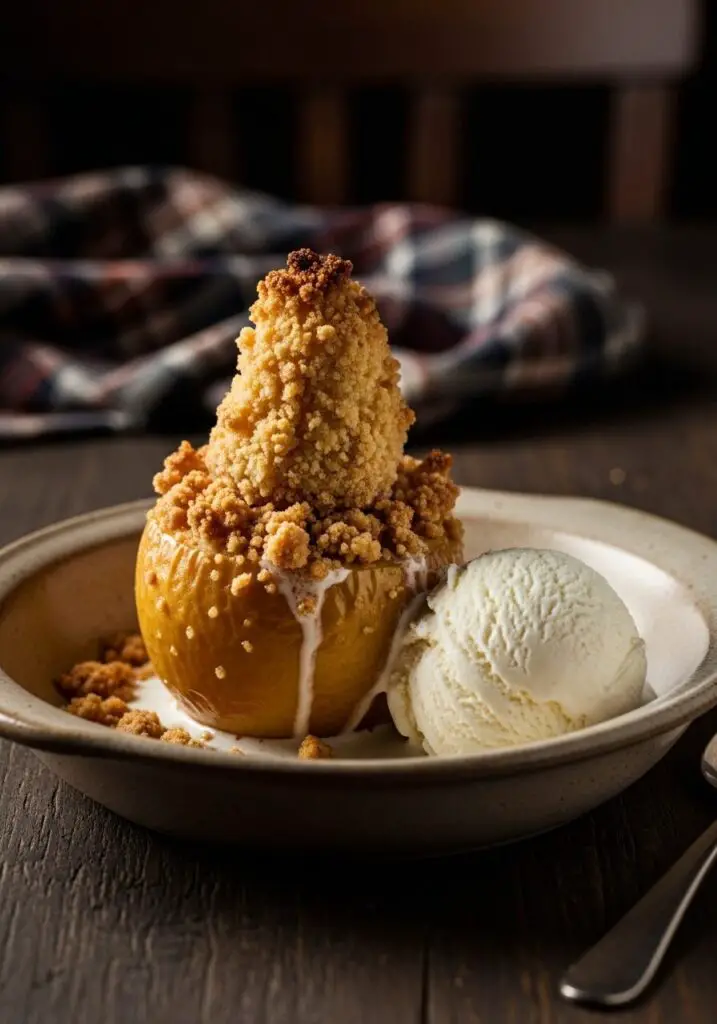
Imagine the incredible, soul-warming aroma of cinnamon and baked apples filling your home. Now, picture breaking through a crunchy, buttery pecan crumble with your spoon to find a perfectly tender, sweet apple, its juices mingling with the melted topping. This, my friends, is not just a dessert; it’s the coziest, most comforting feeling of autumn,…
Imagine the incredible, soul-warming aroma of cinnamon and baked apples filling your home. Now, picture breaking through a crunchy, buttery pecan crumble with your spoon to find a perfectly tender, sweet apple, its juices mingling with the melted topping. This, my friends, is not just a dessert; it’s the coziest, most comforting feeling of autumn, served warm in a bowl.
Here’s the thing: I have a deep, unwavering love for apple pie, but I don’t always have the time or energy for the whole process of making and rolling a perfect crust. This recipe is my genius shortcut to that same, glorious destination. It delivers all the comforting flavors of a classic apple crisp or pie but in a beautiful, elegant, and perfectly portioned individual dessert. It’s pure, simple magic.
I promise you, this is one of the easiest, most rewarding fall desserts you will ever make. It looks so impressive but is secretly so simple to assemble. It’s the perfect finale to a cozy weeknight dinner or an elegant addition to your Thanksgiving dessert table. No slicing, no messy serving—just a perfect, personal apple for everyone.
Get ready to master the simple art of the baked apple and create a stunning dessert that will have everyone believing you spent all day baking.
Why This Is Your New Favorite Fall Dessert!
You are going to be so thrilled with how these turn out. They are a beloved staple in my autumn kitchen for so many good reasons! Here’s why:
- Easier Than Pie, Just as Delicious: You get all the incredible flavor of a classic apple pie or crisp with a fraction of the effort. No crust to roll, no lattice to weave!
- A Stunning, Individual Dessert: Serving everyone their own personal baked apple feels so special and elegant. It’s a guaranteed show-stopper.
- The Perfect Texture Combination: You get the warm, tender, juicy apple, the buttery, sandy crumble, and the crunchy toasted pecans all in one perfect bite.
- Your House Will Smell Like Heaven: The aroma of apples and cinnamon baking in your oven is pure, unadulterated autumn aromatherapy. It’s worth it for the smell alone!
- A Fantastic Make-Ahead Component: You can make the crumble topping days in advance, making the final assembly incredibly fast and easy.
Recipe Snapshot
| Prep Time | 25 minutes |
| Cook Time | 50 minutes |
| Total Time | 1 hour 30 minutes |
| Servings | 4 apples |
| Calories | 519 kcal per serving |
| Course | Dessert |
| Cuisine | American |
| Difficulty/Method | Easy / Baking |
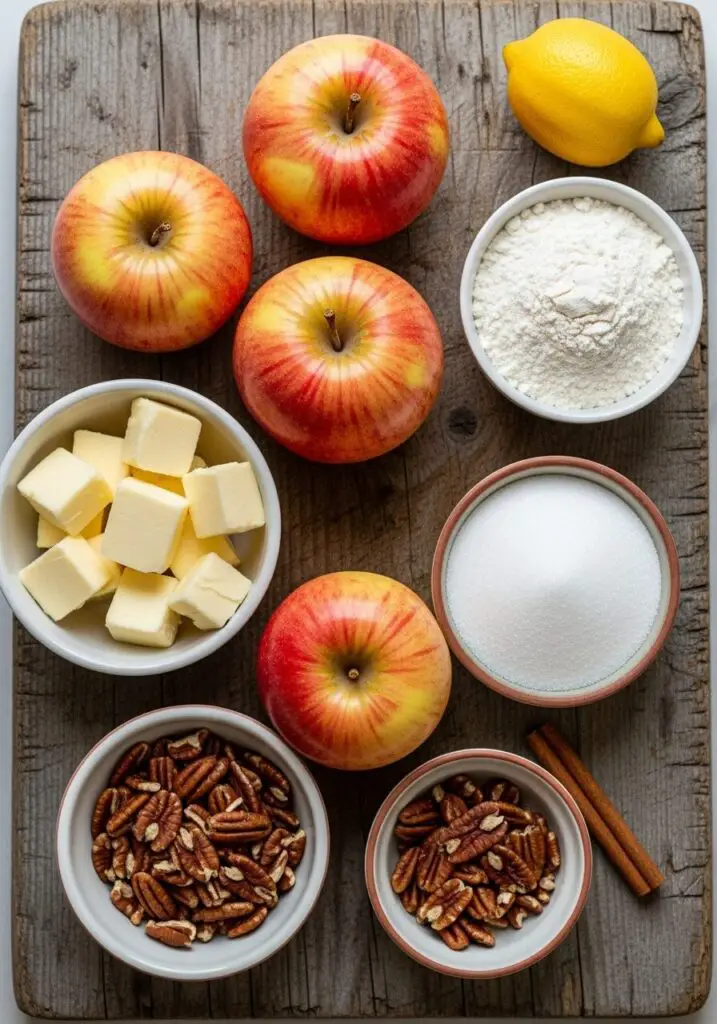
Your Shopping List for This Cozy Treat
This recipe uses classic, simple ingredients where quality truly shines through. Here’s what you’ll need.
→ For the Crunchy Crumble Topping
- 1/2 cup plus 1 tablespoon all-purpose flour → The base of our sandy, delicious crumble.
- 1/4 cup granulated sugar → For the perfect sweetness.
- 1/2 teaspoon ground cinnamon & 1/4 teaspoon kosher salt → For warmth and to balance the flavor.
- 4 tablespoons cold unsalted butter → Cold is key! This is the secret to a perfect crumble.
- 1/4 cup roughly chopped pecans (optional) → For a fantastic, toasty crunch.
→ For the Apples
- 4 large sweet apples → Honeycrisp, Gala, or Fuji are perfect as they are firm and hold their shape.
- 1/4 cup granulated sugar & 1 teaspoon ground cinnamon → The classic, cozy filling.
- A pinch of kosher salt → To enhance the apple’s natural sweetness.
- 2 teaspoons lemon juice → For a bright, tangy note that keeps the apples fresh.
- 1 tablespoon unsalted butter, cut into 4 pieces → A final pat of butter in each apple is pure luxury.
- Vanilla ice cream or whipped cream, for serving → Optional, but is it really?
Let’s Bake! Crafting Your Perfect Baked Apples
Ready to create some pure autumn comfort? This process is so satisfying, and the results are absolutely divine.
Part 1: The Irresistible Crumble Topping
- Prep Your Oven: First things first, get your oven rack in the middle position and preheat to 400°F (205°C).
- Mix the Dry Ingredients: In a medium bowl, whisk together the flour, sugar, cinnamon, and salt.
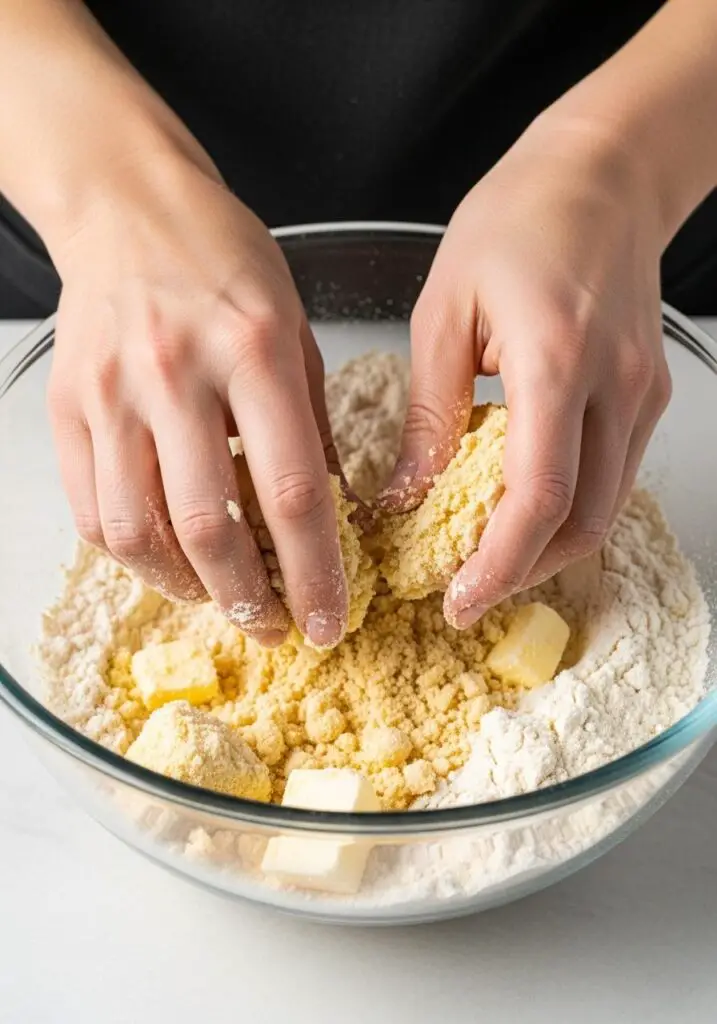
- Cut in the Butter: Add your pieces of cold butter to the flour mixture. Using your fingertips, pinch and rub the butter into the flour until it forms a sandy texture that looks like coarse breadcrumbs. A few pea-sized bits of butter are perfect! Work quickly to keep everything cold.
- Add the Nuts: Toss in the chopped pecans (if you’re using them) and pop the whole bowl in the fridge to stay cold while you prep the apples.
Part 2: Prep, Stuff, and Bake to Perfection
- Core the Apples: Slice about 1/2-inch off the top of each apple to create a flat surface. Now, use a melon baller or a sturdy spoon to carefully scoop out the core and seeds, leaving the bottom 1/2-inch of the apple intact. You want to create a nice little hollow for your filling.
- Make the Cinnamon Sugar Filling: In a small bowl, whisk together the sugar, cinnamon, and salt for the filling.
- Stuff the Apples: Divide this sugar mixture evenly among the four hollowed-out apples. Drizzle 1/2 teaspoon of lemon juice into the center of each apple, and then top with one of your small pieces of butter.
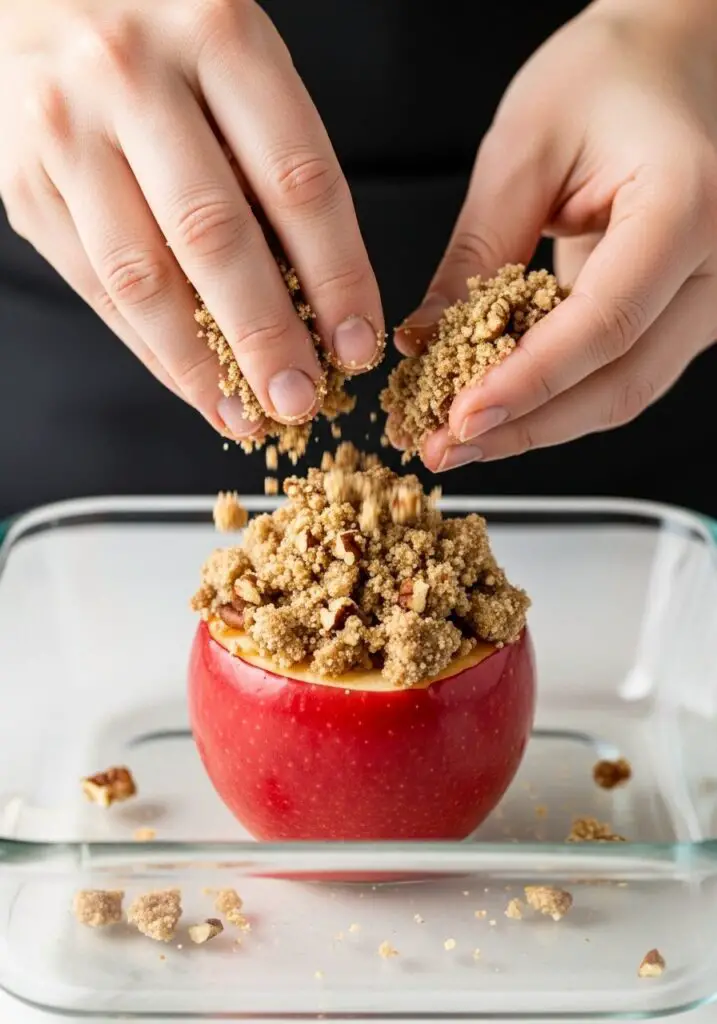
- Add the Crumble and Bake: Take your crumble topping out of the fridge. Carefully pile it high on the flat top of each apple. It’s okay if some falls into the opening, but don’t pack it down! Fill an 8×8-inch baking pan with about 1/2-inch of water and place your apples inside. This water bath is the secret to tender, not tough, apples!
- Bake to Golden Bliss: Bake for 35 to 45 minutes. The apples should be tender enough to be easily pierced with a knife, and the crumble topping should be a beautiful golden brown. Let them cool for about 15 minutes before serving warm with a big scoop of vanilla ice cream!
WiseRecipes’ Top Tips for Perfect Baked Apples
This is a simple recipe, but these pro secrets will make it absolutely flawless.
- Cold Butter is Your Best Friend. For a truly sandy, crumbly topping (and not a greasy paste), your butter MUST be cold. This creates little pockets that steam in the oven, resulting in a light, crisp texture.
- The Water Bath is NOT Optional. Baking the apples in a pan with a little water is the secret to making them perfectly tender and juicy. The steam created by the water gently cooks the apple from the outside in, preventing the bottoms from burning or becoming tough.
- Don’t Pack the Crumble! When you’re piling the crumble on top of the apples, keep it light and airy. Packing it down will make the topping dense and heavy instead of light and crisp.
- Use a Melon Baller. This is my favorite kitchen hack! A melon baller is the absolute perfect tool for neatly and easily scooping out the core and seeds from your apples.
- Tent with Foil if Needed. If you’re using the pecans, they can toast up quickly. Keep an eye on them, and if they start to look too dark after about 20 minutes, just loosely cover the apples with a piece of foil for the rest of the bake time.
Creative Twists: Delicious Ways to Customize Your Dessert
This classic recipe is a wonderful canvas for your own creativity! Here are some fun ideas:
- Add Dried Fruit: Mix a few tablespoons of chopped dried cranberries, raisins, or dates into the cinnamon-sugar filling before stuffing the apples.
- Swap the Nuts: Toasted, chopped walnuts or slivered almonds would be fantastic instead of pecans in the crumble.
- Add a Caramel Drizzle: After they come out of the oven, drizzle the apples with a warm, gooey salted caramel sauce. Absolutely decadent!
- Make it Boozy: Add a tablespoon of bourbon or spiced rum to the cinnamon-sugar filling for a more grown-up, complex flavor.
- Different Spices: Add a pinch of ground cardamom, nutmeg, or allspice to the crumble topping or the apple filling for an even warmer spice profile.
- Use Pears Instead: Firm Bosc pears would be a delicious substitute for the apples.
- Add Oats to the Crumble: For a heartier, more traditional “crisp” topping, you can add a 1/4 cup of old-fashioned rolled oats to your crumble mixture.
- Make a Savory Version: Stuff the apples with a mix of sausage, cheddar cheese, and breadcrumbs for a unique and delicious side dish!
Keep It Fresh! Make-Ahead & Storing Guide
These baked apples are fantastic for getting a head start on your dessert prep. Here’s how.
- Make-Ahead Plan: The crumble topping is your best friend here! You can prepare the entire crumble mixture and store it in an airtight container or a zip-top bag in the refrigerator for up to 5 days, or in the freezer for up to a month. This makes the day-of assembly incredibly fast!
- Refrigerator (Leftovers): Store any leftover baked apples in an airtight container in the refrigerator for up to 4 days.
- Reheating: The best way to reheat is in a 350°F (175°C) oven for about 10-15 minutes, until they are warmed through. You can also use the microwave, but you’ll lose the crispness of the topping.
Crisp-Topped Baked Apples
Ingredients
Method
- Preheat oven to 400°F (205°C). For the crumble, whisk together flour, sugar, cinnamon, and salt in a medium bowl.
- Using your fingertips, rub the cold butter into the flour mixture until a sandy texture forms. Toss in the pecans, if using, and refrigerate the crumble.
- For the apples, slice the top 1/2-inch off each apple. Use a melon baller or spoon to carefully remove the core, leaving the bottom 1/2-inch of the apple intact.
- In a small bowl, whisk together the sugar, cinnamon, and salt for the filling. Divide this mixture evenly among the apples.
- Add 1/2 teaspoon of lemon juice and 1 piece of butter to the center of each apple.
- Pile the chilled crumble topping evenly on top of each apple.
- Fill an 8×8-inch baking pan with about 1/2 inch of water. Place the apples in the pan.
- Bake until the apples are tender and the crumble is golden brown, 35 to 45 minutes. If using pecans, cover loosely with foil after 20 minutes to prevent burning.
- Let the apples cool in the pan for about 15 minutes before serving warm with vanilla ice cream.
Notes
FAQs: Your Baked Apple Questions, Answered!
What are the best apples for baking?
You want to choose a firm apple variety that will hold its shape during the long bake time and not turn into mush. For this recipe, sweet and firm apples are best. My top choices are Honeycrisp, Gala, Fuji, Braeburn, or Jonagold. A Granny Smith will also work if you prefer a more tart flavor.
Can I make these without the pecans or any nuts?
Yes, absolutely! The pecans are completely optional. The crumble topping is absolutely delicious and perfectly crispy on its own without any nuts.
My crumble topping seems like a paste, not a crumble. What did I do wrong?
This almost always means your butter was too soft when you mixed it in. The key to a sandy, crumbly texture is using cold, firm butter and working it into the flour quickly with your fingertips so it doesn’t have time to melt and turn into a paste.
Can I prepare the entire apple ahead of time and bake it later?
I wouldn’t recommend it. Once you cut into the apples, they will start to oxidize and turn brown, even with the lemon juice. For the best result, it’s best to core and stuff the apples right before they go into the oven. But since the crumble can be made well in advance, the final prep is super fast!
My Final Thoughts: The Essence of Autumn in a Bowl
These Crisp-Topped Baked Apples are more than just a dessert; they are the pure, simple, and utterly comforting essence of the fall season. It’s a warm, wholesome, and surprisingly elegant treat that proves you don’t need a lot of fuss to create something truly special. I hope this recipe fills your home with the most incredible smells and a whole lot of cozy happiness!