Crispy Cheesy Roll Ups
Crispy Cheesy Roll Ups How I Found These The first time I made Crispy Cheesy Roll Ups I was half asleep and entirely hungry. It was one of those nights when I wanted something warm, crunchy and cheesy but did not want to haul out a bunch of equipment. I had four slices of bread…
Crispy Cheesy Roll Ups
How I Found These
The first time I made Crispy Cheesy Roll Ups I was half asleep and entirely hungry. It was one of those nights when I wanted something warm, crunchy and cheesy but did not want to haul out a bunch of equipment. I had four slices of bread and a stack of cheese slices in the fridge, and the idea of turning them into little roll-ups felt like a tiny kitchen victory. If you love quick, comforting snacks, this will feel familiar — it’s essentially a grilled cheese that shrank itself and got crispier. I even bookmarked a similar riff when I was experimenting with other roll-up ideas, like the time I read about a keto version that played with fillings in creative ways while hunting for variations.
What Goes in Them
You really only need a few things to make magic: four slices of bread and four slices of cheese (cheddar, mozzarella, or your choice), plus either butter or cooking spray for browning. For dunking, I alternate between marinara sauce and a creamy tomato soup depending on the mood. I often tear off the crusts because it makes rolling neater, and flattening each slice of bread with a rolling pin compresses it just enough to wrap around the cheese without tearing. If you like the idea of swapping in other fillings, I once adapted this method to a different roll-up style I found online and the technique translated perfectly when I tried it with different fillings.
Rolling and Cooking
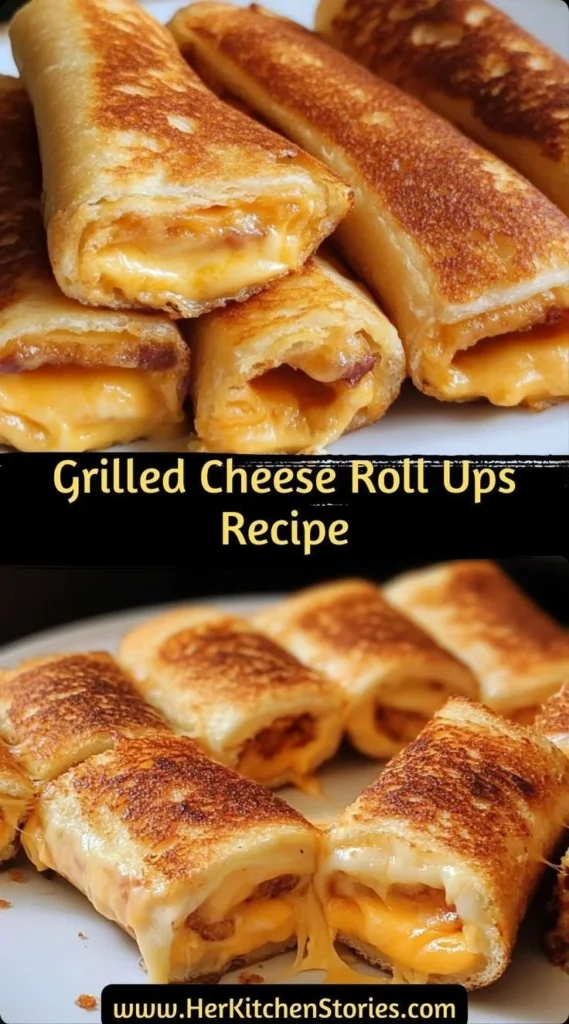
There is a simple rhythm to the process that I enjoy. I always start by preheating a skillet over medium heat. Once the pan is warm, I flatten each slice of bread with a rolling pin so that it becomes pliable and thin. Then I place a slice of cheese on each piece of bread and roll them up tightly, tucking the ends underneath so the cheese stays put. Before the pan goes on, I brush the outside of the rolled bread with butter or spray with cooking spray so the exterior crisps up into that golden, toasted shell.
When the skillet is ready I place the roll-ups seam side down in the skillet and cook until golden brown, turning occasionally for even cooking. You can hear them as they sizzle and transform from floppy to firm; that sound is exactly as satisfying as it sounds. After a few minutes of turning and watching for an even color, I remove the roll-ups from the skillet and slice into bite-sized pieces. I always serve them warm with marinara sauce or tomato soup for dipping, and sometimes I drizzle a touch of olive oil and sprinkle flakes of red pepper if we want a little heat. If you prefer a different texture, it’s fun to try rice paper or a veggie-forward wrapper as I once did while following another crisp-roll technique for inspiration on crisping methods.
A Few Tricks I Swear By
I have picked up a handful of small tricks that make these turn out reliably. First, remove the crusts if you want perfectly smooth rolls; they seal better without the thick edge. Second, flatten the bread just enough — too thin and it tears, too thick and it will not roll neatly. Third, always put the seam down in the skillet so the rolls seal while they brown; that little trick stops the cheese from oozing out mid-cook. Another thing I do when I make a bigger batch is place the cooked roll-ups on a wire rack rather than directly on a plate so they stay crisp instead of sweating. Once I even adapted this idea to a vegetarian version and leaned on a small recipe for stuffed zucchini roll-ups to get the proportions right when swapping in vegetables.
When You Know They’re Perfect
The moment of truth is as sensory as it gets. You’ll know the roll-ups are done when the outside is a deep golden brown and gives a little crunch when tapped with a spatula. The cheese inside should be soft and melty, blotting the bread just enough so each bite is gooey but not oily. If you slice the pieces and the cheese runs out too fast, the pan was probably too hot and the exterior finished before the inside warmed through; lowering the heat a notch solves that. I sometimes test one piece by slicing it in half to check the color and texture before removing the rest. If you want more sonic proof, the rolls will give that pleasant crisp snap when you bite into them, and a faint toasted aroma will be filling the kitchen.
Making It Your Own
This is where the recipe turns playful. You can stick to the classic cheddar, swap to mozzarella for stringier pull, or try a sharp smoked gouda for a richer flavor. For variations, try adding a thin smear of pesto before the cheese for herbal brightness, or tuck in a sliver of ham for a heartier snack — if you like the idea of spice, mixing in jalapeno cream cheese is a brilliant upgrade for an adult-friendly twist. If you want to make them ahead, assemble the roll-ups and keep them covered in the refrigerator for a few hours; when you are ready, cook them straight from chilling — just allow a minute more in the pan for even heating. I once made a big tray of these for a movie night and kept extras warm in a low oven on a rack, and they held up beautifully.
When I think about why I love this recipe, it is the combination of simplicity and comfort. It asks for almost nothing but rewards you with warm cheese and crunchy bread, and it adapts to whatever you have on hand. For a fun cross-check of ideas on rolling techniques, I sometimes revisit other roll-up recipes that inspired my tweaks to compare stuffing methods.
Conclusion
If you want a quick write-up that inspired me, I once read a nice review called Grilled Cheese Roll-Ups Are a Crispy, Gooey Treat for Kids (or Adults) that captured the same appeal, and for a spicy, low-carb spin you might like this take on jalapeno cream cheese roll-ups titled Keto Ham and Cheese Jalapeno Cream Cheese Roll Ups which gave me ideas for bolder fillings.
Crispy Cheesy Roll Ups
Ingredients
Method
- Preheat a skillet over medium heat.
- Flatten each slice of bread with a rolling pin until pliable and thin.
- Place a slice of cheese on each piece of bread and roll them up tightly, tucking the ends underneath.
- Brush the outside of the rolled bread with butter or spray with cooking spray.
- Place the roll-ups seam side down in the skillet.
- Cook until golden brown, turning occasionally for even cooking.
- Remove from skillet and slice into bite-sized pieces.
- Serve warm with marinara sauce or tomato soup for dipping.
- Optionally drizzle with olive oil and sprinkle with red pepper flakes for added heat.