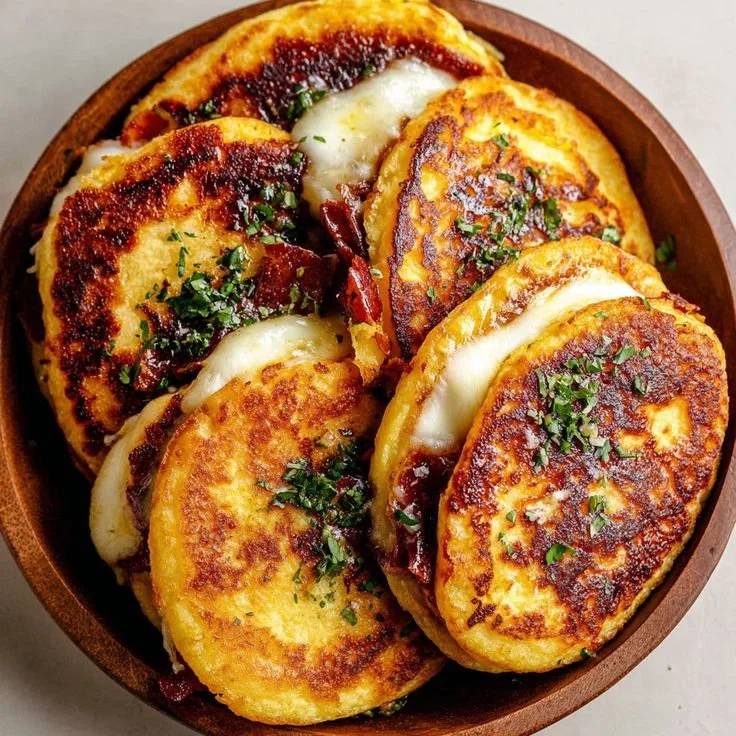
Crispy Hash Brown Egg Cups
That first kitchen accident felt like a small epiphany. I was trying to salvage breakfast for a half-asleep household: a bag of potatoes on the counter, eggs fridge-cold, and a muffin tin I hadn’t used in months. I grated potatoes on a whim, squeezed them until my hands tingled from the cold, and pressed them…
That first kitchen accident felt like a small epiphany. I was trying to salvage breakfast for a half-asleep household: a bag of potatoes on the counter, eggs fridge-cold, and a muffin tin I hadn’t used in months. I grated potatoes on a whim, squeezed them until my hands tingled from the cold, and pressed them into cups because, why not? The result: crunchy little potato nests that held perfectly baked eggs and melted cheese. From that mishap came a favorite—Crispy Hash Brown Egg Cups—that I’ve been adjusting like a scientist ever since.
That memory taught me a lot. I used to think baked eggs had to be fussy; now I treat this like a laboratory where texture and timing are the experiments. If you like tinkering, you’ll enjoy the process. If you like dependable results, you’ll love the final product. If you want an alternative base, try a sweet potato hash brown twist I experimented with once—it keeps the same structure but sings a different flavor.
What the potatoes actually do
Potatoes are the structural hero here. Grated, squeezed, and pressed, they form a thin crust that becomes golden and crisp at high heat. For this recipe you need: 2 cups grated potatoes, 4 large eggs, 1 cup shredded cheese (cheddar, mozzarella, or your choice), salt and pepper to taste, cooking spray or oil for greasing, and any optional toppings you like (diced vegetables, cooked bacon, herbs). I like to vary the cheese depending on mood; a sharper cheddar gives contrast, while mozzarella keeps things creamy. If you’re curious about swaps that make the base lighter or grain-free, I’ve also tried a cauliflower option that behaves similarly in a waffle-iron conversion: cheesy cauliflower hash brown waffles.
The experiment, step by step
I’ll spare you hours of footnotes: the method below is the one I always return to. I usually introduce the eggs and seasonings while the potato crust is baking, which saves time and keeps the eggs at room temperature when they go in.
- Preheat your oven to 400°F (200°C).
- Grease a muffin tin with cooking spray or oil.
- Squeeze excess moisture from the grated potatoes and distribute them evenly into the muffin cups, pressing down firmly to form a crust.
- Bake the potato crusts for 20 minutes or until they are golden brown and crispy.
- In a bowl, whisk together the eggs, salt, and pepper.
- Once the crusts are done, remove them from the oven and pour the egg mixture into each cup.
- Top with shredded cheese and any optional ingredients you’d like.
- Return to the oven and bake for an additional 15-20 minutes, or until the eggs are set.
- Let cool slightly before removing from the muffin tin.
- Serve warm and enjoy!
How you’ll know it’s done: the potato edges should be clearly browned and lift slightly from the muffin tin; the eggs should be set in the center but not rubbery. A little jiggle at the five-minute mark is okay because carryover heat finishes them; if you prefer well-firm eggs, bake the final step closer to 20 minutes.
The 400°F moment
There’s a reason for that oven temp: 400°F crisps without drying too quickly. I learned this after a few batches that either stuck terribly or browned before the centers set. Preheat well. Press the grated potatoes firmly into each cup so the crust is compact; that compression helps the potato hold shape and become a pleasant, thin shell. If you want a heartier cup, press in a bit more potato, but note it will need a touch longer in the initial bake.
When the cheese melts just right
Cheese is the mood-setter. Sprinkle about 1–2 tablespoons of shredded cheese per cup after you add the eggs; this gives a soft, bubbling cap that browns adorably. If you’re adding crisp toppings like bacon or bell pepper, put them on top of the cheese so they get a little roast without burning. For a gooey center, use mozzarella or a young cheddar; for flavor punch, try aged cheddar or gruyere.
Three quick tips from the lab
- Squeeze the potatoes thoroughly: the drier the shreds, the crispier the crust. A clean tea towel or cheesecloth makes this painless.
- Grease aggressively: cooking spray plus a light oil swipe prevents sticking and encourages easy removal.
- Room temperature eggs bake more evenly; whisk them while the crust bakes so they warm slightly.
Variations to keep things interesting
- Veg-forward: omit bacon and fold in finely diced spinach, tomatoes, and scallions for a fresher cup.
- Meat-lover’s shortcut: add chopped cooked sausage to the potato crust before the first bake to embed flavor—this is essentially a cousin to my trial with sausage muffins: sausage hash brown egg muffins.
- Pizza-style: use marinara, mozzarella, and oregano on top for a tiny breakfast pizza; the hash brown base works surprisingly well as a crust in mini form if you want to push it further like my breakfast-pizza experiments: breakfast pizza hash brown crust.
Serving and timing
These cups do best warm, right out of the pan, when cheese is melty and potatoes are crisp. Serve them with a simple green salad and a drizzle of sriracha or herbs for contrast. They also pair well with roasted tomatoes or a yogurt-dill sauce if you want something cooler alongside.
Storage and reheating
Leftovers keep well. Refrigerate in an airtight container for up to 3 days. To reheat, use a 350°F oven for 8–10 minutes to revive crispiness; microwaving is faster but will soften the crust. For make-ahead breakfasts, bake the crusts ahead, cool, fill, and freeze unbaked in a single layer—then finish baking from frozen, adding a few extra minutes to the final bake.
A few final experimental notes
I’ve burned a batch by crowding the oven and learned to space trays for airflow. I once tried par-cooking the potatoes in a skillet first; it added crisp but doubled the work without improving the result. The simplest method—grated, squeezed, pressed, and baked—wins for texture and ease. If you want a sweeter take, swap half the potatoes for sweet potato and reduce bake time slightly; you’ll get a different caramelized note that’s delightful for brunch.
Personal touch
I serve these when friends stop by unexpectedly. There’s something quietly celebratory about stealing a muffin tin for two hours to produce neat little cups of comfort. Watching someone break into one and see melted cheese pull away, then pause to chew thoughtfully—that’s the moment that convinced me to keep this in my rotation.
Conclusion
If you want another angle on the same idea, check out this similar approach to baked egg cups at Hash Brown Egg Cups – I Heart Naptime, which inspired a few of my tweaks. For a cheesier variant with slightly different assembly, see the method over at Cheesy Hash Brown Cups with Baked Eggs – Just a Taste.

Crispy Hash Brown Egg Cups
Ingredients
Method
- Preheat your oven to 400°F (200°C).
- Grease a muffin tin with cooking spray or oil.
- Squeeze excess moisture from the grated potatoes and distribute them evenly into the muffin cups, pressing down firmly to form a crust.
- Bake the potato crusts for 20 minutes or until they are golden brown and crispy.
- In a bowl, whisk together the eggs, salt, and pepper.
- Once the crusts are done, remove them from the oven and pour the egg mixture into each cup.
- Top with shredded cheese and any optional ingredients you’d like.
- Return to the oven and bake for an additional 15-20 minutes, or until the eggs are set.
- Let cool slightly before removing from the muffin tin and serve warm.