Crusty Bread
How I came to call it Crusty Bread I call this recipe Crusty Bread because the first time I pulled that steaming, crackly loaf from the oven I actually laughed out loud. It was the kind of kitchen victory that makes you hoard a slice for yourself while everyone else is distracted. If you want…
How I came to call it Crusty Bread
I call this recipe Crusty Bread because the first time I pulled that steaming, crackly loaf from the oven I actually laughed out loud. It was the kind of kitchen victory that makes you hoard a slice for yourself while everyone else is distracted. If you want the short version: you’ll need 3 cups all-purpose flour, 1 1/2 teaspoons salt, 1/2 teaspoon instant yeast, 1 1/2 cups water, and patience. I started with that handful of pantry staples and a lazy evening at home, and I still make it the same way when I need comfort. If you prefer a flatter sandwich loaf sometimes, I tweak the method from a 5-ingredient crusty panini bread (no-knead) to get a more uniform profile for pressing into paninis.
The Secret Behind Perfect Crusty Bread
The trick is more about time than torque. In a large bowl, mix the flour, salt, and yeast together. Add the water and stir until a shaggy dough forms. I know that sounds too simple, but the shaggy, sticky mass is exactly what gives you the airy crumb later. Cover the bowl with plastic wrap and let it sit at room temperature for 12 to 18 hours. Overnight is my usual—set it out before bed and come back to a bubbly, glossy surface in the morning.
When I’m mixing, I like to use slightly warm water—about body temperature—especially in cooler months. Too hot and you kill the yeast; too cold and it will take forever to show signs of life. One little trick: stir in the water with a wooden spoon until everything is incorporated and resist the urge to knead. That hands-off approach is why this is often called a no-knead loaf, and it gives you a soft, open interior with a crust that shatters when you pull it apart.
If you ever want to riff on shape or proofing times, there’s a great guide for making rolls that inspired a batch I brought to a potluck; it helped me understand how smaller portions behave differently in the oven. For that I sometimes consult crusty French bread rolls for ideas on timing and shaping.
When the Oven Needs to Do the Heavy Lifting
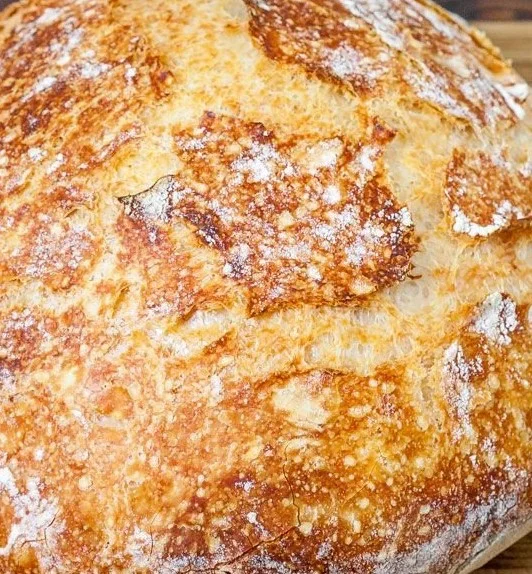
After the long rest you have this beautiful slack dough, and now the oven earns its keep. Preheat your oven to 450°F (232°C) and place a cast iron pot inside to heat. I put mine in while I clean the counter because you want that pot smoking-hot when the dough goes in. Once hot, carefully remove the pot, and place the dough inside. I find lifting the dough onto a square of parchment makes the transfer graceful and keeps my fingers unburned. Cover and bake for 30 minutes, then uncover and bake for an additional 15 minutes until golden brown. That covered bake traps steam and lets the loaf expand without tearing; uncovering finishes the crust.
There are a couple of ways to check doneness that feel almost old-school. The loaf should be a deep golden brown with a few darker spots and it should sound hollow when you knock the underside. If you have an instant-read thermometer, 200 to 205°F inside is a safe target, especially if you’ve added enrichments like olive oil or milk. Let cool before slicing so the crumb sets—this is the hardest part for me because the aroma of caramelized crust and warm bread makes patience feel optional.
A Few Things I’ve Learned (and a couple of small cheats)
One time I forgot to heat the pot and just put the dough on a baking sheet. The crust was fine, but that big oven bloom I love was missing. Heating the pot is the single change that made this loaf go from "good" to "I need to tell everyone about this bread." Another time I tried swapping half the flour for whole wheat and learned that the dough wants a little more water and a touch more proof time; it’s forgiving, but not magical.
Here are a few things I do without thinking: dust the top lightly with flour right before baking for a rustic look; use a serrated knife to slice once it’s cooled to keep the crumb from tearing; and tap the bottom of the loaf to listen for that hollow sound. If you’re impatient and need the bread that day, you can cut the room-proofing shorter, but expect a denser crumb. For a heartier twist I sometimes follow notes from a crusty Italian bread variant—adding a tablespoon of olive oil and a teaspoon of sugar gives a different crust color and a slightly softer crumb.
Making It Your Own
This recipe welcomes small experiments. Add a tablespoon of dried rosemary and a teaspoon of cracked black pepper for herb bread that pairs beautifully with soup. Fold in a handful of olives for a savory, briny loaf that disappears at gatherings. For a seeded top, press sesame or sunflower seeds into the dough before the first rest. I once made a version with caramelized onions and garlic; the house smelled like someone had opened a bakery.
Leftovers keep surprisingly well if you handle them right. I wrap cool slices in a clean linen or store the loaf in a paper bag so the crust stays crisp for a day. For longer, slice and freeze in a resealable bag for up to three months; toast or reheat to bring back some of that original crunch. If you’re planning ahead, I sometimes shape two smaller loaves and freeze one after the first rise; thaw and pop it into a hot pot for a nearly fresh-baked feel.
What to serve it with? I love it with a simple smear of butter and flaky salt, alongside a bowl of tomato soup, or as the vehicle for a thick-cut sandwich. If you bake a loaf on a weekend, it becomes the centerpiece of lunches and impromptu dinners for days.
Conclusion
If you want a visual walkthrough, the Easy Crusty French Bread (VIDEO) on Life As A Strawberry is a helpful companion to this method. For another take on the same no-knead idea with clear instructions, try the World’s Easiest Yeast Bread recipe from Recipetineats.
Crusty Bread
Ingredients
Method
- In a large bowl, mix the flour, salt, and instant yeast together.
- Add the warm water and stir until a shaggy dough forms.
- Cover the bowl with plastic wrap and let it sit at room temperature for 12 to 18 hours.
- Preheat the oven to 450°F (232°C) and place a cast iron pot inside to heat.
- Once the pot is hot, carefully remove it and place the dough inside, using parchment paper for easy transfer.
- Cover and bake for 30 minutes, then uncover and bake for an additional 15 minutes until golden brown.
- Check doneness by tapping the bottom— it should sound hollow.
- Let the bread cool before slicing.