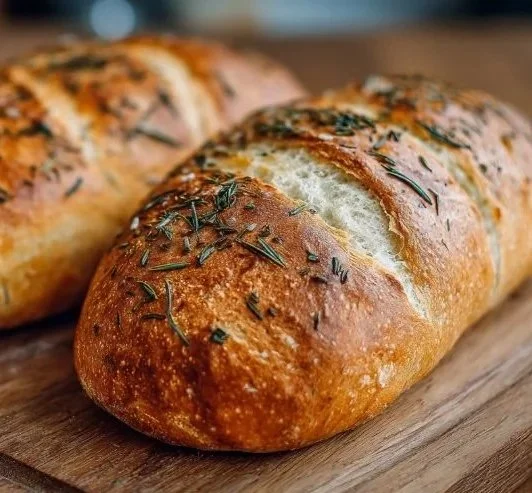
Crusty Italian Bread
How I Fell in Love with Crusty Italian Bread I still remember the first time the smell of a freshly baked loaf filled my tiny kitchen and made me stop whatever I was doing. That day I learned that great bread does not need fuss, only patience and a few honest ingredients: 3 ½ cups…
How I Fell in Love with Crusty Italian Bread
I still remember the first time the smell of a freshly baked loaf filled my tiny kitchen and made me stop whatever I was doing. That day I learned that great bread does not need fuss, only patience and a few honest ingredients: 3 ½ cups all purpose flour, 1 ½ teaspoons salt, 1 teaspoon sugar, 2 ¼ teaspoons active dry yeast, 1 ½ cups warm water (about 110°F), and a little cornmeal for dusting. If you want a quick refresher while you read, I sometimes pull up a similar tutorial to compare techniques, like this crusty Italian loaf guide, but mostly I follow the rhythm I picked up from practice.
There is something about that first frothy bubble of yeast that feels like a tiny promise. Combine warm water, sugar, and yeast in a bowl. Let sit 5–10 minutes until frothy. If it bubbles up, you know the yeast is alive and you are off to a good start.
The Dough: Simple Things That Matter
When the yeast is foamy I stir in the flour and salt. Add flour and salt. Stir until a rough dough forms. At this point it looks shaggy and a little coarse, but that is correct. I turn it out onto a floured surface and knead with the kind of rhythm that makes your forearms hum: knead on a floured surface for 8–10 minutes until smooth and elastic. A good trick I learned is to use the heel of my hand and fold, turn, and push; the dough will change from ragged to silky and springy. Tip: if the dough seems sticky at first, resist the urge to overload it with flour—work a little at a time, and the dough will come together.
Once it’s smooth I grease a bowl and tuck the dough in like a napkin-wrapped present. Place dough in a greased bowl, cover, and let rise 1–2 hours until doubled. I set mine near a warm window or on top of the oven if I just used it for something else. The magic here is patience. When it has doubled, punch it down, shape into a round or oval loaf, and place on a cornmeal-dusted sheet. Cover and let rise 30–45 minutes. That second rise is shorter but important; the loaf puffs and becomes airy in a way that makes the crust sing in the oven.
If you are curious about a no-knead twist or want a fast panini-style bread idea, I sometimes compare techniques with a no-knead version like this simple panini bread to borrow tricks for hydration and timing.
Shaping, Steam, and the Oven Trick That Works Every Time
A small ritual I never skip: preheat the oven to 450°F with a shallow pan of water on the bottom rack for steam. Preheat oven to 450°F with a shallow pan of water on the bottom rack for steam. That steam creates the glossy, crisp exterior that makes people lean in and take a deep breath. When the oven is hot and the loaf has had its second rise, I score it with a sharp blade—long, confident cuts so the bread opens like a flower—and slide it in. Score the loaf and bake 25–30 minutes until golden and hollow sounding when tapped. The first few minutes of baking are loud with expansion; you will hear the crackle as the crust forms.
A personal tip: use a baking stone or a heavy sheet and make sure it is preheated too. Scoring with a razor gives a cleaner ear and a prettier loaf than a dull knife. Also, I sometimes spritz the top with a little water right before it goes in to encourage that initial burst if my oven is dry.
How to Know It’s Done, What to Serve, and Little Variations
When the timer dings I pull the bread and tap the bottom to judge doneness. Bake 25–30 minutes until golden and hollow sounding when tapped. That hollow sound is everything; it tells you the crumb has set and the interior is no longer gummy. Cool on a wire rack before slicing. Cooling is not optional—if you slice too soon the loaf will have a gummy texture because the interior is still finishing the structure.
I love serving this bread torn into chunks alongside a tomato soup that sings of basil, or sliced thick for bruschetta with ripe tomatoes, olive oil, and a flake of salt. It makes the most honest grilled cheese and becomes the backbone for an awesome sandwich when I have guests. If I am packing it for later, I wrap cooled slices in plastic and freeze them; to eat, I toast straight from the freezer. For short-term storage, a paper bag keeps the crust nicer for a day or two while a plastic bag will soften it faster.
A couple of variations I play with: fold in chopped rosemary and a few garlic cloves for an herby loaf, or add a half cup of whole wheat flour for a nuttier flavor and denser crumb. You can also sprinkle semolina into the dough for a slightly crunchy crumb. If you want to be bold, fold in chopped olives after the first rise for a savory, briny loaf that goes beautifully with antipasti.
A Few Things I’ve Learned (and Regrets I’ve Made)
I once rushed the first rise and baked too early; the loaf looked pretty but had an underdeveloped flavor and an uneven crumb. That taught me that the long, slow rise builds depth, not just air. I also learned the hard way to let it cool: slicing into a hot loaf felt like cutting through custard. Now I set a timer for at least 30 minutes of cooling, and I use that time to make a pot of soup, or to layer slices with olive oil and garlic for a snack.
Three quick tips I swear by: always check the yeast by letting it get frothy for 5–10 minutes; keep your water around 110°F so you do not kill the yeast; and when in doubt, give the dough another five minutes of kneading until it feels elastic and springs back.
I love this recipe because it is forgiving yet honest. It rewards small attentions—the exact warmth of water, the right amount of steam, a confident score—and it delivers a loaf that crackles and smells like home. The crust is golden and slightly blistered, the crumb is tender with irregular holes, and the sound when you tap it makes you feel like you did something a little bit magical.
Conclusion
If you want a visual walkthrough, I sometimes watch a video tutorial like this rustic Italian crusty bread recipe video to remind myself of the shaping and scoring motions. And if you want another written take on a crisp, traditional loaf, this Crusty Italian Bread post has lovely photos and variations that complement what I’ve shared.
Crusty Italian Bread
Ingredients
Method
- Combine warm water, sugar, and yeast in a bowl. Let sit for 5–10 minutes until frothy.
- Once the yeast is foamy, stir in the flour and salt until a rough dough forms.
- Turn the dough onto a floured surface and knead for 8–10 minutes until smooth and elastic.
- Place the dough in a greased bowl, cover, and let rise for 1–2 hours until doubled in size.
- Punch down the risen dough, shape into a round or oval loaf, and place on a cornmeal-dusted sheet.
- Cover and let rise for 30–45 minutes.
- Preheat the oven to 450°F with a shallow pan of water on the bottom rack for steam.
- Score the loaf with a sharp blade and bake for 25–30 minutes until golden and hollow sounding when tapped.
- Cool the bread on a wire rack before slicing.