The Ultimate Cupcake Christmas Tree (A Holiday Show-Stopper!)
Imagine a stunning, edible centerpiece that is the absolute star of your holiday party—a towering, sparkling Christmas tree, built entirely out of rich chocolate mini cupcakes. That, my friends, is the breathtaking magic of this Cupcake Christmas Tree. It is, without a doubt, the most memorable and joy-sparking dessert you will create this season. Here’s…
Imagine a stunning, edible centerpiece that is the absolute star of your holiday party—a towering, sparkling Christmas tree, built entirely out of rich chocolate mini cupcakes. That, my friends, is the breathtaking magic of this Cupcake Christmas Tree. It is, without a doubt, the most memorable and joy-sparking dessert you will create this season.
Here’s the thing about a true holiday show-stopper: it should be as fun to make as it is to behold. I fell in love with this project because it’s less about baking and more about creative, joyful construction. It’s my go-to when I want to create a dessert with a massive “wow” factor, something that gathers everyone around the table in awe and delight before the first cupcake is even plucked from the tree.
I promise you, there is no greater holiday triumph than revealing this masterpiece. The deep, chocolatey flavor of the mini cupcakes, the sweet and simple buttercream, and the festive decorations of candy canes and gilded cranberries create a complete holiday experience. It’s not just a dessert; it’s a decoration, a conversation starter, and a delicious treat all in one.
Get ready to assemble an unforgettable, edible work of art that will be the talk of every holiday gathering.
Why This Cupcake Tree is a Holiday Masterpiece!
You are going to be so incredibly proud of this creation. It’s a project that brings so much festive cheer. Here’s why you absolutely must make it:
- The Ultimate Holiday Centerpiece: This isn’t just a dessert; it’s a stunning, edible decoration that will be the focal point of your holiday table.
- A Fun and Creative Project: Building the tree is a joyful and rewarding process. It’s a fantastic project to tackle for a truly special holiday result.
- Delicious Chocolate Cupcakes: The recipe yields moist, deeply chocolatey mini cupcakes that are the perfect bite-sized treat.
- Interactive and Crowd-Pleasing: Guests will love plucking their own individual cupcake right from the tree. It’s a fun, interactive way to serve dessert.
- Completely Make-Ahead: The cupcakes can be baked and the tree fully assembled up to 24 hours in advance, freeing you up on the day of your party.
Recipe Snapshot
| Prep Time | 1 hour 30 minutes |
| Cook Time | 20 minutes |
| Total Time | 1 hour 50 minutes |
| Yield | 20 to 25 servings |
| Calories | ~340 kcal per cupcake |
| Course | Dessert |
| Cuisine | American |
| Difficulty/Method | Intermediate / Assembly |
Your Shopping List for This Edible Masterpiece
This recipe involves a few components: the cupcakes, the frosting, and the structure. Here’s everything you’ll need:

→ For the Chocolate Mini Cupcakes
- 2 cups sugar
- 1 ¾ cups flour
- ¾ cup cocoa powder
- 1 ½ tsp baking powder & 1 ½ tsp baking soda
- 1 tsp salt
- 2 eggs
- 1 cup whole milk
- ½ cup vegetable oil
- 1 tsp pure vanilla extract & 1 tsp almond extract → A classic flavor combination for a rich cake.
- 1 cup boiling water → The secret to a moist, tender crumb.
→ For the Buttercream Frosting
- 8 tbsp unsalted butter → Softened to room temperature.
- 1 pound confectioners’ sugar → About 4 cups.
- 1 tsp pure vanilla extract
- 2 to 4 tbsp whole milk → To achieve the perfect consistency.
→ For the Tree Structure & Decorations
- 1 small 11-inch styrofoam cone → The essential base for your tree. Found at most craft stores.
- 30 to 40 toothpicks → For securely attaching the cupcakes.
- Green sprinkles or jimmies → To give the cupcakes their “pine needle” look.
- 10 small candy canes, ½ cup fresh cranberries, Gold leaf → For beautiful, festive decorations.
- Gold and red curling ribbon & Sugar → For the final, sparkling touches.
Let’s Build a Tree! Your Step-by-Step Guide
This project is all about assembly. Read through the steps, get your components ready, and enjoy the creative process!
Part 1: The Chocolate Mini Cupcakes
- Prep and Mix Dry Ingredients: Preheat the oven to 375°F. Line mini muffin tins with paper liners. In a stand mixer with a whisk attachment, combine the sugar, flour, cocoa powder, baking powder, baking soda, and salt.
- Add Wet Ingredients: Add the eggs and milk and mix until combined. Drizzle in the oil, vanilla extract, and almond extract. With the mixer on low, carefully pour in the boiling water and mix just until the batter is smooth.
- Bake and Cool: Fill the mini cupcake liners about 2/3 full. Bake for about 20 minutes, until a toothpick inserted into the center comes out clean. Let the cupcakes cool completely in their pans.
Part 2: The Buttercream Frosting
- Cream the Butter: In a stand mixer with a paddle attachment, cream the softened butter until smooth.
- Mix the Frosting: Add the confectioners’ sugar, vanilla, and 2 tablespoons of milk. Mix until smooth. If the frosting is too thick, add more milk, one tablespoon at a time, until it’s thick but easily spreadable.
- Frost and Chill: Frost the tops of the completely cooled cupcakes with a flexible spatula. Place the frosted cupcakes in the refrigerator for at least 1 hour to allow the frosting to firm up. This is crucial for the next step!
Part 3: Assemble Your Masterpiece
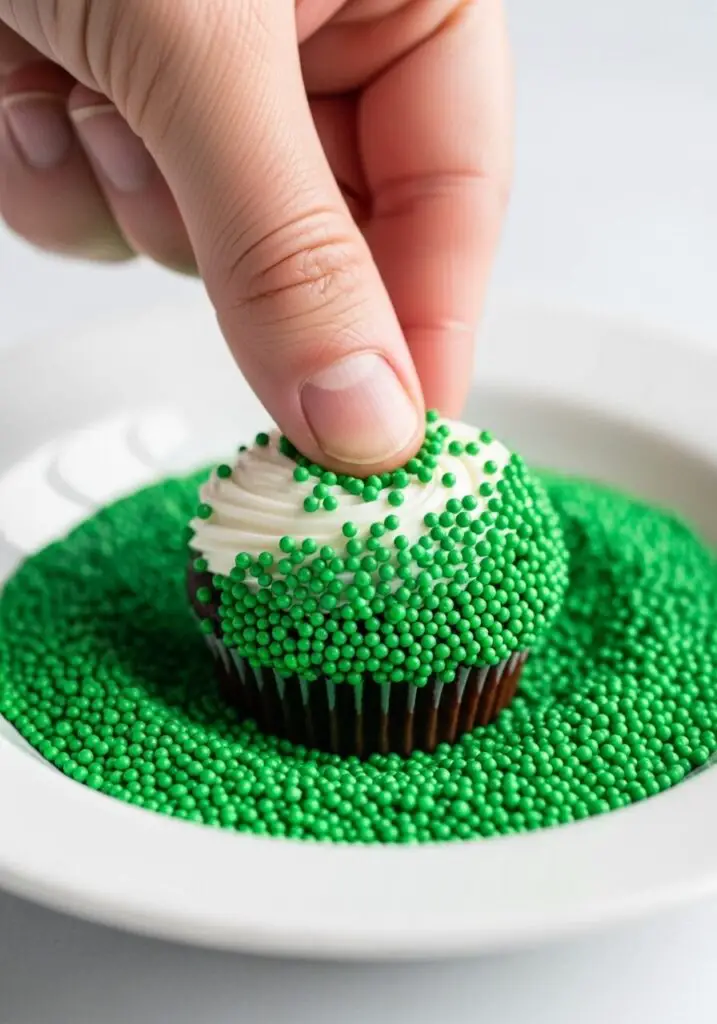
- Coat the Cupcakes: Spread a thick layer of green sprinkles on a plate. Take the chilled, frosted cupcakes and dip the tops into the sprinkles, pressing gently to coat them completely. Set them aside.
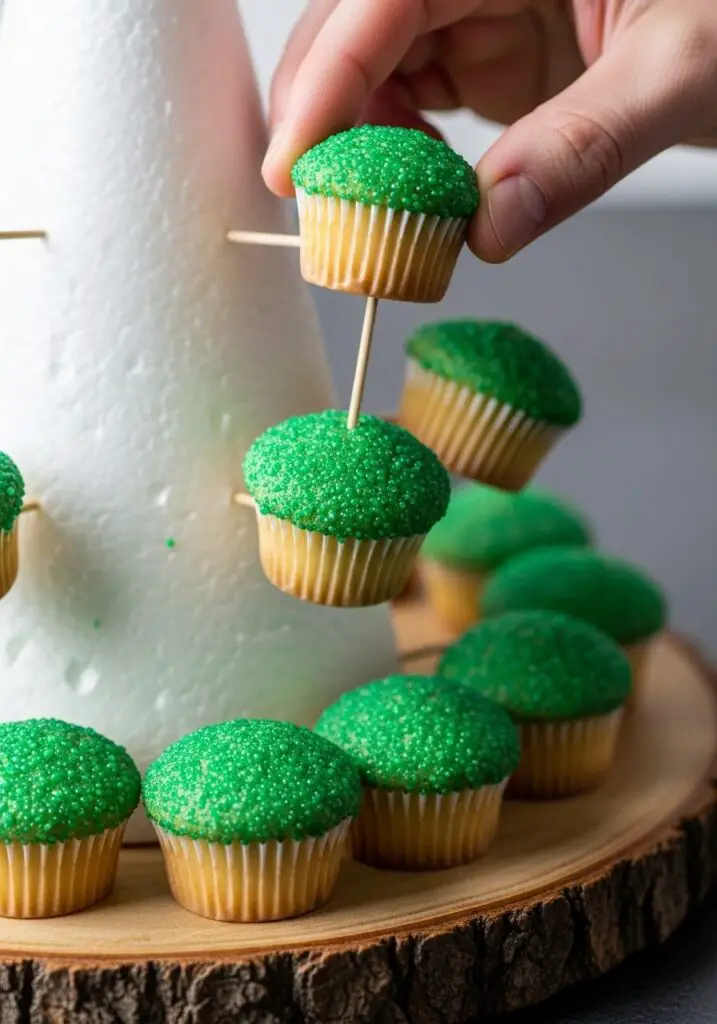
- Prepare the Cone: Place the styrofoam cone on a large, sturdy serving platter. About one inch up from the bottom of the cone, insert a circle of toothpicks, spacing them about 1 ½ inches apart. Make sure they are angled slightly upwards and stick out at least 1 inch.
- Build the Bottom Row: Create the bottom ring of the tree by carefully spearing the bottom of a sprinkle-coated cupcake onto a toothpick. The frosted top should face outwards, and the side of the cupcake should rest on the platter for support. Continue all the way around.
- Build Upwards: About one inch above the tops of the first row of cupcakes, insert another row of toothpicks, staggering them to sit in the gaps between the cupcakes below. Spear the next row of cupcakes onto the toothpicks. You will use fewer cupcakes on each subsequent row.
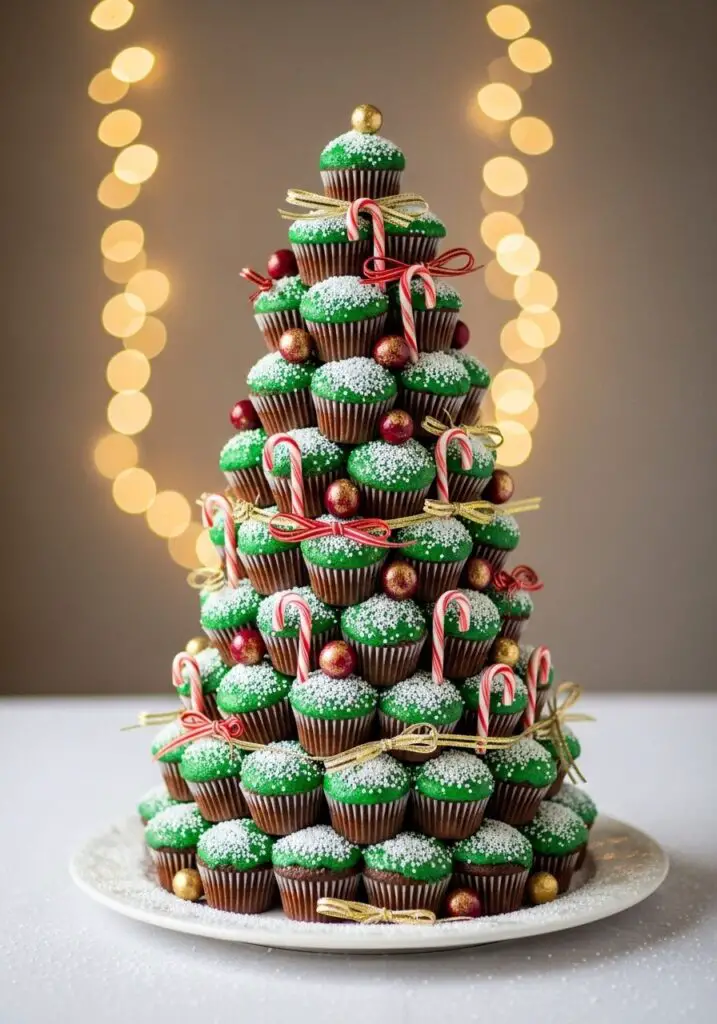
- Complete the Tree: Continue this process up the cone, creating a tree of cupcakes and ending with a single cupcake right at the very top.
- Decorate!: Stick the candy canes into any gaps in the styrofoam. To gild the cranberries, gently roll them on sheets of gold leaf, then use a dab of leftover frosting to stick them onto the “tree.” Tie ribbons around the candy canes. For a final magical touch, pour a layer of granulated sugar onto the platter around the base of the tree to look like sparkling snow.
WiseRecipes’ Top Tips for Tree-Building Success
These are the secrets to making your assembly process smooth and your final tree sturdy and spectacular.
- Chilling is Crucial. Do not skip refrigerating the frosted cupcakes for at least an hour. The firm frosting is what allows the sprinkles to adhere nicely without smearing, and it helps the cupcakes hold up during assembly.
- Angle Your Toothpicks. When you insert the toothpicks into the cone, angle them slightly upwards. This will give the cupcakes a bit of a lift and help them sit more securely against the cone.
- Start with a Sturdy Base. The bottom row is the foundation of your whole tree. Make sure the cupcakes are resting securely on the platter and are pressed firmly onto the toothpicks.
- Fill in the Gaps. As you build upwards, you might find you have small gaps. Don’t be afraid to cut a mini cupcake in half to fill a space and keep the tree looking full and lush.
- Assemble on Your Serving Platter. Build the tree directly on the platter you plan to serve it on. It is very difficult and risky to try and move the finished masterpiece!
Cupcake Christmas Tree
Ingredients
Equipment
Method
- Preheat the oven to 375 degrees F. Line mini muffin tins with paper liners.
- In a mixer, combine sugar, flour, cocoa powder, baking powder, baking soda, and salt. Add eggs and milk and mix. Drizzle in the oil, vanilla, and almond extracts. With the mixer on low, add the boiling water and mix until smooth.
- Fill lined cups about 2/3 full. Bake for about 20 minutes. Let cool completely.
- In a mixer, cream the butter until smooth. Add the sugar, vanilla, and 2 tablespoons milk and mix until smooth. Add more milk as needed until thick and spreadable.
- Frost the tops of the cooled cupcakes. Refrigerate for at least 1 hour until the frosting is firm.
- Spread sprinkles on a plate. Dip the tops of the chilled cupcakes in the sprinkles to coat completely.
- One inch up from the bottom of the styrofoam cone, stick toothpicks into the cone about 1 1/2 inches apart in a circle. Place the cone on a serving platter.
- Create the bottom row by spearing the bottom of a cupcake onto a toothpick, with the frosted side facing out and the cupcake resting on the plate for support.
- One inch above the first row, place another row of toothpicks, staggering them to sit between the cupcakes below. Spear the next row of cupcakes on.
- Continue up the cone to form a tree, ending with a single cupcake on top.
- Decorate by sticking candy canes into the styrofoam, attaching gilded cranberries with frosting, and pouring sugar on the platter for a ‘snow’ effect.
Notes
Keep It Fresh! Storing Your Cupcake Tree
Due to the frosting and cupcakes, this centerpiece needs to be stored properly.
- Refrigerator: The fully assembled tree can be stored in the refrigerator for up to 24 hours. Cover it loosely with plastic wrap to protect it. The “snow” may dissolve slightly, so it’s best to add the final sugar sprinkle just before serving.
- Serving: For the best flavor and texture, you can let the tree sit at room temperature for about 30 minutes before serving. However, it can be served directly from the fridge.
FAQs: Your Cupcake Tree Questions, Answered!
What can I use if I can’t find a styrofoam cone?
A styrofoam cone from a craft store is definitely the easiest and most stable option. In a pinch, you could try to construct a cone shape out of sturdy cardboard and cover it tightly in foil, but be aware that it will not be as sturdy for holding the toothpicks.
Can I use a different flavor of cupcakes or frosting?
Absolutely! A vanilla or even a red velvet cupcake would be delicious. You could also tint a simple vanilla buttercream green instead of using sprinkles for a different look. The possibilities are endless!
Is this dessert difficult to serve?
Not at all! That’s the beauty of it. Serving is incredibly easy and fun. Simply tell your guests to help themselves by gently plucking a cupcake of their choice directly from the tree. No cutting or slicing required!
Can I use regular-sized cupcakes instead of minis?
You would need a much larger and wider cone to support the weight and size of regular cupcakes. While possible, it would be a much heavier and more challenging construction. Mini cupcakes are ideal for this project’s scale and stability.
Final Thoughts: Your Most Spectacular Holiday Dessert
There is such a magical feeling in creating something that brings so much visual joy to a celebration. This Cupcake Christmas Tree is more than just a dessert; it’s a memorable experience that will delight your guests of all ages. I hope you have a wonderful time building your own edible masterpiece. Happy Holidays!