Delicious Keto Crunchwraps Recipe for Guilt-Free Indulgence
There’s something profoundly satisfying about biting into a crunchy, cheesy, and loaded wrap that feels indulgent but guilt-free. If you’re on a keto journey or just trying to keep things lighter without sacrificing flavor, my Delicious Keto Crunchwraps Recipe for Guilt-Free Indulgence will become a fast favorite! Picture perfectly crisp tortillas hugging a melty cheese…
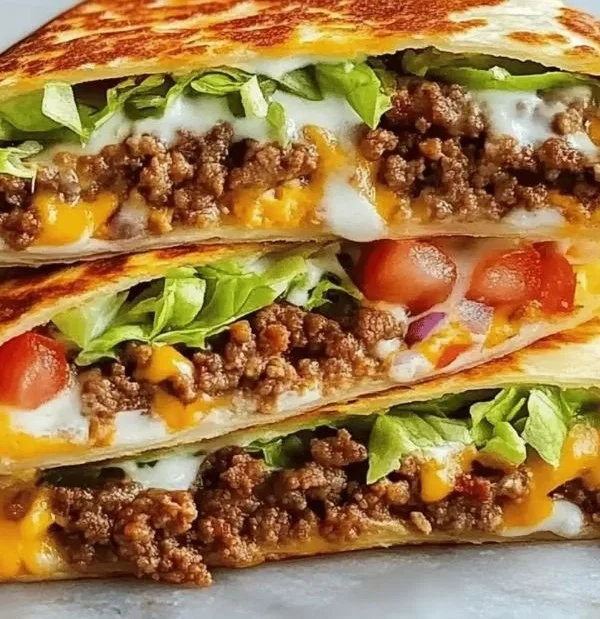
There’s something profoundly satisfying about biting into a crunchy, cheesy, and loaded wrap that feels indulgent but guilt-free. If you’re on a keto journey or just trying to keep things lighter without sacrificing flavor, my Delicious Keto Crunchwraps Recipe for Guilt-Free Indulgence will become a fast favorite! Picture perfectly crisp tortillas hugging a melty cheese sauce, seasoned beef, fresh veggies, and all the toppings. You can easily whip this up for lunch, dinner, or even meal prep, and I promise you’ll be reaching for seconds!
This Recipe is a Winner
What makes these keto crunchwraps stand out in a sea of recipes? Here’s why you’re going to love them:
-
Versatile and Customizable: Whether you’re a seasoned keto dieter or just looking for a delicious low-carb meal, these wraps can be tailored to accommodate your preferences, making it easy to swap in your favorite ingredients.
-
Texture Galore: You get that delightful crunch from the tortillas, which balances beautifully with the creamy cheese sauce and juicy beef. Each bite is a lovely contrast that keeps things exciting.
-
Satisfying Flavor: Infused with zesty taco seasoning and fresh toppings, these wraps are a burst of bold, vibrant flavors. They transport you straight to a cozy taco night at home.
-
Easy Meal Prep: Perfect for those busy evenings or when you want to have ready-to-eat meals on hand, these crunchwraps hold up nicely in the fridge and can be assembled in a jiffy.
-
Kid-Friendly: If you have picky eaters at home, they’ll likely devour these wraps without a second thought, enjoying the fun shape and delicious filling!
Gathering Your Ingredients
Let’s round up the star players for our delicious keto crunchwraps! Here’s what you’ll need, along with a little snippet about what makes each ingredient shine:
-
2 tablespoons Butter (Unsalted): This is for sautéing the beef and adding richness to the cheese sauce.
-
4 ounces Cream Cheese: It gives us that dreamily creamy texture in the cheesy goodness. If you’re avoiding dairy, feel free to swap this with a dairy-free alternative.
-
1/4 cup Heavy Whipping Cream: A perfect low-carb liquid to pour in for ultra-creamy sauce. Coconut cream works as a great option too!
-
1 cup Shredded Cheddar Cheese: I love using sharp cheddar for an intense, satisfying flavor that pairs so well with the seasoned beef.
-
1 pound Ground Beef: Cooked to perfection, this beef layer is rich and hearty. Ground turkey or chicken can be your leaner substitutes.
-
2 tablespoons Taco Seasoning: You can either use your favorite store-bought version or mix up a homemade batch to suit your spice level.
-
4 pieces Low-Carb Tortillas: Brands like Mission Carb Balance work beautifully, but homemade almond flour tortillas can elevate your crunchwrap experience.
-
1 cup Sour Cream: This smooth layer balances the spice and adds a cooling component. Greek yogurt is a lighter option if you wish.
-
1 cup Lettuce: Shredded iceberg or romaine keeps things fresh and crisp with every bite.
-
1 medium Tomato: Juicy and vibrant, it adds a fresh element. If you’re watching carbs closely, bell peppers are a great alternative!
-
1 cup Extra Cheddar Cheese: Because who doesn’t love a bit more cheese? For added heat, you can consider pepper jack.
-
1/4 cup Cilantro: A fresh garnish that brightens the whole dish. If cilantro isn’t your jam, use parsley instead.
-
1/2 cup Jalapeño Slices: Optional for those who enjoy a little kick! You could also use fresh diced jalapeños for more intense flavor.
-
1 tablespoon Olive Oil: Any neutral cooking oil will work for frying, but I love olive oil for its heart-healthy properties.
Let’s Get Cooking
Ready to craft your savory crunchwraps? Here’s how to put it all together in just a few simple steps. I promise you’ll be proud of your kitchen skills after this!
-
Cheese Sauce Preparation: In a small saucepan over medium heat, melt the butter before stirring in the cream cheese. Gradually add the heavy whipping cream, mixing them until smooth. Toss in 1 cup of cheddar cheese and stir until it’s melted and combined. Set aside for that luscious cheese layer.
-
Beef Cooking: In a skillet over medium heat, add the ground beef. Brown it until it’s cooked through, about 8-10 minutes. Use the taco seasoning as per your preference and mix well, allowing those flavors to meld beautifully.
-
Tortillas Crisping: In another skillet (you can use the same one after cleaning), add a touch of oil and crisp each tortilla on both sides until golden brown. This creates the perfect crunchy base for your wrap.
-
Crunchwrap Assembly: On a crisp tortilla, dollop on some cheese sauce first, followed by a generous layer of beef, sour cream, lettuce, chopped tomato, cilantro, jalapeños (if using), and a sprinkle of extra cheddar. Top with another tortilla, and repeat the crispy process with this second layer if desired.
-
Crunchwrap Cooking: Once assembled, return the crunchwrap to the hot skillet, seam side down. Cook for about 2-4 minutes on each side until golden brown and crisp.
-
Serving: Slice the crunchwrap in half to reveal the colorful and enticing layers within. Serve it warm and enjoy the symphony of textures and flavors!
Pro Tips for Perfection
Want to impress friends and family with your crunchwrap skills? Here are some of my best bits of advice:
-
Season Your Beef: Don’t be shy with the taco seasoning! A good amount really amps up the flavor. If you have time, marinate your beef for even deeper flavor development.
-
Don’t Skip the Crunch: Crispy tortillas give the wrap its signature texture. Make sure they are well-cooked on the skillet to prevent sogginess.
-
Customize Your Layers: Feel free to add a layer of guacamole or any other favorite toppings you enjoy—taco night is all about personalization!
-
Avoid Over-Filling: It can be tempting to pile on every delicious ingredient, but less is often more for the crunchwrap’s structural integrity.
-
Experiment with Wrap Sizes: Use smaller tortillas for mini crunchwraps—perfect for appetizers or lunchboxes!
Creative Twists Await
Want to get adventurous with your crunchwraps? Here are some ideas to keep things fresh and exciting:
-
Southwest Twist: Swap the ground beef for shredded rotisserie chicken, and add smoky chipotle sauce for a smoky flavor punch.
-
Veggie Lovers: Go meatless by substituting the beef with sautéed mushrooms, zucchini, and peppers for a hearty vegetarian crunchwrap.
-
Breakfast Crunchwrap: For a morning treat, fill your wrap with scrambled eggs, cheese, avocado, and salsa!
-
Spicy BBQ Chicken: Use shredded BBQ chicken instead of beef for a tangy twist, coupled with crispy slaw for crunch.
-
Mediterranean Flavor: Try feta cheese, olives, and roasted red peppers for a refreshing and unique variation.
Serving Suggestions
When it comes to enjoying your delicious keto crunchwraps, presentation is everything! Serve them warm with a side of crisp salad and a small bowl of salsa or guacamole for dipping. The pops of color from fresh veggies, along with the sizzling crunchwraps, create a vibrant table setting perfect for any casual gathering.
I love to surround my crunchwraps with crunchy tortilla chips (keto-friendly versions, of course) and a zesty salsa verde that adds a refreshing coolness to the meal. Don’t forget to garnish with lime wedges—squeezing fresh lime juice brings out all the wonderful flavors!
Keep It Fresh
To ensure your delicious keto crunchwraps last, let them cool completely before storing. Place them in an airtight container and refrigerate for up to 3 days. They also freeze wonderfully! Just wrap each crunchwrap in parchment paper and freeze, ready to be reheated in the oven or skillet when the craving strikes.
If reheating, I suggest using the oven to regain that glorious crunch—a mere 10-15 minutes will do the trick in a preheated oven set to 350°F.
Your Questions Answered
How can I make keto crunchwraps vegetarian?
Absolutely! Simply replace the ground beef with sautéed vegetables or beans. You could even use a mix of both for a heartier filling.
Can I make these ahead of time?
Yes, meal prepping is a fantastic idea! Prepare the fillings and store each component separately in the fridge. Assemble and cook your crunchwraps when you’re ready to eat.
What if I don’t have taco seasoning?
No worries! Spice up your beef with cumin, chili powder, paprika, and garlic powder to create your own delicious seasoning blend.
Can I bake these instead of frying?
Definitely! Brush the crunchwraps with a little oil and place them on a baking sheet. Bake at 400°F for about 15 minutes or until golden brown and crisp.
Each bite of these Delicious Keto Crunchwraps is a journey through flavor and comfort, reminding us that diet food doesn’t have to be boring or limiting. I encourage you to give this recipe a try and let your creativity shine as you make it your own! Remember, cooking is all about joy, and who doesn’t love a good crunchwrap? Enjoy every moment in the kitchen!
Keto Crunchwraps
Ingredients
Method
- In a small saucepan over medium heat, melt the butter before stirring in the cream cheese.
- Gradually add the heavy whipping cream, mixing until smooth.
- Toss in 1 cup of cheddar cheese and stir until melted and combined. Set aside.
- In a skillet over medium heat, brown the ground beef until cooked through, about 8-10 minutes.
- Add the taco seasoning to the beef, mixing well to meld the flavors.
- In another skillet, add a touch of oil and crisp each tortilla on both sides until golden brown.
- On a crisp tortilla, start with a dollop of cheese sauce, followed by a layer of beef, sour cream, lettuce, chopped tomato, cilantro, jalapeños (if using), and a sprinkle of extra cheddar.
- Top with another tortilla and repeat the crisping process with this second layer if desired.
- Return the assembled crunchwrap to the skillet, seam side down, and cook for about 2-4 minutes on each side until golden brown and crisp.
- Slice the crunchwrap in half and serve warm, enjoying the textures and flavors.