Delicious Red Velvet Oreo Cookies Recipe
The night I first made them I remember the first time I pulled a tray of these from the oven: the kitchen smelled like cocoa and vanilla, the cookies were a startling ruby red flecked with Oreo dark bits, and my neighbor knocked before I even had a chance to plate them. They were an…
The night I first made them
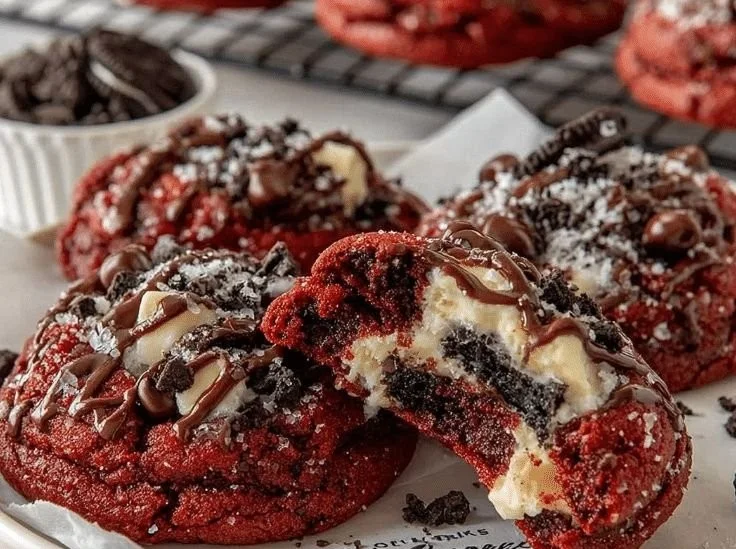
I remember the first time I pulled a tray of these from the oven: the kitchen smelled like cocoa and vanilla, the cookies were a startling ruby red flecked with Oreo dark bits, and my neighbor knocked before I even had a chance to plate them. They were an immediate hit, and over the years the recipe has become my go-to when I want something that looks fancy but comes together without drama. I call it Delicious Red Velvet Oreo Cookies Recipe, and if you like the contrast of chewy red velvet and crunchy cookie pieces, you are going to love this.
A few ingredients that matter
I never talk about recipes without telling you what actually goes into them, but I like to do it like I’d tell a friend who’s standing in my kitchen. For this batch I use 1 cup (226g) unsalted butter, softened, 1 cup (200g) granulated sugar, 1 cup (200g) brown sugar, packed, 2 large eggs, room temperature, 1 teaspoon vanilla extract, and 2 teaspoons red food coloring (gel works best for vibrant color). On the dry side I whisk together 2 ½ cups (315g) all-purpose flour, ¼ cup (25g) unsweetened cocoa powder, 1 teaspoon baking soda, and ½ teaspoon salt. The showstoppers are 1 ½ cups (about 15 cookies) crushed Oreos stirred in for texture and ½ cup (85g) white chocolate chips if you want little pockets of sweetness. Each ingredient brings something: the brown sugar keeps things chewy, the cocoa gives that subtle red velvet depth, and the crushed Oreos add crunch and nostalgia.
The mixing and baking dance
I like to walk friends through the process rather than hand them a strict list. Preheat your oven to 350°F (175°C) and line your baking sheets with parchment paper or silicone baking mats to prevent sticking and ensure even baking. In a large mixing bowl, beat the softened butter, granulated sugar, and brown sugar together until the mixture is light and fluffy, about 2 to 3 minutes. This step incorporates air for a tender texture. Mix in the eggs one at a time to keep the batter smooth. Then add the vanilla extract and red food coloring, beating until the mixture is uniform in color and texture. In a separate bowl, whisk together the all-purpose flour, unsweetened cocoa powder, baking soda, and salt to evenly distribute the leavening and cocoa throughout the flour. Gradually add the dry ingredient mixture into the wet mixture, mixing on low speed until just combined. Avoid overmixing to keep the cookies tender and soft. Gently stir in the crushed Oreos and white chocolate chips using a spatula to disperse them evenly without breaking up the pieces too much. Scoop out dough balls approximately 1 ½ tablespoons each and place them about 2 inches apart on the prepared baking sheets to allow spreading. Bake the cookies in the preheated oven for 10 to 12 minutes, or until the edges are set and the centers still look slightly underbaked. This ensures a chewy center once cooled. Allow the cookies to cool on the baking sheet for 5 minutes to firm up, then transfer them to a wire rack to cool completely, which helps maintain their soft texture.
When I say “slightly underbaked” I mean it. The centers will look a touch glossy; that’s the indicator I watch. The edges should be set and just starting to tone down from their raw softness. If you like your cookies a little more cakey, leave them in the oven for an extra minute or two, but for my money the chewy middle is the whole point.
Little tricks I keep coming back to
I’ve learned a few small things that change the outcome without adding fuss. First, gel food coloring really does give a richer red without watering down the dough, so I use 2 teaspoons red food coloring (gel works best for vibrant color). Second, don’t crush the Oreos into dust; you want little chunks so you get that satisfying bite. Third, when you’re beating the butter and sugars, take the full 2 to 3 minutes until it’s fluffy — that airiness is what keeps the cookie tender. I also like to chill the dough for 15 minutes if my kitchen is warm; it prevents too much spread and gives a neater look. Finally, if you want extra visual contrast, press a mini Oreo half or a few white chocolate chips into the top of each ball just before baking.
What I serve them with and a couple of ways to switch things up
These cookies are wonderful with a tall glass of milk or a scoop of vanilla ice cream when they’re still a little warm. I sometimes serve them with coffee after dinner; the bittersweet espresso cuts through the sweetness in a pleasant way. If you want to change the vibe, try these variations: substitute dark chocolate chips for the white chocolate chips for a richer bite, or fold in a handful of chopped pecans if you like a nutty crunch. For a frosting-style twist, sandwich two cookies together with a layer of cream cheese frosting to amplify the red velvet tradition.
If you want more dramatic flavor, you can increase the cocoa to 1/3 cup for a deeper chocolate hint, or swap the regular Oreos for peanut butter Oreos for a playful twist. I recommend keeping the core balance of butter, sugars, and flour the same so the texture stays reliably chewy.
How I save them for later
I often bake a double batch and stash extras because these cookies freeze well. Once completely cool, you can layer them in an airtight container separated by parchment and freeze for up to three months. To thaw, leave them at room temperature for about 30 minutes or pop them in a 300°F oven for five minutes if you want that just-baked warmth. If you plan to pack them for a party the next day, store them in a single layer at room temperature for up to two days; they keep their chewiness best when not refrigerated unless your kitchen is very hot.
The smell that always gets me
There is something comforting about the way the butter and brown sugar scent the kitchen as they beat together, then the cocoa aroma as the dry ingredients are folded in. When the Oreos hit the dough you get a little crunch and that familiar cookie smell that makes everyone hover around the counter. I once baked these when my daughter was home from college and she came into the kitchen with only half a sentence, “Are those the red ones?” Her eyes widened at the first bite and she said it reminded her of holidays at home. That memory is why I always make these when I want easy comfort food that feels like a treat.
Conclusion
If you want another take on this idea or some inspiration for the crushed cookie element, I found a useful riff called Crushed Oreo Red Velvet Cookies that complements this recipe beautifully. Try the cookies warm, share with friends, and don’t be surprised if you keep the recipe bookmarked.
Delicious Red Velvet Oreo Cookies
Ingredients
Method
- Preheat your oven to 350°F (175°C) and line your baking sheets with parchment paper or silicone baking mats.
- In a large mixing bowl, beat the softened butter, granulated sugar, and brown sugar together until light and fluffy, about 2 to 3 minutes.
- Add the eggs one at a time, mixing well after each addition.
- Mix in the vanilla extract and red food coloring until uniform.
- In a separate bowl, whisk together the flour, cocoa powder, baking soda, and salt.
- Gradually mix the dry ingredients into the wet ingredients until just combined, avoiding overmixing.
- Gently fold in the crushed Oreos and white chocolate chips.
- Scoop out dough balls of approximately 1.5 tablespoons each and place them about 2 inches apart on the prepared baking sheets.
- Bake for 10 to 12 minutes, or until the edges are set and the centers look slightly underbaked.
- Let them cool on the baking sheet for 5 minutes before transferring to a wire rack to cool completely.