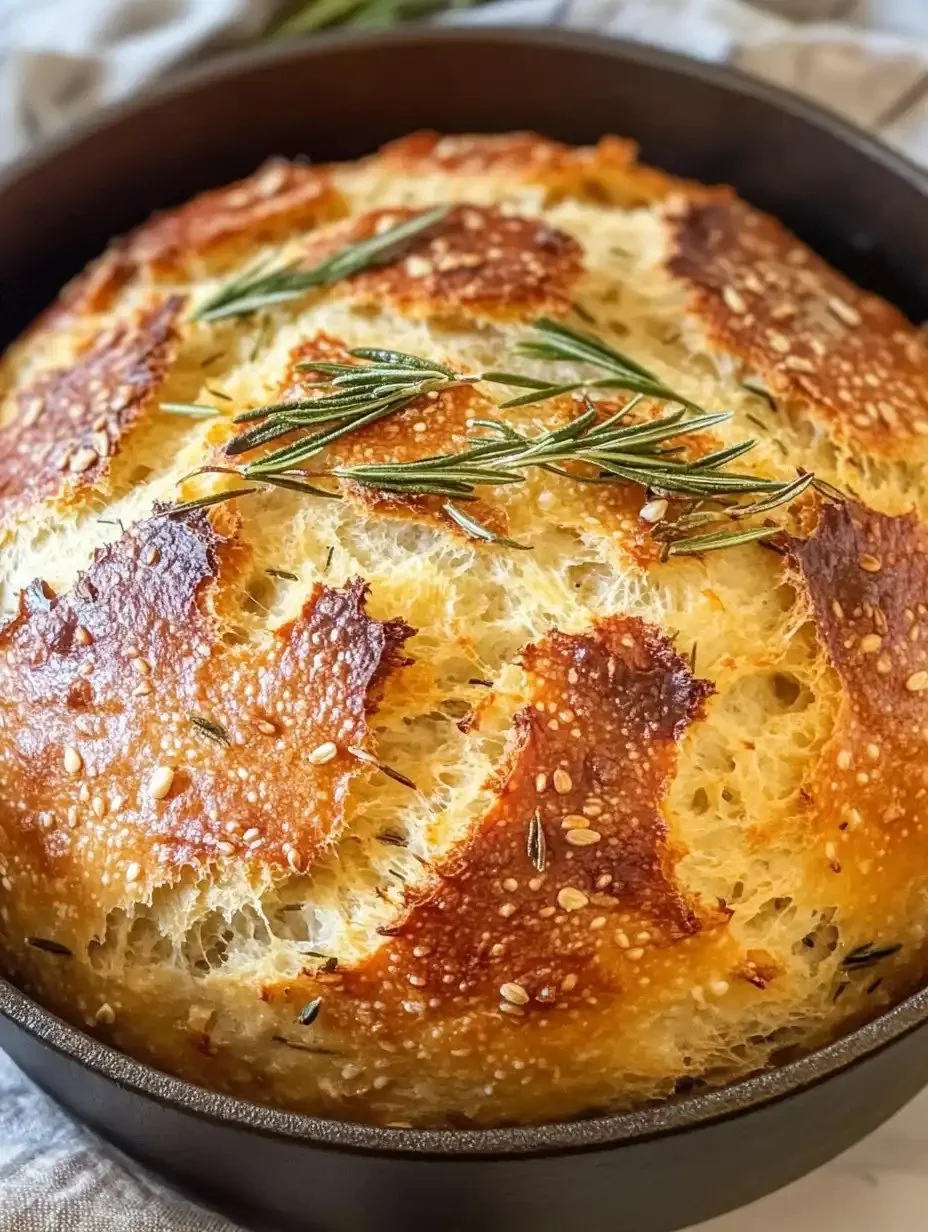
Dutch Oven Garlic Rosemary Bread
The aroma of freshly baked bread wafting through your kitchen is nothing short of magical, and when that bread is infused with the earthy essence of rosemary and the robust kick of garlic, it transforms any ordinary day into something truly special. This Dutch Oven Garlic Rosemary Bread is not just a recipe; it’s an…
The aroma of freshly baked bread wafting through your kitchen is nothing short of magical, and when that bread is infused with the earthy essence of rosemary and the robust kick of garlic, it transforms any ordinary day into something truly special. This Dutch Oven Garlic Rosemary Bread is not just a recipe; it’s an experience—a beautiful blend of warm flavors and crispy crust that beckons you to break off a piece and savor every bite. So, grab your apron, and let’s journey together into the world of homemade bread!
The Heart and Soul of This Bread
This recipe for Dutch Oven Garlic Rosemary Bread deserves a prominent place in your kitchen for more than one reason:
- Simplicity Meets Elegance: With just a few pantry staples, you can whip up a loaf that feels gourmet yet is incredibly approachable.
- Aromatic Symphony: The second you add cloves of garlic and fresh rosemary into your dough, your senses are immediately singing with delight.
- Perfectly Crispy Crust: Cooking with a Dutch oven traps steam, resulting in a crust that’s beautifully golden and crispy, while the inside remains soft and airy—a true bread lover’s dream.
- Versatile Joy: This bread pairs perfectly with soups, salads, or simply slathered with butter, making it a versatile sidekick to your meals.
- Heartfelt Moments: There’s something soul-satisfying about kneading the dough and waiting for it to rise. Plus, sharing fresh bread with friends or family creates connections and warms the heart.
Gather Your Ingredients
To create this delightful loaf, you’ll need the following ingredients, each playing an essential role in the flavors and texture:
- 3 cups All-Purpose Flour: The foundation of your bread, giving it structure and that lovely chewy texture we all love.
- 1 1/2 teaspoons Sugar: Just a hint to help the yeast bloom and add a touch of sweetness to balance the savory garlic and rosemary.
- 2 teaspoons Salt: This enhances all the flavors and ensures your bread isn’t bland—it’s a crucial player!
- 2 1/2 teaspoons Quick Yeast (1 package): The powerhouse that helps the dough rise quickly, so you can get to that warm loaf sooner.
- 1 1/3 cups Warm Water: Activates the yeast; make sure it’s warm to the touch, like a cozy blanket.
- 2 Large Rosemary Sprigs, Diced: Fresh herbaceous notes that elevate the loaf to another level of deliciousness.
- 3 Garlic Cloves, Diced: Adds a robust, savory depth, giving a fragrant essence to the bread that’s simply irresistible.
Let’s Make Some Bread!
Now that we have everything ready, let’s dive into the fun part—turning these simple ingredients into a scrumptious loaf of bread! Follow these steps to create your masterpiece:
-
In a large mixing bowl, combine all the ingredients: flour, sugar, salt, quick yeast, warm water, diced rosemary, and garlic. Take a moment to revel in the beautiful colors and aromas emerging from the bowl. Stir them together until just combined; the dough will be sticky and shaggy, which is perfectly fine!
-
Cover the bowl with a towel. Let the dough rise in a warm place for about 60 minutes. This is where the magic happens as the yeast works its wonders, and the dough expands into a fluffy delight.
-
Once risen, lay out a piece of parchment paper and dust it lightly with flour. Carefully transfer the dough onto the paper. This next step is like a little massage for your loaf—shape it into a ball by folding the edges over towards the center.
-
Flip the dough smooth side up, cover it again with a towel, and let it rise for another 20 minutes, or while you heat the Dutch oven.
-
Place your empty Dutch oven (without the lid) in the oven and preheat it to 450°F. This step is crucial for achieving that crispy crust we all desire.
-
When the oven reaches the desired temperature, carefully remove the Dutch oven with oven mitts. Transfer the dough, still on the parchment, into the hot pot and score the top with a knife—this allows the bread to expand while baking.
-
Cover with the lid and bake for 30 minutes. Anticipation is part of the fun, so take a moment to enjoy the scent wafting through your kitchen!
-
After 30 minutes, remove the lid and bake for an additional 10 minutes until the bread is golden brown and you can barely hold in your excitement.
-
Once baked, remove the Dutch oven from the oven and let it cool for at least 30 minutes before slicing into this masterpiece. Trust me; waiting will be worth it!
Little Secrets for Baking Success
Here are a few professional tips to ensure your baking adventure is as successful and enjoyable as possible:
-
Temperature Check: Make sure that your water is between 105°F-110°F for optimal yeast activation. Too hot, and it might kill the yeast; too cold, and it won’t activate properly.
-
Experiment with Herbs: Feel free to mix in other herbs or spices that you love. Thyme or even a touch of chili flakes can offer exciting variations.
-
Don’t Rush the Cool Down: I know it’s tempting, but allowing the bread to cool helps set the crumb, making for easier slicing and enhancing the flavors.
-
Moisture is Key: During baking, the steam trapped in the Dutch oven is key for that perfect crust. If you don’t have a Dutch oven, a covered baking dish can also work wonders!
Creative Twists on Tradition
Feeling adventurous? Why not mix things up a little! Here are some delightful variations you can consider for your Dutch Oven Garlic Rosemary Bread:
- Cheese Lover’s Dream: Fold in some shredded cheese like Parmesan or Gruyère for a wonderful cheesy touch.
- Olive Garden Style: Chopped olives mixed into the dough can add a briny burst that pairs beautifully with garlic and rosemary.
- Nutty and Healthy: Swap out some all-purpose flour for whole wheat flour and add a handful of seeds like sunflower or pumpkin for added texture and nutrition.
- Sweet Herb Medley: Try using fresh basil or sage instead of rosemary for a different flavor profile that can bring an entirely new experience.
Presenting Your Beautiful Bread
When it’s time to serve this bread, think about how you can make the experience even more delightful. Place the loaf on a wooden cutting board, perhaps accompanied by a small dish of creamy butter or olive oil infused with herbs. You could serve it with a vibrant tomato basil soup or a fresh mixed salad to create a heartwarming meal. Picture the warm, fluffy interior of your bread contrasted with the crispy crust, inviting everyone to dig in and share.
Keeping it Fresh for Later
If you’re lucky enough to have leftover bread (or intentionally make a double batch), here’s how to store it properly:
- Room Temperature: Wrap your bread in a clean kitchen towel or place it in a paper bag. This will keep the crust crisp while the inside remains tender. It can last for 2-3 days this way.
- Freezing for Future Enjoyment: If you want to save some for later, wrap it tightly in plastic wrap and then place it in a freezer bag. It can stay fresh in the freezer for up to 3 months. Just remember to thaw at room temperature when you’re ready for that warm, fresh bread experience once again!
- Reheating: To revive the crust, pop it in a 350°F oven for about 5-10 minutes. It’ll be just like freshly baked again!
Let’s Wrap it Up!
Now that we’ve journeyed through the delightful world of Dutch Oven Garlic Rosemary Bread, I hope you’re feeling just as excited as I am to try this recipe! It’s all about the warm aromas, the tender crumb, and that satisfying crunch when you first break into a loaf. Whether you’re making it for yourself or to share with loved ones, this bread will surely warm both your kitchen and your heart. So, roll up those sleeves and let’s get baking—trust me, you won’t regret it!
Dutch Oven Garlic Rosemary Bread
Ingredients
Method
- In a large mixing bowl, combine all the ingredients: flour, sugar, salt, quick yeast, warm water, diced rosemary, and garlic. Stir them together until just combined; the dough will be sticky and shaggy.
- Cover the bowl with a towel and let the dough rise in a warm place for about 60 minutes.
- Once risen, lay out a piece of parchment paper and dust it lightly with flour. Carefully transfer the dough onto the paper and shape it into a ball.
- Flip the dough smooth side up, cover with a towel, and let it rise for another 20 minutes.
- Preheat your oven to 450°F with the empty Dutch oven inside.
- When the oven reaches the desired temperature, carefully remove the Dutch oven with oven mitts and transfer the dough into the pot on the parchment. Score the top with a knife.
- Cover with the lid and bake for 30 minutes.
- After 30 minutes, remove the lid and bake for an additional 10 minutes until the bread is golden brown.
- Remove the Dutch oven from the oven and let it cool for at least 30 minutes before slicing.