Dutch Oven Garlic Rosemary Bread
The First Loaf I Ever Baked I still remember the afternoon I woke up craving the smell of fresh bread so badly I could almost taste it. I pulled together what I had on the counter and, somehow, ended up with what I now call Dutch Oven Garlic Rosemary Bread. It began with a simple…
The First Loaf I Ever Baked
I still remember the afternoon I woke up craving the smell of fresh bread so badly I could almost taste it. I pulled together what I had on the counter and, somehow, ended up with what I now call Dutch Oven Garlic Rosemary Bread. It began with a simple mix: 3 cups all-purpose flour, 1 1/2 teaspoons sugar, 2 teaspoons salt, 2 1/2 teaspoons quick yeast (one package), and 1 1/3 cups warm water, plus two large rosemary sprigs diced and three garlic cloves diced. If you want to compare notes, I once followed another baker’s version and made a few changes that stuck with me; that little detour is why I sometimes point friends to my favorite Dutch oven riff when they ask for guidance on a first loaf my favorite Dutch oven recipe.
The smell that came out of the oven that day—warm garlic mingled with piney rosemary and browned crust—made me promise I would make this loaf whenever I wanted to impress someone without trying too hard.
The Ingredient Moment That Changes Everything
What changes an ordinary loaf into something memorable is where you put the rosemary and garlic. I like to dice two large rosemary sprigs and three garlic cloves so they release small bursts of flavor throughout the crumb. When you toss those into the dough with the flour, sugar, salt, quick yeast and warm water, you get aromatic pockets rather than a single strong note. You can read about a garlic-herb version I tried that leans into that technique if you are curious about other herb combinations garlic-herb version I tried. The rest of the ingredient list is simple and forgiving, which is why I reach for this recipe when I want maximum reward for minimum fuss.
Making the Dough (my timeline)
I do everything in a large mixing bowl so there are fewer dishes to clean. I combine all the ingredients in one go: the flour, sugar, salt, quick yeast, warm water, diced rosemary, and garlic. I stir together until just combined; the dough will be sticky and shaggy. It is supposed to be messy. Cover the bowl with a towel and let the dough rise in a warm place for about 60 minutes. This first rise is where the yeast wakes up and the room fills with that irresistible yeasty, garlicky scent.
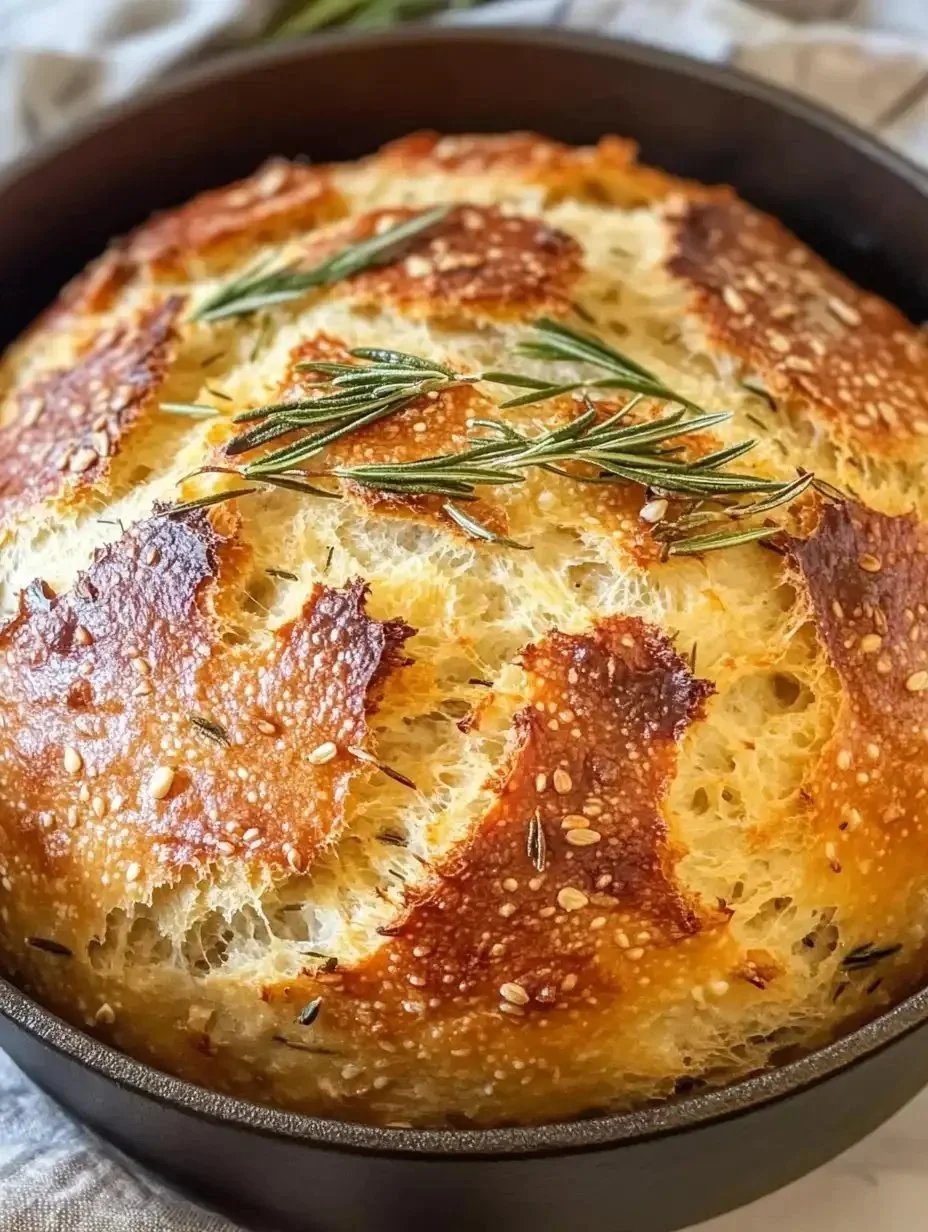
Once the dough has risen, I dust a piece of parchment lightly with flour and turn the dough onto it, folding it gently into a round and shaping it into a ball with light hands. Then I flip the dough so the smooth side is up, cover it with a towel and let it rest and rise another 20 minutes. While that second rest happens, I preheat my oven to 450°F with an empty Dutch oven inside. Heating the pot in the oven is the secret to that crackling crust you hear when you thump a finished loaf.
When the oven is screaming hot, I pull the Dutch oven out carefully with oven mitts, slide the dough into the pot on the parchment, and quickly score the top with a knife so it can expand politely and form an attractive ear. I cover with the lid and bake for 30 minutes. After 30 minutes I remove the lid and bake for an additional 10 minutes until the crust is a deep golden brown. Then I remove the Dutch oven from the oven and let the bread cool for at least 30 minutes before slicing so the crumb sets and the flavors settle.
A Few Tricks I Keep Repeating
One trick I never skip is feeling the water temperature with my wrist. Warm water that is roughly as warm as a baby’s bath wakes the yeast without killing it. Another is not overworking the dough; stir until it is just combined and let time do the rest. I always use a sheet of parchment to move the dough straight into the hot pot. It saves fingers and keeps the loaf intact. When scoring, a single confident stroke makes a cleaner ear than multiple timid cuts. Finally, give the loaf at least 30 minutes to cool. I know it is tempting to slice into steam, but that cool-down is what keeps the interior from becoming gummy.
If you want to experiment, try swapping in some of the ideas I learned from a no-knead cheddar experiment; the method changed how I think about add-ins and timing no-knead cheddar variation.
How I Know It’s Done and What I Serve It With
You can tell this bread is finished when the crust is a deep golden brown and, if you tap the bottom or give it a hollow thunk, it sounds airy and well baked. The aroma will be bold: browned garlic, roasted rosemary, and toasted flour. A good internal check is that it feels light for its size; it should not feel dense.
I love tearing into a warm slice and rubbing a little high-quality butter across it so it melts into the nooks of the crumb. This bread is perfect with soup, especially tomato or a creamy potato leek. It is also excellent alongside a simple cheese plate with a sharp sheep’s milk cheese and olives. For an easy supper, I pile slices with roasted vegetables and a smear of ricotta.
If you are planning to bring this to a picnic, let it cool completely, wrap in a clean kitchen towel and keep it at room temperature for a day. For longer storage, slice and freeze in an airtight bag; toast slices straight from the freezer for breakfast.
Variations and Small Experiments
This dough is a fantastic canvas. Two favorite variations: cheddar and rosemary, where shredded sharp cheddar is folded in at the shaping stage, creating melty pockets; and an olive and sun-dried tomato version for a Mediterranean twist. If you want something faster, there are two-hour no-knead methods that compress the timing while keeping the spirit of this loaf, and those can be worth trying when you are short on time. Another minor but delicious change is to toss a little olive oil and flaked sea salt over the top just before the uncovered bake for an extra glossy, savory crust.
I once made loaves for a neighbor who had just moved in; we shared slices with cold roasted chicken and it became one of those small rituals that made me feel like part of the block. That loaf proved this recipe is not only about technique but about bringing people together.
Conclusion
If you want to try a slightly different take on garlic rosemary bread, the Bewitchin’ Kitchen has an approachable artisan version that inspired some of my finishing ideas, and it is worth a look for visual cues and alternate shaping techniques Easy Artisan Garlic Rosemary Bread | The Bewitchin’ Kitchen. For an accelerated no-knead approach with helpful time-saving tips, this two-hour method lays out a great plan if you need bread in a hurry Rosemary Garlic No-Knead Bread, the Two Hour Method.
Happy baking. If you try it, tell me what you paired it with and whether you scored a perfect ear on the first go.
Dutch Oven Garlic Rosemary Bread
Ingredients
Method
- In a large mixing bowl, combine flour, sugar, salt, quick yeast, warm water, diced rosemary, and diced garlic.
- Stir together until just combined; the dough will be sticky and shaggy.
- Cover the bowl with a towel and let the dough rise in a warm place for about 60 minutes.
- Dust a piece of parchment lightly with flour and turn the dough onto it.
- Fold the dough gently into a round and shape it into a ball.
- Cover with a towel and let it rest and rise for another 20 minutes.
- Preheat the oven to 450°F with an empty Dutch oven inside.
- Once hot, carefully pull the Dutch oven out and slide the dough into the pot on the parchment.
- Score the top of the dough with a knife and cover with the lid.
- Bake for 30 minutes, then remove the lid and bake for an additional 10 minutes until the crust is a deep golden brown.
- Remove the Dutch oven from the oven and let the bread cool for at least 30 minutes before slicing.