The Ultimate Homemade Gravy (Easiest-Ever Recipe!)
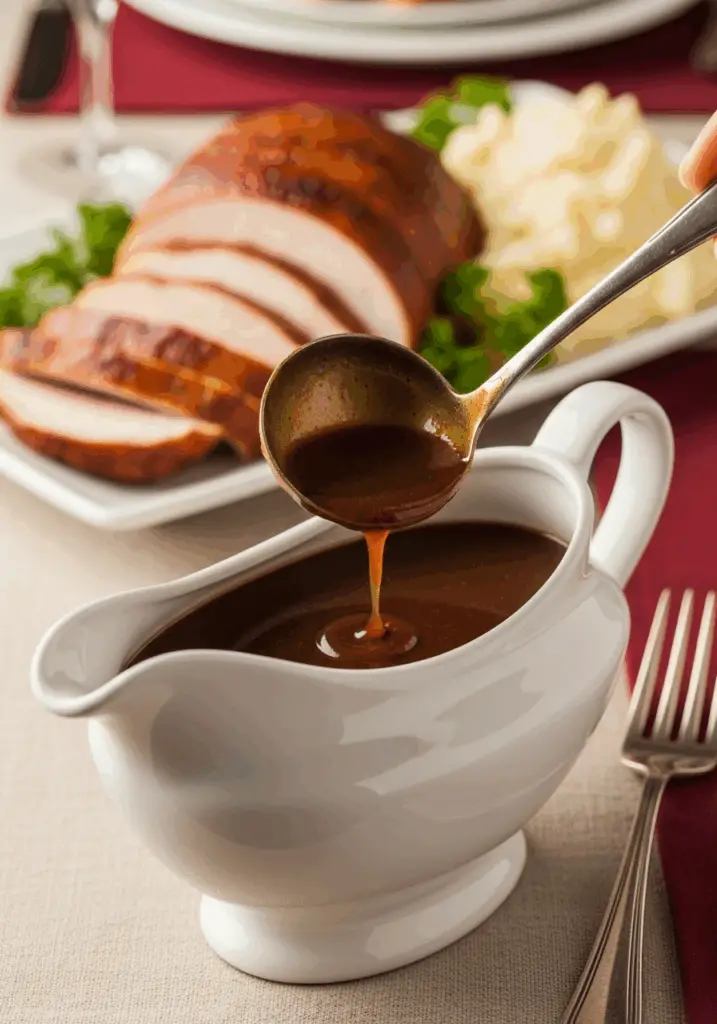
Imagine a rich, deeply savory, and perfectly smooth gravy cascading over a pile of creamy mashed potatoes or a slice of succulent roast turkey. That, my friends, is the heart of a truly memorable feast, and today, we’re making it happen with the easiest, most flavorful gravy recipe you’ll ever need. This is, without a…
Imagine a rich, deeply savory, and perfectly smooth gravy cascading over a pile of creamy mashed potatoes or a slice of succulent roast turkey. That, my friends, is the heart of a truly memorable feast, and today, we’re making it happen with the easiest, most flavorful gravy recipe you’ll ever need. This is, without a doubt, the secret weapon that will elevate your entire dinner.
Here’s the thing about gravy: it can often feel like a stressful, last-minute afterthought. But I’m here to tell you it can be simple, foolproof, and even a clever way to reduce food waste! This recipe is my go-to because it doesn’t rely solely on meat drippings; instead, it builds a massive foundation of flavor from humble vegetables and pantry staples, including the onion skins you might normally throw away.
I promise you, there is no greater culinary triumph than creating a from-scratch gravy that is luscious, rich, and deeply satisfying. This recipe is designed to be a standalone star, but it becomes truly legendary when you enrich it with the juices from your holiday roast. It’s the perfect finishing touch that ties the entire meal together.
Get ready to master the art of perfect, stress-free gravy and create a sauce that will have everyone at the table reaching for the gravy boat again and again.
Why This Will Be Your Forever Gravy Recipe!
You are going to be amazed at how such simple ingredients can produce a gravy with such incredible depth of flavor. This is a true kitchen essential. Here’s why you’ll love it:
- Incredibly Rich and Flavorful: By deeply browning the vegetables, we create a complex, savory flavor base that tastes like it has been simmering for hours.
- Reduces Food Waste: This clever recipe makes brilliant use of vegetable scraps like onion skins, which add incredible color and depth.
- Ready in Under an Hour: With just 10 minutes of active prep, you can have a liter of stunning, homemade gravy ready for your feast.
- Perfectly Customizable: It’s delicious on its own as a vegetarian gravy or can be easily enriched with turkey or chicken juices for a more traditional flavor.
- Foolproof and Freezable: This recipe is incredibly straightforward and forgiving. Plus, it freezes beautifully, making it the perfect make-ahead holiday helper.
Recipe Snapshot
| Prep Time | 10 minutes |
| Cook Time | 35 minutes |
| Total Time | 45 minutes |
| Servings | 6 servings (makes 1 liter) |
| Calories | 85 kcal per serving |
| Course | Sauce |
| Cuisine | British / American |
| Difficulty/Method | Easy / Stovetop |
Your Shopping List for Perfect Gravy
This recipe uses humble, inexpensive ingredients to create liquid gold. Here’s what you’ll need:

→ For the Gravy Base
- 10g butter → Adds a touch of richness and helps with browning.
- 1 tbsp vegetable oil → Prevents the butter from burning and helps fry the vegetables.
- 250g carrots → Scrubbed and sliced. No need to peel! They add sweetness and body.
- 2 onions → Sliced. Their natural sugars are key to the deep, caramelized flavor.
- Onion skins → The reserved skins are our secret weapon for a beautiful, deep brown color!
- 4 tbsp plain flour → Our thickening agent for a perfect gravy consistency.
- 2 rosemary sprigs → Infuses the gravy with a wonderful, aromatic, woody flavor.
- 2 vegetable or chicken stock cubes → Made up to 2 liters. This is the savory backbone of our gravy.
Let’s Make Gravy! Your Step-by-Step Guide
Ready to create the most flavorful gravy of your life? The secret is in building layers of flavor right from the start.
Part 1: Build the Flavor Base
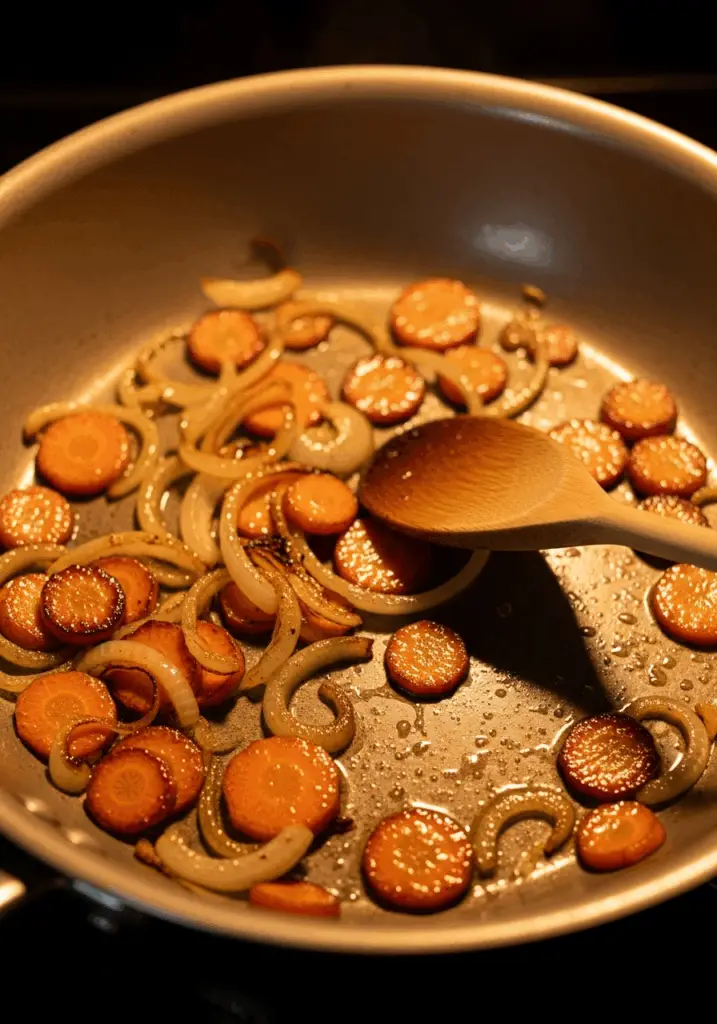
- Brown the Vegetables: Melt the butter and oil together in a large, heavy-bottomed saucepan over high heat. Add the sliced carrots and fry, stirring often, for about 5 minutes until they start to darken and caramelize at the edges.
- Caramelize the Onions: Add the sliced onions to the pot, then lower the heat to medium. Continue to fry for another 10-12 minutes, until the onions are soft, sweet, and a beautiful golden brown color. Don’t rush this step!
Part 2: Simmer and Infuse
- Cook the Flour: Stir the plain flour into the vegetables until it’s fully incorporated and has lost its raw, dusty appearance. This creates a “roux” that will thicken our gravy.
- Add Liquids and Aromatics: Add the rosemary sprigs, the reserved onion skins, and the prepared stock to the saucepan. Stir everything together and bring the mixture to a boil.
- Simmer and Mash: Once boiling, let the gravy simmer fiercely for 10 minutes. Then, take a potato masher and give the vegetables in the pot a good mashing to release all their flavor into the liquid. Let it simmer for 10 more minutes.
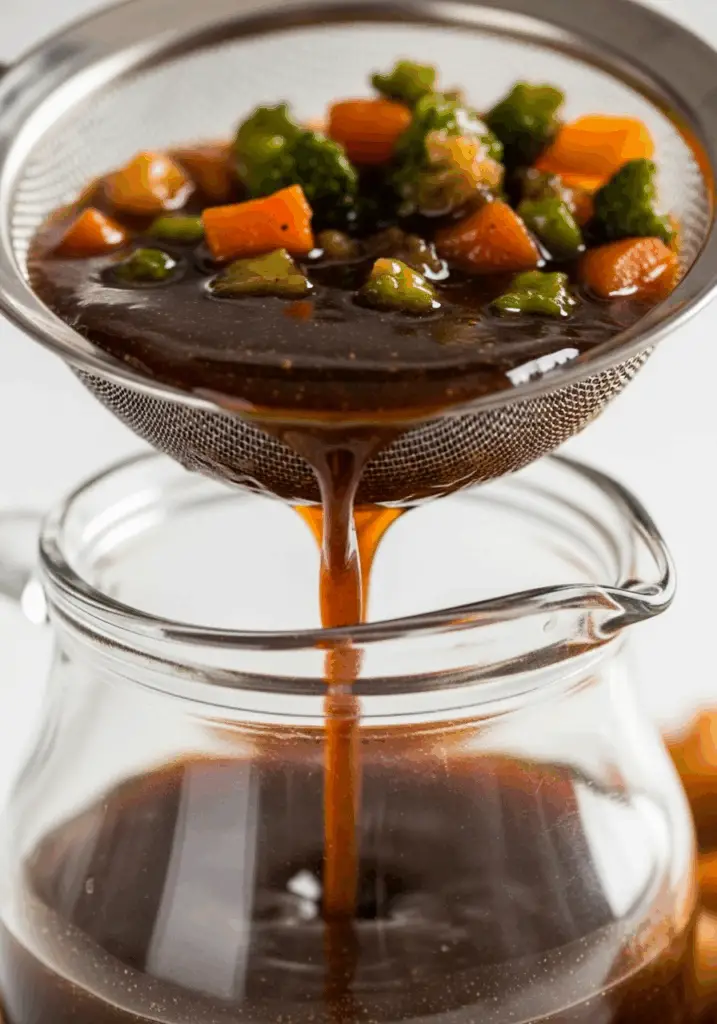
Part 3: Strain and Finish
- Sieve for Smoothness: Pour the gravy through a fine-mesh sieve into a clean bowl or jug, pressing on the solids with the back of a spoon to extract every last drop of flavorful liquid. Discard the solids.
- Season and Serve: Season the smooth gravy with salt and pepper to taste. Reheat it gently on the hob or in the microwave to serve.
- Optional – Add Turkey Juices: To take it to the next level, pour the juices from your roasting tin into a jug. Let it settle for a few minutes, then use a spoon to skim off the fat that rises to the top. Stir these rich, savory juices into your gravy when you reheat it.
WiseRecipes’ Top Tips for Gravy Mastery
These simple tricks will ensure your gravy is deep, rich, and delicious every single time.
- Don’t Be Afraid of Color. The key to a deeply flavorful gravy is in the browning. Let your carrots and onions get a good, dark color on them (without burning). This caramelization is where all the rich, complex flavor comes from.
- The Onion Skin Secret. It might sound strange, but adding the dry, papery skins of the onions to the simmering liquid is a classic chef’s trick. They impart a beautiful, deep golden-brown color to the final gravy without affecting the flavor.
- Mash the Veggies. Seriously, don’t skip this step! Mashing the softened vegetables halfway through the simmering process breaks them down and ensures every last bit of their sweet, savory flavor is released into the stock.
- Always Skim the Fat. If you’re adding pan drippings, letting the juices settle and skimming the fat off the top is crucial. You want to add the flavorful juices to your gravy, not the grease, which can make it heavy and oily.
- Taste and Season at the End. Stock cubes can be salty, and pan juices are already seasoned. Wait until the very end, after you’ve sieved the gravy and added any juices, to taste and adjust the seasoning with salt and pepper.
Easiest-Ever Homemade Gravy
Ingredients
Equipment
Method
- Melt the butter and oil in a large saucepan over a high heat. Add the carrots and fry, stirring often, for 5 mins or until darkened. Add the onions, lower the heat and fry for a further 10-12 mins until golden brown.
- Stir in the flour until it loses its dusty appearance. Add the rosemary, reserved onion skins, and the prepared stock.
- Bring to the boil, then simmer fiercely for 10 mins. Use a potato masher to give the vegetables a good mash in the pot, then simmer for 10 more minutes.
- Pour the gravy through a fine-mesh sieve into a jug or bowl, pressing on the vegetables to extract all the liquid. Season to taste.
- To add turkey juices: Pour juices from the roasting tin into a jug, let settle, then spoon off the fat from the top. Stir the remaining juices into the gravy when you reheat it to serve.
Notes
Keep It Fresh! Storing Your Make-Ahead Gravy
This gravy is the perfect make-ahead component for any big meal, saving you stress on the day.
- Refrigerator: The finished gravy can be cooled and kept in an airtight container in the fridge for 2-3 days. Reheat gently on the stovetop or in the microwave before serving.
- Freezing: This gravy freezes beautifully. Let it cool completely, then pour it into freezer-safe bags or containers. It will keep for up to 3 months. Thaw overnight in the refrigerator before reheating.
FAQs: Your Gravy Questions, Answered!
Can I make this gravy gluten-free?
Yes, absolutely! To make it gluten-free, simply substitute the plain flour with a good quality gluten-free all-purpose flour blend and ensure you are using certified gluten-free stock cubes.
My gravy isn’t as dark as I’d like. What can I do?
The color comes from browning the vegetables and using the onion skins. If you want it even darker, you can add a teaspoon of Marmite, a splash of dark soy sauce, or a bit of browning liquid (like Gravy Master) at the end.
How can I make my gravy thicker?
If your gravy is too thin for your liking, you can simmer it a bit longer to reduce and concentrate it. Alternatively, you can make a “slurry” by mixing one tablespoon of cornstarch with two tablespoons of cold water until smooth. Whisk this mixture into the simmering gravy and let it cook for a minute or two until it thickens.
Can I add other herbs or vegetables?
Of course! Celery, leeks, and mushrooms are all fantastic additions for building flavor. A bay leaf or a few sprigs of thyme would also be lovely additions alongside the rosemary.
Final Thoughts: The Heart of the Feast
There is nothing that brings a celebratory meal together quite like a boat of hot, rich, homemade gravy. It’s the ultimate comfort food, and this simple, foolproof recipe proves that you don’t need a lot of fuss to create something truly spectacular. I hope this easy gravy becomes the crowning jewel of your family dinners for years to come. Happy cooking!