Easter Bunny Cinnamon Rolls
The memory that makes me bake these every spring The first time I shaped cinnamon rolls into bunnies, my kitchen smelled like sugar and Sunday morning. My neighbor’s little girl was staying for a sleepover and woke up with a mission: "Make bunnies." I fumbled through the pantry and found a can of refrigerated cinnamon…
The memory that makes me bake these every spring
The first time I shaped cinnamon rolls into bunnies, my kitchen smelled like sugar and Sunday morning. My neighbor’s little girl was staying for a sleepover and woke up with a mission: "Make bunnies." I fumbled through the pantry and found a can of refrigerated cinnamon roll dough, and from that messy little start something delightful was born. If you like quick, cheerful baking projects that look like you actually tried for hours, you will understand why I keep this one in my back pocket. I even altered it a bit after seeing a cute twist in a heart-shaped project, and you can find a guide for that here heart-shaped cinnamon rolls if you want to try another fun shape.
What I keep on the counter for these bunnies
I never need a long ingredient run for this. Really, the whole thing starts with one basic item: 1 can of refrigerated cinnamon roll dough. From there I grab a little flour for dusting if the dough is sticky, and sometimes a dab of butter to grease the pan to make them slide off easily when they’re done. For the finishing touch I use edible flowers made from icing — they give the bunnies that springtime, whimsical look. I like to tell friends the list like this in one breath so it feels casual: 1 can of refrigerated cinnamon roll dough, edible flowers made from icing, flour for dusting (optional), butter (optional for greasing). That’s it.
How I actually make them (and the little steps I whisper to myself)
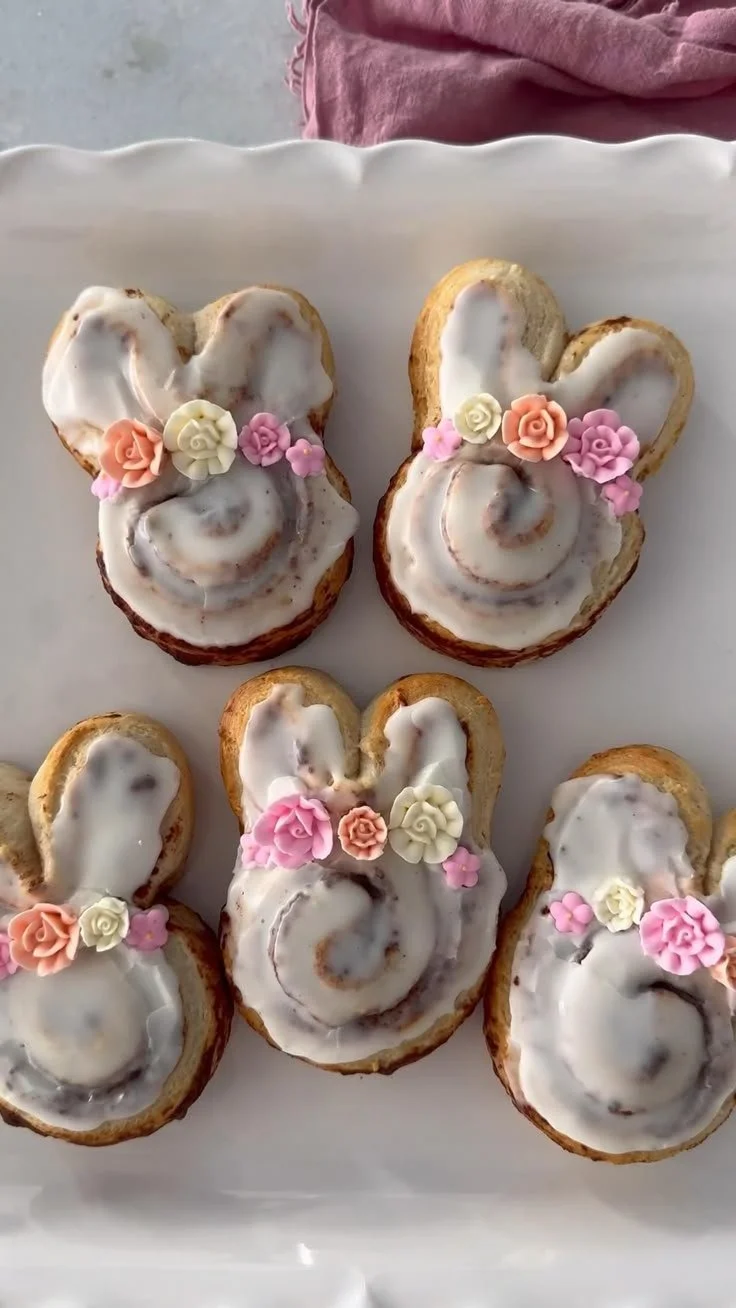
I always say the work is mostly shaping and the oven does the rest. First, 1. Preheat your oven to the temperature recommended on the cinnamon roll package. That little step is worth doing right away; when the dough is shaped it’s nice to slide it straight into a hot oven. Then, 2. Open the can of cinnamon roll dough and separate the rolls. I usually let the rounds relax for a few minutes on the counter so they’re not too tight to work with. Next, 3. Shape each roll into a bunny shape, ensuring you create the head and ears. I pinch the top to make two ears and form a rounded head — sometimes I pull off a tiny piece to tuck in as a tail. After shaping, 4. Place the shaped rolls on a greased baking sheet or lined pan. I prefer to brush the pan with a little butter, but parchment works fine too. Then 5. Bake according to package instructions until golden brown. You’ll know they’re ready when the tops are glossy and warm, a nutty cinnamon smell fills the room, and the edges are slightly crisp. Once out of the oven, 6. Once baked, allow them to cool slightly. Letting them rest for five minutes makes them easier to move and decorate, and the centers stay soft. Then 7. Decorate each bunny with edible icing flowers to create a flower crown on top. I press the little icing flowers into the glaze or onto the warm roll so they sit like a tiny crown. Finally, 8. Serve and enjoy your adorable Easter Bunny Cinnamon Rolls! The kids will squeal, adults will smile, and you’ll get to enjoy a warm, sugary bite that’s somehow both playful and classic.
When the texture is just right and how to tell
Cinnamon rolls have a voice — the higher, softer sigh when you pull them apart. When they are done correctly, the exterior is golden brown and the inside is pillowy and tender, not gummy. If the center is underbaked it feels dense and cool when you lightly press; if it’s perfect the dough yields and the cinnamon-sugar ribbon looks swirled but not wet. I find the smell is also a reliable cue: when the scent of caramelized sugar and baked dairy fills the kitchen, it is time to check. A toothpick in the center isn’t rude here; if it comes out with only a few moist crumbs you’re good to go.
A few tricks I’ve picked up (and I promise they help)
I have a handful of little habits that save me from baking headaches. First, lightly dusting the surface with flour makes shaping easier, especially if the dough is sticky from being warm. Second, when you make the ears, try tucking a small piece of dough under the head so they stay upright and don’t flatten while baking. Third, if you want a shinier top, brush the bunnies with a thin swipe of melted butter before they go into the oven; it promotes browning and adds a subtle richness. And a practical one: if you’re making these for a crowd, you can shape them the night before, cover the tray tightly, and pop them in the oven in the morning — just remember to preheat first.
Little variations and ideas to make them your own
Once you start doing this, it’s hard to stop experimenting. I once folded a few chocolate chips into the center before rolling to make a speckled, gooey surprise. Another time I swapped the edible icing flowers in for a simple cream cheese glaze and then pressed the flowers on top for color. If you like a bolder flavor, the cookies-and-cream twist is delightful and worth trying after you’ve mastered the basic bunny; the texture plays well with the classic spice and you can find an inspiration for that variation here cookies-and-cream cinnamon rolls. For a spiced kick, add a pinch of nutmeg or cardamom to the cinnamon filling, or borrow a saucy idea from a Biscoff version that swaps the filling for cookie butter and creates a caramelized edge that’s irresistible Biscoff cookie cinnamon rolls.
What to serve with them and how to keep leftovers happy
I tend to keep it simple: a pot of strong coffee or hot chocolate for the kids, and a small bowl of fresh berries to cut the sweetness. They are perfect alongside a soft-boiled egg on a busy Easter morning. If you plan to keep leftovers, cool the rolls completely and store them in an airtight container at room temperature for up to two days; for longer life, pop them in the fridge for up to a week. To revive them, warm briefly in a preheated 300 degree oven for five to eight minutes or a quick zap in the microwave covered with a damp paper towel — they come back soft and fragrant. I find making them the night before and reheating is a great hosting hack; it keeps the kitchen calm and the aroma irresistible.
Conclusion
If you want a visual guide while you shape and bake, this guide for Easter Bunny Cinnamon Rolls (using Pillsbury refrigerated rolls) is a lovely companion that shows the steps in pictures and matches what I’ve described here. Happy baking, and don’t forget to save one bunny for yourself before the crowd finds them.

Easter Bunny Cinnamon Rolls
Ingredients
Method
- Preheat your oven to the temperature recommended on the cinnamon roll package.
- Open the can of cinnamon roll dough and separate the rolls.
- Shape each roll into a bunny shape, ensuring you create the head and ears.
- Place the shaped rolls on a greased baking sheet or lined pan.
- Bake according to package instructions until golden brown.
- Allow the rolls to cool slightly for about five minutes.
- Decorate each bunny with edible icing flowers.
- Serve and enjoy your adorable Easter Bunny Cinnamon Rolls!