Slitheringly Good Breadstick Snakes: A Fun Halloween Snack for Kids!
There is a special kind of joy in the kitchen during Halloween, a time when we get to play with our food and turn simple snacks into something wonderfully spooky and fun. If you’re looking for the perfect, low-effort, high-impact treat to make with your kids, you can officially stop scrolling. These Breadstick Rattlers are…
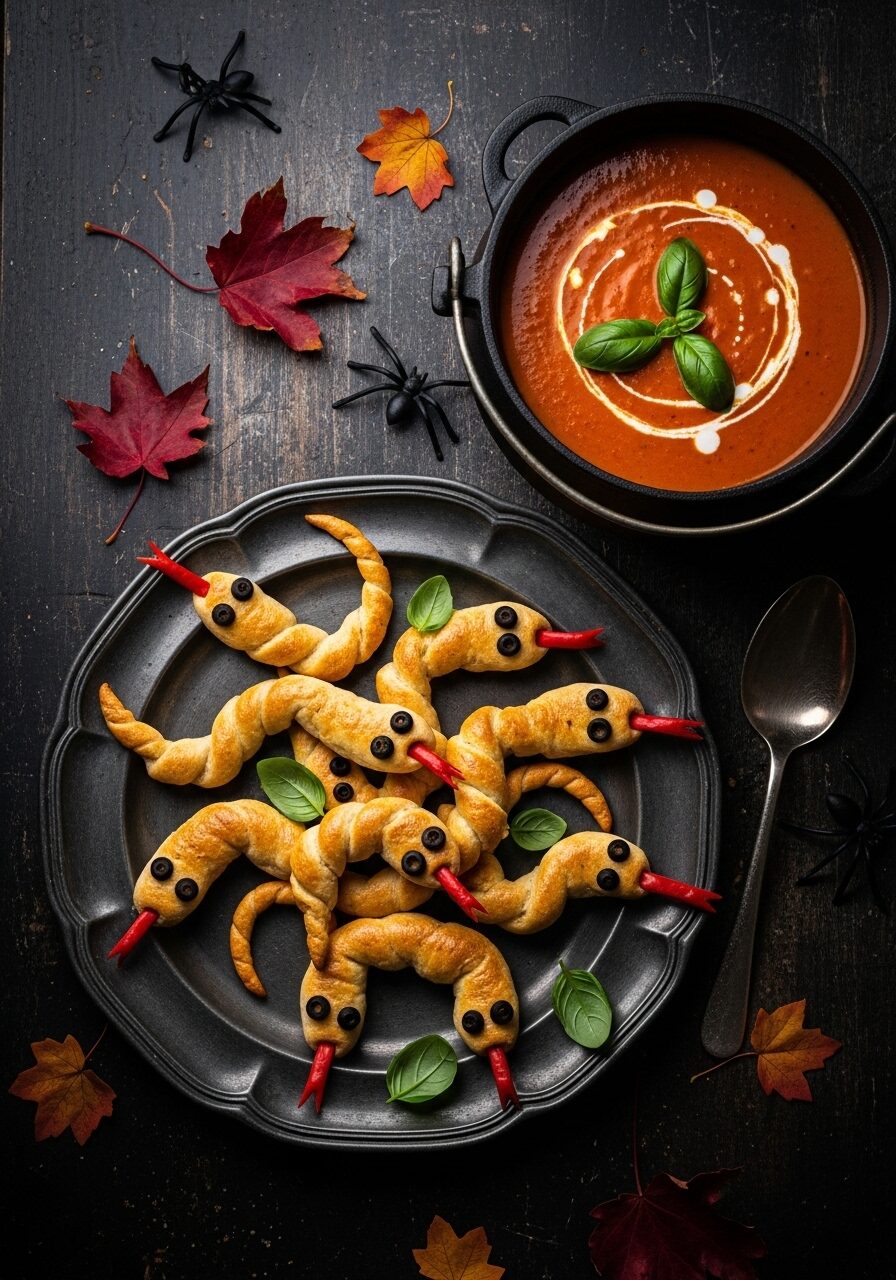
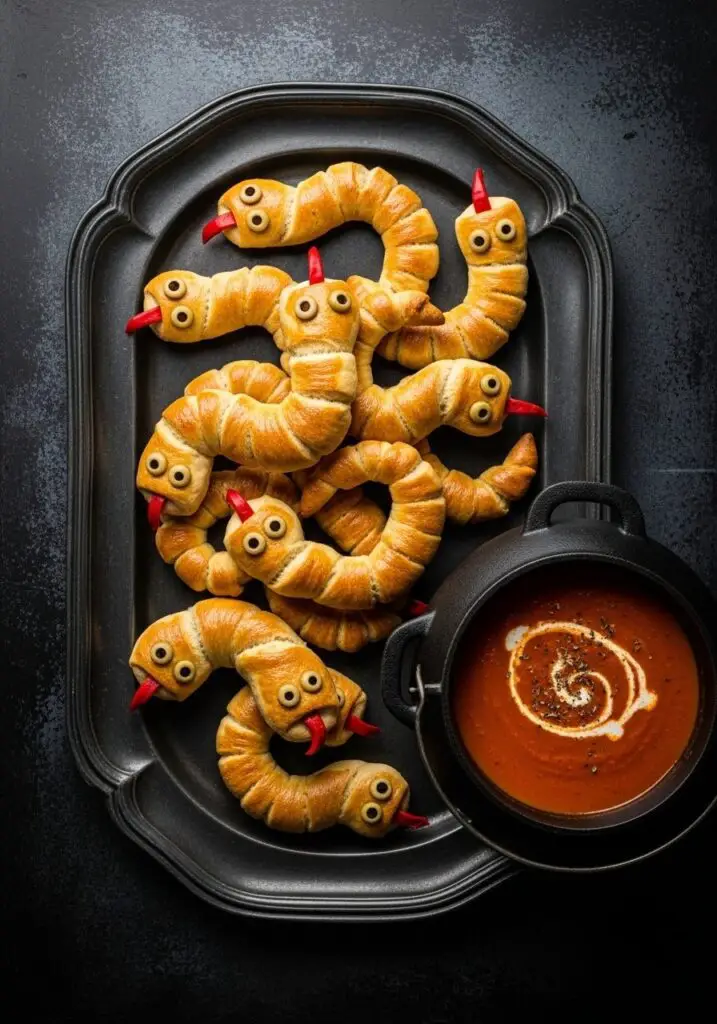
There is a special kind of joy in the kitchen during Halloween, a time when we get to play with our food and turn simple snacks into something wonderfully spooky and fun. If you’re looking for the perfect, low-effort, high-impact treat to make with your kids, you can officially stop scrolling. These Breadstick Rattlers are everything you could want in a Halloween snack! We take the ultimate kid-friendly shortcut—refrigerated pizza dough—and transform it into the most charmingly creepy, slithering snakes you’ve ever seen. Each one is twisted and baked to golden-brown perfection, with a “scaly” coat of poppy and sesame seeds, beady little olive eyes, and a fiery red chile tongue. The best part? They are ridiculously fun to make. Your little goblins will love rolling out the dough ropes and creating their own little snake pals. Served alongside a warm “cauldron” of tomato soup for dipping, this isn’t just a snack; it’s a full-blown Halloween activity that ends with a delicious, savory treat. These are a guaranteed hit for any class party or pre-trick-or-treating snack!

Why These Breadstick Snakes Are a Halloween Must-Make!
- A Fun, Kid-Friendly Project: Rolling the dough into ropes and shaping the snakes is the perfect, hands-on kitchen activity for kids of all ages.
- Incredibly Easy with a Shortcut: Using store-bought refrigerated pizza dough is a brilliant time-saver that makes this impressive-looking snack completely stress-free.
- Perfectly Spooky, Not Scary: With their simple, charming faces, these snake breadsticks are more fun than frightening, making them ideal for school parties and younger children.
- The Ultimate Dipping Stick: Their long, twisty shape is absolutely perfect for dipping into a warm bowl of tomato soup, turning a simple snack into a hearty and satisfying treat.
- Ready in Under 30 Minutes: From start to finish, you can have a whole platter of these slithering snacks ready to go in about 25 minutes, making them perfect for a last-minute party idea.
Recipe Snapshot
| Prep Time | 10 minutes |
| Cook Time | 15 minutes |
| Total Time | 25 minutes |
| Servings | 12 breadsticks |
| Calories | See recipe card for details |
| Course | Appetizer, Snack |
| Cuisine | American, Halloween |
| Method | Baking |
Your Simple Shopping List for Spooky Snakes
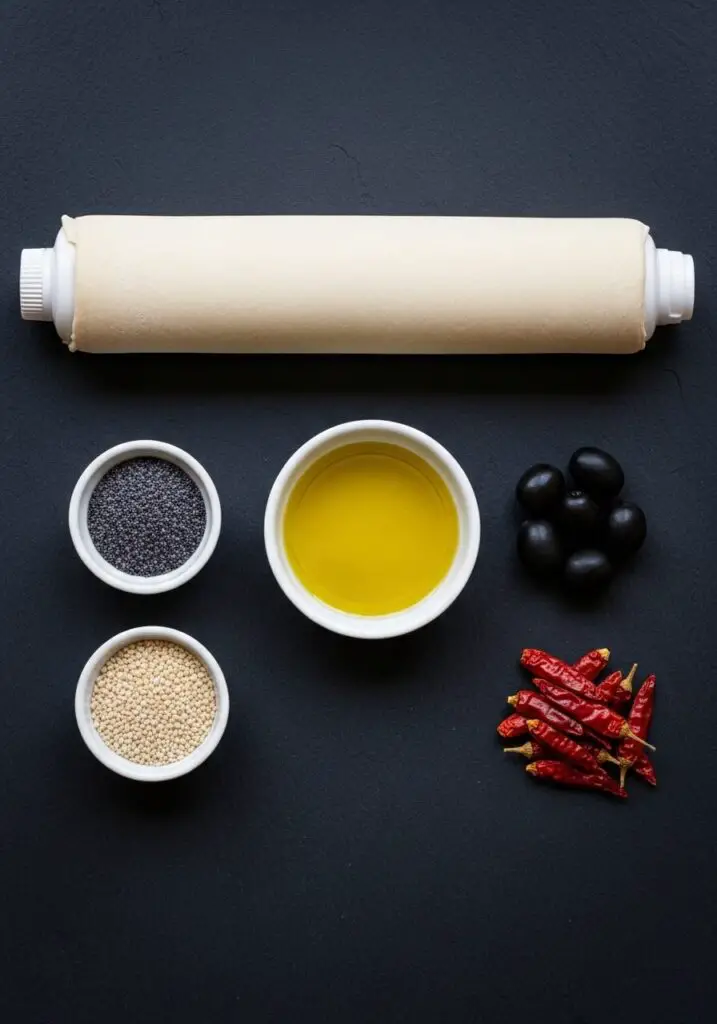
You only need a few simple ingredients to bring these creepy, crawly, and completely delicious breadsticks to life.
→ For the Breadstick Snakes
- Refrigerated Pizza Dough: One 13.8-oz. tube. This is our magical shortcut for a perfect, easy dough.
- Olive Oil: 1/4 cup, for brushing. This helps the seeds stick and gives the snakes a beautiful golden color.
- Poppy Seeds & Sesame Seeds: For creating the “scaly” texture on the snake bodies and tails.
- Black Olives: Just a few are needed to cut into tiny triangles for the eyes.
- Dried Chiles: 12 small ones, like chiles de árbol. These make the most perfect, forked red tongues!
→ For Serving
- Store-Bought Tomato Soup: The perfect “witch’s brew” for dipping your delicious snakes into.
Let’s Get Slithering! Your Step-by-Step Guide
This is one of the most fun and rewarding recipes to make. The key is to have your chopsticks ready and your little helpers on standby!
Phase 1: Shape the Snakes (Time: ~10 minutes)
This is where simple dough becomes a creepy, crawly creature!
- Preheat and Prep. Preheat your oven to 350°F. Line two large baking sheets with parchment paper. Lightly grease about 12 chopsticks with oil.
- Cut and Roll the Dough. Unroll the pizza dough onto a lightly floured surface. Using a pizza cutter or a sharp knife, cut the dough on the long side into 12 even strips.
- Shape the Snakes. Take one strip of dough and roll it into a 12-inch rope. Gently taper one end to create the “tail” and slightly flatten the other end to create the “head.”
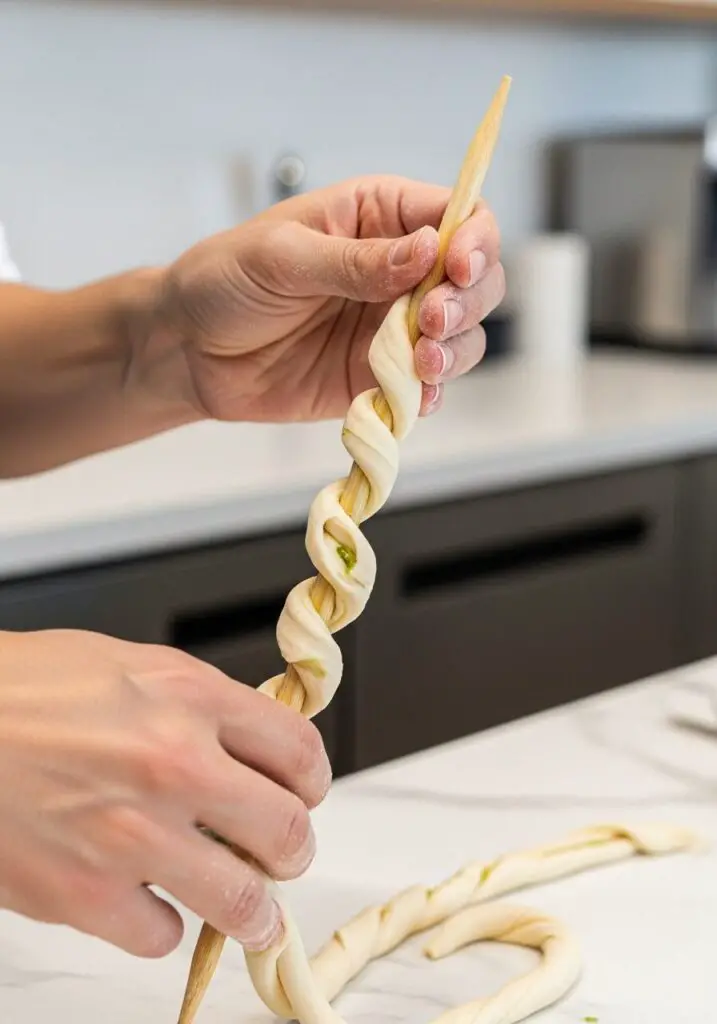
- Wrap Around Chopsticks. Carefully wrap each dough rope in a loose spiral around one of the greased chopsticks. This will help them hold that fun, slithering shape as they bake.
Phase 2: Decorate and Bake (Time: ~15 minutes)
Now we give our snakes their personality before they head into the oven.
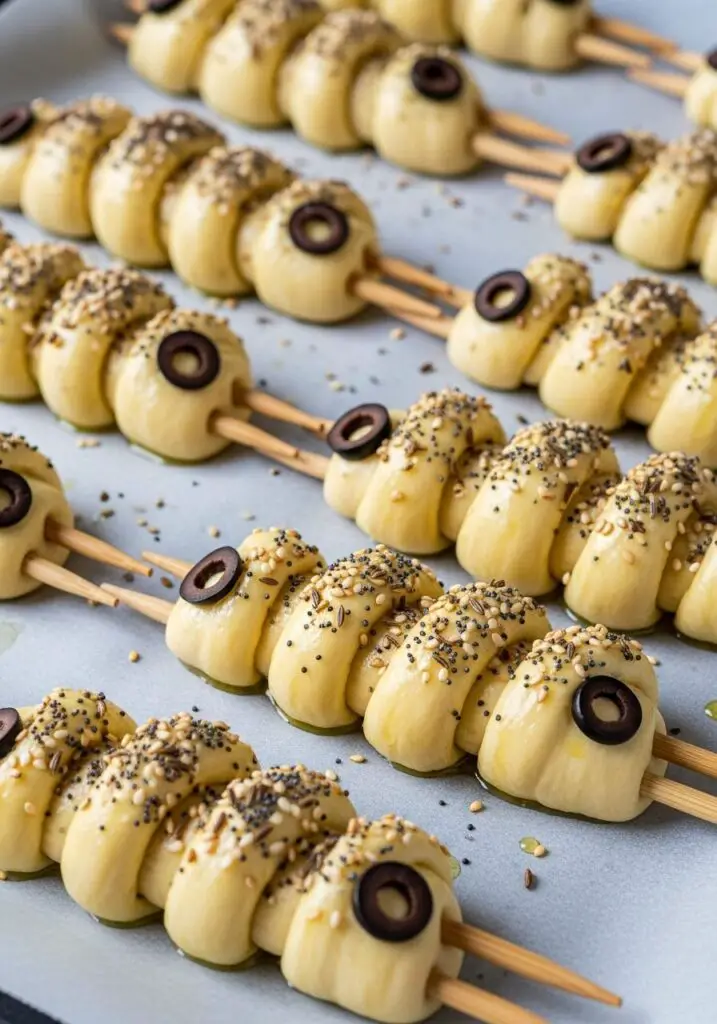
- Brush and Sprinkle. Place the chopstick-wrapped snakes on your prepared baking sheets. Brush each one with olive oil. Sprinkle the main “body” of each snake with poppy seeds and the tapered “tail” with sesame seeds for a two-toned look.
- Add the Eyes. Cut the black olives into tiny triangles. Gently press two olive triangles onto the flattened head of each snake to create the eyes.
- Bake to Golden Brown. Bake for 15 to 18 minutes, or until the breadsticks are puffed and a beautiful golden brown.
Phase 3: The Finishing Touches (Time: ~5 minutes)
The final, fiery details that bring our rattlers to life!
- Remove the Chopsticks. Let the baked snakes cool on the baking sheet for about 3 minutes. They need to be cool enough to handle but still warm. Carefully and gently twist the chopstick and slide it out of the breadstick spiral.
- Add the Tongue. While the snakes are still warm, use a toothpick to poke a small hole in the very tip of the flattened “head.” Carefully insert a dried chile into the hole to create a forked red tongue.
- Serve! For the ultimate presentation, warm up your tomato soup and serve it in a cauldron-like cast iron pot. Arrange your Breadstick Rattlers on a platter alongside for some spooky dipping fun!
WiseRecipes’ Top Tips for Perfect Breadstick Snakes!
- Don’t Skip Warming the Dough: Let your refrigerated pizza dough sit at room temperature for a few minutes before you unroll it. Cold dough is less pliable and more prone to tearing.
- Grease Your Chopsticks: A light coating of oil on your chopsticks is the crucial step that ensures you can easily slide them out of the baked breadsticks without breaking your beautiful snakes.
- Leave Room to Grow: When you wrap the dough around the chopstick, do it in a loose spiral. The dough will puff up significantly as it bakes, and a tight wrap can cause it to crack.
- The Chopstick Removal Trick: The key to removing the chopsticks cleanly is to do it while the breadsticks are still warm and pliable. A gentle twisting motion as you pull is the best technique.
- Serve Soup in a Cauldron: This is all about presentation! Serving your tomato soup in a small, black cast-iron pot or a dark-colored bowl instantly turns it into a spooky witch’s cauldron.
Creative Twists: Delicious Ways to Customize Your Rattlers!
- Cheesy Snakes: Before rolling the dough strips into ropes, press some grated Parmesan or cheddar cheese into them for a cheesy twist.
- Herb Snakes: Brush the snakes with garlic butter instead of olive oil and sprinkle with Italian seasoning for a more savory, garlic-bread-style snake.
- Everything Bagel Snakes: Use everything bagel seasoning instead of poppy and sesame seeds for a huge flavor punch.
- Use a Different Dough: Refrigerated breadstick or crescent roll dough can also be used to create these spooky shapes.
- Try Different Dips: These would also be delicious with a cheese dip, a creamy ranch, or even a pesto dip.
Easy Halloween Breadstick Rattlers
Ingredients
Equipment
Method
- Preheat oven to 350°F and line two baking sheets with parchment. Unroll pizza dough and cut into 12 long strips. Roll each strip into a 12-inch rope, tapering one end for the tail and flattening the other for the head.
- Wrap each rope in a loose spiral around a greased 10.5-inch chopstick.
- Place wrapped ropes on the prepared baking sheets. Brush with olive oil. Sprinkle the body with poppy seeds and the tail with sesame seeds.
- Cut black olives into small triangles and gently press two triangles onto each head to make the eyes.
- Bake until golden brown, 15 to 18 minutes. Let cool for 3 minutes on the baking sheet.
- Carefully remove the chopsticks by gently twisting and pulling them out while the breadsticks are still warm.
- While still warm, use a toothpick to poke a hole in the tip of each head and carefully insert a dried chile to make the tongue.
- Serve warm with tomato soup for dipping.
Notes
Keep Them Spooky! Storing Your Breadsticks
These breadsticks are definitely at their crispy best when served fresh from the oven, but leftovers are still delicious!
Storing Leftovers
Store any leftover Breadstick Rattlers in an airtight container or a zip-top bag at room temperature for up to 2 days. The chile “tongue” may soften a bit.
Reheating
To bring back their warmth and crispiness, reheat the breadsticks on a baking sheet in a 350°F oven or in an air fryer for 3-5 minutes until they are warmed through.
FAQs: Your Breadstick Rattler Questions, Answered!
What if I don’t have chopsticks?
If you don’t have chopsticks, you can use metal skewers or even wrap the dough around thick, oven-safe wooden dowels. The key is to use something long, thin, and oven-safe that has been greased. You can also just shape them into a freeform “S” shape directly on the baking sheet.
Can I use homemade pizza dough?
Yes, absolutely! If you have a favorite homemade pizza dough recipe, it will work wonderfully here. Just let it go through its first rise, then portion it out and roll it into ropes as directed.
Why did my snakes stick to the chopsticks?
This usually happens for one of two reasons: either the chopsticks weren’t greased well enough, or you waited until the breadsticks were completely cold before trying to remove them. A good coating of oil and removing them while still warm is the key!
Can I make these ahead of time?
The best way to make these ahead is to prepare the dough ropes, wrap them on the greased chopsticks, arrange them on the baking sheet, and cover them tightly with plastic wrap. You can store them in the refrigerator for a few hours before you plan to bake and serve them fresh.
These Breadstick Rattlers are the perfect combination of a fun kitchen craft and a delicious, savory snack. They are a wonderful, low-stress way to create a memorable treat for your little ghouls and goblins. It’s a recipe that’s all about getting creative and enjoying the playful spirit of the holiday. I hope you and your family have a blast making your own slithering snakes. Happy Halloween!