Easy Mini Pecan Pies
The Night I First Made Easy Mini Pecan Pies I remember the first time I pulled a tray of these out of the oven: the kitchen filled with a warm, caramel-y smell, the tiny crusts golden and shyly cradling a glossy pecan filling. I called them "Easy Mini Pecan Pies" because, frankly, they require almost…
The Night I First Made Easy Mini Pecan Pies
I remember the first time I pulled a tray of these out of the oven: the kitchen filled with a warm, caramel-y smell, the tiny crusts golden and shyly cradling a glossy pecan filling. I called them "Easy Mini Pecan Pies" because, frankly, they require almost no ceremony and get devoured like they’re tiny golden trophies. If you’re the kind of person who likes shortcuts that actually taste homemade, you’ll get along with them fine. If you love small bites across savory and sweet nights, you might enjoy my spin on easy mini shepherd’s pies too — I jump between sweet minis and savory minis depending on my mood.
The Ingredient Roll Call (but not a boring list)
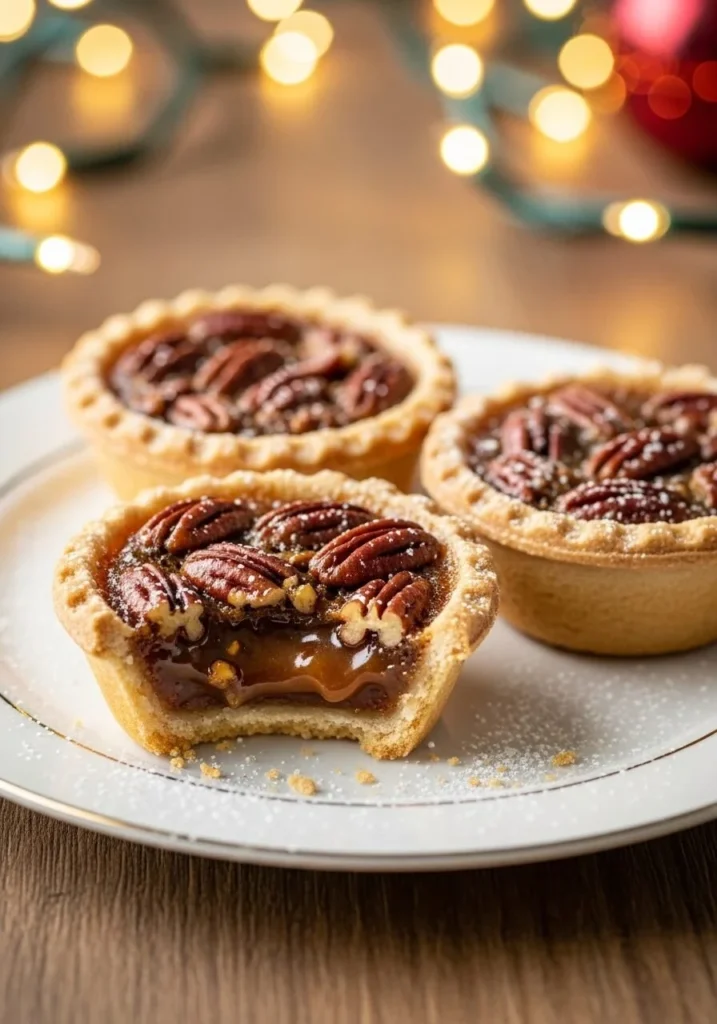
I don’t like reading recipes like instruction manuals, so I’ll introduce what you need as you go. Start with 2 refrigerated pie crusts—these are the backbone and the fastest way to get flaky shells without fuss. For the filling, you’ll whisk together 3 large eggs (at room temperature) with 1 cup dark brown sugar and 1/2 cup light corn syrup for that chewy, nutty sweetness. I fold in 3/4 cup chopped pecans because I like a nice, nutty bite in every mouthful. To round out the richness, add 3 tablespoons butter, melted and cooled slightly, and 1 teaspoon vanilla extract to give that toasty, fragrant finish. That combination makes a filling that is glossy, pourable, and sings against a crisp crust.
How I Make Them (and the little mistakes I learned from)
I preheat the oven before I even unroll the crusts because everything goes smoother if the oven is ready. Preheat oven to 350°F (175°C) and lightly spray a 24-cup muffin pan with nonstick cooking spray. While that’s warming, I roll the pie crusts on a floured surface and cut out 24 circles with a 3.5 to 4-inch round cookie cutter; then I press each circle into the muffin pan openings so each shell is neat and even. One thing I tell friends: use the 3.5-inch cutter if you want a slightly taller shell, 4-inch if you want a bit more edge for crimping.
In a large bowl, whisk the eggs, then add brown sugar, corn syrup, melted butter, and vanilla, whisking until smooth. The mixture should be glossy and slightly ribbon-like when you lift the whisk. Stir in chopped pecans and fill each crust with about 1.5 tablespoons of filling; I find this amount keeps the minis a perfect bite-size with a little room to breathe so the filling doesn’t overflow. Bake for about 30 minutes until the filling is set and doesn’t jiggle. You’ll know they are done when the tops aren’t glossy and they give only a gentle wobble if you nudge the pan. Let mini pies cool in the pan for 15 minutes, then transfer to a wire rack to cool completely. The initial cooling in the pan helps the filling firm up so they pop out cleanly, and moving them to a rack prevents soggy bottoms.
A little tip here: I try to have the eggs at room temperature because cold eggs can make the filling take longer to set and sometimes the texture is less smooth. Another trick is to toast the pecans lightly for five minutes in a 350°F oven before chopping—this deepens their flavor without adding work. And when you melt the butter, let it cool slightly; pouring hot butter right into the eggs can cook them a little and make the texture grainy.
What to Serve Them With, and How They Change the Party
I like to serve these warm with a dollop of whipped cream or a small scoop of vanilla ice cream for contrast; the hot-cold thing is irresistible. For a grown-up finish, drizzle a tiny bit of bourbon caramel or sprinkle flaky sea salt over the top right after baking. They’re surprisingly festive on a dessert board next to sliced apples, some tangy cheeses, and a bowl of toasted nuts. If you’re making a holiday spread, they disappear within the hour.
If you’re thinking about doubling the recipe for a crowd, make two pans and bake them one at a time so you don’t crowd the oven. And if you want to prep ahead, you can cut out the dough circles and line the muffin tin, cover with plastic, and refrigerate for up to a day before filling and baking. For inspiration on similar dependable mini-pecan approaches, I sometimes compare this to my go-to method in a different recipe and I swear by the principles in foolproof mini pecan pies when I’m tinkering.
Variations, Leftovers, and a Few Honest Confessions
I tinker with this recipe depending on mood. One variation: swap half the corn syrup for maple syrup for a deeper, woodsy flavor. Another: add a tablespoon of bourbon or dark rum to the filling for a boozy note that adults always appreciate. For a chocolate twist, sprinkle a few mini chocolate chips into each shell before adding the filling so they melt into little pockets of goo.
Leftovers keep well if you store them properly. Once completely cooled, I put them in a single layer in an airtight container, and they’re fine in the refrigerator for up to 4 days. To refresh, pop them in a 300°F oven for five to eight minutes so the crust regains its crispness; reheating in a microwave will make them soft. If you want to freeze them, I lay them out on a baking sheet until firm, then transfer to a freezer-safe container separated by parchment. They thaw nicely and can be reheated the same way.
A confession: the first time I made these, I overfilled half the shells and ended up with sweet little lava cups on the bottom of the pan. I learned to measure out about 1.5 tablespoons of filling into each crust and to wipe any drips before baking. Another lesson was about patience—letting them cool in the pan for 15 minutes is not negotiable if you want intact bottoms.
Conclusion
If you want a lovely reference for a similar small-pledge pecan pie, this version from my go-to baker is helpful: Mini Pecan Pies – Live Well Bake Often.
Final thought: these Easy Mini Pecan Pies are proof that simple ingredients and a few small habits—room-temperature eggs, modest filling amounts, and a short cooling window—can make something wonderfully nostalgic and shareable. Keep a roll of refrigerated crust in your fridge and you’re 30 minutes away from a buttery, nutty treat that feels like a treat and not a project.
Easy Mini Pecan Pies
Ingredients
Method
- Preheat the oven to 350°F (175°C) and spray a 24-cup muffin pan with nonstick cooking spray.
- On a floured surface, roll out the pie crusts and cut out 24 circles with a 3.5 to 4-inch cookie cutter.
- Press each circle into the muffin pan openings to form the crusts.
- In a large bowl, whisk together the eggs, brown sugar, corn syrup, melted butter, and vanilla until smooth.
- Stir in the chopped pecans.
- Fill each crust with about 1.5 tablespoons of the filling.
- Bake for about 30 minutes until the filling is set and not glossy.
- Let cool in the pan for 15 minutes before transferring to wire rack.