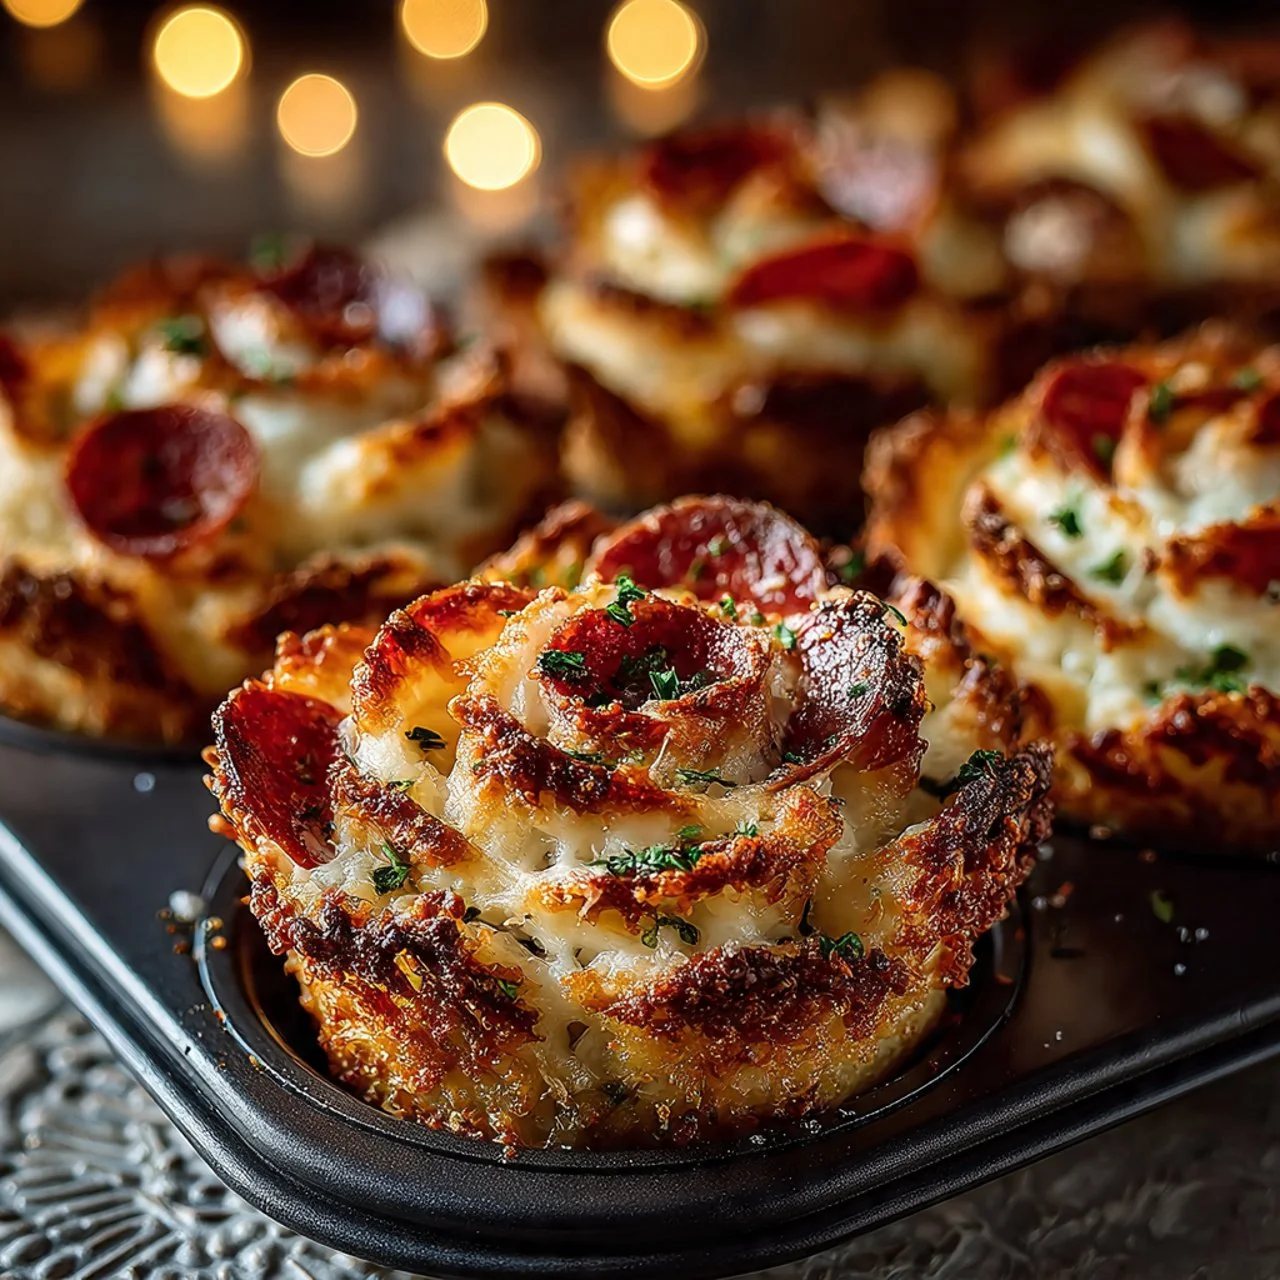
Easy Pizza Roses for Valentine’s Day: A Fun and Delicious Way to Celebrate Love
Every now and then, a recipe comes along that just makes your heart sing, and today, I’m thrilled to share one that’s perfect for sparking joy—and love! These Easy Pizza Roses are not only delightful to look at but also invite a lovely, nostalgic flavor experience. Imagine flaking apart the soft, golden layers of pizza…
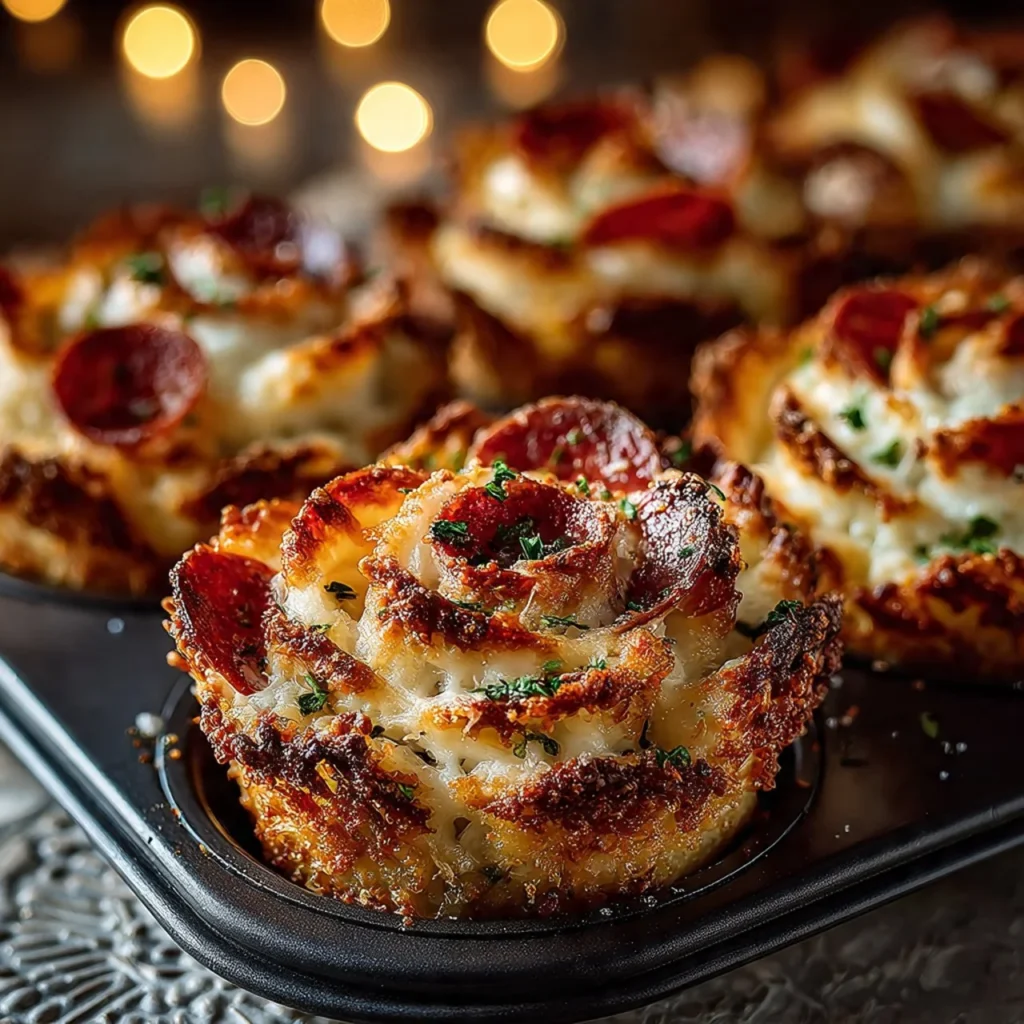
Every now and then, a recipe comes along that just makes your heart sing, and today, I’m thrilled to share one that’s perfect for sparking joy—and love! These Easy Pizza Roses are not only delightful to look at but also invite a lovely, nostalgic flavor experience. Imagine flaking apart the soft, golden layers of pizza dough, with gooey cheese peeking out and aromatic pepperoni adding the perfect hint of spice. Whether you’re celebrating Valentine’s Day with that special someone or simply indulging in a fun cooking project, these little beauties are sure to impress. Let’s explore why this dish deserves a front-row seat in your kitchen!
Why You’ll Love These Pizza Roses
- Visual Delight: Each rose is a miniature masterpiece, creating a stunning presentation that will have your guests ooh-ing and aah-ing. Perfect for romantic dinners or festive gatherings!
- Customizable Flavor: With a base of pizza dough and your choice of toppings, the flavor combinations are endless. Whether you’re a classic pizza lover or adventurous with toppings, these roses can be tailored to suit any palate.
- Easy to Make: Using store-bought pizza dough makes this dish incredibly accessible. You won’t need to spend hours in the kitchen, yet the results are sure to impress.
- Interactive Cooking: Rolling up the dough into roses can be a fun activity for families or friends. Involve everyone and make it a bonding experience while crafting your tasty creations.
- Perfect for Leftovers: Any extras? No problem! These beauties pack well and reheat beautifully, making them a fantastic addition to your lunchbox.
Gathering Your Ingredients
Here’s what you’ll need to bring your Easy Pizza Roses to life:
- 1 can of pizza dough: This is the secret to a quick and hassle-free base. Store-bought dough gives you a wonderful texture without the fuss of making it from scratch.
- 1/2 cup marinara sauce: The classic go-to pizza sauce! Feel free to switch this for pesto or even a creamy Alfredo for a unique twist.
- 6-8 slices of mozzarella cheese: For that melty, stretchy goodness that everyone loves. Cheddar or gouda can also be fun substitutes if you’re looking for a little something different.
- 12-18 slices of pepperoni: These will create the “petals” of your rose. If you’re not a pepperoni fan, try vegetables, prosciutto, or even cooked sausage for alternative flavors.
Let’s Get Cooking
Now that you have all your delicious ingredients, it’s time to bring your pizza roses to life! Follow these simple steps, and you’ll have a stunning dish that’s bound to impress.
- Preheat your oven to 400°F (200°C) to ensure it’s ready to bake those beautiful roses.
- Lightly grease a muffin tin with cooking spray or butter; this will help your pizza roses pop out easily once baked.
- Open that can of pizza dough, and unroll it on a clean surface. Grab a pizza cutter or sharp knife and slice the dough into six long strips, about 1-2 inches wide each.
- Spread a thin layer of marinara sauce across each strip of dough, leaving a small border. Adjust the sauce amount depending on how saucy you like it!
- Cut mozzarella cheese into slices that fit comfortably along the length of the dough strips. Layer the cheese over the sauce.
- Arrange your pepperoni slices on top of the cheese, with half of each slice hanging off the edge of the dough to form those delightful petals.
- Carefully roll each strip of dough into a tight rose shape, tucking in the ends to keep them snug.
- Gently place each rolled pizza rose into the muffin tin, creating a cozy fit in each muffin cup.
- Bake in the preheated oven for 12-15 minutes, until the dough is golden brown and the cheese is beautifully melted and bubbly.
- Once baked, allow the pizza roses to cool slightly before serving. A sprinkle of fresh basil or a drizzle of olive oil can elevate these roses even further.
Crafting Perfect Pizza Roses: Tried-and-True Tips
- Keep It Refrigerated: If the dough gets too warm while you are assembling your roses, it can become difficult to handle. Keep it cool for the best results.
- Don’t Overstuff: It can be tempting to add a lot of toppings, but sticking to the recommended amounts will help keep everything from spilling out and ensure your roses stay intact.
- Experiment with Shapes: If you want a twist, try making larger or smaller roses to fit your mood or occasion. You can even create mini versions using a muffin tin that holds smaller portions.
- Par-bake the Dough: If you’re making these in advance, consider par-baking the dough for 5 minutes before filling and rolling it; this will help reduce sogginess when reheating.
Mix It Up: Variations for Your Pizza Roses
Why not get a little creative with your pizza roses? Here are some fun ideas to switch up the classic recipe:
- Veggie Delight: Swap out the pepperoni for sautéed mushrooms, bell peppers, and onions for a colorful veggie option.
- BBQ Chicken Roses: Use shredded rotisserie chicken and BBQ sauce instead of marinara for a smoky, sweet twist that’s oh-so-tasty.
- Cheesy Spinach: Add a layer of cheesy spinach dip spread over the dough before topping it with cheese for a rich, savory flavor.
- Casual Caprese: Combine fresh mozzarella, diced tomatoes, and basil for a delicious twist reminiscent of beloved caprese salad.
Presenting Your Pizza Roses
Serving your Easy Pizza Roses is an integral part of the experience! Place them on a stunning platter, with a few scattered fresh basil leaves for a touch of elegance. Drizzle a little balsamic reduction over the top for a beautiful finish. Pair them with a refreshing side salad or a light soup for a complete meal. Imagine the smiles on your loved ones’ faces as they pull apart these glistening, flaky roses!
Storing Your Leftovers
If you happen to have any pizza roses left, don’t fret! These little gems can be stored easily. Simply place them in an airtight container in the fridge, where they’ll stay fresh for about 3-4 days. For longer storage, you can freeze them—just ensure they are well-wrapped to prevent freezer burn. Reheat them in the oven at 350°F (175°C) until warmed through and the cheese is melty again. They’re just as delightful the second time around!
Your Questions Answered
- Can I use gluten-free pizza dough? Absolutely! Many excellent gluten-free options are available that you can use for this recipe.
- How do I make them ahead of time? You can prepare everything up to the baking step and place the assembled roses in the fridge (or even freezer) until you’re ready to bake.
- Can I use other cheeses? Yes, definitely! Feel free to mix and match cheeses to find your favorite combination.
- What should I serve with these pizza roses? They pair beautifully with a simple green salad or any favorite dipping sauce, like marinara or ranch for extra fun.
These Easy Pizza Roses are not just a feast for the eyes but a delightful culinary experience as well! They bring a little bit of magic to mealtime, ideal for any occasion. So roll up your sleeves, gather your loved ones, and dive into making these lovely edible blooms. Trust me, the smiles and applause you’ll receive will be worth every effort! Happy cooking, and may your kitchen always echo with laughter and joy!
Easy Pizza Roses
Ingredients
Method
- Preheat your oven to 400°F (200°C).
- Lightly grease a muffin tin with cooking spray or butter.
- Unroll the pizza dough on a clean surface and slice it into six long strips, about 1-2 inches wide.
- Spread a thin layer of marinara sauce across each strip, leaving a border.
- Cut mozzarella cheese into slices and layer them over the sauce.
- Arrange the pepperoni slices on top of the cheese, with half of each slice hanging off the edge.
- Carefully roll each strip of dough into a tight rose shape.
- Place each rolled pizza rose into the muffin tin.
- Bake in the preheated oven for 12-15 minutes, until golden brown and the cheese is melted and bubbly.
- Allow to cool slightly before serving. Optionally, add fresh basil or a drizzle of olive oil.