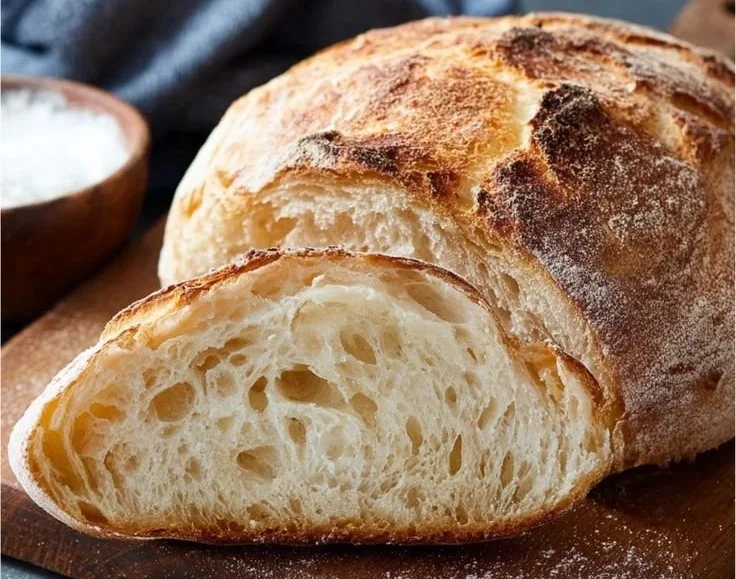
Easy Rustic Bread
I remember the first time I baked this loaf: rain tapping the windows, the whole kitchen smelling faintly of yeast, and a crust so loud when it cracked that my cat came running. It feels indulgent and impossibly simple at the same time, which is why I call it Easy Rustic Bread. If you ever…
I remember the first time I baked this loaf: rain tapping the windows, the whole kitchen smelling faintly of yeast, and a crust so loud when it cracked that my cat came running. It feels indulgent and impossibly simple at the same time, which is why I call it Easy Rustic Bread. If you ever need a gluten-free take on a similarly forgiving loaf, I keep a link handy to an easy rustic gluten-free bread that saved me more than once when a dinner guest needed an alternative.
How I Found This Easy Rustic Bread
I stumbled over this method during a week when I wanted fresh bread but did not want to fuss. The trick is patience more than muscle: you mix, you forget, and you let time do the lifting. I use a very small amount of yeast, which quietly wakes up overnight and gives that open crumb and tang you associate with artisanal loaves. The recipe is deceptively simple—3 cups all-purpose flour, 1 1/2 teaspoons salt, 1 teaspoon sugar, 1/4 teaspoon instant yeast, and 1 1/2 cups warm water—but the result reads like something you’d pay dearly for at a bakery.
The Ingredient Moment
I never line up ingredients in a rigid fashion when I’m telling the story of a loaf; instead I pull them together as I work. To start, in a large bowl I combine flour, salt, sugar, and yeast. The salt and sugar balance each other and the teeny bit of yeast lets the dough ferment slowly. Then I add warm water and stir until a shaggy dough forms. It looks messy at this point, stringy and rough, but that’s the character-building stage.
If you like a softer, more sandwich-friendly crumb, try swapping a cup of the all-purpose for bread flour instead, or experiment with a few tablespoons of olive oil for a slightly richer flavor. For a more savory loaf, fold in a tablespoon of chopped rosemary or a sprinkle of coarse cornmeal to the surface before baking.
The Simple Method I Follow
I almost always follow the same gentle rhythm. After the dough comes together, I cover the bowl with plastic wrap and let it rest for 12 to 18 hours at room temperature—overnight usually works perfectly. This long rest is what gives the bread its depth of flavor and those large, irregular holes that make the first tear of crust so satisfying. When the long rest is done, I preheat my oven to 450°F (230°C) and place a Dutch oven inside to heat up; a screaming-hot pot is the secret to steam and a glossy crust. I turn the dough out onto a floured surface and shape it into a ball, careful not to deflate it too much. After forming the ball, I let it rest for about 30 minutes so the gluten relaxes and the loaf puffs slightly. When I’m ready, I carefully place the dough into the hot Dutch oven, cover with a lid, and bake for 30 minutes. Then I remove the lid and bake for an additional 10 to 15 minutes until golden brown. Finally, the loaf needs to cool on a wire rack before slicing; impatient as I am, I resist cutting into it right away because the interior finishes setting as it cools.
Little Tricks I Swear By
I have a few minor rituals that make a noticeable difference. One is using slightly warmer than room-temperature water—warm to the touch but not uncomfortably hot—which wakes the yeast without stressing it. Another is giving the shaped ball a dusting of flour and a quick score with a sharp knife; the cut controls where the crust will split as it blooms in the oven. When I lift the lid after the first bake, the steam that billows out smells like bread from a bakery, and the crust is beginning to bronzify. If your oven runs hot, start checking at the lower end of the additional baking time. I also like to tap the bottom of the cooled loaf: a hollow sound means it is done. If you have a thermometer, aim for about 205°F inside the center for a truly finished crumb.
A personal fail-safe: if I’m short on time in the morning, I’ll mix everything in the evening and let it rise at room temperature for the shorter end of the 12 to 18 hour range; it still works beautifully. If I want to plan further ahead, I shape the dough and let it sit in the fridge for a slow overnight proof, then bake the next day—this also concentrates flavor and makes scheduling easy.
When It’s Perfect and What to Serve With
A perfect loaf will be a deep golden brown, the crust loud with cracks you can almost hear as you slice, and the interior soft and slightly chewy with irregular holes. You know it’s right when the aroma fills the kitchen and the first slice sops up olive oil beautifully. I love this bread with a slab of butter and flaky salt at breakfast, smeared with ricotta and honey for a late-morning treat, or dunked into a hearty stew for dinner. If you want ideas beyond the obvious, try serving it alongside a simple tomato salad; the acidity cuts through the richness of the crumb in a way that feels effortlessly satisfying.
Leftovers keep well for a day or two wrapped in a paper bag at room temperature; the paper helps the crust stay crisp while preventing the interior from drying out. For longer storage, slice and freeze; you can toast slices straight from the freezer and they recover much of that just-baked snap. I learned this the hard way after making three loaves for a family gathering and not wanting any to go to waste.
Making It Your Own
There are a couple of easy variations that make this loaf feel different depending on what I’m craving. For a nuttier flavor, I’ll add a handful of toasted seeds into the dough. For a rustic whole-grain twist, replace up to one cup of the all-purpose flour with whole wheat and add a touch more water; it will be denser but richly flavored. If you want to go savory-sweet, fold in a quarter cup of chopped dried fruit and a pinch of cinnamon—this becomes breakfast bread in the nicest way. If you’re feeling adventurous and need something lighter, I sometimes look up a cottage cheese flatbread idea to adapt textures in a hurry, like the version I bookmarked at a cottage-cheese flatbread recipe.
I used to worry about getting the timing exactly right, but that’s the beauty of this recipe: it is forgiving. If your dough looks over-proofed it will still bake into something pleasant; you might just get a flatter loaf. If it under-proofs, give it a bit more time on the counter. And if you ever need a gluten-free sandwich-ready option, I keep a reliable standby saved here: an easy gluten-free sandwich bread that pairs nicely with the same toppings I use on this rustic loaf.
Conclusion
If you want step-by-step photos or another variation, I often cross-check techniques with a trusted online guide such as World’s Easiest Yeast Bread recipe – Artisan, NO KNEAD crusty bread for reassurance, and I also like to read different storytellers’ takes like the one at RUSTIC ARTISAN BREAD: NO KNEAD AND SO EASY TO MAKE! for inspiration on shaping and scoring. Give this loaf a try on a slow evening; there is a kind of quiet magic in the way a few humble ingredients turn into something that makes your whole house feel like a bakery.
Easy Rustic Bread
Ingredients
Method
- In a large bowl, combine the all-purpose flour, salt, sugar, and instant yeast.
- Add warm water and stir until a shaggy dough forms.
- Cover the bowl with plastic wrap and let it rest for 12 to 18 hours at room temperature.
- Preheat your oven to 450°F (230°C) and place a Dutch oven inside to heat.
- Turn the dough out onto a floured surface and shape it into a ball.
- Let the formed ball rest for about 30 minutes.
- Carefully place the dough into the hot Dutch oven, cover with a lid and bake for 30 minutes.
- Remove the lid and bake for an additional 10 to 15 minutes until golden brown.
- Let the loaf cool on a wire rack before slicing.