Easy & Tasty Cherry Crumble Bars
The Secret Behind Perfect Easy & Tasty Cherry Crumble Bars The title of this one is Easy & Tasty Cherry Crumble Bars, and if you love something that tastes like summer wrapped up in a square, you are going to want to make these. I first scribbled the idea down on a scrap of recipe…
The Secret Behind Perfect Easy & Tasty Cherry Crumble Bars
The title of this one is Easy & Tasty Cherry Crumble Bars, and if you love something that tastes like summer wrapped up in a square, you are going to want to make these. I first scribbled the idea down on a scrap of recipe card while standing at a farmer’s market stall, watching someone load box after box of cherries into the trunk of their car. The ingredients are wonderfully straightforward: 2 cups fresh cherries, pitted and halved, 1 cup all-purpose flour, 1 cup rolled oats, 1/2 cup brown sugar, 1/2 cup granulated sugar, 1/2 cup unsalted butter, melted, 1 teaspoon vanilla extract, 1 teaspoon baking powder, 1/2 teaspoon salt. If that list feels familiar because you like easy bar recipes, you might also enjoy my version of easy sopapilla cheesecake bars, which play the same “simple pantry ingredients, amazing results” tune.
What I love most about these bars is how little fuss they require and how much they reward you. There is nothing intimidating about preheating the oven to 350°F (175°C) and greasing a 9×9-inch baking dish. Those two small steps make everything else fall into place, and the warm, buttery aroma that fills your kitchen while they bake is impossible not to smile at.
The First Time I Made These
The first time I made this recipe I learned two things quickly. One, fresh cherries are gloriously messy when you pit them, so wear an apron. Two, the crumb mixture is forgiving in the best possible way. In a bowl I combined the flour, oats, brown sugar, granulated sugar, baking powder, and salt. Then I poured in the melted butter and the vanilla extract and mixed until everything came together into that perfect crumbly stage. Half of that mixture gets pressed into the bottom of the prepared baking dish to form the base. I smooth it out with the back of a spoon so it is even but not overly compacted.
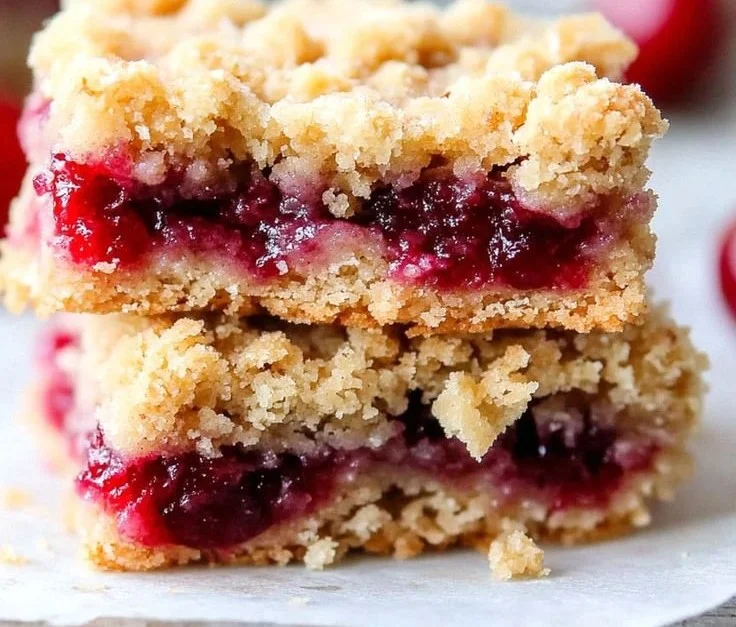
Next comes the cherries. I spread the 2 cups of fresh cherries, pitted and halved, evenly over the crust. A neat trick I learned is to toss the cherries with just a little granulated sugar first if they are not quite at peak sweetness; it brings out their juice and helps the filling set while baking. After that I sprinkled the remaining crumb mixture on top of the cherries in an even layer, like snowfall. The pan then goes into the oven to bake for 30 to 35 minutes, or until the top is golden brown and you can hear a quiet blipping of cherry juices along the edges. You must allow the bars to cool before cutting into them so the filling has a chance to set; patience is the hardest part of this whole recipe.
I sometimes entertain with a mix of things on the counter, and if you want a tart contrast I also love making lemon oatmeal crumble bars on the same day so guests can choose between bright citrus and rich cherry.
Getting the Texture Just Right
Texture is everything here. The base should be firm enough to hold together when you cut the bars but tender and crumbly when you bite into them. Using 1 cup of rolled oats with 1 cup of all-purpose flour gives you that pleasing chew, while the 1/2 cup of melted unsalted butter binds the crumbs without turning the whole thing cakey. When you mix the dry components — the flour, oats, brown sugar, granulated sugar, baking powder, and salt — into the melted butter and vanilla extract, stop mixing when it looks crumbly. Overworking it will lead to a denser crust and not the little crunchy pockets I adore.
You know they are done when the top has a warm golden color and the cherries are bubbling faintly at the edges. If you touch the center lightly it should feel set, not jiggly. A thin knife inserted into the center should come out with just a hint of sticky fruit, not a puddle. Let the pan cool on a rack; the cooling is actually part of achieving the right texture, as the juices thicken and the crumbs firm up. If you are in a hurry, chilling in the refrigerator for 15 to 20 minutes helps immensely before cutting.
Here are a few small tips that make a big difference: pit cherries with a straw or a cherry pitter to save time and avoid bruising, toss cherries with a teaspoon of cornstarch if they seem watery to avoid a soggy middle, and press only half the crumb mixture for the base so the top stays light and sandwich-like.
Little Changes I Like to Make
I tinker with this recipe depending on the mood. Sometimes I add a pinch of lemon zest to the cherry layer, which brightens the flavor and cuts through the sweetness. Other times I fold in a half teaspoon of almond extract into the melted butter for a subtle nutty note. When I want a richer bar reminiscent of my grandmother’s treats I grate a little white chocolate over the cherries before adding the top crumbs. If you like a creamier variant, try layering a thin spread of sweetened cream cheese between the base and the cherries, inspired by my love for Nana’s easy cheesecake bars.
Two easy variations are swapping cherries for mixed berries or using frozen cherries that have been thawed and drained. For a gluten-free version you can substitute the 1 cup all-purpose flour with a gluten-free blend and add an extra tablespoon of oat flour if the mixture seems too wet. These small swaps keep the method exactly the same: press, spread, sprinkle, and bake.
Storage is where these bars show their practicality. If I make a pan for a weekend picnic, I cool the bars completely and keep them in an airtight container refrigerated for up to four days. For longer storage I freeze individual squares wrapped tightly and transfer them to a freezer bag for up to three months. When it’s time to eat, a few moments in a warm oven or a quick zap in the microwave brings them back to life.
Conclusion
If you want a close relative of this idea with a slightly different twist, I often look at other recipes for inspiration and came across a great example in the Cherry Pie Crumb Bars Recipe – Crunchy Creamy Sweet, which highlights similar techniques for a fruit-filled crumb bar. Give these Easy & Tasty Cherry Crumble Bars a try the next time cherries are in season; the combination of buttery oat crumbs and juicy fruit is as comforting as a childhood memory and as satisfying as any dessert I keep coming back to.
Cherry Crumble Bars
Ingredients
Method
- Preheat the oven to 350°F (175°C) and grease a 9x9-inch baking dish.
- In a bowl, combine flour, oats, brown sugar, granulated sugar, baking powder, and salt.
- Pour in melted butter and vanilla extract; mix until the mixture is crumbly.
- Press half of the crumb mixture into the prepared baking dish to form the base.
- Spread the fresh cherries evenly over the crust.
- Sprinkle the remaining crumb mixture on top of the cherries evenly.
- Bake in the preheated oven for 30 to 35 minutes, or until the top is golden brown and bubbling.
- Allow the bars to cool before cutting into them to help the filling set.