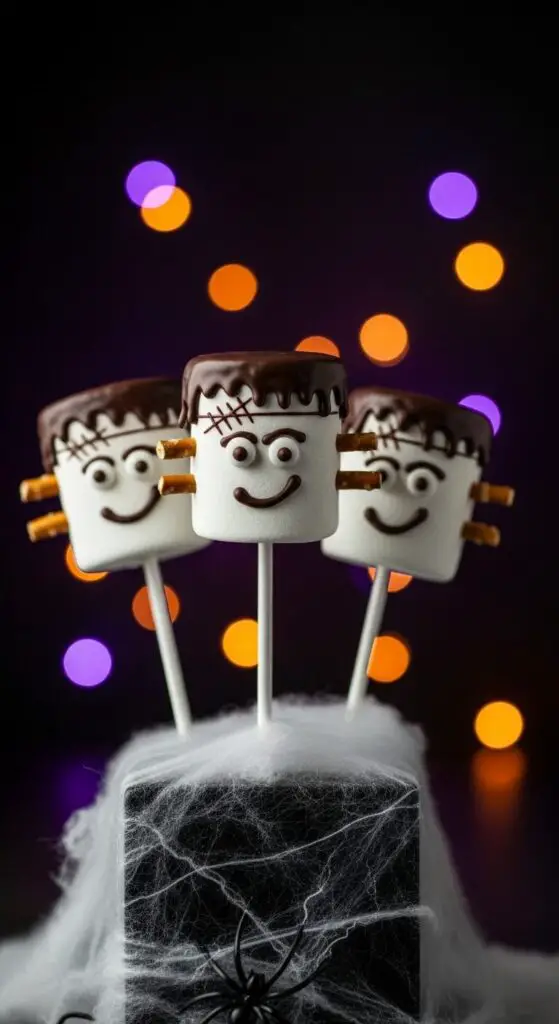
The Ultimate Frankenstein Marshmallow Pops (The Funniest, Easy Halloween Dessert!)
Imagine a Halloween treat that’s more cute than creepy, incredibly fun to make, and guaranteed to be the star of any party platter. Picture this: a soft, fluffy marshmallow, transformed into a goofy Frankenstein monster with a chocolatey hairdo, pretzel bolts, and googly eyes, all served on a convenient stick. That, my friends, is the…
Imagine a Halloween treat that’s more cute than creepy, incredibly fun to make, and guaranteed to be the star of any party platter. Picture this: a soft, fluffy marshmallow, transformed into a goofy Frankenstein monster with a chocolatey hairdo, pretzel bolts, and googly eyes, all served on a convenient stick. That, my friends, is the pure, simple joy of these Frankenstein Marshmallow Pops, and it is, without a doubt, one of the most fun and easy Halloween desserts you will ever create.
Here’s the thing about Halloween treats: the best ones are a fun activity, not just a recipe. I’m always searching for low-stress, no-bake ideas that are perfect for getting the kids involved in the kitchen, and this one is a total home run. There’s no oven required, and the decorating process is a blast of creative, spooky fun. It’s the perfect project for a chilly October afternoon.
I promise you, there is no greater party victory than a platter of these adorable, handmade monsters. They are a true show-stopper, combining the classic, beloved texture of a marshmallow with a crisp candy coating. They are the perfect centerpiece, a great classroom treat, and one of the best easy Halloween desserts for makers of all ages.
Get ready to bring your own little monsters to life with this simple, step-by-step guide to the cutest treats on the block.
Why These Frankenstein Pops Are a Halloween Must-Have!
You are going to be completely charmed by how simple it is to create these adorable treats. This recipe is destined to become a yearly tradition. Here’s why you’ll love it:
- The Ultimate No-Bake Recipe: This is one of those fantastic, easy Halloween desserts that requires no oven and minimal cooking, freeing you up for other spooky preparations.
- So Easy, The Kids Can Help: Dipping, decorating, and drawing the faces is the perfect, fun, and creative kitchen project for little monsters of all ages.
- A True Party Show-Stopper: A platter of these goofy green guys is a guaranteed centerpiece that will have everyone smiling and grabbing for one.
- Perfect for Parties & Gifting: Because they’re on a stick, they are a clean, easy-to-eat party food and can be individually wrapped as adorable Halloween party favors.
- Incredibly Fun and Customizable: You can give each Frankenstein monster its own unique personality with different mouths, scars, and hair styles!
Recipe Snapshot
| Prep Time | 1 hour (includes chilling) |
| Cook Time | 5 minutes |
| Total Time | 1 hour 5 minutes |
| Servings | 6 servings |
| Calories | 149 kcal per pop |
| Course | Dessert, Snack |
| Cuisine | American |
| Difficulty/Method | Easy / No-Bake |
Your Shopping List for a Monster Mash
This fun recipe uses a handful of specialty baking ingredients to bring your monsters to life.

→ For the Frankenstein Pops
- Green candy melts → The key to that perfect, vibrant Frankenstein green and a smooth, hard coating.
- Marshmallows → Use the large, standard-sized ones for the best results.
- Small pretzel rods → These make the perfect “bolts” for Frankenstein’s neck.
- Semisweet chocolate chips → For melting to create the classic, spiky hair.
- Candy eyeballs → The essential ingredient for a cute and goofy expression!
- Edible red and black markers → For drawing on the final spooky details.
- Lollipop sticks or colorful straws → For serving your pops on.
Let’s Make Monsters! Your Step-by-Step Guide
Ready to create the cutest, spookiest treats ever? Let’s break it down into fun, simple parts.
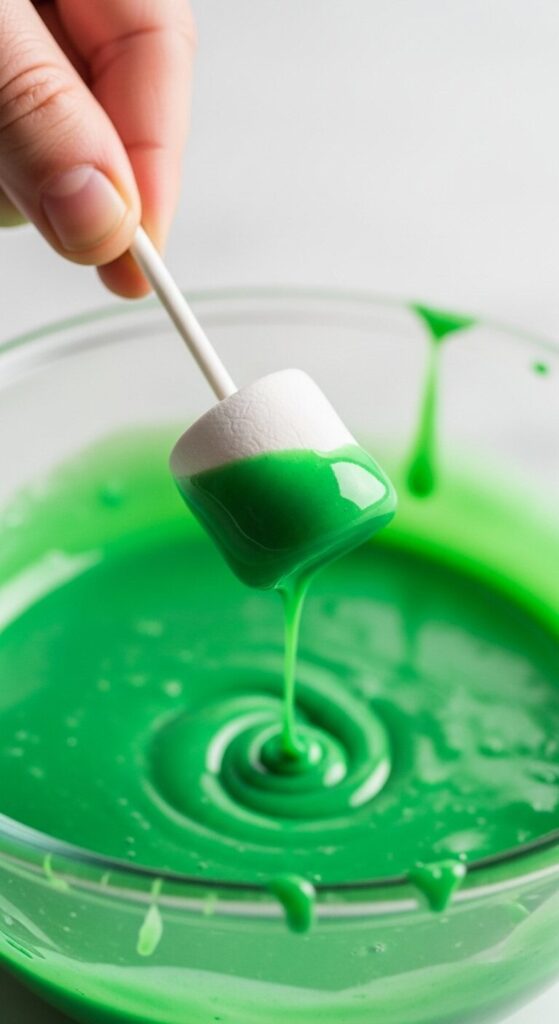
Part 1: The Green Coating
- Melt the Candy: Melt the green candy melts in a microwave-safe bowl or a double boiler, following the package directions until the mixture is completely smooth and fluid.
- Dip the Marshmallows: Push a lollipop stick firmly into the bottom of each marshmallow. Dip each marshmallow into the melted green candy, turning it to ensure it’s completely coated.
- Let Them Set: As you finish dipping each one, stand the marshmallow pops upright to set. The best trick is to fill a tall glass with uncooked rice or oatmeal and stick the pops in to hold them vertically. Place the glass in the fridge for about 5 minutes to help the coating harden slightly.
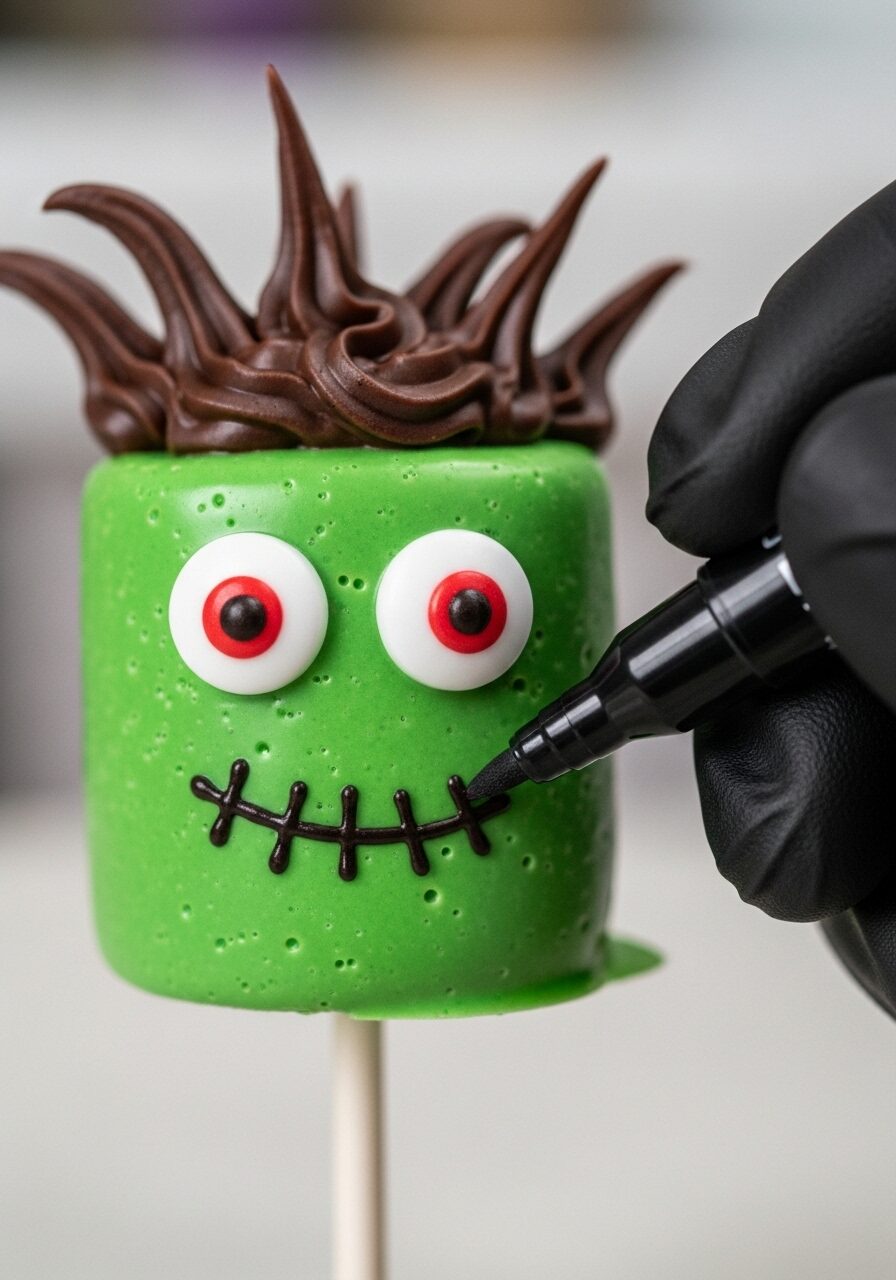
Part 2: Hair, Bolts, and Eyes
- Make the Hair: Melt the semisweet chocolate chips in a small microwave-safe bowl until smooth. Dip the top of each green-coated marshmallow into the melted chocolate. Using a toothpick, immediately drag some of the chocolate down towards the base to create a spiky, classic Frankenstein hairdo. Return the pops to the glass in the fridge for another 5 minutes to harden the hair.
- Add the Neck Bolts: Break the ends off of your pretzel rods to create small, 1/8-inch pieces. Carefully and gently push one pretzel “bolt” into each side of the marshmallow, about one-third of the way up from the bottom.
- Attach the Eyes: Using a toothpick, dab two small dots of the remaining melted chocolate onto the face of each marshmallow pop. Immediately press on the candy eyeballs before the chocolate sets.
Part 3: The Finishing Touches
- Draw the Faces: Using the black edible marker, draw a quirky, stitched mouth onto each Frankenstein.
- Add a Spooky Scar: Use the red edible marker to draw a small, jagged laceration on each monster’s forehead for a final spooky detail.
- Serve or Store: Enjoy your adorable marshmallow pops immediately, or store them in an airtight container in the fridge until you’re ready to party!

WiseRecipes’ Top Tips for Monster Pop Mastery
These simple secrets will ensure your spooky treats are a huge, adorable success.
- Use Candy Melts, Not Dyed White Chocolate. This is the most important tip! Candy melts are specifically designed to melt smoothly and set up hard. Trying to color white chocolate with regular food coloring will cause it to seize and become a clumpy mess.
- The Rice-in-a-Glass Trick is a Lifesaver. Finding a way to let your pops dry vertically is key to a smooth, drip-free finish. Filling a tall, heavy glass with uncooked rice or oats creates the perfect, stable stand. A block of styrofoam also works wonders.
- Work in Batches. The melted candy and chocolate can start to harden as you work. It’s often easiest to do all the green dipping first, then all the hair, then all the eyes, rather than trying to complete one pop at a time from start to finish.
- A Toothpick is Your Best Tool. A simple toothpick is incredibly versatile here. It’s perfect for creating the spiky hair, for applying the “glue” for the eyes, and for cleaning up any little smudges or mistakes.
- Chill Time is Key. Don’t skip the brief chilling periods in the fridge! This helps each layer of chocolate and candy set up quickly and firmly, which makes the next step of decorating much cleaner and easier.
Frankenstein Marshmallow Pops
Ingredients
Equipment
Method
- Melt the green candy melts in a microwave or double boiler according to package directions until smooth.
- Push a lollipop stick into each marshmallow, then dip the marshmallow into the melted green candy, turning to cover it completely.
- Stand the marshmallows upright in a glass filled with uncooked rice to set. Place in the fridge for about 5 minutes to harden slightly.
- Melt the chocolate chips until smooth. Dip the tops of each coated marshmallow in the chocolate to form the hair. Use a toothpick to drag the chocolate down to form spikes. Return to the fridge for 5 minutes to harden.
- Break the ends off pretzel rods to form small “bolts.” Carefully push one piece into each side of the marshmallow for the neck.
- Using a toothpick, dab two small dots of melted chocolate onto each marshmallow and press on the candy eyeballs.
- Using the black edible marker, draw on a mouth. Use the red edible marker to draw a laceration on the forehead.
Notes
Keep It Fresh! Storing Your Spooky Pops
These treats are perfect for making ahead of your Halloween party!
- Refrigerator: Once the decorations are fully set, you can store the finished Frankenstein Marshmallow Pops in an airtight container in the refrigerator for up to 3-4 days. Placing them in a single layer or between sheets of wax paper can help prevent them from sticking to each other.
FAQs: Your Frankenstein Pop Questions, Answered!
Where can I find candy melts and candy eyeballs?
These are specialty baking items that you can usually find in the baking or seasonal aisle of most major craft stores (like Michaels or Jo-Ann) or in the cake decorating section of larger grocery stores. They are also widely available online.
Can I make these ahead of time for a party?
Yes, absolutely! They are one of the best make-ahead easy Halloween desserts. You can make them completely one or two days in advance and keep them in an airtight container in the fridge until you’re ready to serve.
What if I don’t have lollipop sticks?
No problem! Sturdy, colorful paper straws are a great and festive substitute. You could also use wooden skewers (with the sharp point snipped off) or even sturdy pretzel rods as an edible stick.
My candy melts seem too thick for dipping. How can I fix it?
If your candy melts are too thick, you can stir in a very small amount (about 1/2 teaspoon at a time) of vegetable shortening or coconut oil. Do not add water! This will thin it out to a perfect, smooth dipping consistency.
Final Thoughts: Your Cutest Halloween Creation
There is such a special joy in creating a Halloween treat that is more fun than frightening and brings a smile to everyone’s face. These Frankenstein Marshmallow Pops are a true celebration of creative, spooky fun. They are the perfect project to make with your family and a guaranteed hit at any Halloween gathering. Happy monster making!