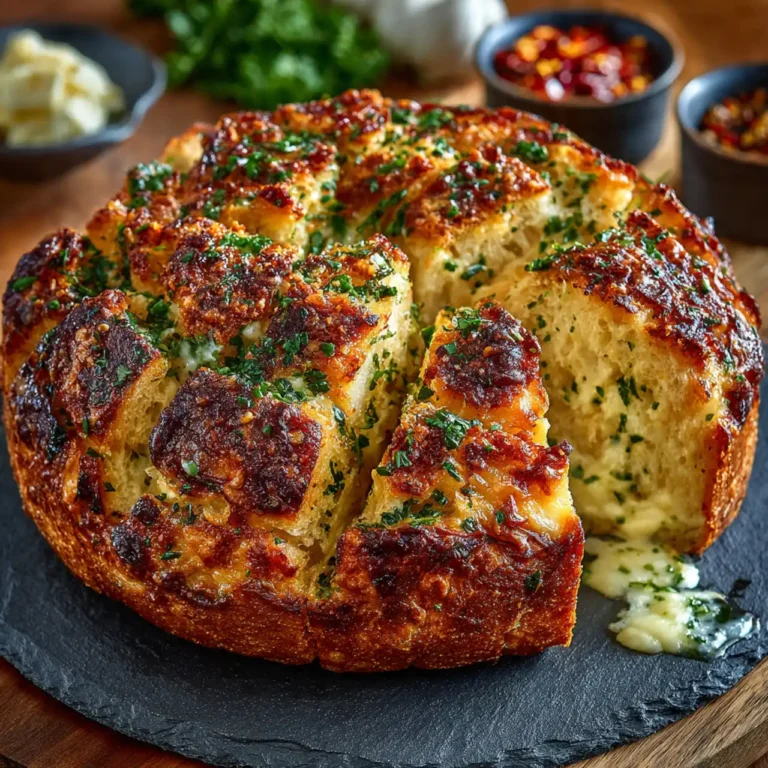
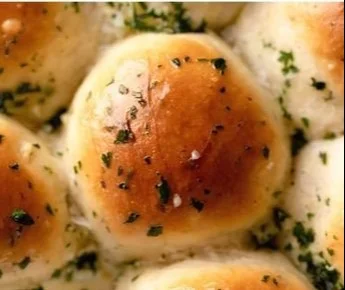
Garlic Bread Rolls
The aroma of fresh-baked bread can make any house feel like home, but when that bread comes infused with the fragrant allure of garlic and buttery goodness, it transforms into something truly irresistible. Garlic Bread Rolls are the ultimate comfort food, perfect for family dinners, cozy gatherings, or even just a treat for yourself after…
The aroma of fresh-baked bread can make any house feel like home, but when that bread comes infused with the fragrant allure of garlic and buttery goodness, it transforms into something truly irresistible. Garlic Bread Rolls are the ultimate comfort food, perfect for family dinners, cozy gatherings, or even just a treat for yourself after a long day. These fluffy, golden spheres of delight are as lovely with a casual weeknight meal as they are when served at festive occasions.
You’re Going to Love This
-
Warm and Buttery Bliss: These rolls are the epitome of comfort, with a fluffy texture and a decadent garlic butter glaze that’ll have everyone begging for seconds.
-
Simple Steps for Superior Results: There’s nothing complicated about making these delectable rolls. With straightforward ingredients and easy-to-follow steps, even beginner bakers will shine.
-
Versatility at Its Best: Whether paired with a rich pasta dish, enjoying on their own with a bit of jam, or presented at a gathering, these rolls fit seamlessly into any occasion.
-
Feel-Good Cooking: Baking these rolls allows the aroma of garlic and herbs to fill your kitchen, creating an inviting atmosphere that’s perfect for gathering with loved ones.
-
Share the Love: Imagine presenting a warm basket of these fragrant rolls to your friends or family. It’s more than food; it’s an experience, a cherished memory in the making.
Your Shopping List
Let’s gather up everything you need to create these luscious rolls. Here’s what you’ll be picking up on your next grocery trip:
-
4 1/2 tablespoons unsalted butter: Adds richness to your dough and glistening flavor when brushed on top.
-
2 tablespoons minced garlic: Essential for that pungent, aromatic kick we all adore.
-
3 1/2 cups + 1 tablespoon all-purpose flour: This is your building block for creating the perfect texture. Tip: For accurate measurement, spoon the flour into your measuring cup and level it off with a knife.
-
3 tablespoons chopped fresh parsley: This bursts with a fresh flavor, adding a pop of color and earthy aroma.
-
1 tablespoon granulated sugar: Not just for sweetness; it helps activate the yeast for a perfect rise.
-
2 1/4 teaspoons instant yeast: This is what makes your rolls beautifully light and fluffy.
-
1 teaspoon fine sea salt: Just the right amount to enhance all the flavors without overwhelming them.
-
1 cup whole or 2% milk (warmed to 110°F): Acts as a liquid catalyst for the yeast, giving your dough life.
-
1 large egg (room temperature): This binds everything together and contributes to the rich texture.
-
1 beaten egg, for brushing the tops: A simple wash gives your rolls that stunning golden-brown finish.
-
2 tablespoons unsalted butter (for the topping): More butter equals more flavor! It also adds a glossy finish.
-
1 tablespoon minced garlic (for the topping): Infusing the fresh, buttery glaze with even more garlicky goodness.
-
1 tablespoon chopped fresh parsley (for the topping): To sprinkle on top, because we eat with our eyes first!
-
Flaky sea salt (for finishing): A simple sprinkle on top elevates the flavor and adds a delightful crunch.
Let’s Get Cooking
Ready to embark on this flavorful journey? Buckle up as we turn these humble ingredients into a masterpiece:
-
Lightly butter the bottom and sides of a 9×13 pan and set it aside. This will ensure your rolls come out effortlessly.
-
In a small pot, melt the butter and add the minced garlic. Cook for 1-2 minutes or until the garlic releases its fragrant aroma. After smelling this heavenly scent, remove it from the heat and let it cool while you prep the other ingredients.
-
In a stand mixing bowl, combine the flour, parsley, sugar, yeast, and salt. Mix it up to combine all those flavors! Then add the warmed milk, your room-temperature egg, and the garlic butter. Knead on low speed with the dough hook until the dough is smooth, soft, and tacky, which should take about 10-12 minutes. If the dough sticks too much, add one tablespoon of flour at a time until it becomes manageable.
-
Divide the kneaded dough into 12 equal portions (aim for about 67 grams each for accuracy). Shape each piece into a smooth ball by using the palms of your hands. Pinch the bottom at the seam to keep them tight and place into your prepared baking pan.
-
Cover your rolls with plastic wrap or a clean kitchen towel and set them in a warm place to rise until doubled in size, approximately 1-2 hours. Pro tip: If it’s chilly, set your oven to the lowest temperature for a few minutes, then turn it off. Place your pan inside to give the dough a nice warm resting place.
-
Preheat the oven to 350°F (180°C).
-
Brush the tops of each roll with a beaten egg wash—a magical step that will team up with the heat for that beautiful golden color. Bake for 20-30 minutes, or until the tops crown gloriously golden brown.
-
While the rolls bake, prepare the garlic butter. Melt the remaining butter in a pot and add the minced garlic. Cook until fragrant (1-2 minutes), then remove from heat and stir in some fresh parsley.
-
Once your rolls are out of the oven, brush them immediately with that glorious garlic butter we just made. Sprinkle with flaky sea salt if desired, and serve these heavenly bites warm!
Tips for Success
-
Patience is Key: Allowing your dough enough time to rise is crucial for achieving that light, fluffy texture. Don’t rush this part; the magic happens when the yeast gets busy!
-
Room Temperature Egg & Milk: Make sure your milk and egg are at room temperature to help the yeast activate more effectively and achieve the best dough consistency.
-
Perfect Roll Size: Use a kitchen scale for even-sized rolls, ensuring they bake uniformly. Each roll should be about 67 grams.
-
Keep an Eye on Them: Every oven is different! Begin checking for doneness at 20 minutes, as you want a beautifully golden hue.
Creative Twists
If you feel adventurous, here are some variations to keep your baking exciting:
-
Cheesy Delight: Mix in cheese like shredded mozzarella or Parmesan into the dough for a cheesy surprise in every bite.
-
Herbed Rolls: Experiment with different herbs such as rosemary, thyme, or oregano to infuse a unique flavor profile.
-
Spicy Kick: Add a pinch of red pepper flakes to the dough or the garlic butter for an unexpected kick of heat.
-
Sun-Dried Tomato: Chopped sun-dried tomatoes can lend a burst of sweetness and acidity that pairs beautifully with garlic.
Bringing It to the Table
These Garlic Bread Rolls are as delightful to look at as they are to eat. Serve them warm in a beautiful basket, lined with a soft cloth to keep them cozy. Drizzle some additional garlic butter on top just before presenting to your guests; every flourish adds to the anticipation!
Pair your rolls with a comforting bowl of soup, a vibrant salad, or as a side to your favorite pasta dish. I love to tear into one, slather it with a bit of butter, or enjoy it with a scoop of my favorite jam for a sweet twist.
Keep It Fresh
Storing leftovers? These Garlic Bread Rolls will remain fresh and delicious when you follow these simple tips:
- Refrigeration: Place any leftover rolls in an airtight container in the fridge. They can last up to 3 days.
- Freezing: These rolls freeze beautifully! Just wrap them well in plastic wrap or foil followed by a freezer bag. They can last in the freezer for up to 3 months. When you’re ready to enjoy, simply thaw and reheat in the oven.
- Reheating: To revive that fresh-baked taste, warm them in the oven wrapped in foil for about 10 minutes at 350°F.
Your Questions Answered
-
Can I use regular yeast instead of instant yeast? Absolutely! Just remember that regular yeast needs to be activated in warm water before being added to your mixture.
-
What can I do if my dough doesn’t rise? Ensure your yeast is fresh! If your dough seems slack, let it rise a bit longer in a warmer location.
-
Can I make these rolls in advance? Yes! You can prepare the dough a day ahead, refrigerate it after kneading, and let it rise when you’re ready to bake.
-
How do I make them gluten-free? Substitute all-purpose flour with a gluten-free flour blend, but be sure to add a binding agent like xanthan gum if it’s not already included.
The flavor and aroma of these Garlic Bread Rolls are truly something special. They evoke warmth, joy, and the spirit of shared meals. I encourage you to whip up a batch soon and experience the magic for yourself. Enjoy each buttery bite, and remember to share some love—there’s plenty to go around!
Garlic Bread Rolls
Ingredients
Method
- Lightly butter the bottom and sides of a 9x13 pan and set it aside.
- In a small pot, melt the butter and add the minced garlic. Cook for 1-2 minutes or until aromatic, then remove from heat and let it cool.
- In a stand mixing bowl, combine the flour, parsley, sugar, yeast, and salt, mixing to combine.
- Add the warmed milk, the room-temperature egg, and the garlic butter to the dry ingredients. Knead on low speed with a dough hook until smooth and soft, about 10-12 minutes.
- If the dough sticks, add flour a tablespoon at a time until manageable.
- Divide the dough into 12 portions, shape each into a ball, and place in the prepared baking pan.
- Cover with plastic wrap or a kitchen towel and let rise in a warm place until doubled in size, about 1-2 hours.
- Preheat the oven to 350°F (180°C).
- Brush tops of rolls with the beaten egg wash and bake for 20-30 minutes or until golden brown.
- While rolls bake, prepare the garlic butter by melting remaining butter and adding minced garlic. Cook until fragrant, then stir in fresh parsley.
- Upon removing from oven, immediately brush with garlic butter and sprinkle with flaky sea salt if desired.