Garlic Herb Dutch Oven Bread
The First Loaf I Ever Baked I still remember the first time my kitchen smelled like a bakery: warm garlic, woody rosemary, and that almost-burnt-sugar note of a good crust. It was a weeknight experiment that turned into a family ritual. I wanted something simple but with personality, so I grabbed 3 cups of all-purpose…
The First Loaf I Ever Baked
I still remember the first time my kitchen smelled like a bakery: warm garlic, woody rosemary, and that almost-burnt-sugar note of a good crust. It was a weeknight experiment that turned into a family ritual. I wanted something simple but with personality, so I grabbed 3 cups of all-purpose flour, measured out 2 teaspoons of fine sea salt and 1/2 teaspoon of instant yeast, and told myself this was going to be easy. If you like that slow, cozy cooking that fills the house, you might want to try this Garlic Herb Dutch Oven Bread; I even bookmarked a variation online as a reference to come back to when I tinker with proportions for a garlic herb dutch oven bread recipe you’ll love today.
The Ingredient That Changes Everything
People assume the herbs are the star, but for me it’s the garlic and how you treat it. Four cloves of garlic, finely minced, melt into the crumb so that every bite carries a gentle warmth without turning harsh. I like to use two tablespoons of fresh rosemary, chopped, and two tablespoons of fresh thyme, chopped, because those flavors are bright when the bread is hot. The other small but crucial things: 1.5 cups of lukewarm water between 90 and 100°F and a tablespoon of olive oil. The oil is not just for flavor; when you coat the Dutch oven with that tablespoon before setting the dough in, it prevents sticking and helps form that beautiful bottom crust.
How the Dough Comes Together
I usually start by combining the flour, salt, and yeast in a big bowl; it feels almost therapeutic to whisk them and watch the plain dry mix become the promise of something fragrant minutes later. Then I create a well in the center and add the lukewarm water along with the minced garlic and the chopped herbs. I gently fold everything until a shaggy dough forms, not worrying about smoothness—this is no-knead comfort bread in spirit. Cover the bowl with a damp cloth and let it rise in a warm spot for two hours. I once set mine near the oven vent and forgot about it; when I came back the dough had that perfect puffy look, lots of little gas bubbles visible under the surface.
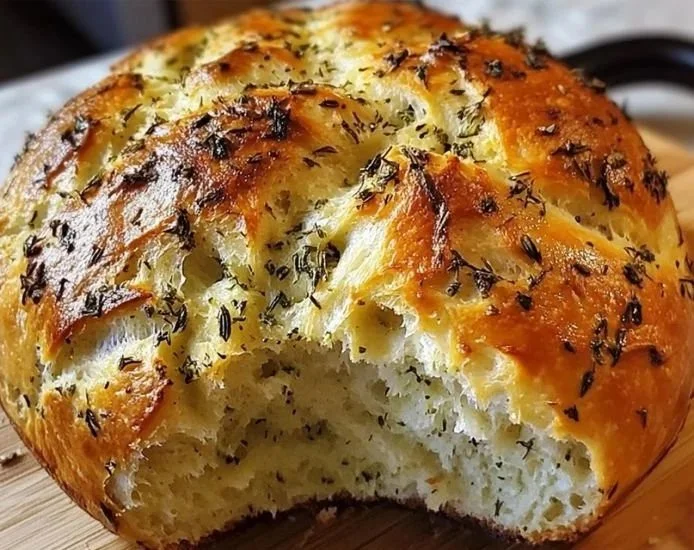
When the rise is done, I scrape the dough onto a floured surface and fold it gently to shape it into a ball. This is when a light hand pays off; overworking will tighten the crumb. Coat your Dutch oven with the tablespoon of olive oil to prevent sticking, then place the dough inside, cover, and let it rest for another hour; this second rest gives the loaf that final spring when it hits the heat. While it rests, preheat the oven to 450°F. Just before it goes in, score the top of the dough with a sharp knife so it can expand without popping wildly. I put the lid on and bake for about 30 minutes with the lid on so the steam helps set the crust. After that I remove the lid and let it bake for an additional 15 minutes until the top is a deep, golden brown.
A small tip I learned the hard way: check your water temperature. If the water is too cool, the yeast sleeps and the rise takes forever; too hot and it kills the yeast. A quick kitchen thermometer helps. Another tip is to mince the garlic very fine or even smash it into a paste so little raw pockets don’t surprise you. And when you scrape the dough from the bowl, do it with a bench scraper or flexible spatula to preserve the air bubbles.
When the Crust Is Perfect
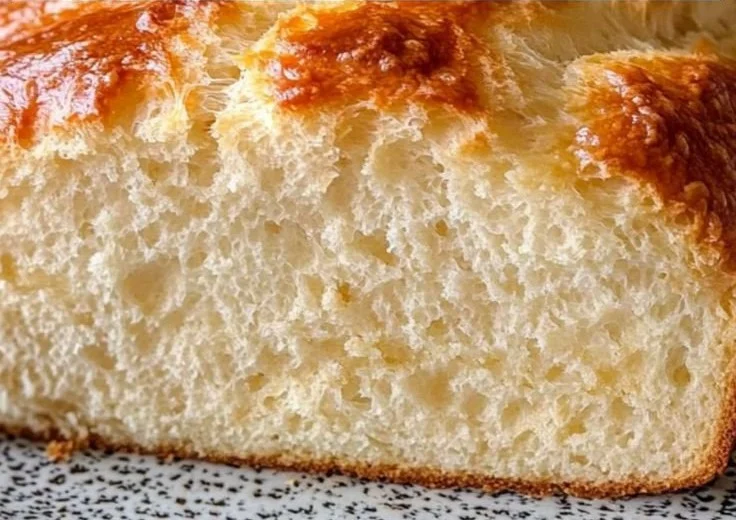
There is a moment that tells you you nailed it: a hollow, wooden sound when you tap the bottom and an even, bronzed top with a few rustic cracks. I usually let the loaf cool on a rack for 30 minutes before slicing; it’s torture, but slicing too soon makes the crumb gummy because it needs time to set. If you want a foolproof finish, aim for an internal temperature of around 205°F, but when I’m without a thermometer I go by the sound and color. When it’s right, the crust crackles under your fingers and the inside is tender, flecked with pockets of herb and garlic.
If you want more depth of flavor, try lightly toasting the herbs in a dry pan for 30 seconds before chopping, or swap the fresh rosemary for a teaspoon of lemon zest to brighten things up. I sometimes riff on this bread with a little shredded cheddar folded in for a savory melt, which is indulgent and perfect for soup nights; a recipe that inspired my cheese experiment lives in my bookmarks for a no-knead cheddar bread in the Dutch oven.
A Few Things I’ve Learned (and How to Make It Yours)
This loaf is incredibly flexible. If you want to play with herbs, try swapping thyme for sage in the fall. If you love a smoky note, roast the garlic whole until soft, then squeeze it into the dough for a buttery, mellow flavor. For quicker prep, you could let the dough rise in a warmer place for less time, but I prefer the two-hour rise because it builds flavor. If things go wrong and the dough barely rises, it could be old yeast or water that was too hot; always check those first.
Serve this bread with a smear of salted butter, an herbaceous olive oil for dipping, or alongside a bowl of tomato soup. It also makes a killer sandwich—thick slices toasted with melted cheese and roasted vegetables. Leftovers store well: wrap the cooled loaf in a kitchen towel and keep it in a paper bag at room temperature for up to two days, or slice and freeze what you won’t eat within a couple days; thaw and re-toast slices as needed. When I make extra, I slice and freeze; it saves me on busy mornings and reheats beautifully in a toaster oven.
There are so many little tricks I’ve picked up: use a floured cloth under the dough for a second rise to easily lift it into the Dutch oven, score the loaf with a single decisive slash rather than many shallow cuts, and try to resist slicing right away. Those small choices change the character of the bread.
Conclusion
If you want another take on a similar rustic loaf baked in a Dutch oven, I like to compare notes with this Dutch Oven Garlic and Herb Bread – Two Cups Flour post for technique ideas and this classic Garlic Herb No Knead Bread – I Heart Eating for variations and inspiration. Give the 3 cups of flour, 2 teaspoons of fine sea salt, 1/2 teaspoon instant yeast, 1.5 cups lukewarm water (90 to 100°F), 4 finely minced garlic cloves, 2 tablespoons chopped fresh rosemary, 2 tablespoons chopped fresh thyme, and 1 tablespoon olive oil a try—you might end up making this the loaf you bake when you want the house to smell like Sunday.
Garlic Herb Dutch Oven Bread
Ingredients
Method
- In a large bowl, combine the flour, salt, and yeast, whisking until mixed.
- Create a well in the center and add lukewarm water, minced garlic, and chopped herbs.
- Gently fold ingredients until a shaggy dough forms. Cover with a damp cloth and let rise for 2 hours.
- After rising, scrape the dough onto a floured surface and gently shape into a ball.
- Coat the Dutch oven with olive oil, place the dough inside, cover, and let it rest for another hour.
- Preheat the oven to 450°F.
- Score the top of the dough with a sharp knife.
- Cover with the lid and bake for 30 minutes, then remove the lid and bake for an additional 15 minutes until golden brown.
- Let the bread cool on a rack for 30 minutes before slicing.