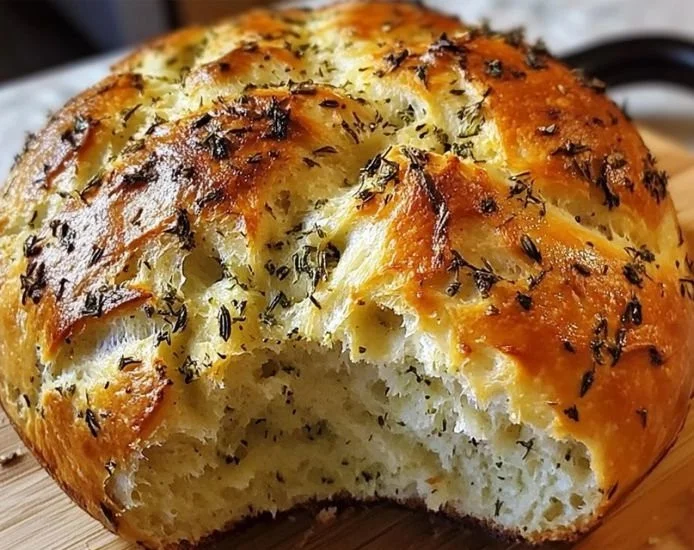
Garlic Herb Dutch Oven Bread Recipe You’ll Love Today!
Garlic Herb Dutch Oven Bread Recipe You’ll Love Today! Ah, there’s nothing quite like the comforting aroma of freshly baked bread wafting through the house. Today, I’ve become captivated by the idea of a Garlic Herb Dutch Oven Bread. It’s warm, crusty, and infused with the aromatic magic of garlic and herbs. First, let’s talk…
Garlic Herb Dutch Oven Bread Recipe You’ll Love Today!
Ah, there’s nothing quite like the comforting aroma of freshly baked bread wafting through the house. Today, I’ve become captivated by the idea of a Garlic Herb Dutch Oven Bread. It’s warm, crusty, and infused with the aromatic magic of garlic and herbs.
First, let’s talk about the stars of the show: garlic and herbs. I went with a delightful combination of rosemary and thyme, promising a fragrant loaf that’s perfect for slathering with butter or pairing with a hearty stew. They seamlessly blend into the dough, providing bursts of flavor with each bite.
The Dough Demystified
To begin, I combined 3 cups of all-purpose flour with 2 teaspoons of fine sea salt and 1/2 teaspoon of instant yeast in a spacious mixing bowl. The yeast will do its magic later, but for now, it’s just a dry mix. The key to this recipe is the lukewarm water—that’s 1 1/2 cups at a cozy temperature of 90 to 100°F.
Once you’ve whisked the dry ingredients, it’s time to create a bit of a well in the center of your flour mixture. Pour in that glistening water, and add in four finely minced cloves of garlic—breathe it in! Next, toss in those chopped fresh herbs. It’ll look a bit messy, but trust the process.
I found my hands to be the best tool. After a gentle mix, I ended up with a shaggy, wet dough, which was exactly what I wanted. You see, this bread is meant to be rustic, so don’t worry about perfection; embrace the texture.
The Rise and Shine
Now, the real waiting game begins. I covered the bowl with a damp cloth and tucked it away in a warm spot. Two hours later, the dough had doubled in size, bubbling with life and filling my kitchen with a warm, inviting aroma. After that first rise, I couldn’t resist peeking. Each bubble promised a wonderful surprise when baked.
Before I proceeded, I lightly coated my Dutch oven with olive oil. A hint of wisdom: make sure it’s well-oiled to prevent sticking and to achieve that glorious crust. I carefully scraped the dough onto a floured surface, folding it gently a couple of times to shape it into a rough ball. It made my heart sing.
Baking Time!
Once formed, I plopped the dough into the warm pot and covered it once more, letting it rest for another hour. This is when the anticipation really builds. The time finally came to preheat the oven to a blistering hot 450°F.
Just before sliding the pot into the oven, I remembered the most crucial step: scoring the top of the bread. This isn’t just for show; it allows the loaf to expand as it bakes, leading to an artful, rustic finish. After a quick slash, I watched that pot disappear into the oven, and with the lid on, creation began.
The Sweet Sound of Success
After about 30 minutes, I removed the lid, revealing a stunning golden brown, crusty loaf. The final act involved a quick return to the oven, allowing it to crisp up for another 15 minutes. My heart was racing with excitement!
Once the timer chimed, I carefully lifted the bread out—it was the moment of truth. How had I done? A gentle thump on the bottom produced a hollow sound, indicating that my loaf had risen to bread-baking glory.
It took all my willpower not to slice in right away. I settled for letting it cool for about 30 minutes, which allowed the crumb to set beautifully.
A Simple Indulgence
When I finally cut into the bread, the crumb revealed perfect pockets of air, and the garlic-herb aroma enveloped me once more. The crust was crisp but not too thick, perfectly yielding to the tender interior. Each bite reminded me that the most rewarding things often require a bit of patience.
If you ever decide to try adding different herbs or perhaps a sprinkle of cheese to the mix, I suggest going for it. Bread-making is about personal expression, after all.
On a poignant note, while I love the rustic look of this bread, I found that it can be a bit sticky to handle if you let the dough go too long during the rise. A light touch when shaping can yield delightful results.
In the end, it’s not just about having bread on the table; it’s about savoring the process that makes it all the more special. Enjoy!
Garlic Herb Dutch Oven Bread
Ingredients
Method
- In a bowl, combine the flour, salt, and yeast.
- Create a well in the center and add lukewarm water, minced garlic, and chopped herbs.
- Mix the ingredients until a shaggy dough forms.
- Cover the bowl with a damp cloth and let rise in a warm area for 2 hours.
- Coat the Dutch oven with olive oil to prevent sticking.
- Scrape the risen dough onto a floured surface and fold gently to shape into a ball.
- Place the dough inside the Dutch oven, cover, and let rest for another hour.
- Preheat the oven to 450°F.
- Score the top of the dough to allow it to expand.
- Bake for about 30 minutes with the lid on.
- Remove the lid and bake for an additional 15 minutes until golden brown.
- Once baked, remove the bread and let cool for 30 minutes before slicing.