Glazed Kielbasa Pineapple Bites Recipe
Glazed Kielbasa Pineapple Bites: A Sweet and Savory Adventure There are certain combinations in the culinary world that just seem to sing together, and for me, there’s nothing quite like the marriage of sweet and savory. When I first stumbled upon the idea of glazed kielbasa and pineapple bites, I thought it was something I…
Glazed Kielbasa Pineapple Bites: A Sweet and Savory Adventure
There are certain combinations in the culinary world that just seem to sing together, and for me, there’s nothing quite like the marriage of sweet and savory. When I first stumbled upon the idea of glazed kielbasa and pineapple bites, I thought it was something I simply had to try. Fast forward a few attempted gatherings and many happy taste-testers later, and I can confidently say these bites are the ultimate party appetizer.
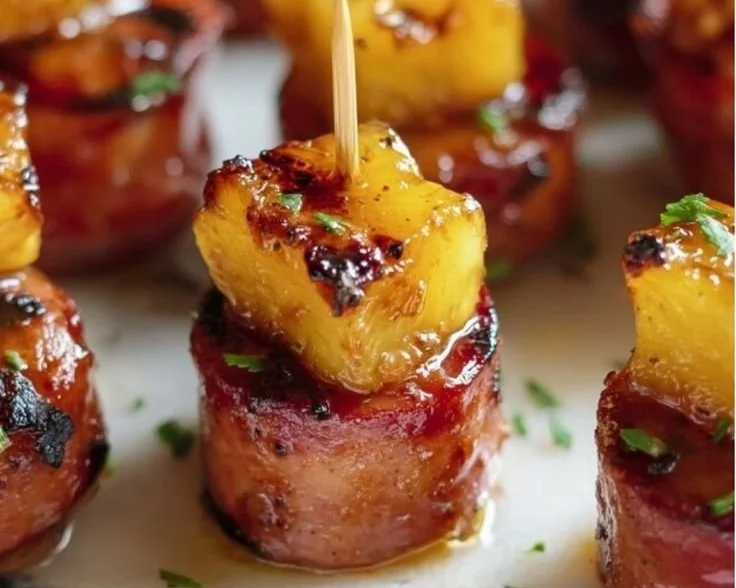
The heart of the recipe is straightforward yet oh-so-satisfying. I’ve found that the beef kielbasa brings a distinct flavor profile that complements the sweetness of the pineapple chunks perfectly. Start with 14 oz of beef kielbasa, sliced into chunky bites. As you prep these adorable morsels, make sure the size is just right—too small and they might dry out; too large and they might not fit on your toothpick.
Next comes the delightful case of pineapple. I find it’s best to use a 20 oz can of pineapple chunks. Remember to hold onto that juice, as it plays a vital role in creating the glaze that will coat these bites into a sticky and irresistible treat.
Now let’s get to the sauce. This isn’t any typical glaze; oh no. I like to mix things up with 3 tablespoons of teriyaki sauce, 1 tablespoon of sweet chili sauce, and another tablespoon of honey. The addition of that pineapple juice balances the flavors beautifully, giving the bites a glossy finish that is impossible to resist.
Putting It All Together
Once you have all the components ready, it’s time to assemble our bites. Start with your favorite sturdy baking dish; I usually opt for a rimmed sheet pan to catch any drips that might happen during the baking process. First, layer the sliced kielbasa and pineapple chunks, kind of like a sweet and savory game of Tetris.
Drizzle the sauce mixture over the top, making sure every piece is nicely coated; I often find myself going back for more sauce just to ensure every bite has that glorious glisten. I usually bake them at 375°F for about 20 minutes, giving them a good toss halfway through to really get that glaze working.
While they’re baking, it’s a great time to arrange your toothpicks on a serving platter. I like to have them ready, anticipating the moment guests arrive and can’t keep their hands off the morsels.
The Grand Reveal
Once out of the oven, let them cool for a bit. They’ll be bubbling and sticky—just the way I like them. I must say, the aroma wafting through the kitchen is always a crowd-pleaser. Not to mention, when you present them to your guests, the shiny glaze and colorful display are stunning.
A little tip: these bites shine not only as appetizers but can also be jazzed up as a main course when served over rice. Just think, you’ve got the perfect sweet and savory dish that can easily transition from cocktail hour to dinner.
Reflecting on my cooking experience, I realized one limitation: timing is everything. I tried preparing these delicious bites while multitasking and ended up over-baking my first batch. So, be mindful of your oven’s temperament and give these bites the attention they deserve. Once you do, they’ll become a staple at any gathering!
Happy cooking!
Glazed Kielbasa Pineapple Bites
Ingredients
Method
- Preheat the oven to 375°F.
- In a mixing bowl, combine teriyaki sauce, sweet chili sauce, honey, and reserved pineapple juice to create the glaze.
- In a rimmed baking dish or sheet pan, layer the sliced kielbasa and pineapple chunks.
- Drizzle the glaze mixture over the kielbasa and pineapple, ensuring each piece is well coated.
- Bake in the preheated oven for about 20 minutes, tossing halfway through to ensure an even glaze.
- Remove from the oven and let cool slightly before serving.